jump start CHEVROLET SILVERADO 1500 2023 Owners Manual
[x] Cancel search | Manufacturer: CHEVROLET, Model Year: 2023, Model line: SILVERADO 1500, Model: CHEVROLET SILVERADO 1500 2023Pages: 463, PDF Size: 19.26 MB
Page 219 of 463
Chevrolet Silverado 1500 Owner Manual (GMNA-Localizing-U.S./Canada/
Mexico/Paraguay-16515119) - 2023 - CRC - 6/2/22
218 Driving and Operating
Leaving the Vehicle with the Engine
Running
{Warning
It can be dangerous to leave the vehicle
with the engine running. It could
overheat and catch fire.
It is dangerous to get out of the vehicle
if the vehicle is not in P (Park) with the
parking brake set. The vehicle can roll.
Do not leave the vehicle when the engine
is running. If you have left the engine
running, the vehicle can move suddenly.
You or others could be injured. To be
sure the vehicle will not move, even
when you are on fairly level ground,
always set the parking brake and shift to
P (Park). SeeShifting Into Park
(Mechanical Shifter) 0216 or
Shifting Into Park (Electronic Shifter) 0217
. If you are towing a trailer, see Driving
Characteristics and Towing Tips 0299.
Shifting out of Park (Mechanical
Shifter)
This vehicle is equipped with an electronic
shift lock release system. The system is
designed to prevent movement of the shift
lever out of P (Park), unless the brake pedal
is applied and the ignition is on or in
Service Mode.
The shift lock release is always functional
except in the case of an uncharged or low
voltage –less than 9 volt –battery.
If the vehicle has an uncharged or low
voltage battery, try charging or jump
starting the battery. See Jump Starting -
North America 0399.
To shift out of P (Park): 1. Apply the brake pedal.
2. Release the parking brake if it is applied. See Electric Parking Brake 0235.
3. Pull the shift lever toward you, then move it to the desired position, and
release.
If the vehicle still cannot be shifted out of
P (Park): 1. Ease the pressure on, or release the shift lever. 2. While holding the brake pedal, push the
shift lever all the way into P (Park).
3. Pull the shift lever toward you, then move it to the desired position, and
release.
If equipped, the Buckle to Drive feature may
prevent shifting from P (Park). See Buckle To
Drive 053.
If there is still a problem shifting, have the
vehicle serviced soon.
Shifting out of Park (Electronic
Shifter)
This vehicle is equipped with an electronic
transmission. The shift lock release button is
designed to prevent inadvertent shifting out
of P (Park).
To shift out of P (Park): 1. Ensure the engine is running.
2. Apply the brake pedal.
3. Press and hold the shift lock release button on the shift lever.
4. Move the shift lever to the desired position. For N (Neutral) hold the lever in
the N (Neutral) position until the N
indicator illuminates red.
Page 332 of 463
Chevrolet Silverado 1500 Owner Manual (GMNA-Localizing-U.S./Canada/
Mexico/Paraguay-16515119) - 2023 - CRC - 6/2/22
Vehicle Care 331
Vehicle Care
General Information
General Information . . . . . . . . . . . . . . . . . . . 332
California Perchlorate MaterialsRequirements . . . . . . . . . . . . . . . . . . . . . . . . 332
Accessories and Modifications . . . . . . . . . 332
Vehicle Checks
Doing Your Own Service Work . . . . . . . . . 333
Hood . . . . . . . . . . . . . . . . . . . . . . . . . . . . . . . . . . 333
Engine Compartment Overview . . . . . . . . 335
Engine Oil . . . . . . . . . . . . . . . . . . . . . . . . . . . . . 338
Engine Oil Life System . . . . . . . . . . . . . . . . 340
Automatic Transmission Fluid . . . . . . . . . 340
Engine Air Filter Life System . . . . . . . . . . . 341
Engine Air Cleaner/Filter . . . . . . . . . . . . . . . 341
Cooling System . . . . . . . . . . . . . . . . . . . . . . . . 343
Engine Overheating . . . . . . . . . . . . . . . . . . . 346
Overheated Engine Protection Operating Mode . . . . . . . . . . . . . . . . . . . . . 347
Engine Fan . . . . . . . . . . . . . . . . . . . . . . . . . . . . 348
Washer Fluid . . . . . . . . . . . . . . . . . . . . . . . . . . 348
Brakes . . . . . . . . . . . . . . . . . . . . . . . . . . . . . . . . 349
Brake Pad Life System . . . . . . . . . . . . . . . . 349
Brake Fluid . . . . . . . . . . . . . . . . . . . . . . . . . . . . 350
Battery - North America . . . . . . . . . . . . . . . 351
Four-Wheel Drive . . . . . . . . . . . . . . . . . . . . . . 353
Front Axle . . . . . . . . . . . . . . . . . . . . . . . . . . . . . 354
Rear Axle . . . . . . . . . . . . . . . . . . . . . . . . . . . . . . 354 Automatic Transmission Shift Lock
Control Function Check (Mechanical
Shifter) . . . . . . . . . . . . . . . . . . . . . . . . . . . . . . 354
Park Brake and P (Park) Mechanism Check . . . . . . . . . . . . . . . . . . . . . . . . . . . . . . . . 354
Wiper Blade Replacement . . . . . . . . . . . . . 355
Glass Replacement . . . . . . . . . . . . . . . . . . . . . 355
Windshield Replacement . . . . . . . . . . . . . . . 355
Gas Strut(s) . . . . . . . . . . . . . . . . . . . . . . . . . . . 356Headlamp Aiming
Front Headlamp Aiming . . . . . . . . . . . . . . . 356
Bulb Replacement
Bulb Replacement . . . . . . . . . . . . . . . . . . . . . 357
Halogen Bulbs . . . . . . . . . . . . . . . . . . . . . . . . . 357
LED Lighting . . . . . . . . . . . . . . . . . . . . . . . . . . . 357
Headlamps, Front Turn Signal, Sidemarker, and Parking Lamps . . . . . . 357
Taillamps, Turn Signal, Stoplamps, and Back-Up Lamps . . . . . . . . . . . . . . . . . . . . . . 358
Center High-Mounted Stoplamp (CHMSL) and Cargo Lamp . . . . . . . . . . . . 359
License Plate Lamp . . . . . . . . . . . . . . . . . . . . 359
Electrical System
Electrical System Overload . . . . . . . . . . . . 360
Fuses and Circuit Breakers . . . . . . . . . . . . . 361
Engine Compartment Fuse Block . . . . . . 362
Instrument Panel Fuse Block (Left) . . . . 365
Instrument Panel Fuse Block (Right) . . . 367
Wheels and Tires
Tires . . . . . . . . . . . . . . . . . . . . . . . . . . . . . . . . . . 369
All-Season Tires . . . . . . . . . . . . . . . . . . . . . . . 370
Winter Tires . . . . . . . . . . . . . . . . . . . . . . . . . . . 370
All-Terrain Tires . . . . . . . . . . . . . . . . . . . . . . . 370
Tire Sidewall Labeling . . . . . . . . . . . . . . . . . . 371
Tire Designations . . . . . . . . . . . . . . . . . . . . . . 372
Tire Terminology and Definitions . . . . . . 374
Tire Pressure . . . . . . . . . . . . . . . . . . . . . . . . . . 375
Tire Pressure Monitor System . . . . . . . . . 377
Tire Pressure Monitor Operation . . . . . . . 377
Tire Inspection . . . . . . . . . . . . . . . . . . . . . . . . . 381
Tire Rotation . . . . . . . . . . . . . . . . . . . . . . . . . . 382
When It Is Time for New Tires . . . . . . . . 383
Buying New Tires . . . . . . . . . . . . . . . . . . . . . 383
Different Size Tires and Wheels . . . . . . . 385
Uniform Tire Quality Grading . . . . . . . . . 385
Wheel Alignment and Tire Balance . . . . 386
Wheel Replacement . . . . . . . . . . . . . . . . . . . 386
Tire Chains . . . . . . . . . . . . . . . . . . . . . . . . . . . . 387
If a Tire Goes Flat . . . . . . . . . . . . . . . . . . . . . 387
Tire Changing . . . . . . . . . . . . . . . . . . . . . . . . . 389
Full-Size Spare Tire . . . . . . . . . . . . . . . . . . . . 399
Jump Starting
Jump Starting - North America . . . . . . . . 399
Towing the Vehicle
Transporting a Disabled Vehicle . . . . . . . 402
Recreational Vehicle Towing . . . . . . . . . . . 403
Page 337 of 463
Chevrolet Silverado 1500 Owner Manual (GMNA-Localizing-U.S./Canada/
Mexico/Paraguay-16515119) - 2023 - CRC - 6/2/22
336 Vehicle Care
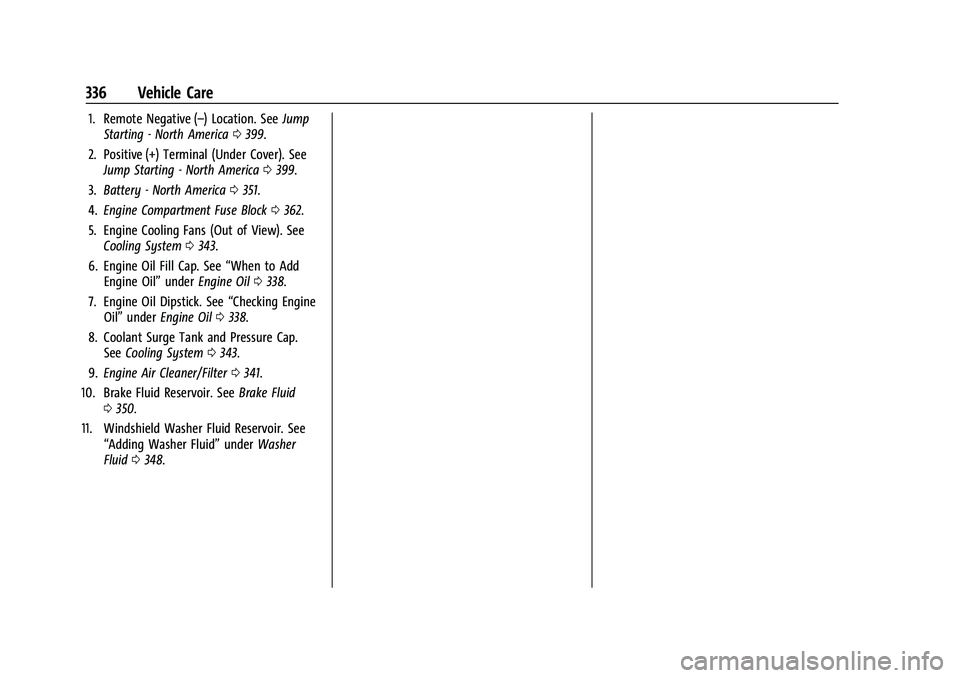
1. Remote Negative (–) Location. SeeJump
Starting - North America 0399.
2. Positive (+) Terminal (Under Cover). See Jump Starting - North America 0399.
3. Battery - North America 0351.
4. Engine Compartment Fuse Block 0362.
5. Engine Cooling Fans (Out of View). See Cooling System 0343.
6. Engine Oil Fill Cap. See “When to Add
Engine Oil” underEngine Oil 0338.
7. Engine Oil Dipstick. See “Checking Engine
Oil” under Engine Oil 0338.
8. Coolant Surge Tank and Pressure Cap. See Cooling System 0343.
9. Engine Air Cleaner/Filter 0341.
10. Brake Fluid Reservoir. See Brake Fluid
0 350.
11. Windshield Washer Fluid Reservoir. See “Adding Washer Fluid” underWasher
Fluid 0348.
Page 338 of 463
Chevrolet Silverado 1500 Owner Manual (GMNA-Localizing-U.S./Canada/
Mexico/Paraguay-16515119) - 2023 - CRC - 6/2/22
Vehicle Care 337
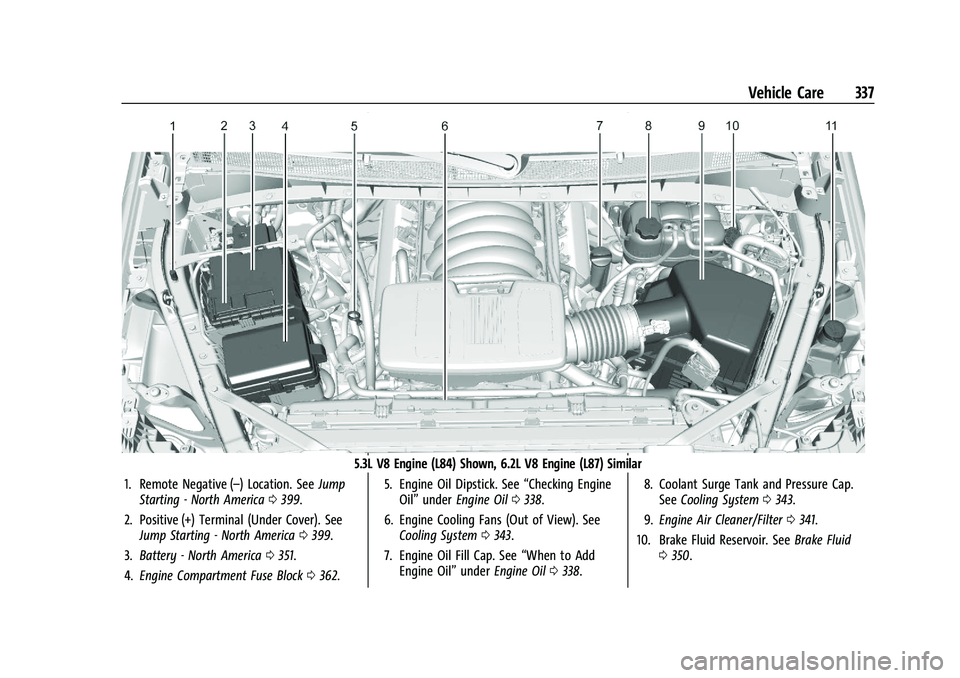
5.3L V8 Engine (L84) Shown, 6.2L V8 Engine (L87) Similar
1. Remote Negative (–) Location. See Jump
Starting - North America 0399.
2. Positive (+) Terminal (Under Cover). See Jump Starting - North America 0399.
3. Battery - North America 0351.
4. Engine Compartment Fuse Block 0362. 5. Engine Oil Dipstick. See
“Checking Engine
Oil” under Engine Oil 0338.
6. Engine Cooling Fans (Out of View). See Cooling System 0343.
7. Engine Oil Fill Cap. See “When to Add
Engine Oil” underEngine Oil 0338. 8. Coolant Surge Tank and Pressure Cap.
See Cooling System 0343.
9. Engine Air Cleaner/Filter 0341.
10. Brake Fluid Reservoir. See Brake Fluid
0 350.
Page 353 of 463
Chevrolet Silverado 1500 Owner Manual (GMNA-Localizing-U.S./Canada/
Mexico/Paraguay-16515119) - 2023 - CRC - 6/2/22
352 Vehicle Care
Vehicle Storage
{Warning
Batteries have acid that can burn you and
gas that can explode. You can be badly
hurt if you are not careful. Always wear
eye protection. SeeJump Starting - North
America 0399 for tips on working
around a battery without getting hurt.
Infrequent Usage: Remove the black,
negative (−) cable from the battery to keep
the battery from running down.
Extended Storage: Remove the black,
negative (−) cable from the battery or use a
battery trickle charger.
Negative Battery Cable Disconnection
{Warning
Before disconnecting the negative battery
cable, turn off all features, turn the
ignition off, and remove the key,
if equipped, from the vehicle. If this is
not done, you or others could be injured,
and the vehicle could be damaged.
Caution
If the battery is disconnected with the
ignition on or the vehicle in Retained
Accessory Power (RAP), the OnStar
back-up battery will be permanently
discharged and will need to be replaced.
1. Make sure the lamps, features, and accessories are turned off.
2. Turn the ignition off and remove the key, if equipped.
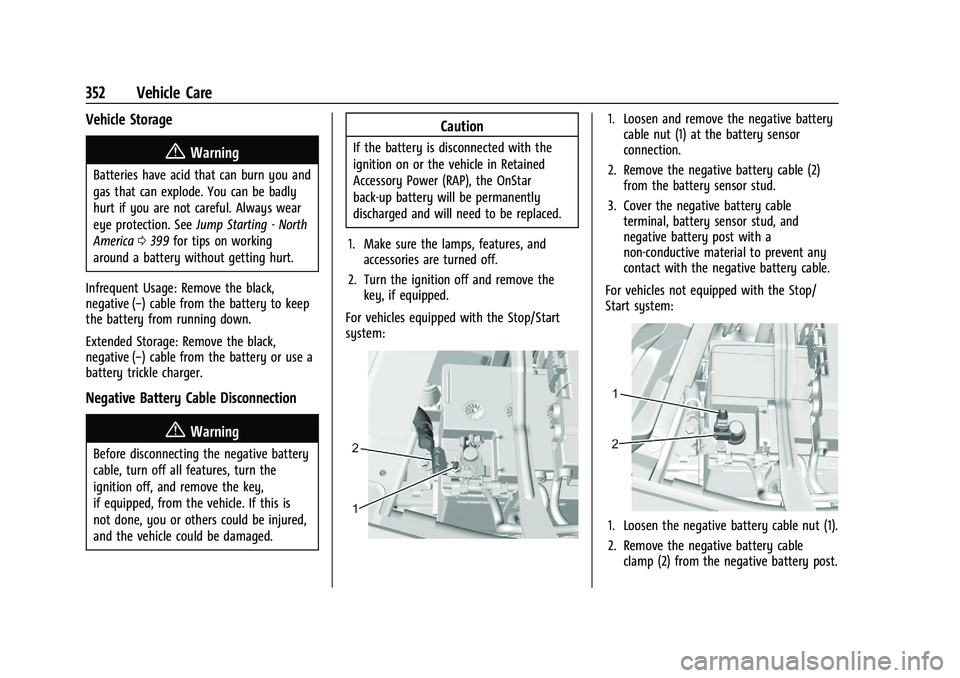
For vehicles equipped with the Stop/Start
system:
1. Loosen and remove the negative battery cable nut (1) at the battery sensor
connection.
2. Remove the negative battery cable (2) from the battery sensor stud.
3. Cover the negative battery cable terminal, battery sensor stud, and
negative battery post with a
non-conductive material to prevent any
contact with the negative battery cable.
For vehicles not equipped with the Stop/
Start system:
1. Loosen the negative battery cable nut (1).
2. Remove the negative battery cable clamp (2) from the negative battery post.
Page 400 of 463
Chevrolet Silverado 1500 Owner Manual (GMNA-Localizing-U.S./Canada/
Mexico/Paraguay-16515119) - 2023 - CRC - 6/2/22
Vehicle Care 399
Full-Size Spare Tire
If this vehicle came with a full-size spare
tire, it was fully inflated when new,
however, it can lose air over time. Check the
inflation pressure regularly. SeeTire Pressure
0 375 and
Vehicle Load Limits 0204 for information
regarding proper tire inflation and loading
the vehicle. For instructions on how to
remove, install, or store a spare tire, see Tire
Changing 0389.
After installing the spare tire on the vehicle,
stop as soon as possible and check that the
spare is correctly inflated. The spare tire is
made to perform well at speeds up to
112 km/h (70 MPH) at the recommended
inflation pressure, so you can finish
your trip.
Have the damaged or flat road tire repaired
or replaced and installed back onto the
vehicle as soon as possible so the spare tire
will be available in case it is needed again.
Do not mix tires and wheels of different
sizes, because they will not fit. Keep the
spare tire and its wheel together.
Caution
If the vehicle has four-wheel drive and a
different size spare tire is installed, do
not drive in four-wheel drive until the flat
tire is repaired and/or replaced. The
vehicle could be damaged and the repairs
would not be covered by the warranty.
Never use four-wheel drive when a
different size spare tire is installed on the
vehicle.
The vehicle may have a different size spare
tire than the road tires originally installed
on the vehicle. This spare tire was developed
for use on this vehicle, so it is all right to
drive on it. If the vehicle has four-wheel
drive and a different size spare tire is
installed, drive only in two-wheel drive.
If the vehicle has a spare tire that does not
match the original road tires and wheels in
size and type, do not include the spare in
the tire rotation.
If equipped with a temporary use full-size
spare tire, it is indicated on the tire sidewall.
See Tire Sidewall Labeling 0371. This spare
tire should not be driven on over 112 km/h
(70 mph), or 88 km/h (55 mph) when
pulling a trailer, at the proper inflation pressure. Repair and replace the road tire as
soon as it is convenient, and stow the spare
tire for future use.
Jump Starting
Jump Starting - North America
For more information about the vehicle
battery, see
Battery - North America 0351.
If the vehicle's battery (or batteries) has run
down, you may want to use another vehicle
and some jumper cables to start your
vehicle. Be sure to use the following steps
to do it safely.
{Warning
WARNING: Battery posts, terminals and
related accessories can expose you to
chemicals including lead and lead
compounds, which are known to the
State of California to cause cancer and
birth defects or other reproductive harm.
Wash hands after handling. For more
information go to
www.P65Warnings.ca.gov.
See California Proposition 65 Warning 01.
Page 401 of 463
Chevrolet Silverado 1500 Owner Manual (GMNA-Localizing-U.S./Canada/
Mexico/Paraguay-16515119) - 2023 - CRC - 6/2/22
400 Vehicle Care
{Warning
Batteries can hurt you. They can be
dangerous because:
.They contain acid that can burn you.
.They contain gas that can explode or
ignite.
.They contain enough electricity to
burn you.
If you do not follow these steps exactly,
some or all of these things can hurt you.
Caution
Ignoring these steps could result in costly
damage to the vehicle that would not be
covered by the vehicle warranty. Trying
to start the vehicle by pushing or pulling
it will not work, and it could damage the
vehicle.
Caution
If the jumper cables are connected or
removed in the wrong order, electrical
shorting may occur and damage the
vehicle. The repairs would not be covered
(Continued)
Caution (Continued)
by the vehicle warranty. Always connect
and remove the jumper cables in the
correct order, making sure that the cables
do not touch each other or other metal.
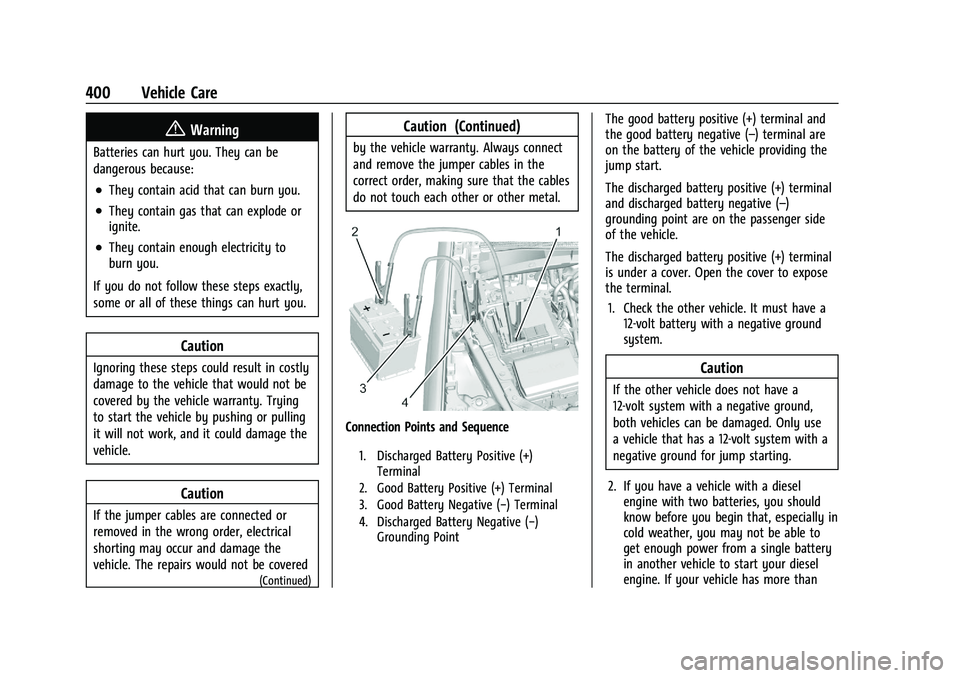
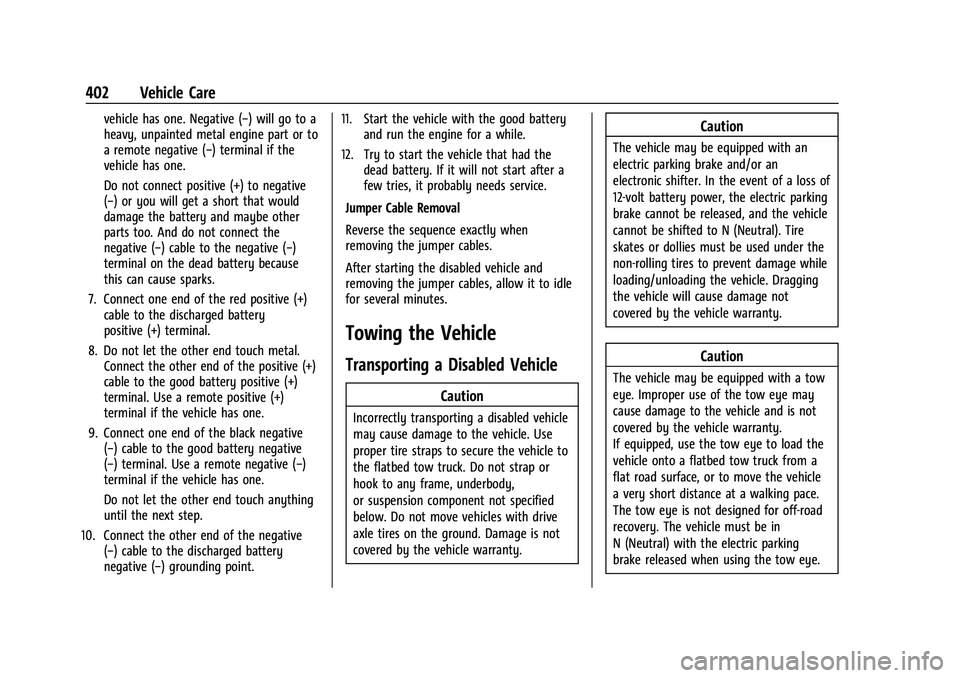
Connection Points and Sequence
1. Discharged Battery Positive (+) Terminal
2. Good Battery Positive (+) Terminal
3. Good Battery Negative (−) Terminal
4. Discharged Battery Negative (−) Grounding Point
The good battery positive (+) terminal and
the good battery negative (–) terminal are
on the battery of the vehicle providing the
jump start.
The discharged battery positive (+) terminal
and discharged battery negative (–)
grounding point are on the passenger side
of the vehicle.
The discharged battery positive (+) terminal
is under a cover. Open the cover to expose
the terminal.
1. Check the other vehicle. It must have a 12-volt battery with a negative ground
system.
Caution
If the other vehicle does not have a
12-volt system with a negative ground,
both vehicles can be damaged. Only use
a vehicle that has a 12-volt system with a
negative ground for jump starting.
2. If you have a vehicle with a diesel engine with two batteries, you should
know before you begin that, especially in
cold weather, you may not be able to
get enough power from a single battery
in another vehicle to start your diesel
engine. If your vehicle has more than
Page 402 of 463
Chevrolet Silverado 1500 Owner Manual (GMNA-Localizing-U.S./Canada/
Mexico/Paraguay-16515119) - 2023 - CRC - 6/2/22
Vehicle Care 401
one battery, using the battery that is
closer to the starter will reduce electrical
resistance. This is located on the
passenger side, in the rear of the engine
compartment.
3. Get the vehicles close enough so the jumper cables can reach, but be sure the
vehicles are not touching each other.
If they are, it could cause an unwanted
ground connection. You would not be
able to start your vehicle, and the bad
grounding could damage the electrical
systems.
To avoid the possibility of the vehicles
rolling, set the parking brake firmly on
both vehicles involved in the jump start
procedure. Put the automatic
transmission in P (Park) before setting
the parking brake. If you have a
four-wheel-drive vehicle, be sure the
transfer case is in a drive gear, not in
N (Neutral).
Caution
If any accessories are left on or plugged
in during the jump starting procedure,
they could be damaged. The repairs
would not be covered by the vehicle
(Continued)
Caution (Continued)
warranty. Whenever possible, turn off or
unplug all accessories on either vehicle
when jump starting.
4. Turn the ignition off on both vehicles. Unplug unnecessary accessories plugged
into the accessory power outlets. Turn
off the radio and all the lamps that are
not needed. This will avoid sparks and
help save both batteries. And it could
save the radio!
5. Open the hood on the other vehicle and locate the positive (+) and negative (−)
terminal locations on that vehicle.
{Warning
An electric fan can start up even when
the engine is not running and can injure
you. Keep hands, clothing, and tools
away from any underhood electric fan.
{Warning
Using a match near a battery can cause
battery gas to explode. People have been
hurt doing this, and some have been
blinded. Use a flashlight if you need
more light.
Battery fluid contains acid that can burn
you. Do not get it on you. If you
accidentally get it in your eyes or on
your skin, flush the place with water and
get medical help immediately.
{Warning
Fans or other moving engine parts can
injure you badly. Keep your hands away
from moving parts once the engine is
running.
6. Check that the jumper cables do not have loose or missing insulation. If they
do, you could get a shock. The vehicles
could be damaged too.
Before you connect the cables, here are
some basic things you should know.
Positive (+) will go to positive (+) or to a
remote positive (+) terminal if the
Page 403 of 463
Chevrolet Silverado 1500 Owner Manual (GMNA-Localizing-U.S./Canada/
Mexico/Paraguay-16515119) - 2023 - CRC - 6/2/22
402 Vehicle Care
vehicle has one. Negative (−) will go to a
heavy, unpainted metal engine part or to
a remote negative (−) terminal if the
vehicle has one.
Do not connect positive (+) to negative
(−) or you will get a short that would
damage the battery and maybe other
parts too. And do not connect the
negative (−) cable to the negative (−)
terminal on the dead battery because
this can cause sparks.
7. Connect one end of the red positive (+) cable to the discharged battery
positive (+) terminal.
8. Do not let the other end touch metal. Connect the other end of the positive (+)
cable to the good battery positive (+)
terminal. Use a remote positive (+)
terminal if the vehicle has one.
9. Connect one end of the black negative (−) cable to the good battery negative
(−) terminal. Use a remote negative (−)
terminal if the vehicle has one.
Do not let the other end touch anything
until the next step.
10. Connect the other end of the negative (−) cable to the discharged battery
negative (−) grounding point. 11. Start the vehicle with the good battery
and run the engine for a while.
12. Try to start the vehicle that had the dead battery. If it will not start after a
few tries, it probably needs service.
Jumper Cable Removal
Reverse the sequence exactly when
removing the jumper cables.
After starting the disabled vehicle and
removing the jumper cables, allow it to idle
for several minutes.
Towing the Vehicle
Transporting a Disabled Vehicle
Caution
Incorrectly transporting a disabled vehicle
may cause damage to the vehicle. Use
proper tire straps to secure the vehicle to
the flatbed tow truck. Do not strap or
hook to any frame, underbody,
or suspension component not specified
below. Do not move vehicles with drive
axle tires on the ground. Damage is not
covered by the vehicle warranty.
Caution
The vehicle may be equipped with an
electric parking brake and/or an
electronic shifter. In the event of a loss of
12-volt battery power, the electric parking
brake cannot be released, and the vehicle
cannot be shifted to N (Neutral). Tire
skates or dollies must be used under the
non-rolling tires to prevent damage while
loading/unloading the vehicle. Dragging
the vehicle will cause damage not
covered by the vehicle warranty.
Caution
The vehicle may be equipped with a tow
eye. Improper use of the tow eye may
cause damage to the vehicle and is not
covered by the vehicle warranty.
If equipped, use the tow eye to load the
vehicle onto a flatbed tow truck from a
flat road surface, or to move the vehicle
a very short distance at a walking pace.
The tow eye is not designed for off-road
recovery. The vehicle must be in
N (Neutral) with the electric parking
brake released when using the tow eye.
Page 404 of 463
Chevrolet Silverado 1500 Owner Manual (GMNA-Localizing-U.S./Canada/
Mexico/Paraguay-16515119) - 2023 - CRC - 6/2/22
Vehicle Care 403
Contact a professional towing service if the
disabled vehicle must be transported. GM
recommends a flatbed tow truck to
transport a disabled vehicle. Use ramps to
help reduce approach angles, if necessary.
If equipped, a tow eye may be located near
the spare tire or emergency jack. Do not use
the tow eye to pull the vehicle from the
snow, mud, sand, or ditch. Tow eye threads
may have right or left-hand threads. Use
caution when installing or removing the
tow eye.
The vehicle must be in N (Neutral) and the
electric parking brake must be released
when loading the vehicle onto a flatbed tow
truck.
Vehicles Equipped with Electronic Shifter
The vehicle must be in N (Neutral) and the
electric parking brake must be released
when loading the vehicle onto a flatbed tow
truck.
.If the vehicle is equipped with car wash
mode and has 12-volt battery power, refer
to“Car Wash Mode” underAutomatic
Transmission (Electronic Shifter) 0223 or
Automatic Transmission (Mechanical
Shifter) 0220 to place the vehicle in
N (Neutral).
.If the 12-volt battery is dead and/or the
engine will not start, the vehicle will not
move. Try to jump start the vehicle. Refer
to Jump Starting - North America 0399
and if the jump start is successful, retry
the “Car Wash Mode” procedure.
Vehicles Equipped with Mechanical
Transmission Range Select Shifter
.The vehicle must be in N (Neutral) and
the Electric Parking Brake must be
released when loading the vehicle onto a
flatbed tow truck. If the 12-volt battery is
dead and/or Electric Parking Brake is not
released, the vehicle will not move. Try to
jump start the vehicle with a known good
12-volt battery, shift the car into
N (Neutral), and release the Electric
Parking Brake. Refer to Jump Starting -
North America 0399.
If jump starting is unsuccessful, the vehicle
will not move. Tire skates or dollies must be
used under the non-rolling tires to prevent
vehicle damage.
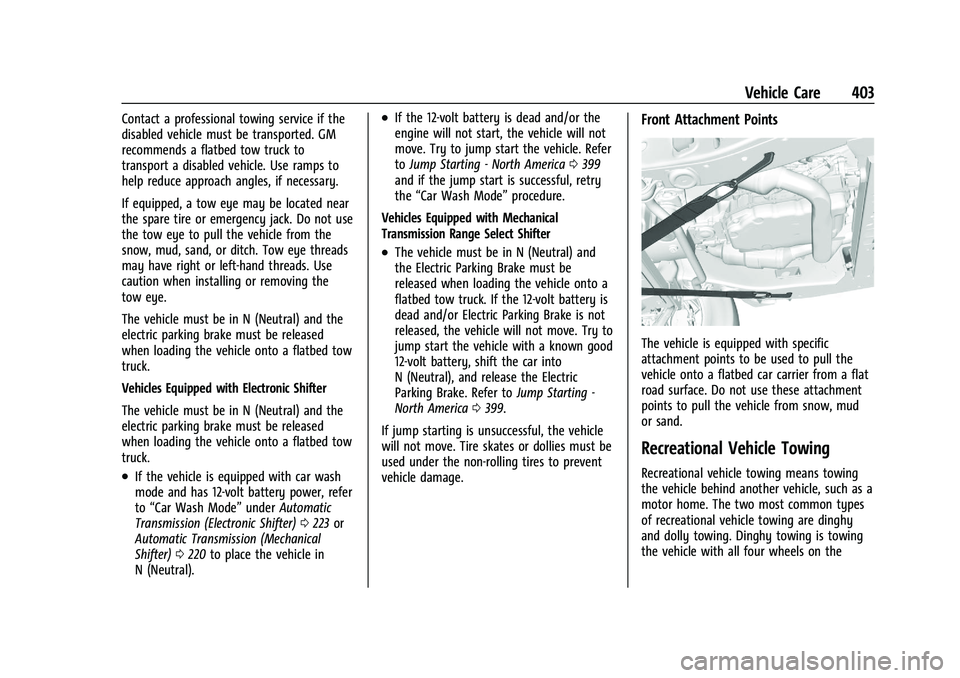
Front Attachment Points
The vehicle is equipped with specific
attachment points to be used to pull the
vehicle onto a flatbed car carrier from a flat
road surface. Do not use these attachment
points to pull the vehicle from snow, mud
or sand.
Recreational Vehicle Towing
Recreational vehicle towing means towing
the vehicle behind another vehicle, such as a
motor home. The two most common types
of recreational vehicle towing are dinghy
and dolly towing. Dinghy towing is towing
the vehicle with all four wheels on the