driver seat adjustment CHEVROLET SILVERADO 1500 LD 2019 Owner's Manual
[x] Cancel search | Manufacturer: CHEVROLET, Model Year: 2019, Model line: SILVERADO 1500 LD, Model: CHEVROLET SILVERADO 1500 LD 2019Pages: 490, PDF Size: 6.74 MB
Page 6 of 490
Chevrolet Silverado LD 1500 and Silverado 2500/3500 Owner Manual (GMNA-
Localizing-U.S./Canada-12162993) - 2019 - crc - 7/30/18
In Brief 5
In Brief
Instrument Panel
Instrument Panel . . . . . . . . . . . . . . . . 6
Initial Drive Information
Initial Drive Information . . . . . . . . . . 8
Remote Keyless Entry (RKE)System . . . . . . . . . . . . . . . . . . . . . . . . 8
Remote Vehicle Start . . . . . . . . . . . 9
Door Locks . . . . . . . . . . . . . . . . . . . . . 9
Windows . . . . . . . . . . . . . . . . . . . . . . . 10
Seat Adjustment . . . . . . . . . . . . . . . 11
Memory Features . . . . . . . . . . . . . . 13
Heated and Ventilated Seats . . . 14
Head Restraint Adjustment . . . . 14
Seat Belts . . . . . . . . . . . . . . . . . . . . . 14
Passenger Sensing System . . . 15
Mirror Adjustment . . . . . . . . . . . . . . 15
Steering Wheel Adjustment . . . . 17
Throttle and Brake Pedal Adjustment . . . . . . . . . . . . . . . . . . . 17
Interior Lighting . . . . . . . . . . . . . . . . 18
Exterior Lighting . . . . . . . . . . . . . . . 18
Windshield Wiper/Washer . . . . . . 19
Climate Controls . . . . . . . . . . . . . . . 19
Transmission . . . . . . . . . . . . . . . . . . 22
Four-Wheel Drive . . . . . . . . . . . . . . 23
Vehicle Features
Infotainment System . . . . . . . . . . . 24
Radio(s) . . . . . . . . . . . . . . . . . . . . . . . 24
Satellite Radio . . . . . . . . . . . . . . . . . 25
Portable Audio Devices . . . . . . . . 25
Bluetooth . . . . . . . . . . . . . . . . . . . . . . 25
Steering Wheel Controls . . . . . . . 25
Cruise Control . . . . . . . . . . . . . . . . . 26
Driver Information Center (DIC) . . . . . . . . . . . . . . . . . 26
Forward Collision Alert (FCA) System . . . . . . . . . . . . . . . . . . . . . . . 27
Forward Automatic Braking (FAB) (1500 Series) . . . . . . . . . . 27
Lane Departure Warning (LDW) . . . . . . . . . . . . . . . 27
Lane Keep Assist (LKA) . . . . . . . 28
Rear Vision Camera (RVC) . . . . 28
Park Assist . . . . . . . . . . . . . . . . . . . . 28
Power Outlets . . . . . . . . . . . . . . . . . 28
Universal Remote System . . . . . 29
Sunroof . . . . . . . . . . . . . . . . . . . . . . . . 29
Performance and Maintenance
Traction Control/Electronic Stability Control . . . . . . . . . . . . . . 30
Tire Pressure Monitor . . . . . . . . . . 30
Fuel (Diesel) . . . . . . . . . . . . . . . . . . . 31
Fuel (Gasoline) . . . . . . . . . . . . . . . . 31
E85 or FlexFuel . . . . . . . . . . . . . . . . 31 Engine Oil Life System . . . . . . . . 31
Driving for Better Fuel
Economy . . . . . . . . . . . . . . . . . . . . . 32
Roadside Assistance Program . . . . . . . . . . . . . . . . . . . . . . 32
Page 15 of 490
Chevrolet Silverado LD 1500 and Silverado 2500/3500 Owner Manual (GMNA-
Localizing-U.S./Canada-12162993) - 2019 - crc - 7/30/18
14 In Brief
Memory adjustments may not be
available upon delivery or after
service until steps in“Saving
Memory Positions” section are
performed. See Memory Seats060.
Heated and Ventilated
Seats
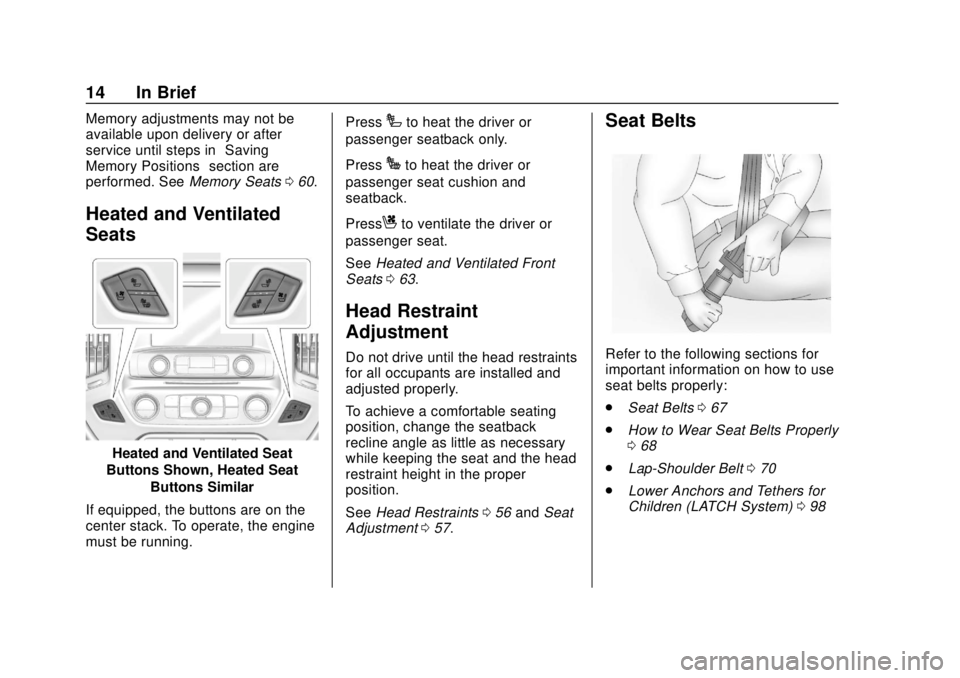
Heated and Ventilated Seat
Buttons Shown, Heated Seat
Buttons Similar
If equipped, the buttons are on the
center stack. To operate, the engine
must be running. Press
Ito heat the driver or
passenger seatback only.
Press
Jto heat the driver or
passenger seat cushion and
seatback.
Press
Cto ventilate the driver or
passenger seat.
See Heated and Ventilated Front
Seats 063.
Head Restraint
Adjustment
Do not drive until the head restraints
for all occupants are installed and
adjusted properly.
To achieve a comfortable seating
position, change the seatback
recline angle as little as necessary
while keeping the seat and the head
restraint height in the proper
position.
See Head Restraints 056 and Seat
Adjustment 057.
Seat Belts
Refer to the following sections for
important information on how to use
seat belts properly:
.
Seat Belts 067
. How to Wear Seat Belts Properly
068
. Lap-Shoulder Belt 070
. Lower Anchors and Tethers for
Children (LATCH System) 098
Page 17 of 490
Chevrolet Silverado LD 1500 and Silverado 2500/3500 Owner Manual (GMNA-
Localizing-U.S./Canada-12162993) - 2019 - crc - 7/30/18
16 In Brief
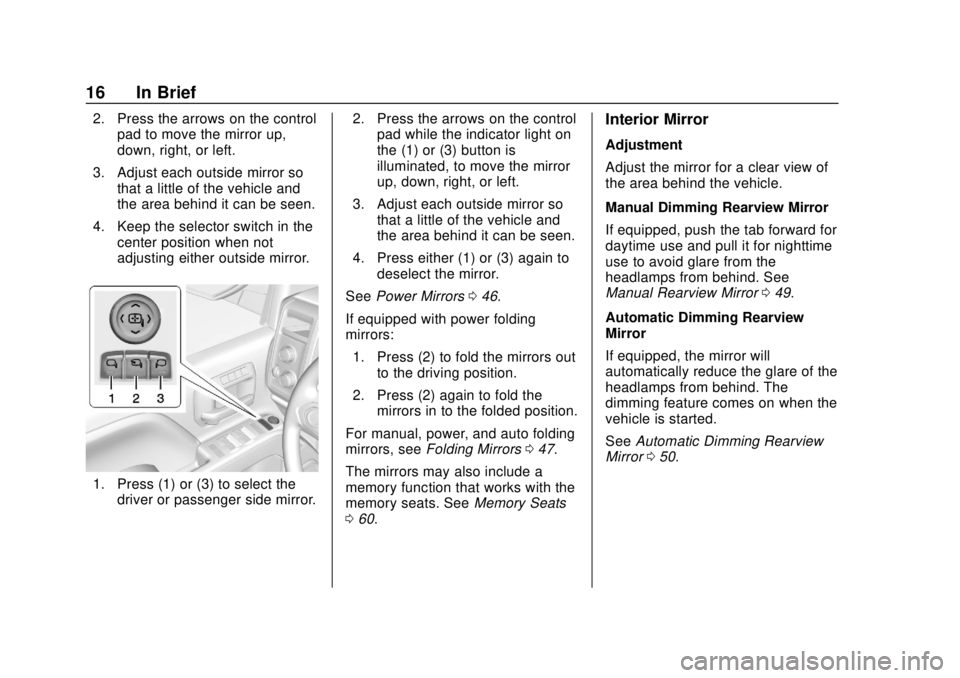
2. Press the arrows on the controlpad to move the mirror up,
down, right, or left.
3. Adjust each outside mirror so that a little of the vehicle and
the area behind it can be seen.
4. Keep the selector switch in the center position when not
adjusting either outside mirror.
1. Press (1) or (3) to select thedriver or passenger side mirror. 2. Press the arrows on the control
pad while the indicator light on
the (1) or (3) button is
illuminated, to move the mirror
up, down, right, or left.
3. Adjust each outside mirror so that a little of the vehicle and
the area behind it can be seen.
4. Press either (1) or (3) again to deselect the mirror.
See Power Mirrors 046.
If equipped with power folding
mirrors: 1. Press (2) to fold the mirrors out to the driving position.
2. Press (2) again to fold the mirrors in to the folded position.
For manual, power, and auto folding
mirrors, see Folding Mirrors 047.
The mirrors may also include a
memory function that works with the
memory seats. See Memory Seats
0 60.
Interior Mirror
Adjustment
Adjust the mirror for a clear view of
the area behind the vehicle.
Manual Dimming Rearview Mirror
If equipped, push the tab forward for
daytime use and pull it for nighttime
use to avoid glare from the
headlamps from behind. See
Manual Rearview Mirror 049.
Automatic Dimming Rearview
Mirror
If equipped, the mirror will
automatically reduce the glare of the
headlamps from behind. The
dimming feature comes on when the
vehicle is started.
See Automatic Dimming Rearview
Mirror 050.
Page 58 of 490
Chevrolet Silverado LD 1500 and Silverado 2500/3500 Owner Manual (GMNA-
Localizing-U.S./Canada-12162993) - 2019 - crc - 7/30/18
Seats and Restraints 57
Rear Seats
The rear seat has adjustable
headrests in the outboard seating
positions.
The height of the headrest can be
adjusted. Pull the headrest up to
raise it. To lower the headrest, push
the headrest down.
If you are installing a child restraint
in the rear seat, see“Securing a
Child Restraint Designed for the
LATCH System” underLower
Anchors and Tethers for Children
(LATCH System) 098.
Front Seats
Seat Adjustment
{Warning
You can lose control of the
vehicle if you try to adjust a driver
seat while the vehicle is moving.
Adjust the driver seat only when
the vehicle is not moving.
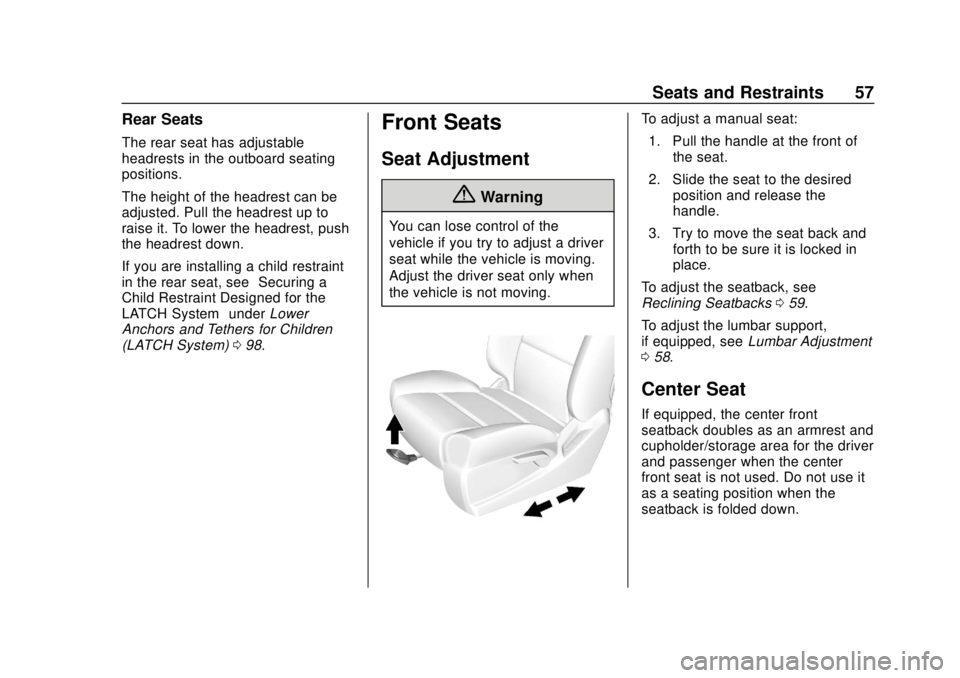
To adjust a manual seat:
1. Pull the handle at the front of the seat.
2. Slide the seat to the desired position and release the
handle.
3. Try to move the seat back and forth to be sure it is locked in
place.
To adjust the seatback, see
Reclining Seatbacks 059.
To adjust the lumbar support,
if equipped, see Lumbar Adjustment
0 58.
Center Seat
If equipped, the center front
seatback doubles as an armrest and
cupholder/storage area for the driver
and passenger when the center
front seat is not used. Do not use it
as a seating position when the
seatback is folded down.
Page 59 of 490
Chevrolet Silverado LD 1500 and Silverado 2500/3500 Owner Manual (GMNA-
Localizing-U.S./Canada-12162993) - 2019 - crc - 7/30/18
58 Seats and Restraints
Power Seat Adjustment
{Warning
The power seats will work with
the ignition off. Children could
operate the power seats and be
injured. Never leave children
alone in the vehicle.
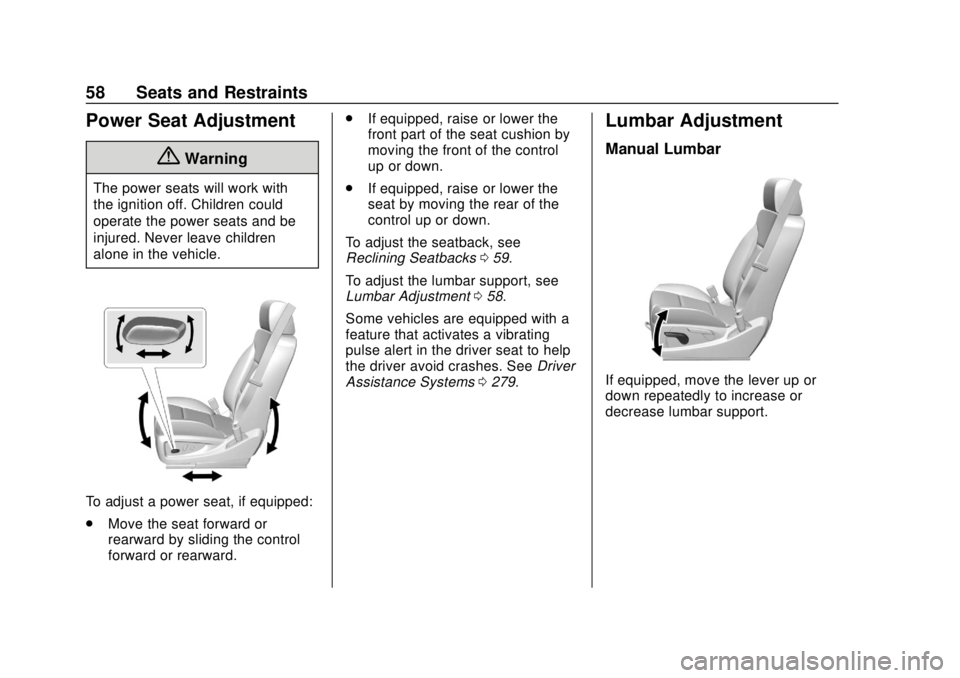
To adjust a power seat, if equipped:
.Move the seat forward or
rearward by sliding the control
forward or rearward. .
If equipped, raise or lower the
front part of the seat cushion by
moving the front of the control
up or down.
. If equipped, raise or lower the
seat by moving the rear of the
control up or down.
To adjust the seatback, see
Reclining Seatbacks 059.
To adjust the lumbar support, see
Lumbar Adjustment 058.
Some vehicles are equipped with a
feature that activates a vibrating
pulse alert in the driver seat to help
the driver avoid crashes. See Driver
Assistance Systems 0279.
Lumbar Adjustment
Manual Lumbar
If equipped, move the lever up or
down repeatedly to increase or
decrease lumbar support.
Page 62 of 490
Chevrolet Silverado LD 1500 and Silverado 2500/3500 Owner Manual (GMNA-
Localizing-U.S./Canada-12162993) - 2019 - crc - 7/30/18
Seats and Restraints 61
Before saving, adjust all available
memory feature positions. Turn the
ignition on and then press and
release SET; a beep will sound.
Then immediately press and hold 1,
2, or
B(Exit) until two beeps
sound. To manually recall these
positions, press and hold 1, 2, or
B
until the saved position is reached.
Follow the instructions under
“Saving Memory Positions.”
The vehicle identifies the current
driver ’s RKE transmitter number (1–
8). See Remote Keyless Entry
(RKE) System Operation 036. Only
RKE transmitters 1 and 2 can be
used for automatic memory recalls.
A Driver Information Center (DIC)
welcome message indicating the
transmitter number may display for
the first few ignition cycles following
a transmitter change. For Auto
Memory Recall to work properly,
save the positions to the memory
button (1 or 2) matching the RKE
transmitter number displayed in the
DIC welcome message. Carry the
linked RKE transmitter when
entering the vehicle. Memory adjustments may not be
available upon delivery or after
service until steps in
“Saving
Memory Positions” section are
performed.
Vehicle Personalization Settings
. To have the Auto Memory Recall
movement begin when the
vehicle is started, select the
Settings menu, then Vehicle,
then Comfort and Convenience,
and then Auto Memory Recall.
Select On or Off. See “Auto
Memory Recall” later in this
section.
. To begin Easy Exit Recall
movement when the ignition is
turned off and the driver door is
opened, or when the ignition is
turned off with the driver door
already opened, select the
Settings menu, then Vehicle,
then Comfort and Convenience,
and then Easy Exit Options.
Select On or Off. See “Easy Exit
Recall” later in this section. .
See Vehicle Personalization
0 160 for additional setting
information.
Identifying Driver Number
To identify the driver number: 1. Start the vehicle with a different key or RKE transmitter. The
DIC should display the driver
number; 1 or 2. Turn the
ignition off and remove the key
or RKE transmitter from the
vehicle.
2. Start the vehicle with the initial key or RKE transmitter. The
DIC should display the other
driver number not shown in
Step 1.
Saving Memory Positions
Read these instructions completely
before saving memory positions.
To save preferred driving positions
1 and 2: 1. Turn the ignition on or to ACC/ ACCESSORY.
A DIC welcome message may
indicate driver number 1 or 2.
Page 73 of 490
Chevrolet Silverado LD 1500 and Silverado 2500/3500 Owner Manual (GMNA-
Localizing-U.S./Canada-12162993) - 2019 - crc - 7/30/18
72 Seats and Restraints
To unlatch the belt, push the button
on the buckle. The belt should
return to its stowed position.
Always stow the seat belt slowly.
If the seat belt webbing returns
quickly to the stowed position, the
retractor may lock and cannot be
pulled out. If this happens, pull the
seat belt straight out firmly to unlock
the webbing, and then release it.
If the webbing is still locked in the
retractor, see your dealer.
Before a door is closed, be sure the
seat belt is out of the way. If a door
is slammed against a seat belt,
damage can occur to both the seat
belt and the vehicle.
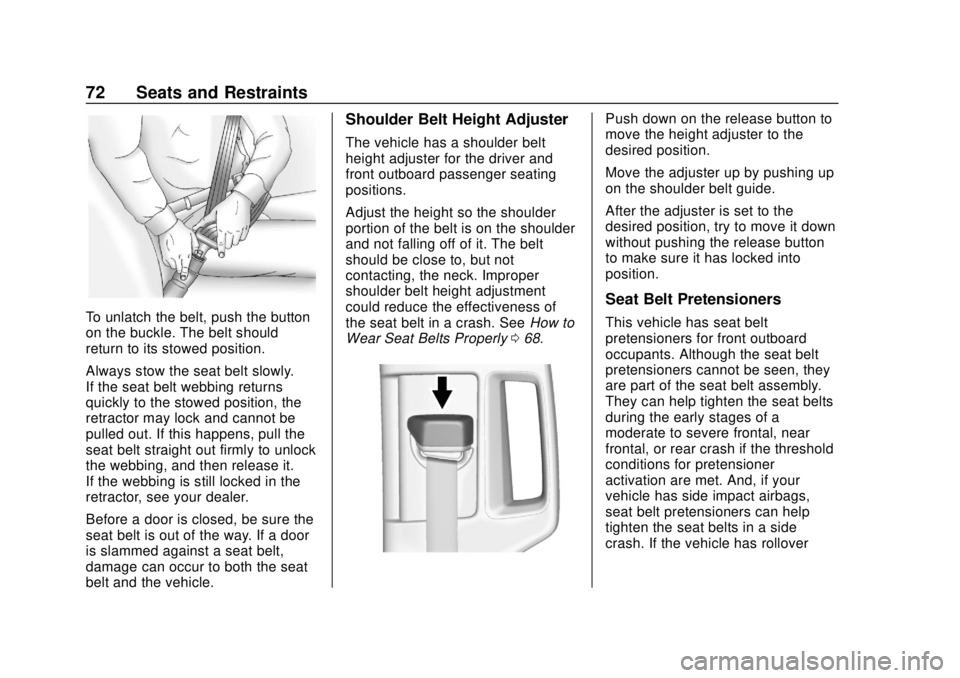
Shoulder Belt Height Adjuster
The vehicle has a shoulder belt
height adjuster for the driver and
front outboard passenger seating
positions.
Adjust the height so the shoulder
portion of the belt is on the shoulder
and not falling off of it. The belt
should be close to, but not
contacting, the neck. Improper
shoulder belt height adjustment
could reduce the effectiveness of
the seat belt in a crash. SeeHow to
Wear Seat Belts Properly 068.
Push down on the release button to
move the height adjuster to the
desired position.
Move the adjuster up by pushing up
on the shoulder belt guide.
After the adjuster is set to the
desired position, try to move it down
without pushing the release button
to make sure it has locked into
position.
Seat Belt Pretensioners
This vehicle has seat belt
pretensioners for front outboard
occupants. Although the seat belt
pretensioners cannot be seen, they
are part of the seat belt assembly.
They can help tighten the seat belts
during the early stages of a
moderate to severe frontal, near
frontal, or rear crash if the threshold
conditions for pretensioner
activation are met. And, if your
vehicle has side impact airbags,
seat belt pretensioners can help
tighten the seat belts in a side
crash. If the vehicle has rollover
Page 127 of 490
Chevrolet Silverado LD 1500 and Silverado 2500/3500 Owner Manual (GMNA-
Localizing-U.S./Canada-12162993) - 2019 - crc - 7/30/18
126 Instruments and Controls
Instruments and
Controls
Controls
Steering Wheel Adjustment . . . 127
Steering Wheel Controls . . . . . . 127
Heated Steering Wheel . . . . . . . 128
Horn . . . . . . . . . . . . . . . . . . . . . . . . . . 128
Windshield Wiper/Washer . . . . 128
Compass . . . . . . . . . . . . . . . . . . . . . 129
Clock . . . . . . . . . . . . . . . . . . . . . . . . . 129
Power Outlets . . . . . . . . . . . . . . . . 130
Wireless Charging . . . . . . . . . . . . 132
Warning Lights, Gauges, and
Indicators
Warning Lights, Gauges, andIndicators . . . . . . . . . . . . . . . . . . . 135
Instrument Cluster . . . . . . . . . . . . 136
Speedometer . . . . . . . . . . . . . . . . . 139
Odometer . . . . . . . . . . . . . . . . . . . . . 139
Trip Odometer . . . . . . . . . . . . . . . . 139
Tachometer . . . . . . . . . . . . . . . . . . . 139
Fuel Gauge . . . . . . . . . . . . . . . . . . . 139
Engine Oil Pressure Gauge . . . . . . . . . . . . . . . . . . . . . . 140
Engine Coolant Temperature Gauge . . . . . . . . . . . . . . . . . . . . . . 141 Voltmeter Gauge . . . . . . . . . . . . . 142
Seat Belt Reminders . . . . . . . . . 143
Airbag Readiness Light . . . . . . . 143
Airbag On-Off Light . . . . . . . . . . . 144
Passenger Airbag Status
Indicator . . . . . . . . . . . . . . . . . . . . 145
Charging System Light . . . . . . . 146
Malfunction Indicator Lamp . . . 146
Brake System Warning Light . . . . . . . . . . . . . . . . . . . . . . . . 148
Antilock Brake System (ABS) Warning Light . . . . . . . . . . . . . . . 149
Four-Wheel-Drive Light . . . . . . . 150
Tow/Haul Mode Light . . . . . . . . . 150
Hill Descent Control Light . . . . 150
Lane Departure Warning (LDW) Light (2500/3500
Series) . . . . . . . . . . . . . . . . . . . . . . 150
Lane Keep Assist (LKA) Light (1500 Series) . . . . . . . . . . . . . . . 151
Vehicle Ahead Indicator . . . . . . 151
Traction Off Light . . . . . . . . . . . . . 151
StabiliTrak OFF Light . . . . . . . . . 151
Traction Control System (TCS)/ StabiliTrak Light . . . . . . . . . . . . . 152
Tire Pressure Light . . . . . . . . . . . 152
Low Fuel Warning Light . . . . . . 153
Security Light . . . . . . . . . . . . . . . . . 153
High-Beam On Light . . . . . . . . . . 153
Front Fog Lamp Light . . . . . . . . . 153 Lamps On Reminder . . . . . . . . . 154
Cruise Control Light . . . . . . . . . . 154
Information Displays
Driver Information Center (DIC)
(Base Level) . . . . . . . . . . . . . . . . 154
Driver Information Center (DIC) (Uplevel) . . . . . . . . . . . . . . . . . . . . 156
Vehicle Messages
Vehicle Messages . . . . . . . . . . . . 159
Engine Power Messages . . . . . 159
Vehicle Speed Messages . . . . . 159
Vehicle Personalization
Vehicle Personalization . . . . . . . 160
Universal Remote System
Universal Remote System . . . . 167
Universal Remote SystemProgramming . . . . . . . . . . . . . . . 167
Universal Remote System Operation . . . . . . . . . . . . . . . . . . . 170