power CHEVROLET SILVERADO 2006 1.G Service Manual
[x] Cancel search | Manufacturer: CHEVROLET, Model Year: 2006, Model line: SILVERADO, Model: CHEVROLET SILVERADO 2006 1.GPages: 594, PDF Size: 3.41 MB
Page 241 of 594
Unlock Doors (Automatic
Transmission only)
If you have an automatic transmission vehicle, press the
customization button until UNLOCK DOORS appears
in the display. To select your preference for automatic
unlocking, press the select button while UNLOCK
DOORS is displayed on the DIC. Pressing the select
button will scroll through the following choices:
UNLOCK DOORS: IN PARK (default):All of the doors
will unlock when the vehicle is shifted into PARK (P).
UNLOCK DRIVER: IN PARK:The driver’s door will be
unlocked when the vehicle is shifted into PARK (P).
UNLOCK DOORS: KEY OUT:All of the doors
will unlock when the key is taken out of the ignition.
UNLOCK DOORS: MANUALLY:The doors will not be
unlocked automatically.
Choose one of the available options and press the
customization button while it is displayed on the DIC to
select it and move on to the next feature. For more
information on automatic door locks, seeProgrammable
Automatic Door Locks on page 2-10.
Door Lock Delay (Crew Cab only)
If your DIC does not have this feature, you still may be
able to program the delayed locking feature. See
Delayed Locking on page 2-9for more information.
When locking the doors with the power lock switch or
the keyless entry transmitter and a door is open,
the delayed locking feature will delay locking the doors
until ve seconds after the last door is closed.
Press the customization button until DOOR LOCK
DELAY appears in the display. To select your
preference for delayed locking, press the select button
while DOOR LOCK DELAY is displayed on the DIC.
Pressing the select button will scroll through the
following choices:
DOOR LOCK DELAY: OFF (default):The doors will
lock immediately when pressing the power lock switch or
the lock button on the keyless entry transmitter.
DOOR LOCK DELAY: ON:The doors will not lock until
ve seconds after the last door is closed. You will
hear three chimes to signal that the delayed locking
feature is in use. You can temporarily override delayed
locking by pressing the lock button on the door or
keyless entry transmitter a second time.
Choose one of the available options and press the
customization button while it is displayed on the DIC to
select it and move on to the next feature.
This feature will not operate if the key is in the ignition.
3-65
Page 247 of 594
Notice:The chime signals related to safety belts,
parking brake, and other functions of your vehicle
operate through the radio/entertainment system.
If that equipment is replaced or additional equipment
is added to your vehicle, the chimes may not
work. Make sure that replacement or additional
equipment is compatible with your vehicle before
installing it. SeeAccessories and Modifications
on page 5-4.
Your vehicle may have a feature called Retained
Accessory Power (RAP). With RAP, the audio system
can be played even after the ignition is turned off.
SeeRetained Accessory Power (RAP) on page 2-22for
more information.
Setting the Time for Radios without
Radio Data Systems (RDS)
Press and hold HR until the correct hour appears on the
display. Press and hold MIN until the correct minute
appears on the display. There is an initial two-second
delay before the clock goes into time-set mode.
Display the time with the ignition off, by pressing RCL,
HR, or MIN.
Setting the Time for Radios with
Radio Data Systems (RDS)
The radio may have a button marked with an H or HR
to represent hours and an M or MN to represent
minutes.
Press and hold the hour button until the correct hour
appears on the display. Press and hold the minute
button until the correct minute appears on the display.
The time can be set with the ignition on or off.
To synchronize the time with an FM station broadcasting
Radio Data System (RDS) information, press and
hold the hour and minute buttons at the same time until
RDS TIME appears on the display. To accept this
time, press and hold the hour and minute buttons, at the
same time, for another two seconds. If the time is not
available from the station, NO UPDAT will appear on the
display.
RDS time is broadcast once a minute. After tuning to an
RDS broadcast station, it may take a few minutes for
the time to update.
3-71
Page 248 of 594
AM-FM Radio
Playing the Radio
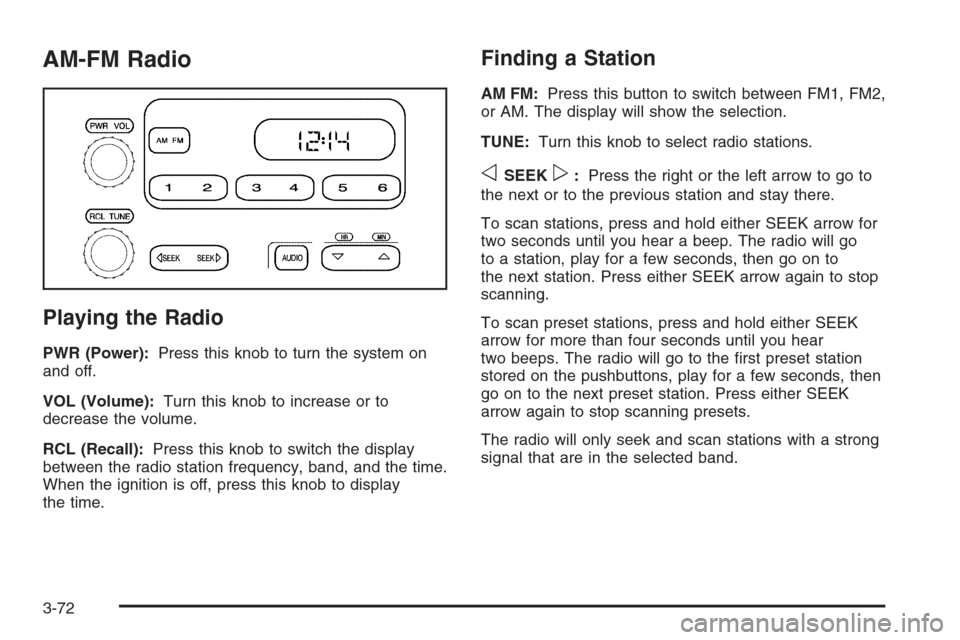
PWR (Power):Press this knob to turn the system on
and off.
VOL (Volume):Turn this knob to increase or to
decrease the volume.
RCL (Recall):Press this knob to switch the display
between the radio station frequency, band, and the time.
When the ignition is off, press this knob to display
the time.
Finding a Station
AM FM:Press this button to switch between FM1, FM2,
or AM. The display will show the selection.
TUNE:Turn this knob to select radio stations.
oSEEKp:Press the right or the left arrow to go to
the next or to the previous station and stay there.
To scan stations, press and hold either SEEK arrow for
two seconds until you hear a beep. The radio will go
to a station, play for a few seconds, then go on to
the next station. Press either SEEK arrow again to stop
scanning.
To scan preset stations, press and hold either SEEK
arrow for more than four seconds until you hear
two beeps. The radio will go to the rst preset station
stored on the pushbuttons, play for a few seconds, then
go on to the next preset station. Press either SEEK
arrow again to stop scanning presets.
The radio will only seek and scan stations with a strong
signal that are in the selected band.
3-72
Page 251 of 594
Radio Data System (RDS)
The audio system has a Radio Data System (RDS).
RDS features are available for use only on FM stations
that broadcast RDS information.
With RDS, the radio can do the following:
Seek to stations broadcasting the selected type of
programming
Receive announcements concerning local and
national emergencies
Display messages from radio stations
This system relies upon receiving specic information
from these stations and will only work when the
information is available. In rare cases, a radio station
may broadcast incorrect information that will cause
the radio features to work improperly. If this happens,
contact the radio station.
While the radio is tuned to an RDS station, the station
name or call letters will appear on the display instead of
the frequency. RDS stations may also provide the
time of day, a program type (PTY) for current
programming, and the name of the program being
broadcast.
XM™ Satellite Radio Service
XM™ is a satellite radio service that is based in the
48 contiguous United States and in Canada (if available).
XM™ offers over 100 coast-to-coast channels including
music, news, sports, talk, and children’s programming.
XM™ provides digital quality audio and text information
that includes song title and artist name. A service fee is
required in order to receive the XM™ service. For more
information, contact XM™ at www.xmradio.com or call
1-800-852-XMXM (9696).
Playing the Radio
PWR (Power):Press this knob to turn the system on
and off.
oVOLp(Volume):Turn this knob to increase or to
decrease the volume.
INFO (Information):When the ignition is off, press this
knob to display the time.
For RDS, press the INFO knob to change what appears
on the display while using RDS. The display options
are station name, RDS station frequency, PTY, and the
name of the program (if available).
3-75
Page 262 of 594
Radio Data System (RDS)
The audio system has a Radio Data System (RDS).
RDS features are available for use only on FM stations
that broadcast RDS information.
With RDS, the radio can do the following:
Seek to stations broadcasting the selected type of
programming
Receive announcements concerning local and
national emergencies
Display messages from radio stations
This system relies upon receiving specic information
from these stations and will only work when the
information is available. In rare cases, a radio station
may broadcast incorrect information that will cause
the radio features to work improperly. If this happens,
contact the radio station.
While the radio is tuned to an RDS station, the station
name or call letters will appear on the display instead of
the frequency. RDS stations may also provide the
time of day, a program type (PTY) for current
programming, and the name of the program being
broadcast.
XM™ Satellite Radio Service
XM™ is a satellite radio service that is based in the
48 contiguous United States and in Canada (if available).
XM™ offers over 100 coast-to-coast channels including
music, news, sports, talk, and children’s programming.
XM™ provides digital quality audio and text information
that includes song title and artist name. A service fee is
required in order to receive the XM™ service. For more
information, contact XM™ at www.xmradio.com or call
1-800-852-XMXM (9696).
Playing the Radio
PWR (Power):Press this knob to turn the system on
and off.
oVOLp(Volume):Turn this knob to increase or to
decrease the volume.
INFO (Information):When the ignition is off, press this
knob to display the time.
For RDS, press the INFO knob to change what appears
on the display while using RDS. The display options
are station name, RDS station frequency, PTY, and the
name of the program (if available).
3-86
Page 272 of 594
CLEAN:If this message appears on the display, the
cassette tape player needs to be cleaned. It will still play
tapes, but it should be cleaned as soon as possible to
prevent damage to the tapes and player. SeeCare
of the Cassette Tape Player on page 3-128.
If the cassette tape is not playing correctly, for any other
reason, try a known good cassette.
If any error occurs repeatedly or if an error cannot be
corrected, contact your GM dealer. If the radio displays
an error message, write it down and provide it to
your GM dealer when reporting the problem.
CD Adapter Kits
It is possible to use a portable CD player with the
cassette tape player after activating the bypass feature
on your tape player.
To activate the bypass feature, perform the
following steps:
1. Turn the ignition on.
2. Turn the radio off.
3. Press and hold the TAPE DISC button for
ve seconds. READY will appear on the display
and the tape symbol on the display will ash,
indicating the feature is active.
4. Insert the adapter into the cassette tape slot. It will
power up the radio and begin playing.
The override feature will remain active until the eject
button is pressed.
Playing a CD
Insert a CD part way into the slot, label side up. The
player will pull it in and the CD should begin playing. If
you want to insert a CD with the ignition off, rst
press the eject button or the INFO knob.
If the ignition or radio is turned off with the CD in the
player, it will stay in the player. When the ignition
or radio is turned on, the CD will start playing where it
stopped, if it was the last selected audio source.
When a CD is inserted, the CD symbol will appear on
the display. As each new track starts to play, the
track number will appear on the display.
The CD player can play the smaller 3 inch (8 cm) single
CDs with an adapter ring. Full-size CDs and the
smaller CDs are loaded in the same manner.
If playing a CD-R, the sound quality may be reduced
due to CD-R quality, the method of recording, the quality
of the music that has been recorded, and the way the
CD-R has been handled. There may be an increase
in skipping, difficulty in nding tracks, and/or difficulty in
loading and ejecting. If these problems occur, check
the bottom surface of the CD. If the surface of the CD is
damaged, such as cracked, broken, or scratched, the
CD will not play properly. If the surface of the CD
is soiled, seeCare of Your CDs and DVDs on
page 3-129for more information.
If there is no apparent damage, try a known good CD.
3-96
Page 276 of 594
Radio Data System (RDS)
The audio system has a Radio Data System (RDS).
RDS features are available for use only on FM stations
that broadcast RDS information.
With RDS, the radio can do the following:
Seek to stations broadcasting the selected type of
programming
Receive announcements concerning local and
national emergencies
Display messages from radio stations
This system relies upon receiving specic information
from these stations and will only work when the
information is available. In rare cases, a radio station
may broadcast incorrect information that will cause
the radio features to work improperly. If this happens,
contact the radio station.
While the radio is tuned to an RDS station, the station
name or call letters will appear on the display instead of
the frequency. RDS stations may also provide the
time of day, a program type (PTY) for current
programming, and the name of the program being
broadcast.
XM™ Satellite Radio Service
XM™ is a satellite radio service that is based in the
48 contiguous United States and in Canada (if available).
XM™ offers over 100 coast-to-coast channels including
music, news, sports, talk, and children’s programming.
XM™ provides digital quality audio and text information
that includes song title and artist name. A service fee is
required in order to receive the XM™ service. For more
information, contact XM™ at www.xmradio.com or call
1-800-852-XMXM (9696).
Playing the Radio
PWR (Power):Push this knob to turn the system on
and off.
oVOLUMEp:Turn this knob to increase or to
decrease the volume.
INFO (Information):When the ignition is off, press this
knob to display the time.
For RDS, press the INFO knob to change what appears
on the display while using RDS. The display options
are station name, RDS station frequency, PTY, and the
name of the program (if available).
3-100
Page 290 of 594
Rear Seat Entertainment System
Your vehicle may have a DVD Rear Seat Entertainment
(RSE) system. The RSE system includes a DVD
player, a video display screen, two sets of wireless
headphones, and a remote control.
Parental Control
This button is located behind the video screen. Press
this button while a DVD or CD is playing to freeze
the video and mute the audio. The video screen will
display Parental Control ON and the power indicator
light on the DVD player will ash. It will also disable all
other button operations from the remote control and
the DVD player, with the exception of the eject button.
Press this button again to restore operation of the
DVD player.
This button may also be used to turn the DVD player
power on and automatically resume play if the ignition
is in RUN, ACCESSORY, or if RAP is active.
Before You Drive
The RSE system is for rear seat passengers only.
The driver cannot safely view the video screen while
driving and should not try to do so.
Headphones
The RSE system includes two sets of wireless
headphones.
Each set of headphones has an ON/OFF control.
An indicator light will illuminate on the headphones
when they are on. If the light does not illuminate, the
batteries may need to be replaced. See “Battery
Replacement” following for more information.
Each set of headphones has a volume knob. To adjust
the volume, adjust this knob.
The transmitters are located below the video display
screen. The headphones will shut off automatically
if they lose the signal from the system after about
four minutes to save battery power. The signal may be
lost if the system is turned off or if the headphones
are out of range of the transmitters.
When using the wired headphones, if the front seat
passengers play a CD in the Radio with Six-Disc CD
(if equipped) or use XM™ Satellite Radio Service
(if equipped), you will hear the audio for these sources,
instead of the DVD or CD that is currently playing
through the RSE.
Notice:Do not store the headphones in heat or
direct sunlight. This could damage the headphones
and repairs will not be covered by your warranty.
Keep the headphones stored in a cool, dry place.
3-114
Page 291 of 594
Both sets of rear seat headphones may include foam
ear pads that can be replaced.
Foam ear pads on these headphones may become
worn or damaged. The headphone foam ear pads can
become damaged if they are not handled or stored
properly. If the foam ear pads do become damaged or
worn out, the pads can be replaced separately from
the headphone set. It is not necessary to replace
the complete headphone set.
The headphone replacement foam ear pads can be
ordered in pairs. See your dealer for more information.
Battery Replacement
To change the batteries, do the following:
1. Loosen the screw on the battery compartment door
located on the left side of the headphone earpiece.
2. Replace the two AAA batteries in the compartment.
Make sure that they are installed correctly, using
the diagram on the inside of the battery
compartment.
3. Tighten the screw to close the compartment door.
If the headphones are to be stored for a long period
of time, remove the batteries and keep them in a cool,
dry place.
Stereo RCA Jacks
The RCA jacks are located behind the video screen.
The RCA jacks allow audio and video signals to
be connected from an auxiliary device such as a
camcorder or a video game unit to the RSE system.
Standard RCA cables, not included, are needed
to connect the auxiliary device to the RCA jacks. The
yellow connector inputs video and the red and white
connectors input right and left audio. Refer to the
manufacturer’s instructions for proper connection of the
auxiliary device.
To use the auxiliary inputs on the RSE system, connect
an external auxiliary device to the color-coded RCA
jacks and turn both the auxiliary device and the
RSE system power on. If the RSE system had been
previously in the DVD player mode, pressing the SRCE
button on the faceplate or the remote control will
switch the RSE system between the auxiliary device
and the DVD player.
3-115
Page 292 of 594
How to Change the Video Format when
in the Auxiliary Mode
The auxiliary input video format is preset to NTSC.
In some countries, the video format may be in the
PAL system. To change the video format, perform the
following:
1. Press the display menu button.
2. Press the down arrow button to highlight the
Video Format option.
3. Press the enter button to select Video Format.
4. Press the right or left arrow button to select
the desired video format.
5. Press the enter button to accept the change.
Audio Output
Audio from the DVD player or auxiliary inputs may be
heard through the following possible sources:
Wireless Headphones
Vehicle Speakers
Vehicle wired headphone jacks on the Rear Seat
Audio system (if equipped)The RSE system will always transmit the audio signal
by infrared to the wireless headphones, if there is audio
available. See “Headphones” previously for more
information.
The RSE system is capable of outputting audio to the
vehicle speakers by using the radio. The RSE
system may be selected as an audio source on the
radio if the RSE system power is on. Once the
RSE system is selected as an audio source on the
radio, adjust the speaker volume on the radio, if
necessary. If the RSE system power is not on, the RSE
system will not be an available source on the radio.
Refer to the radio information for the radio that
your vehicle has for more information.
The RSE system is capable of outputting audio to the
wired headphone jacks on the rear seat audio system
(if equipped). The RSE system may be selected as
an audio source on the rear seat audio system if
the RSE system power is on. Refer toRear Seat Audio
(RSA) on page 3-125for more information.
3-116