wiper blades CHEVROLET SILVERADO 2009 2.G Owners Manual
[x] Cancel search | Manufacturer: CHEVROLET, Model Year: 2009, Model line: SILVERADO, Model: CHEVROLET SILVERADO 2009 2.GPages: 600, PDF Size: 3.24 MB
Page 197 of 600
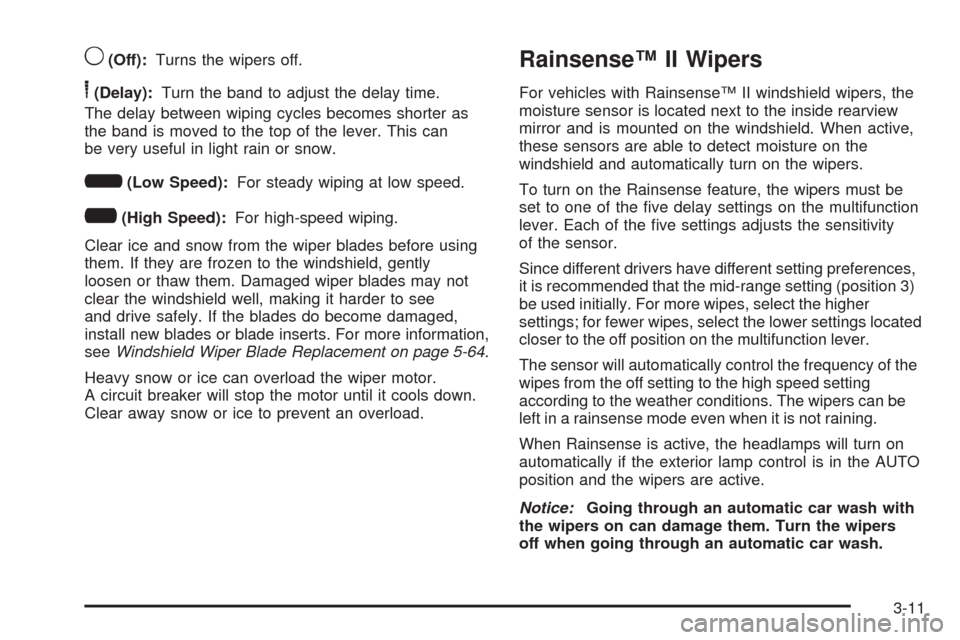
9(Off):Turns the wipers off.
6(Delay):Turn the band to adjust the delay time.
The delay between wiping cycles becomes shorter as
the band is moved to the top of the lever. This can
be very useful in light rain or snow.
6(Low Speed):For steady wiping at low speed.
?(High Speed):For high-speed wiping.
Clear ice and snow from the wiper blades before using
them. If they are frozen to the windshield, gently
loosen or thaw them. Damaged wiper blades may not
clear the windshield well, making it harder to see
and drive safely. If the blades do become damaged,
install new blades or blade inserts. For more information,
seeWindshield Wiper Blade Replacement on page 5-64.
Heavy snow or ice can overload the wiper motor.
A circuit breaker will stop the motor until it cools down.
Clear away snow or ice to prevent an overload.
Rainsense™ II Wipers
For vehicles with Rainsense™ II windshield wipers, the
moisture sensor is located next to the inside rearview
mirror and is mounted on the windshield. When active,
these sensors are able to detect moisture on the
windshield and automatically turn on the wipers.
To turn on the Rainsense feature, the wipers must be
set to one of the �ve delay settings on the multifunction
lever. Each of the �ve settings adjusts the sensitivity
of the sensor.
Since different drivers have different setting preferences,
it is recommended that the mid-range setting (position 3)
be used initially. For more wipes, select the higher
settings; for fewer wipes, select the lower settings located
closer to the off position on the multifunction lever.
The sensor will automatically control the frequency of the
wipes from the off setting to the high speed setting
according to the weather conditions. The wipers can be
left in a rainsense mode even when it is not raining.
When Rainsense is active, the headlamps will turn on
automatically if the exterior lamp control is in the AUTO
position and the wipers are active.
Notice:Going through an automatic car wash with
the wipers on can damage them. Turn the wipers
off when going through an automatic car wash.
3-11
Page 354 of 600
Hydroplaning
Hydroplaning is dangerous. Water can build up under
your vehicle’s tires so they actually ride on the
water. This can happen if the road is wet enough and
you are going fast enough. When your vehicle is
hydroplaning, it has little or no contact with the road.
There is no hard and fast rule about hydroplaning. The
best advice is to slow down when the road is wet.
Other Rainy Weather Tips
Besides slowing down, other wet weather driving tips
include:
Allow extra following distance.
Pass with caution.
Keep windshield wiping equipment in good shape.
Keep the windshield washer �uid reservoir �lled.
Have good tires with proper tread depth. SeeTires
on page 5-65.
Turn off cruise control.
Before Leaving on a Long Trip
To prepare your vehicle for a long trip, consider having it
serviced by your dealer/retailer before departing.
Things to check on your own include:
Windshield Washer Fluid:Reservoir full? Windows
clean — inside and outside?
Wiper Blades:In good shape?
Fuel, Engine Oil, Other Fluids:All levels checked?
Lamps:Do they all work and are lenses clean?
Tires:Are treads good? Are tires in�ated to
recommended pressure?
Weather and Maps:Safe to travel? Have
up-to-date maps?
Highway Hypnosis
Always be alert and pay attention to your surroundings
while driving. If you become tired or sleepy, �nd a safe
place to park your vehicle and rest.
Other driving tips include:
Keep the vehicle well ventilated.
Keep interior temperature cool.
Keep your eyes moving — scan the road ahead
and to the sides.
Check the rearview mirror and vehicle instruments
often.
4-26
Page 414 of 600
Bulb Replacement..........................................5-58
Halogen Bulbs..............................................5-58
Headlamps..................................................5-58
Center High-Mounted Stoplamp (CHMSL)
and Cargo Lamp.......................................5-59
Pickup Box Identi�cation and Fender
Marker Lamps...........................................5-60
Taillamps, Turn Signal, Stoplamps and
Back-up Lamps.........................................5-61
License Plate Lamp......................................5-63
Replacement Bulbs.......................................5-63
Windshield Wiper Blade Replacement..............5-64
Tires..............................................................5-65
Tire Sidewall Labeling...................................5-66
Tire Terminology and De�nitions.....................5-70
In�ation - Tire Pressure.................................5-73
High-Speed Operation...................................5-74
Dual Tire Operation.......................................5-75
Tire Pressure Monitor System.........................5-76
Tire Pressure Monitor Operation.....................5-77
Tire Inspection and Rotation...........................5-81
When It Is Time for New Tires.......................5-83
Buying New Tires.........................................5-84
Different Size Tires and Wheels......................5-86Uniform Tire Quality Grading..........................5-86
Wheel Alignment and Tire Balance..................5-88
Wheel Replacement......................................5-89
Tire Chains..................................................5-90
If a Tire Goes Flat........................................5-92
Changing a Flat Tire.....................................5-93
Removing the Spare Tire and Tools................5-94
Removing the Flat Tire and Installing the
Spare Tire................................................5-99
Secondary Latch System..............................5-107
Storing a Flat or Spare Tire and Tools...........5-110
Spare Tire.................................................5-114
Appearance Care
..........................................5-114
Interior Cleaning.........................................5-114
Fabric/Carpet..............................................5-116
Leather......................................................5-116
Instrument Panel, Vinyl, and Other Plastic
Surfaces.................................................5-117
Care of Safety Belts....................................5-117
Weatherstrips.............................................5-117
Washing Your Vehicle..................................5-118
Cleaning Exterior Lamps/Lenses....................5-118
Finish Care................................................5-119
Windshield and Wiper Blades.......................5-119
Section 5 Service and Appearance Care
5-2
Page 476 of 600
Windshield Wiper Blade
Replacement
Windshield wiper blades should be inspected for wear
or cracking. SeeScheduled Maintenance (Gasoline
Engine) on page 6-4for more information on wiper blade
inspection.
Replacement blades come in different types and are
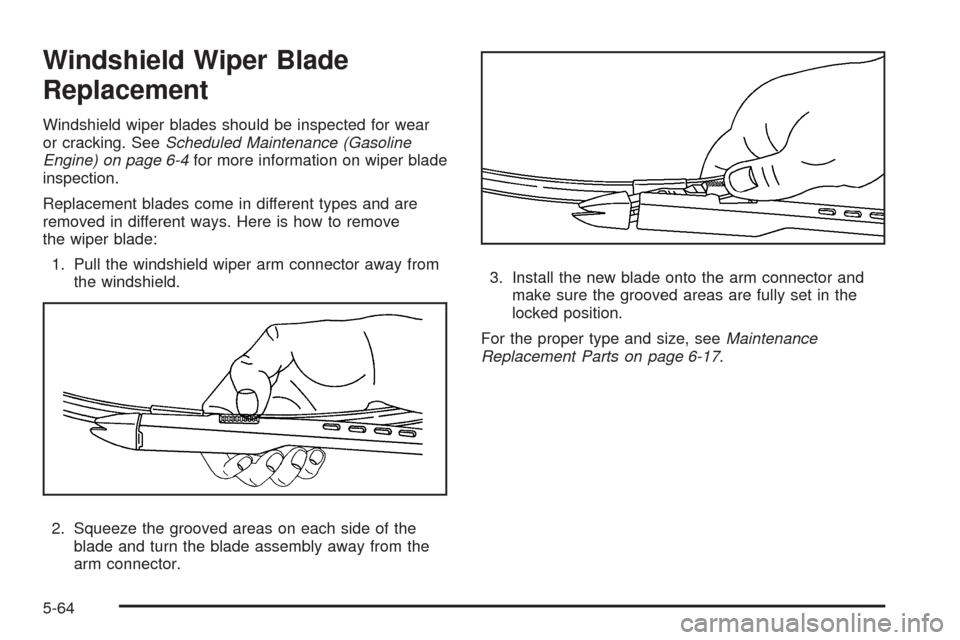
removed in different ways. Here is how to remove
the wiper blade:
1. Pull the windshield wiper arm connector away from
the windshield.
2. Squeeze the grooved areas on each side of the
blade and turn the blade assembly away from the
arm connector.3. Install the new blade onto the arm connector and
make sure the grooved areas are fully set in the
locked position.
For the proper type and size, seeMaintenance
Replacement Parts on page 6-17.
5-64
Page 531 of 600
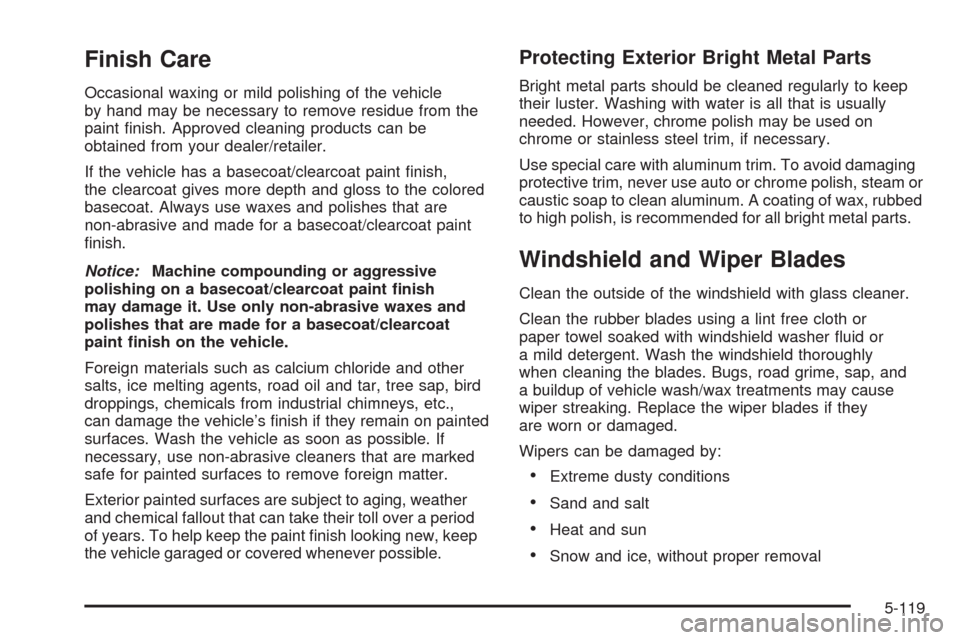
Finish Care
Occasional waxing or mild polishing of the vehicle
by hand may be necessary to remove residue from the
paint �nish. Approved cleaning products can be
obtained from your dealer/retailer.
If the vehicle has a basecoat/clearcoat paint �nish,
the clearcoat gives more depth and gloss to the colored
basecoat. Always use waxes and polishes that are
non-abrasive and made for a basecoat/clearcoat paint
�nish.
Notice:Machine compounding or aggressive
polishing on a basecoat/clearcoat paint �nish
may damage it. Use only non-abrasive waxes and
polishes that are made for a basecoat/clearcoat
paint �nish on the vehicle.
Foreign materials such as calcium chloride and other
salts, ice melting agents, road oil and tar, tree sap, bird
droppings, chemicals from industrial chimneys, etc.,
can damage the vehicle’s �nish if they remain on painted
surfaces. Wash the vehicle as soon as possible. If
necessary, use non-abrasive cleaners that are marked
safe for painted surfaces to remove foreign matter.
Exterior painted surfaces are subject to aging, weather
and chemical fallout that can take their toll over a period
of years. To help keep the paint �nish looking new, keep
the vehicle garaged or covered whenever possible.
Protecting Exterior Bright Metal Parts
Bright metal parts should be cleaned regularly to keep
their luster. Washing with water is all that is usually
needed. However, chrome polish may be used on
chrome or stainless steel trim, if necessary.
Use special care with aluminum trim. To avoid damaging
protective trim, never use auto or chrome polish, steam or
caustic soap to clean aluminum. A coating of wax, rubbed
to high polish, is recommended for all bright metal parts.
Windshield and Wiper Blades
Clean the outside of the windshield with glass cleaner.
Clean the rubber blades using a lint free cloth or
paper towel soaked with windshield washer �uid or
a mild detergent. Wash the windshield thoroughly
when cleaning the blades. Bugs, road grime, sap, and
a buildup of vehicle wash/wax treatments may cause
wiper streaking. Replace the wiper blades if they
are worn or damaged.
Wipers can be damaged by:
Extreme dusty conditions
Sand and salt
Heat and sun
Snow and ice, without proper removal
5-119
Page 550 of 600
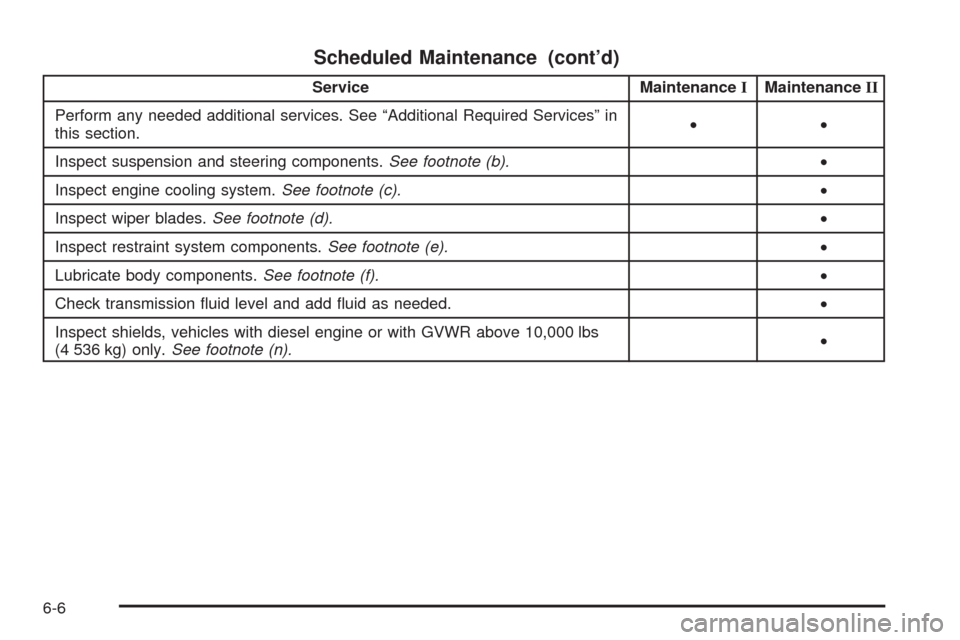
Scheduled Maintenance (cont’d)
Service MaintenanceIMaintenanceII
Perform any needed additional services. See “Additional Required Services” in
this section.••
Inspect suspension and steering components.See footnote (b).•
Inspect engine cooling system.See footnote (c).•
Inspect wiper blades.See footnote (d).•
Inspect restraint system components.See footnote (e).•
Lubricate body components.See footnote (f).•
Check transmission �uid level and add �uid as needed.•
Inspect shields, vehicles with diesel engine or with GVWR above 10,000 lbs
(4 536 kg) only.See footnote (n).•
6-6
Page 553 of 600
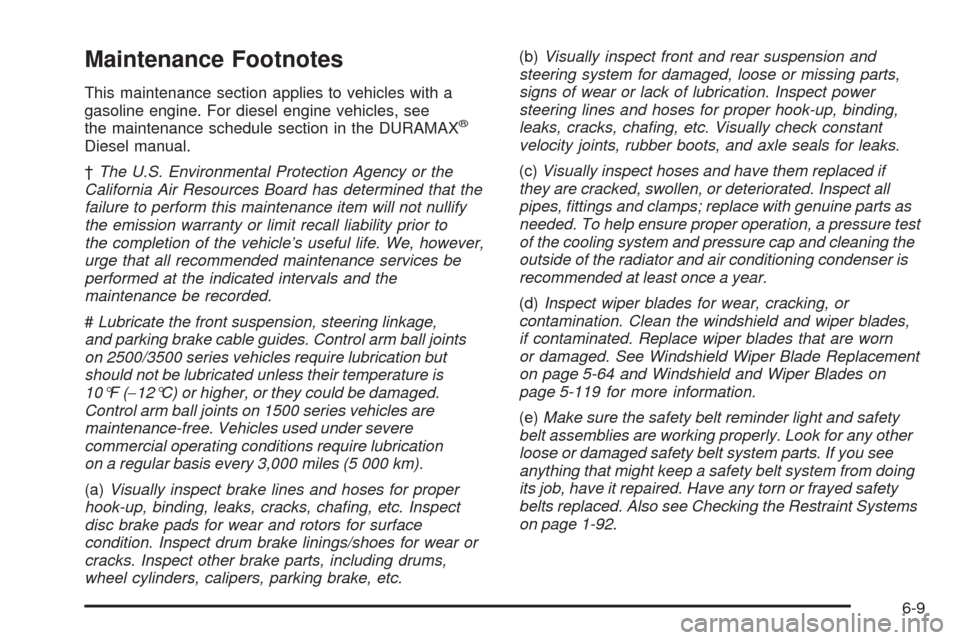
Maintenance Footnotes
This maintenance section applies to vehicles with a
gasoline engine. For diesel engine vehicles, see
the maintenance schedule section in the DURAMAX
®
Diesel manual.
†The U.S. Environmental Protection Agency or the
California Air Resources Board has determined that the
failure to perform this maintenance item will not nullify
the emission warranty or limit recall liability prior to
the completion of the vehicle’s useful life. We, however,
urge that all recommended maintenance services be
performed at the indicated intervals and the
maintenance be recorded.
#Lubricate the front suspension, steering linkage,
and parking brake cable guides. Control arm ball joints
on 2500/3500 series vehicles require lubrication but
should not be lubricated unless their temperature is
10°F (−12°C) or higher, or they could be damaged.
Control arm ball joints on 1500 series vehicles are
maintenance-free. Vehicles used under severe
commercial operating conditions require lubrication
on a regular basis every 3,000 miles (5 000 km).
(a)Visually inspect brake lines and hoses for proper
hook-up, binding, leaks, cracks, chafing, etc. Inspect
disc brake pads for wear and rotors for surface
condition. Inspect drum brake linings/shoes for wear or
cracks. Inspect other brake parts, including drums,
wheel cylinders, calipers, parking brake, etc.(b)Visually inspect front and rear suspension and
steering system for damaged, loose or missing parts,
signs of wear or lack of lubrication. Inspect power
steering lines and hoses for proper hook-up, binding,
leaks, cracks, chafing, etc. Visually check constant
velocity joints, rubber boots, and axle seals for leaks.
(c)Visually inspect hoses and have them replaced if
they are cracked, swollen, or deteriorated. Inspect all
pipes, fittings and clamps; replace with genuine parts as
needed. To help ensure proper operation, a pressure test
of the cooling system and pressure cap and cleaning the
outside of the radiator and air conditioning condenser is
recommended at least once a year.
(d)Inspect wiper blades for wear, cracking, or
contamination. Clean the windshield and wiper blades,
if contaminated. Replace wiper blades that are worn
or damaged. See Windshield Wiper Blade Replacement
on page 5-64 and Windshield and Wiper Blades on
page 5-119 for more information.
(e)Make sure the safety belt reminder light and safety
belt assemblies are working properly. Look for any other
loose or damaged safety belt system parts. If you see
anything that might keep a safety belt system from doing
its job, have it repaired. Have any torn or frayed safety
belts replaced. Also see Checking the Restraint Systems
on page 1-92.
6-9
Page 561 of 600
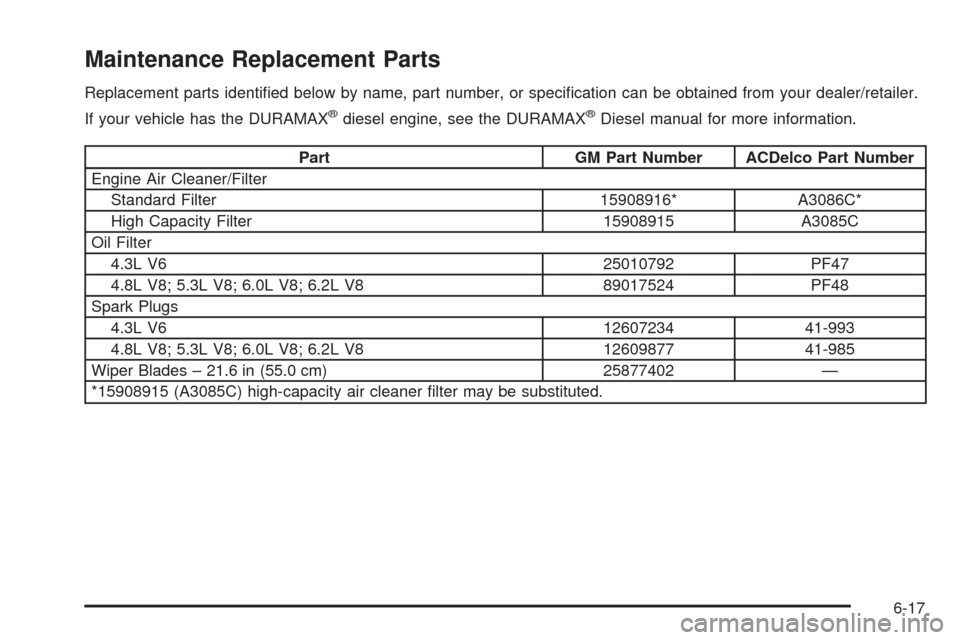
Maintenance Replacement Parts
Replacement parts identi�ed below by name, part number, or speci�cation can be obtained from your dealer/retailer.
If your vehicle has the DURAMAX
®diesel engine, see the DURAMAX®Diesel manual for more information.
Part GM Part Number ACDelco Part Number
Engine Air Cleaner/Filter
Standard Filter 15908916* A3086C*
High Capacity Filter 15908915 A3085C
Oil Filter
4.3L V6 25010792 PF47
4.8L V8; 5.3L V8; 6.0L V8; 6.2L V8 89017524 PF48
Spark Plugs
4.3L V6 12607234 41-993
4.8L V8; 5.3L V8; 6.0L V8; 6.2L V8 12609877 41-985
Wiper Blades – 21.6 in (55.0 cm) 25877402 —
*15908915 (A3085C) high-capacity air cleaner �lter may be substituted.
6-17
Page 585 of 600
A
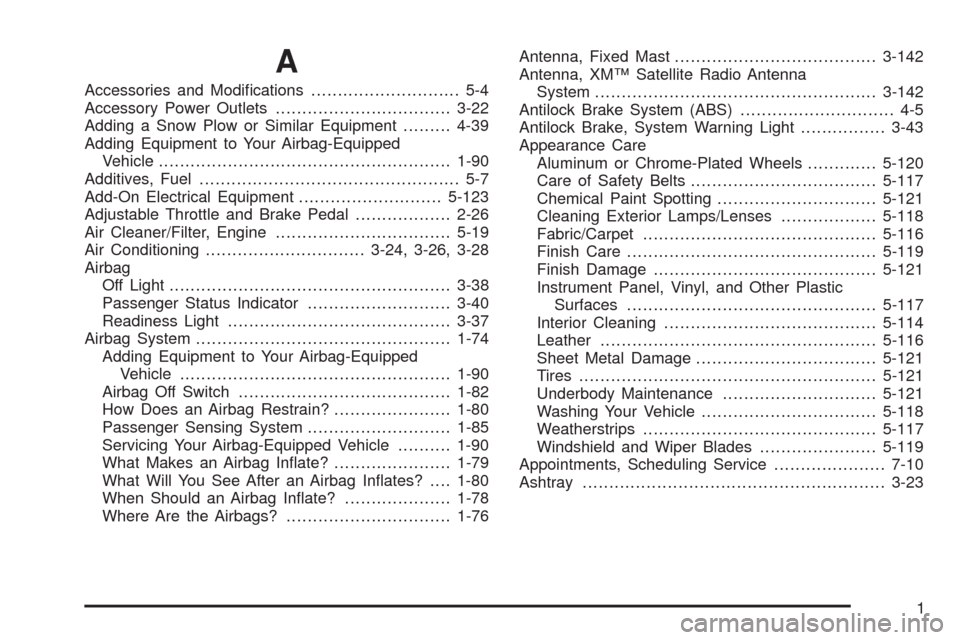
Accessories and Modi�cations............................ 5-4
Accessory Power Outlets.................................3-22
Adding a Snow Plow or Similar Equipment.........4-39
Adding Equipment to Your Airbag-Equipped
Vehicle.......................................................1-90
Additives, Fuel................................................. 5-7
Add-On Electrical Equipment...........................5-123
Adjustable Throttle and Brake Pedal..................2-26
Air Cleaner/Filter, Engine.................................5-19
Air Conditioning..............................3-24, 3-26, 3-28
Airbag
Off Light.....................................................3-38
Passenger Status Indicator...........................3-40
Readiness Light..........................................3-37
Airbag System................................................1-74
Adding Equipment to Your Airbag-Equipped
Vehicle...................................................1-90
Airbag Off Switch........................................1-82
How Does an Airbag Restrain?......................1-80
Passenger Sensing System...........................1-85
Servicing Your Airbag-Equipped Vehicle..........1-90
What Makes an Airbag In�ate?......................1-79
What Will You See After an Airbag In�ates?....1-80
When Should an Airbag In�ate?....................1-78
Where Are the Airbags?...............................1-76Antenna, Fixed Mast......................................3-142
Antenna, XM™ Satellite Radio Antenna
System.....................................................3-142
Antilock Brake System (ABS)............................. 4-5
Antilock Brake, System Warning Light................3-43
Appearance Care
Aluminum or Chrome-Plated Wheels.............5-120
Care of Safety Belts...................................5-117
Chemical Paint Spotting..............................5-121
Cleaning Exterior Lamps/Lenses..................5-118
Fabric/Carpet............................................5-116
Finish Care...............................................5-119
Finish Damage..........................................5-121
Instrument Panel, Vinyl, and Other Plastic
Surfaces...............................................5-117
Interior Cleaning........................................5-114
Leather....................................................5-116
Sheet Metal Damage..................................5-121
Tires........................................................5-121
Underbody Maintenance.............................5-121
Washing Your Vehicle.................................5-118
Weatherstrips............................................5-117
Windshield and Wiper Blades......................5-119
Appointments, Scheduling Service.....................7-10
Ashtray.........................................................3-23
1
Page 587 of 600
Capacities and Speci�cations..........................5-130
Carbon Monoxide...........................2-12, 2-55, 4-28
Care of
Safety Belts..............................................5-117
Cargo Lamp...................................................3-21
Cargo Management System.............................2-83
CD, MP3 ............................................3-108, 3-113
Center Console Storage Area...........................2-82
Center High-Mounted Stoplamp (CHMSL) and
Cargo Lamp...............................................5-59
Center Seat...................................................1-14
Chains, Tire...................................................5-90
Charging System Light....................................3-41
Check
Engine Lamp..............................................3-45
Checking Things Under the Hood......................5-12
Chemical Paint Spotting.................................5-121
Child Restraints
Child Restraint Systems...............................1-45
Infants and Young Children...........................1-41
Lower Anchors and Tethers for Children..........1-49
Older Children.............................................1-38
Securing a Child Restraint in a Rear Seat
Position..................................................1-58Child Restraints (cont.)
Securing a Child Restraint in the Center
Front Seat Position...................................1-61
Securing a Child Restraint in the Right
Front Seat Position..................1-61, 1-66, 1-71
Where to Put the Restraint...........................1-47
Cigarette Lighter.............................................3-23
Cleaning
Aluminum or Chrome-Plated Wheels.............5-120
Exterior Lamps/Lenses................................5-118
Fabric/Carpet............................................5-116
Finish Care...............................................5-119
Instrument Panel, Vinyl, and Other Plastic
Surfaces...............................................5-117
Interior.....................................................5-114
Leather....................................................5-116
Tires........................................................
5-121
Underbody Maintenance.............................5-121
Washing Your Vehicle.................................5-118
Weatherstrips............................................5-117
Windshield and Wiper Blades......................5-119
Climate Control System...........................3-24, 3-26
Dual Automatic............................................3-28
Outlet Adjustment........................................3-33
3