inflation CHEVROLET SILVERADO 2010 2.G Owners Manual
[x] Cancel search | Manufacturer: CHEVROLET, Model Year: 2010, Model line: SILVERADO, Model: CHEVROLET SILVERADO 2010 2.GPages: 626, PDF Size: 4.8 MB
Page 119 of 626
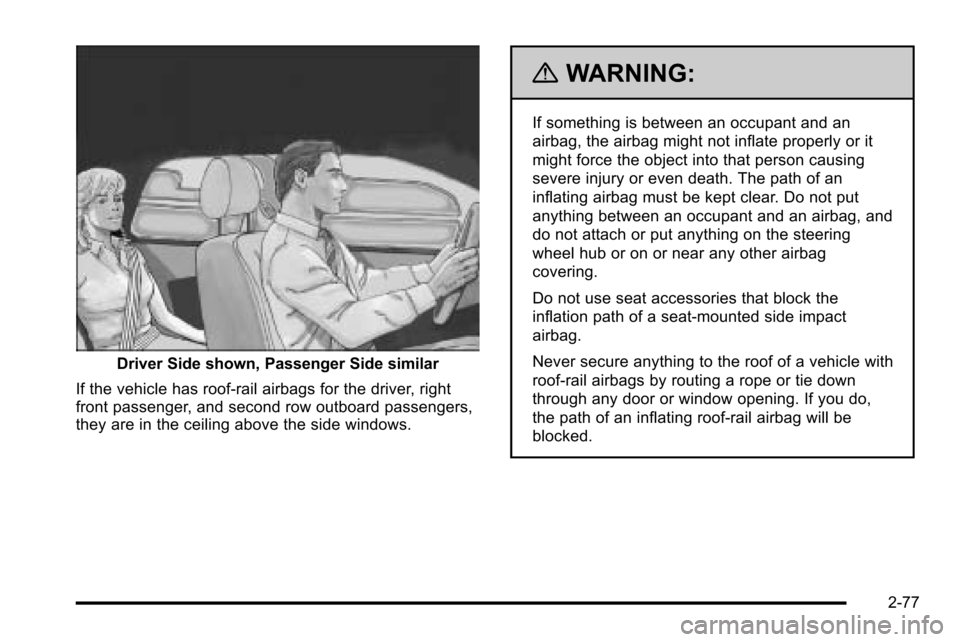
Driver Side shown, Passenger Side similar
If the vehicle has roof-rail airbags for the driver, right
front passenger, and second row outboard passengers,
they are in the ceiling above the side windows.
{WARNING:
If something is between an occupant and an
airbag, the airbag might not inflate properly or it
might force the object into that person causing
severe injury or even death. The path of an
inflating airbag must be kept clear. Do not put
anything between an occupant and an airbag, and
do not attach or put anything on the steering
wheel hub or on or near any other airbag
covering.
Do not use seat accessories that block the
inflation path of a seat-mounted side impact
airbag.
Never secure anything to the roof of a vehicle with
roof-rail airbags by routing a rope or tie down
through any door or window opening. If you do,
the path of an inflating roof-rail airbag will be
blocked.
2-77
Page 121 of 626
Vehicles with dual stage airbags also have a driver's
seat position sensor which enables the sensing system
to monitor the position of the driver seat (all models).
The seat position sensor provides information that is
used to determine if the airbags should deploy at a
reduced level or at full deployment.
The vehicle may or may not have seat‐mounted side
impact and roof-rail airbags. SeeAirbag System
on
page 2‑73. Seat‐mounted side impact and roof-rail
airbags are intended to inflate in moderate to severe
side crashes. In addition, these roof-rail airbags are
intended to inflate during a rollover or in a severe frontal
impact. Seat‐mounted side impact and roof-rail airbags
will inflate if the crash severity is above the system's
designed threshold level. The threshold level can vary
with specific vehicle design.
Roof-rail airbags are not intended to inflate in rear
impacts. A seat‐mounted side impact airbag is intended
to deploy on the side of the vehicle that is struck. Both
roof-rail airbags will deploy when either side of the
vehicle is struck, or if the sensing system predicts that
the vehicle is about to roll over, or in a severe frontal
impact. In any particular crash, no one can say whether an
airbag should have inflated simply because of the
damage to a vehicle or because of what the repair costs
were. For frontal airbags, inflation is determined by what
the vehicle hits, the angle of the impact, and how
quickly the vehicle slows down. For seat‐mounted side
impact and roof-rail airbags, deployment is determined
by the location and severity of the side impact. In a
rollover event, roof-rail airbag deployment is determined
by the direction of the roll.
What Makes an Airbag Inflate?
In a deployment event, the sensing system sends an
electrical signal triggering a release of gas from the
inflator. Gas from the inflator fills the airbag causing the
bag to break out of the cover and deploy. The inflator,
the airbag, and related hardware are all part of the
airbag module.
Frontal airbag modules are located inside the steering
wheel and instrument panel. For vehicles with seat‐
mounted side impact airbags, there are airbags
modules in the side of the front seatbacks closest to the
door. For vehicles with roof-rail airbags, there are airbag
modules in the ceiling of the vehicle, near the side
windows that have occupant seating positions.
2-79
Page 122 of 626
How Does an Airbag Restrain?
In moderate to severe frontal or near frontal collisions,
even belted occupants can contact the steering wheel
or the instrument panel. In moderate to severe side
collisions, even belted occupants can contact the inside
of the vehicle.
Airbags supplement the protection provided by safety
belts. Frontal airbags distribute the force of the impact
more evenly over the occupant's upper body, stopping
the occupant more gradually. Seat‐mounted side impact
and roof-rail airbags distribute the force of the impact
more evenly over the occupant's upper body.
Rollover capable roof-rail airbags are designed to help
contain the head and chest of occupants in the
outboard seating positions in the first and second rows.
The rollover capable roof-rail airbags are designed to
help reduce the risk of full or partial ejection in rollover
events, although no system can prevent all such
ejections.
But airbags would not help in many types of collisions,
primarily because the occupant's motion is not toward
those airbags. SeeWhen Should an Airbag Inflate?
on
page 2‑78for more information.
Airbags should never be regarded as anything more
than a supplement to safety belts.
What Will You See After an Airbag
Inflates?
After the frontal airbags and seat-mounted side impact
airbags inflate, they quickly deflate, so quickly that
some people may not even realize an airbag inflated.
Roof-rail airbags may still be at least partially inflated for
some time after they deploy. Some components of the
airbag module may be hot for several minutes. For
location of the airbag modules, see What Makes an
Airbag Inflate? on page 2‑79.
The parts of the airbag that come into contact with you
may be warm, but not too hot to touch. There may be
some smoke and dust coming from the vents in the
deflated airbags. Airbag inflation does not prevent the
driver from seeing out of the windshield or being able to
steer the vehicle, nor does it prevent people from
leaving the vehicle.
2-80
Page 135 of 626
deployment of the passenger airbag(s) or prevent
the passenger sensing system from properly turning
off the passenger airbag(s). SeePassenger Sensing
System on page 2‑86.
If you have any questions about this, you should
contact Customer Assistance before you modify
your vehicle. The phone numbers and addresses for
Customer Assistance are in Step Two of the
Customer Satisfaction Procedure in this manual.
See Customer Satisfaction Procedure on page 8‑2.
If the vehicle has rollover roof-rail airbags, see
Different Size Tires and Wheels
on page 6‑85for
additional important information.
Q: What if I added a snow plow? Will it keep the airbags from working properly?
A: We have designed our airbag systems to work
properly under a wide range of conditions, including
snow plowing with vehicles that have the optional
Snow Plow Prep Package (RPO VYU). But do not
change or defeat the snow plow's “tripping
mechanism.” If you do, it can damage your snow
plow and your vehicle, and it may cause an airbag
inflation. Q: Because I have a disability, I have to get my
vehicle modified. How can I find out whether this
will affect my airbag system?
A: If you have questions, call Customer Assistance.
The phone numbers and addresses for Customer
Assistance are in Step Two of the Customer
Satisfaction Procedure in this manual. See
Customer Satisfaction Procedure on page 8‑2.
In addition, your dealer and the service manual have
information about the location of the airbag sensors,
sensing and diagnostic module and airbag wiring.
2-93
Page 258 of 626
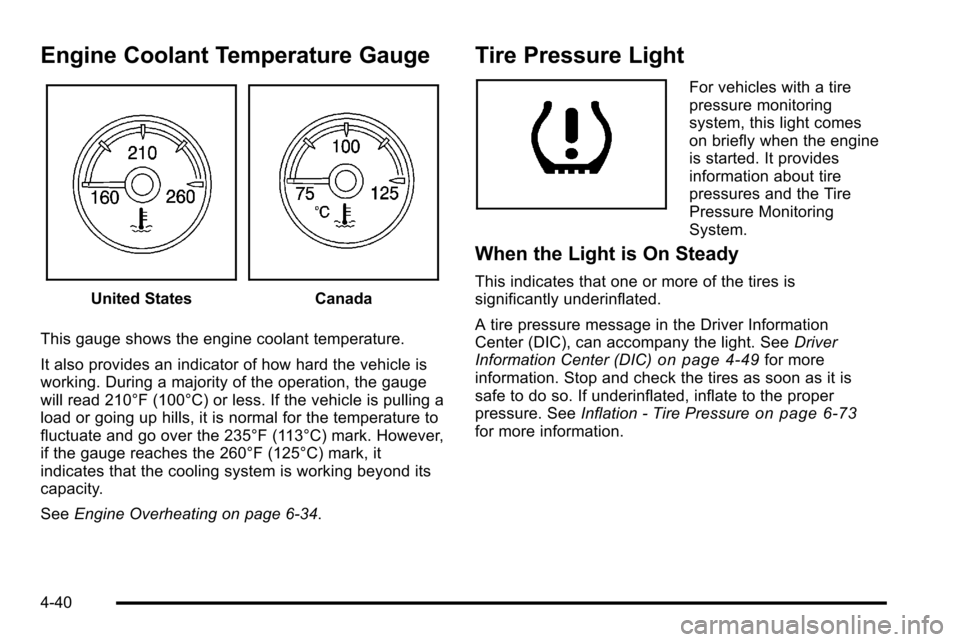
Engine Coolant Temperature Gauge
United StatesCanada
This gauge shows the engine coolant temperature.
It also provides an indicator of how hard the vehicle is
working. During a majority of the operation, the gauge
will read 210°F (100°C) or less. If the vehicle is pulling a
load or going up hills, it is normal for the temperature to
fluctuate and go over the 235°F (113°C) mark. However,
if the gauge reaches the 260°F (125°C) mark, it
indicates that the cooling system is working beyond its
capacity.
See Engine Overheating on page 6‑34.
Tire Pressure Light
For vehicles with a tire
pressure monitoring
system, this light comes
on briefly when the engine
is started. It provides
information about tire
pressures and the Tire
Pressure Monitoring
System.
When the Light is On Steady
This indicates that one or more of the tires is
significantly underinflated.
A tire pressure message in the Driver Information
Center (DIC), can accompany the light. See Driver
Information Center (DIC)
on page 4‑49for more
information. Stop and check the tires as soon as it is
safe to do so. If underinflated, inflate to the proper
pressure. See Inflation - Tire Pressure
on page 6‑73for more information.
4-40
Page 271 of 626
Vehicle Information Menu Items
T
(Vehicle Information):Press this button to scroll
through the following menu items:
Oil Life
Press the vehicle information button until OIL LIFE
REMAINING displays. This display shows an estimate
of the oil's remaining useful life. If you see 99% OIL
LIFE REMAINING on the display, that means 99% of
the current oil life remains. The engine oil life system
will alert you to change the oil on a schedule consistent
with your driving conditions.
When the remaining oil life is low, the CHANGE
ENGINE OIL SOON message will appear on the
display. See “CHANGE ENGINE OIL SOON” underDIC
Warnings and Messages
on page 4‑63. You should
change the oil as soon as you can. See Engine Oilon
page 6‑18. In addition to the engine oil life system
monitoring the oil life, additional maintenance is
recommended in the Maintenance Schedule in this
manual. See Scheduled Maintenance
on page 7‑3for
more information.
Remember, you must reset the OIL LIFE display
yourself after each oil change. It will not reset itself.
Also, be careful not to reset the OIL LIFE display
accidentally at any time other than when the oil has just been changed. It cannot be reset accurately until the
next oil change. To reset the engine oil life system, see
Engine Oil Life System on page 6‑20.
Units
Press the vehicle information button until UNITS
displays. This display allows you to select between
English or Metric units of measurement. Once in this
display, press the set/reset button to select between
ENGLISH or METRIC units. All of the vehicle
information will then be displayed in the unit of
measurement selected.
Tire Pressure
If your vehicle has the Tire Pressure Monitor System
(TPMS), the pressure for each tire can be viewed in the
DIC. The tire pressure will be shown in either pounds
per square inch (psi) or kilopascals (kPa). Press the
vehicle information button until the DIC displays FRONT
TIRES PSI (kPa) LEFT ## RIGHT ##. Press the vehicle
information button again until the DIC displays REAR
TIRES PSI (kPa) LEFT ## RIGHT ##.
If a low tire pressure condition is detected by the
system while driving, a message advising you to add
pressure in a specific tire will appear in the display. See
Inflation - Tire Pressure
on page 6‑73and
DIC
Warnings and Messageson page 4‑63for more
information.
4-53
Page 289 of 626
TIRE LEARNING ACTIVE
If your vehicle has the Tire Pressure Monitor System
(TPMS), this message displays when the system is
re-learning the tire positions on your vehicle. See“DIC
Operation and Displays (Without DIC Buttons)” earlier in
this section for more information. The tire positions must
be re-learned after rotating the tires or after replacing a
tire or sensor. See Tire Inspection and Rotation
on
page 6‑80, Tire Pressure Monitor Systemon
page 6‑75, and Inflation - Tire Pressureon page 6‑73for more information.
TIRE LOW ADD AIR TO TIRE
If your vehicle has the Tire Pressure Monitor System
(TPMS), this message displays when the pressure in
one or more of the vehicle's tires is low. This message
also displays LEFT FRT (left front), RIGHT FRT (right
front), LEFT RR (left rear), or RIGHT RR (right rear) to
indicate the location of the low tire. The low tire
pressure warning light will also come on. See Tire
Pressure Light
on page 4‑40. You can receive more than one tire pressure message at a time. To read the
other messages that may have been sent at the same
time, press the set/reset button or the trip odometer
reset stem. If a tire pressure message appears on the
DIC, stop as soon as you can. Have the tire pressures
checked and set to those shown on the Tire Loading
Information label. See
Tires
on page 6‑64,Loading the
Vehicleon page 5‑29, and Inflation - Tire Pressureon
page 6‑73. The DIC also shows the tire pressure
values. See “DIC Operation and Displays (With DIC
Buttons)” earlier in this section.
TRACTION CONTROL OFF
If your vehicle has StabiliTrak, this message displays
when the Traction Control System (TCS) is turned off.
Adjust your driving accordingly. See StabiliTrak
®
Systemon page 5‑6for more information.
4-71
Page 396 of 626
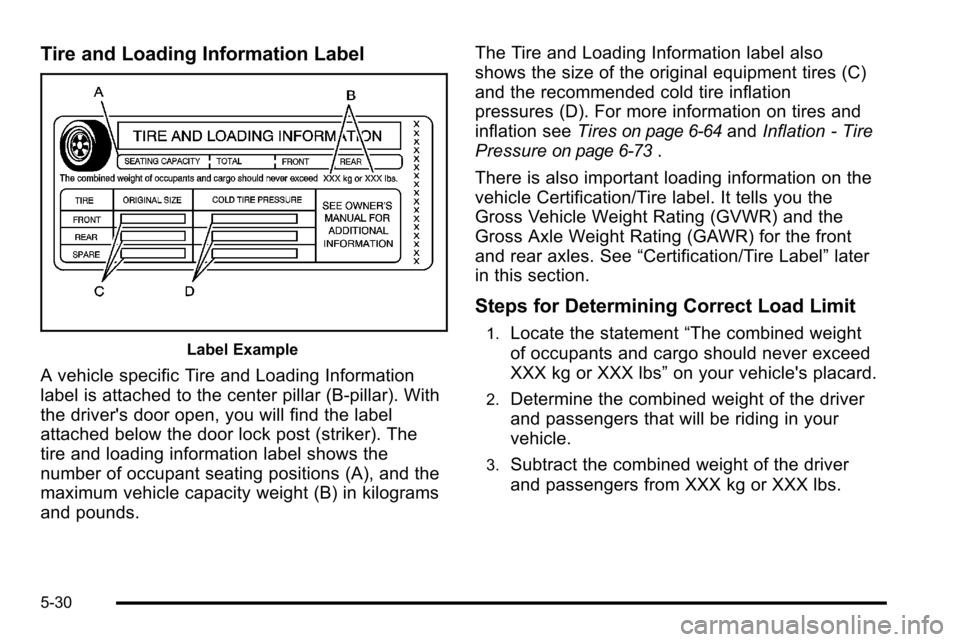
Tire and Loading Information Label
Label Example
A vehicle specific Tire and Loading Information
label is attached to the center pillar (B-pillar). With
the driver's door open, you will find the label
attached below the door lock post (striker). The
tire and loading information label shows the
number of occupant seating positions (A), and the
maximum vehicle capacity weight (B) in kilograms
and pounds.The Tire and Loading Information label also
shows the size of the original equipment tires (C)
and the recommended cold tire inflation
pressures (D). For more information on tires and
inflation see
Tires
on page 6‑64andInflation - Tire
Pressure
on page 6‑73.
There is also important loading information on the
vehicle Certification/Tire label. It tells you the
Gross Vehicle Weight Rating (GVWR) and the
Gross Axle Weight Rating (GAWR) for the front
and rear axles. See “Certification/Tire Label” later
in this section.
Steps for Determining Correct Load Limit
1.Locate the statement “The combined weight
of occupants and cargo should never exceed
XXX kg or XXX lbs” on your vehicle's placard.
2.Determine the combined weight of the driver
and passengers that will be riding in your
vehicle.
3.Subtract the combined weight of the driver
and passengers from XXX kg or XXX lbs.
5-30
Page 399 of 626
Refer to your vehicle's tire and loading information
label for specific information about your vehicle's
capacity weight and seating positions. The
combined weight of the driver, passengers, and
cargo should never exceed your vehicle's capacity
weight.
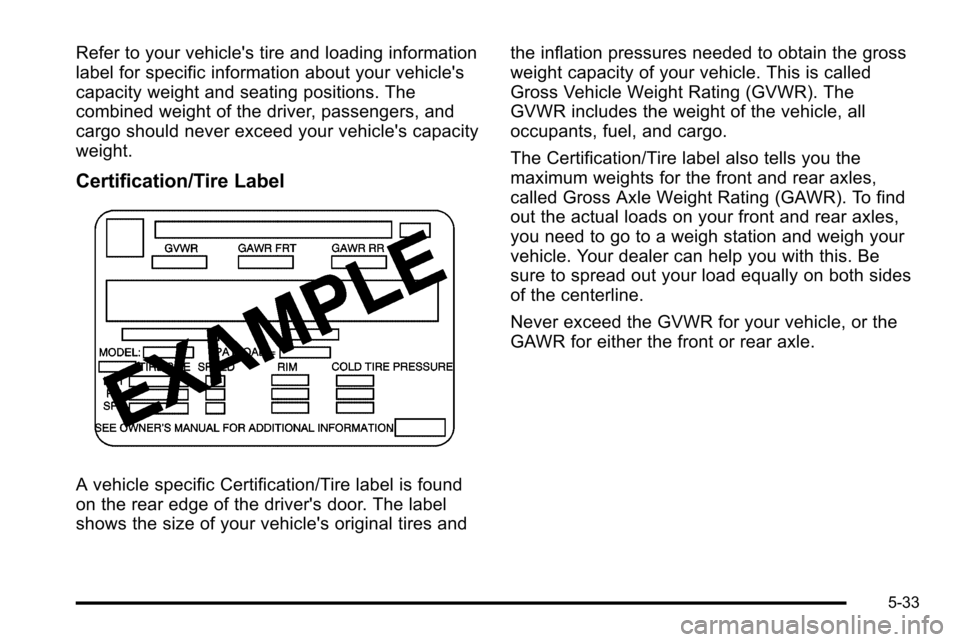
Certification/Tire Label
A vehicle specific Certification/Tire label is found
on the rear edge of the driver's door. The label
shows the size of your vehicle's original tires andthe inflation pressures needed to obtain the gross
weight capacity of your vehicle. This is called
Gross Vehicle Weight Rating (GVWR). The
GVWR includes the weight of the vehicle, all
occupants, fuel, and cargo.
The Certification/Tire label also tells you the
maximum weights for the front and rear axles,
called Gross Axle Weight Rating (GAWR). To find
out the actual loads on your front and rear axles,
you need to go to a weigh station and weigh your
vehicle. Your dealer can help you with this. Be
sure to spread out your load equally on both sides
of the centerline.
Never exceed the GVWR for your vehicle, or the
GAWR for either the front or rear axle.
5-33
Page 428 of 626
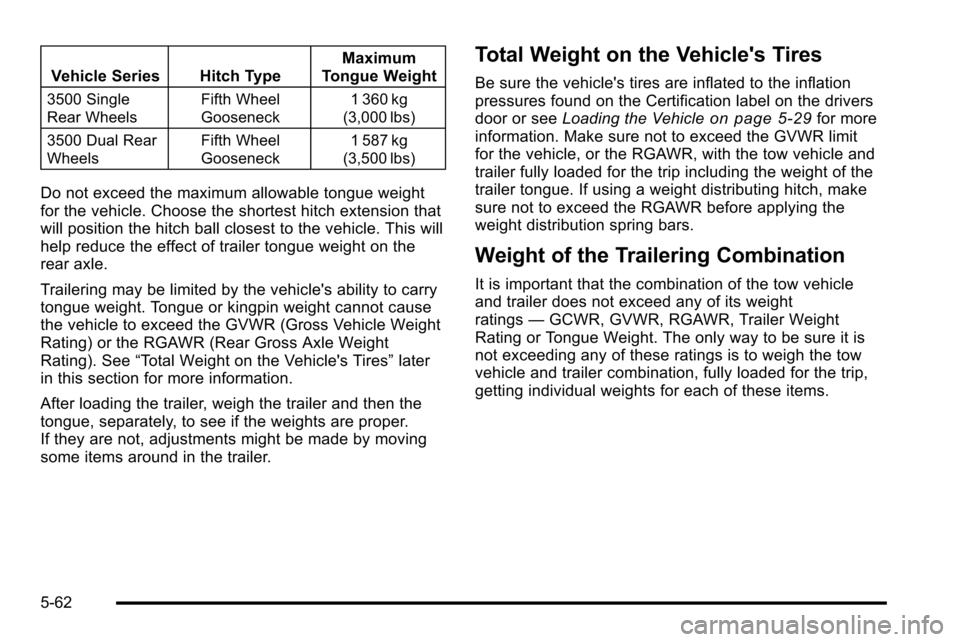
Vehicle Series Hitch TypeMaximum
Tongue Weight
3500 Single
Rear Wheels Fifth Wheel
Gooseneck1 360 kg
(3,000 lbs)
3500 Dual Rear
Wheels Fifth Wheel
Gooseneck1 587 kg
(3,500 lbs)
Do not exceed the maximum allowable tongue weight
for the vehicle. Choose the shortest hitch extension that
will position the hitch ball closest to the vehicle. This will
help reduce the effect of trailer tongue weight on the
rear axle.
Trailering may be limited by the vehicle's ability to carry
tongue weight. Tongue or kingpin weight cannot cause
the vehicle to exceed the GVWR (Gross Vehicle Weight
Rating) or the RGAWR (Rear Gross Axle Weight
Rating). See “Total Weight on the Vehicle's Tires” later
in this section for more information.
After loading the trailer, weigh the trailer and then the
tongue, separately, to see if the weights are proper.
If they are not, adjustments might be made by moving
some items around in the trailer.
Total Weight on the Vehicle's Tires
Be sure the vehicle's tires are inflated to the inflation
pressures found on the Certification label on the drivers
door or see Loading the Vehicle
on page 5‑29for more
information. Make sure not to exceed the GVWR limit
for the vehicle, or the RGAWR, with the tow vehicle and
trailer fully loaded for the trip including the weight of the
trailer tongue. If using a weight distributing hitch, make
sure not to exceed the RGAWR before applying the
weight distribution spring bars.
Weight of the Trailering Combination
It is important that the combination of the tow vehicle
and trailer does not exceed any of its weight
ratings —GCWR, GVWR, RGAWR, Trailer Weight
Rating or Tongue Weight. The only way to be sure it is
not exceeding any of these ratings is to weigh the tow
vehicle and trailer combination, fully loaded for the trip,
getting individual weights for each of these items.
5-62