check transmission fluid CHEVROLET SILVERADO 2013 2.G Owners Manual
[x] Cancel search | Manufacturer: CHEVROLET, Model Year: 2013, Model line: SILVERADO, Model: CHEVROLET SILVERADO 2013 2.GPages: 542, PDF Size: 7.91 MB
Page 175 of 542
Black plate (45,1)Chevrolet Silverado Owner Manual - 2013 - crc2 - 8/13/12
Instruments and Controls 5-45
GRADE BRAKING ON
This message displays when the
grade braking has been activated
while driving on downhill grades.
This message will only appear the
first time the feature is activated in
an ignition cycle. SeeTow/Haul
Mode on page 9‑38, Automatic
Transmission on page 9‑33, and
Cruise Control on page 9‑59.
SERVICE 4 WHEEL DRIVE
If the vehicle has four-wheel drive,
this message may display if a
problem occurs with the
four-wheel-drive system. If this
message appears, stop as soon as
possible and turn off the vehicle.
Make sure the key is in the LOCK/
OFF position for at least one minute
and then restart the vehicle and
check for the message on the DIC
display. If the message is still
displayed or appears again when
you begin driving, the
four-wheel-drive system needs
service. See your dealer.
TRANSMISSION HOT IDLE
ENGINE
Notice: Do not drive the vehicle
while the transmission fluid is
overheating and the transmission
temperature warning is displayed
on the instrument cluster and/or
DIC, or the transmission can be
damaged. This could lead to
costly repairs that would not be
covered by the warranty.
This message displays and a chime
may sound if the transmission fluid
in the vehicle gets hot. Driving with
the transmission fluid temperature
high can cause damage to the
vehicle. Stop the vehicle and let it
idle to allow the transmission to
cool. This message clears and the
chime stops when the fluid
temperature reaches a safe level.
Vehicle Reminder
Messages
CHECK TRAILER WIRING
On vehicles with the Integrated
Trailer Brake Control (ITBC) system,
this message may display and a
chime may sound when one of the
following conditions exists:
.A trailer with electric brakes
becomes disconnected from the
vehicle.
‐ If the disconnect occurs while
the vehicle is stopped, this
message clears itself after a
short time.
‐ If the disconnect occurs while
the vehicle is moving, this
message stays on until the
ignition is turned off.
.There is a short in the wiring to
the electric trailer brakes.
When this message displays, power
is no longer available to the trailer
brakes.
Page 279 of 542
Black plate (11,1)Chevrolet Silverado Owner Manual - 2013 - crc2 - 8/13/12
Driving and Operating 9-11
WARNING (Continued)
happens, you and other vehicle
occupants could drown. Do not
ignore police warnings and be
very cautious about trying to drive
through flowing water.
Hydroplaning
Hydroplaning is dangerous. Water
can build up under the vehicle's
tires so they actually ride on the
water. This can happen if the road is
wet enough and you are going fast
enough. When the vehicle is
hydroplaning, it has little or no
contact with the road.
There is no hard and fast rule about
hydroplaning. The best advice is to
slow down when the road is wet.
Other Rainy Weather Tips
Besides slowing down, other wet
weather driving tips include:
.Allow extra following distance.
.Pass with caution.
.Keep windshield wiping
equipment in good shape.
.Keep the windshield washer fluid
reservoir filled.
.Have good tires with proper
tread depth. SeeTires on
page 10‑47.
.Turn off cruise control.
Highway Hypnosis
Always be alert and pay attention to
your surroundings while driving.
If you become tired or sleepy, find a
safe place to park the vehicle
and rest.
Other driving tips include:
.Keep the vehicle well ventilated.
.Keep the interior
temperature cool.
.Keep your eyes moving —scan
the road ahead and to the sides.
.Check the rearview mirror and
vehicle instruments often.
Hill and Mountain Roads
Driving on steep hills or through
mountains is different than driving
on flat or rolling terrain. Tips for
driving in these conditions include:
.Keep the vehicle serviced and in
good shape.
.Check all fluid levels and brakes,
tires, cooling system, and
transmission.
.Shift to a lower gear when going
down steep or long hills.
{WARNING
If you do not shift down, the
brakes could get so hot that they
would not work well. You would
then have poor braking or even
none going down a hill. You could
crash. Shift down to let the engine
assist the brakes on a steep
downhill slope.
Page 345 of 542
Black plate (77,1)Chevrolet Silverado Owner Manual - 2013 - crc2 - 8/13/12
Driving and Operating 9-77
WARNING (Continued)
wrong, the rig could start to move.
People can be injured, and both
the vehicle and the trailer can be
damaged. When possible, always
park the rig on a flat surface.
If parking the rig on a hill:
1. Press the brake pedal, but do not shift into P (Park) yet. Turn
the wheels into the curb if facing
downhill or into traffic if facing
uphill.
2. Have someone place chocks under the trailer wheels.
3. When the wheel chocks are in place, release the regular brakes
until the chocks absorb the load.
4. Reapply the brake pedal. Then apply the parking brake and shift
into P (Park).
5. Release the brake pedal.
Leaving After Parking on a Hill
1. Apply and hold the brake pedal.
2. Start the engine.
3. Shift into a gear.
4. Release the parking brake.
5. Let up on the brake pedal.
6. Drive slowly until the trailer is clear of the chocks.
7. Stop and have someone pick up and store the chocks.
Maintenance when Trailer
Towing
The vehicle needs service more
often when pulling a trailer. See
Maintenance Schedule on
page 11‑3. Things that are
especially important in trailer
operation are automatic
transmission fluid, engine oil, axle
lubricant, belts, cooling system, and
brake system. It is a good idea to
inspect these before and during
the trip. Check periodically to see that all
hitch nuts and bolts are tight.
Trailer Towing
If the vehicle has a diesel engine,
see the Duramax diesel supplement
for more information.
If the vehicle is a hybrid, see the
hybrid supplement for more
information.
If the vehicle is bi-fuel, see the
bi-fuel supplement for more
information.
Do not tow a trailer during break-in.
See
New Vehicle Break-In on
page 9‑23 for more information.
{WARNING
The driver can lose control when
pulling a trailer if the correct
equipment is not used or the
vehicle is not driven properly. For
example, if the trailer is too
heavy, the brakes may not work
(Continued)
Page 377 of 542
Black plate (1,1)Chevrolet Silverado Owner Manual - 2013 - crc2 - 8/13/12
Vehicle Care 10-1
Vehicle Care
General Information
General Information . . . . . . . . . . 10-2
California Proposition65 Warning . . . . . . . . . . . . . . . . . 10-2
California Perchlorate Materials Requirements . . . . 10-3
Accessories and Modifications . . . . . . . . . . . . . . . 10-3
Vehicle Checks
Doing Your OwnService Work . . . . . . . . . . . . . . . 10-3
Hood . . . . . . . . . . . . . . . . . . . . . . . . 10-4
Engine Compartment Overview . . . . . . . . . . . . . . . . . . . 10-5
Engine Oil . . . . . . . . . . . . . . . . . . . 10-6
Engine Oil Life System . . . . . . 10-9
Automatic Transmission Fluid (4-Speed
Transmission) . . . . . . . . . . . . . 10-10
Automatic Transmission Fluid (6-Speed
Transmission) . . . . . . . . . . . . . 10-12
Manual Transmission Fluid . . . . . . . . . . . . . . . . . . . . . . 10-15
Hydraulic Clutch . . . . . . . . . . . . 10-15 Engine Air Cleaner/Filter . . . . 10-16
Cooling System . . . . . . . . . . . . 10-17
Engine Coolant . . . . . . . . . . . . . 10-18
Engine Overheating . . . . . . . . 10-21
Overheated Engine
Protection
Operating Mode . . . . . . . . . . . 10-23
Engine Fan . . . . . . . . . . . . . . . . . 10-23
Power Steering Fluid . . . . . . . 10-24
Washer Fluid . . . . . . . . . . . . . . . 10-24
Brakes . . . . . . . . . . . . . . . . . . . . . 10-25
Brake Fluid . . . . . . . . . . . . . . . . . 10-26
Battery . . . . . . . . . . . . . . . . . . . . . 10-28
Four-Wheel Drive . . . . . . . . . . . 10-29
Front Axle . . . . . . . . . . . . . . . . . . 10-30
Rear Axle . . . . . . . . . . . . . . . . . . 10-31
Noise Control System . . . . . . 10-32
Starter Switch Check . . . . . . . 10-33
Automatic Transmission Shift Lock Control Function
Check . . . . . . . . . . . . . . . . . . . . . 10-33
Ignition Transmission Lock Check . . . . . . . . . . . . . . . . . . . . . 10-34
Park Brake and P (Park) Mechanism Check . . . . . . . . 10-34
Wiper Blade Replacement . . . . . . . . . . . . . . 10-35
Glass Replacement . . . . . . . . 10-35
Headlamp Aiming
Headlamp Aiming . . . . . . . . . . 10-35
Bulb Replacement
Bulb Replacement . . . . . . . . . . 10-36
Halogen Bulbs . . . . . . . . . . . . . . 10-36
Headlamps, Front Turn Signal, Sidemarker, and
Parking Lamps . . . . . . . . . . . . 10-36
Pick-Up Box Identification and Fender Marker
Lamps . . . . . . . . . . . . . . . . . . . . 10-37
Taillamps (Chassis Cab Models) . . . . . . . . . . . . . . . . . . . 10-37
Taillamps, Turn Signal, Stoplamps, and Back-Up
Lamps . . . . . . . . . . . . . . . . . . . . 10-37
Center High-Mounted
Stoplamp (CHMSL) and
Cargo Lamp . . . . . . . . . . . . . . 10-38
License Plate Lamp . . . . . . . . 10-39
Replacement Bulbs . . . . . . . . . 10-39
Page 382 of 542
Black plate (6,1)Chevrolet Silverado Owner Manual - 2013 - crc2 - 8/13/12
10-6 Vehicle Care
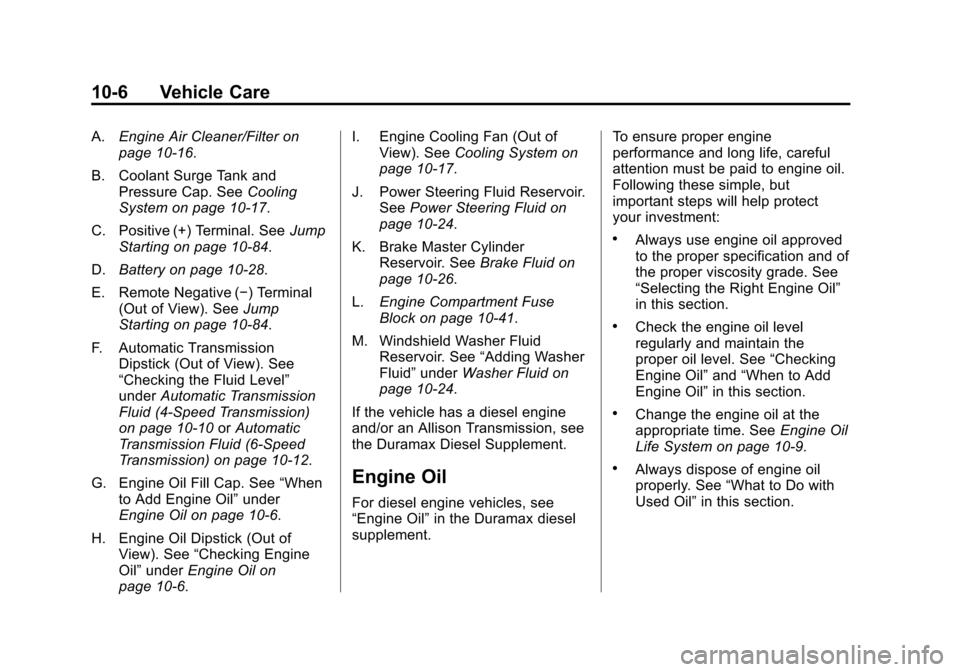
A.Engine Air Cleaner/Filter on
page 10‑16.
B. Coolant Surge Tank and Pressure Cap. See Cooling
System on page 10‑17.
C. Positive (+) Terminal. See Jump
Starting on page 10‑84.
D. Battery on page 10‑28.
E. Remote Negative (−) Terminal (Out of View). See Jump
Starting on page 10‑84.
F. Automatic Transmission Dipstick (Out of View). See
“Checking the Fluid Level”
under Automatic Transmission
Fluid (4-Speed Transmission)
on page 10‑10 orAutomatic
Transmission Fluid (6-Speed
Transmission) on page 10‑12.
G. Engine Oil Fill Cap. See “When
to Add Engine Oil” under
Engine Oil on page 10‑6.
H. Engine Oil Dipstick (Out of View). See “Checking Engine
Oil” under Engine Oil on
page 10‑6. I. Engine Cooling Fan (Out of
View). See Cooling System on
page 10‑17.
J. Power Steering Fluid Reservoir. See Power Steering Fluid on
page 10‑24.
K. Brake Master Cylinder Reservoir. See Brake Fluid on
page 10‑26.
L. Engine Compartment Fuse
Block on page 10‑41.
M. Windshield Washer Fluid Reservoir. See “Adding Washer
Fluid” under Washer Fluid on
page 10‑24.
If the vehicle has a diesel engine
and/or an Allison Transmission, see
the Duramax Diesel Supplement.
Engine Oil
For diesel engine vehicles, see
“Engine Oil” in the Duramax diesel
supplement. To ensure proper engine
performance and long life, careful
attention must be paid to engine oil.
Following these simple, but
important steps will help protect
your investment:
.Always use engine oil approved
to the proper specification and of
the proper viscosity grade. See
“Selecting the Right Engine Oil”
in this section.
.Check the engine oil level
regularly and maintain the
proper oil level. See
“Checking
Engine Oil” and“When to Add
Engine Oil” in this section.
.Change the engine oil at the
appropriate time. See Engine Oil
Life System on page 10‑9.
.Always dispose of engine oil
properly. See “What to Do with
Used Oil” in this section.
Page 386 of 542
Black plate (10,1)Chevrolet Silverado Owner Manual - 2013 - crc2 - 8/13/12
10-10 Vehicle Care
On all vehicles, the Engine Oil Life
System can be reset as follows:
1. Turn the ignition to ON/RUN withthe engine off.
2. Fully press the accelerator pedal slowly three times within
five seconds.
3. Display the OIL LIFE REMAINING on the DIC. If the
display shows 100%, the system
is reset. See Driver Information
Center (DIC) on page 5‑29.
If the vehicle has a CHANGE
ENGINE OIL SOON message and it
comes back on when the vehicle is
started and/or the OIL LIFE
REMAINING is near 0%, the engine
oil life system has not been reset.
Repeat the procedure.Automatic Transmission
Fluid (4-Speed
Transmission)
When to Check and Change
Automatic Transmission Fluid
A good time to check the automatic
transmission fluid level is when the
engine oil is changed.
Change the fluid and filter at the
intervals listed in Maintenance
Schedule on page 11‑3 and be sure
to use the transmission fluid listed in
Recommended Fluids and
Lubricants on page 11‑12.
How to Check Automatic
Transmission Fluid
Because this operation can be a
little difficult, it may be best to have
this done at the dealer service
department.
If not taken to the dealer, be sure to
follow all the instructions here or a
false reading on the dipstick could
result. Notice:
Too much or too little
fluid can damage the
transmission. Too much can
mean that some of the fluid could
come out and fall on hot engine
parts or exhaust system parts,
starting a fire. Too little fluid
could cause the transmission to
overheat. Be sure to get an
accurate reading if checking the
transmission fluid.
Wait at least 30 minutes before
checking the transmission fluid level
if you have been driving:
.When outside temperatures are
above 32°C (90°F).
.At high speed for quite a while.
.In heavy traffic —especially in
hot weather.
.While pulling a trailer.
To get the right reading, the fluid
should be at normal operating
temperature, which is 82°C to 93°C
(180°F to 200°F).
Page 387 of 542
Black plate (11,1)Chevrolet Silverado Owner Manual - 2013 - crc2 - 8/13/12
Vehicle Care 10-11
Get the vehicle warmed up by
driving about 24 km (15 miles) when
outside temperatures are above
10°C (50°F). If it is colder than 10°C
(50°F), drive the vehicle in 3 (Third)
until the engine temperature gauge
moves and then remains steady for
10 minutes.
A cold fluid check can be made
after the vehicle has been sitting for
eight hours or more with the engine
off, but this is used only as a
reference. Let the engine run at idle
for five minutes if outside
temperatures are 10°C (50°F) or
more. If it is colder than 10°C
(50°F), the engine may have to idle
longer. Should the fluid level be low
during this cold check, the fluid must
be checked when hot before adding
fluid. Checking the fluid hot will give
you a more accurate reading of the
fluid level.
Checking the Fluid Level
Prepare the vehicle as follows:
1. Park the vehicle on a levelplace. Keep the engine running. 2. With the parking brake applied,
place the shift lever in P (Park).
3. With your foot on the brake pedal, move the shift lever
through each gear range,
pausing for about three seconds
in each range. Then, position the
shift lever in P (Park).
4. Let the engine run at idle for three minutes or more.
Then, without shutting off the
engine, follow these steps:
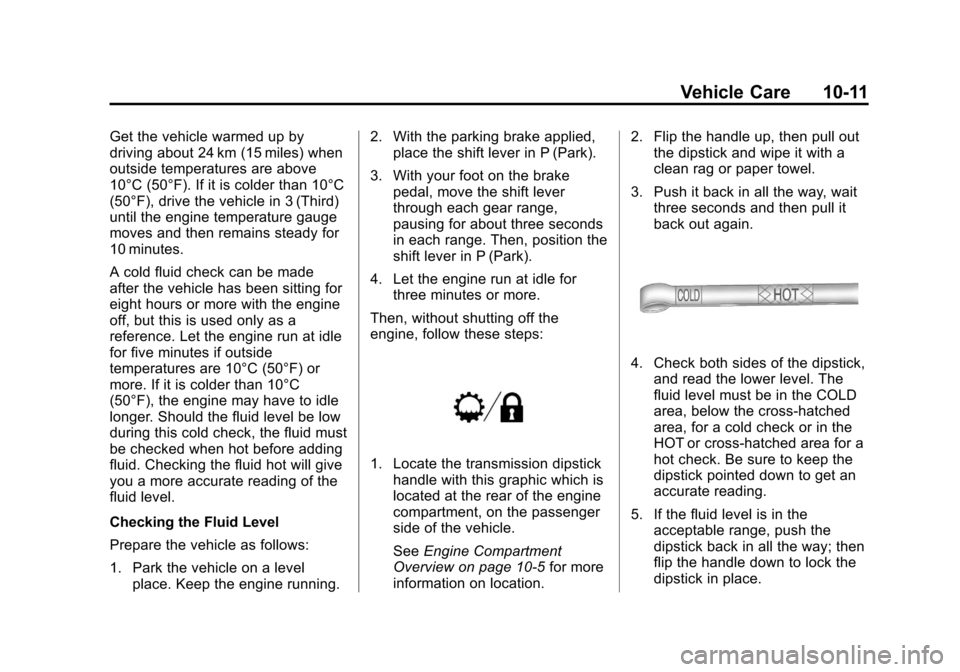
1. Locate the transmission dipstick handle with this graphic which is
located at the rear of the engine
compartment, on the passenger
side of the vehicle.
See Engine Compartment
Overview on page 10‑5 for more
information on location. 2. Flip the handle up, then pull out
the dipstick and wipe it with a
clean rag or paper towel.
3. Push it back in all the way, wait three seconds and then pull it
back out again.
4. Check both sides of the dipstick,and read the lower level. The
fluid level must be in the COLD
area, below the cross-hatched
area, for a cold check or in the
HOT or cross-hatched area for a
hot check. Be sure to keep the
dipstick pointed down to get an
accurate reading.
5. If the fluid level is in the acceptable range, push the
dipstick back in all the way; then
flip the handle down to lock the
dipstick in place.
Page 388 of 542
Black plate (12,1)Chevrolet Silverado Owner Manual - 2013 - crc2 - 8/13/12
10-12 Vehicle Care
Consistency of Readings
Always check the fluid level at least
twice using the procedure described
previously. Consistency (repeatable
readings) is important to maintaining
proper fluid level. If readings are still
inconsistent, contact the dealer.
How to Add Automatic
Transmission Fluid
Refer toRecommended Fluids and
Lubricants on page 11‑12 to
determine what kind of transmission
fluid to use.
Using a funnel, add fluid down the
transmission dipstick tube only after
checking the transmission fluid
while it is hot. A cold check is used
only as a reference. If the fluid level
is low, add only enough of the
proper fluid to bring the level up to
the HOT area for a hot check.
It does not take much fluid,
generally less than 0.5 Liter (1 Pint).
Do not overfill. Notice:
Use of the incorrect
automatic transmission fluid may
damage the vehicle, and the
damages may not be covered by
the vehicle warranty. Always use
the automatic transmission fluid
listed in Recommended Fluids
and Lubricants on page 11‑12.
.After adding fluid, recheck the
fluid level as described under
“How to Check Automatic
Transmission Fluid,” earlier in
this section.
.When the correct fluid level is
obtained, push the dipstick back
in all the way; then flip the
handle down to lock the dipstick
in place.
Automatic Transmission
Fluid (6-Speed
Transmission)
When to Check and Change
Automatic Transmission Fluid
It is usually not necessary to check
the transmission fluid level. The only
reason for fluid loss is a
transmission leak or overheated
transmission. If a small leak is
suspected, then use the following
checking procedures to check the
fluid level. However, if there is a
large leak, then it may be necessary
to have the vehicle towed to a
dealer service department and have
it repaired before driving the vehicle
further.
Notice: Use of the incorrect
automatic transmission fluid may
damage the vehicle, and the
damages may not be covered by
the vehicle warranty. Always use
the automatic transmission fluid
listed in Recommended Fluids
and Lubricants on page 11‑12.
Page 389 of 542
Black plate (13,1)Chevrolet Silverado Owner Manual - 2013 - crc2 - 8/13/12
Vehicle Care 10-13
Change the fluid and filter at the
scheduled maintenance intervals
listed inMaintenance Schedule on
page 11‑3. Be sure to use the
transmission fluid listed in
Recommended Fluids and
Lubricants on page 11‑12.
How to Check Automatic
Transmission Fluid
Notice: Too much or too little
fluid can damage the
transmission. Too much can
mean that some of the fluid could
come out and fall on hot engine
parts or exhaust system parts,
starting a fire. Too little fluid
could cause the transmission to
overheat. Be sure to get an
accurate reading if checking the
transmission fluid. Before checking the fluid level,
prepare the vehicle as follows:
1. Start the engine and park the
vehicle on a level surface. Keep
the engine running.
2. Apply the parking brake and place the shift lever in P (Park).
3. With your foot on the brake pedal, move the shift lever
through each gear range,
pausing for about three seconds
in each range. Then, move the
shift lever back to P (Park).
4. Allow the engine to idle (500 –
800 rpm) for at least 1 minute.
Slowly release the brake pedal.
5. Keep the engine running and press the Trip/Fuel button or trip
odometer reset stem until
TRANS TEMP (Transmission
Temperature) displays on the
Driver Information Center (DIC). 6. Using the TRANS TEMP
reading, determine and perform
the appropriate check
procedure. If the TRANS TEMP
reading is not within the required
temperature ranges, allow the
vehicle to cool, or operate the
vehicle until the appropriate
transmission fluid temperature is
reached.
Cold Check Procedure
Use this procedure only as a
reference to determine if the
transmission has enough fluid to be
operated safely until a hot check
procedure can be made. The hot
check procedure is the most
accurate method to check the fluid
level. Perform the hot check
procedure at the first opportunity.
Use this cold check procedure to
check fluid level when the
transmission temperature is
between 27°C and 32°C (80°F
and 90°F).
Page 390 of 542
Black plate (14,1)Chevrolet Silverado Owner Manual - 2013 - crc2 - 8/13/12
10-14 Vehicle Care
1. Locate the transmission dipstickat the rear of the engine
compartment, on the passenger
side of the vehicle.
See Engine Compartment
Overview on page 10‑5 for more
information.
2. Flip the handle up, then pull out the dipstick and wipe it with a
clean rag or paper towel.
3. Install the dipstick by pushing it back in all the way; wait
three seconds, and then pull it
back out again.
4. Check both sides of the dipstick and read the lower level. Repeat
the check procedure to verify the
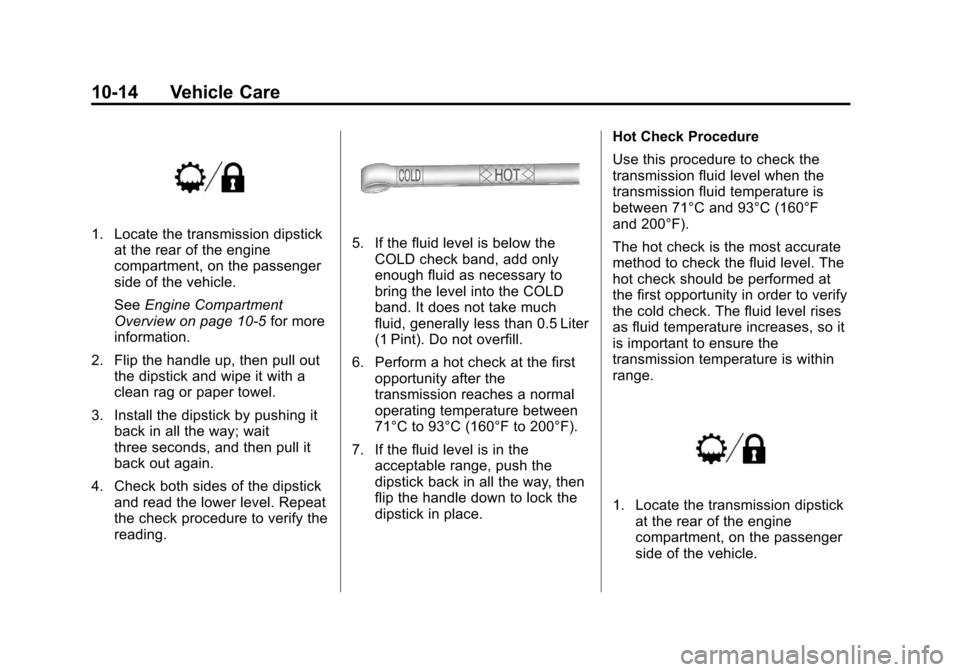
reading.5. If the fluid level is below theCOLD check band, add only
enough fluid as necessary to
bring the level into the COLD
band. It does not take much
fluid, generally less than 0.5 Liter
(1 Pint). Do not overfill.
6. Perform a hot check at the first opportunity after the
transmission reaches a normal
operating temperature between
71°C to 93°C (160°F to 200°F).
7. If the fluid level is in the acceptable range, push the
dipstick back in all the way, then
flip the handle down to lock the
dipstick in place. Hot Check Procedure
Use this procedure to check the
transmission fluid level when the
transmission fluid temperature is
between 71°C and 93°C (160°F
and 200°F).
The hot check is the most accurate
method to check the fluid level. The
hot check should be performed at
the first opportunity in order to verify
the cold check. The fluid level rises
as fluid temperature increases, so it
is important to ensure the
transmission temperature is within
range.
1. Locate the transmission dipstick
at the rear of the engine
compartment, on the passenger
side of the vehicle.