start stop button CHEVROLET SILVERADO 2013 2.G Owners Manual
[x] Cancel search | Manufacturer: CHEVROLET, Model Year: 2013, Model line: SILVERADO, Model: CHEVROLET SILVERADO 2013 2.GPages: 542, PDF Size: 7.91 MB
Page 38 of 542
Black plate (32,1)Chevrolet Silverado Owner Manual - 2013 - crc2 - 8/13/12
1-32 In Brief
The low tire pressure warning light
may come on in cool weather when
the vehicle is first started, and then
turn off as the vehicle is driven. This
may be an early indicator that the
tire pressures are getting low and
the tires need to be inflated to the
proper pressure.
The TPMS does not replace normal
monthly tire maintenance. Maintain
the correct tire pressures.
SeeTire Pressure Monitor System
on page 10‑58.
Engine Oil Life System
The engine oil life system calculates
engine oil life based on vehicle use
and, on most vehicles, displays a
DIC message when it is necessary
to change the engine oil and filter.
The oil life system should be reset
to 100% only following an oil
change. Resetting the Oil Life System
To reset the Engine Oil Life System
on most vehicles:
1. Display OIL LIFE REMAINING
on the DIC. If the vehicle does
not have DIC buttons, the
vehicle must be in P (Park) to
access this display.
2. Press and hold the SET/RESET button on the DIC, or the trip
odometer reset stem if the
vehicle does not have DIC
buttons, for more than
five seconds. The oil life will
change to 100%.
On all vehicles, the Engine Oil Life
System can be reset as follows:
1. Turn the ignition to ON/RUN with the engine off.
2. Fully press the accelerator pedal slowly three times within
five seconds.
3. Display OIL LIFE REMAINING on the DIC. If the display shows
100%, the system is reset. See
Engine Oil Life System on
page 10‑9.
Fuel E85 (85% Ethanol)
Vehicles that have a yellow fuel cap
can use either unleaded gasoline or
ethanol fuel containing up to 85%
ethanol (E85). See Fuel E85 (85%
Ethanol) on page 9‑71. For all other
vehicles, use only the unleaded
gasoline described under
Recommended Fuel on page 9‑69.
Driving for Better Fuel
Economy
Driving habits can affect fuel
mileage. Here are some driving tips
to get the best fuel economy
possible.
.Avoid fast starts and accelerate
smoothly.
.Brake gradually and avoid
abrupt stops.
.Avoid idling the engine for long
periods of time.
Page 45 of 542
Black plate (5,1)Chevrolet Silverado Owner Manual - 2013 - crc2 - 8/13/12
Keys, Doors, and Windows 2-5
During a remote start, if the vehicle
has an automatic climate control
system and heated seats, the
heated seats will turn on during
colder outside temperatures and will
shut off when the key is turned to
ON/RUN. If the vehicle does not
have an automatic climate control
system, during remote start,
manually turn the heated seats on
and off. SeeHeated and Ventilated
Front Seats on page 3‑9 for
additional information.
Laws in some communities may
restrict the use of remote starters.
For example, some laws may
require a person using the remote
start to have the vehicle in view
when doing so. Check local
regulations for any requirements on
remote starting of vehicles.
Do not use the remote start feature
if the vehicle is low on fuel. The
vehicle may run out of fuel.
The RKE transmitter range may be
less while the vehicle is running. There are other conditions which
can affect the performance of the
transmitter. See
Remote Keyless
Entry (RKE) System on page 2‑2 for
additional information.
/(Remote Start): This button will
be on the RKE transmitter if the
vehicle has remote start.
To start the vehicle using the remote
start feature:
1. Aim the RKE transmitter at the vehicle.
2. Press and release
Q.
3. Immediately press and hold
/
until the turn signal lamps flash.
If you cannot see the vehicle's
lamps, press and hold
/for at
least two seconds.
When the vehicle starts, the
parking lamps will turn on and
remain on while the vehicle is
running. The doors will be
locked and the climate control
system may come on. The engine will continue to run
for 10 minutes. Repeat the steps
for a 10-minute time extension.
Remote start can be extended
only once.
After entering the vehicle during a
remote start, insert and turn the key
to ON/RUN to drive the vehicle.
To cancel a remote start:
.Aim the RKE transmitter at the
vehicle and press and hold
/
until the parking lamps turn off.
.Turn on the hazard warning
flashers.
.Turn the ignition on and then
back off.
The vehicle can be remote started
two separate times between driving
sequences. The engine will run for
10 minutes after each remote start.
Or, you can extend the engine run
time by another 10 minutes within
the first 10 minute remote start time
frame, and before the engine stops.
Page 51 of 542
Black plate (11,1)Chevrolet Silverado Owner Manual - 2013 - crc2 - 8/13/12
Keys, Doors, and Windows 2-11
To arm the theft-deterrent system:
1. Open the door.
2. Lock the door with the RemoteKeyless Entry (RKE) transmitter.
The security light should flash.
If the delayed locking feature is
active, the alarm will not be
activated until all doors are
closed and the security light
goes off.
3. Close all doors. The security light will stop flashing and go off
after approximately 30 seconds.
The system is armed when the
security light goes off.
If a locked driver door is opened
without using the RKE transmitter, a
10 second pre-alarm will occur. The
horn will chirp and the lights will
flash. If the key is not placed in the
ignition and turned to START or the
door is not unlocked by pressing the
unlock button on the RKE
transmitter during the 10 second
pre-alarm, the alarm will go off. The
vehicle's headlamps will flash and the horn will sound for about
30 seconds, then will turn off to save
the battery power.
The theft-deterrent system will not
activate if the doors are locked with
the key or the manual door lock.
It activates only if you use the
power door lock switch or the RKE
transmitter. The vehicle can be
started with the correct key if the
alarm is set off.
To avoid setting off the alarm by
accident:
.If you do not want to activate the
theft-deterrent system, the
vehicle should be locked with
the door key after the doors are
closed.
.Always unlock a door with the
RKE transmitter.
If the alarm is set off, press unlock
on the RKE transmitter or place the
key in the ignition and turn it to
START.
Testing the Alarm
To test the alarm:
1. Lower the driver window and open the driver door.
2. Press lock on the RKE transmitter.
3. Close the door and wait for the security light to go out.
4. Reach in through the window, unlock the door with the manual
door lock, and open the door.
This should set off the alarm.
If the alarm does not sound when it
should but the headlamps flash,
check to see if the horn works. The
horn fuse may be blown. To replace
the fuse, see Fuses and Circuit
Breakers on page 10‑40.
If the alarm does not sound or the
headlamps do not flash, see your
dealer for service.
Page 77 of 542
Black plate (15,1)Chevrolet Silverado Owner Manual - 2013 - crc2 - 8/13/12
Seats and Restraints 3-15
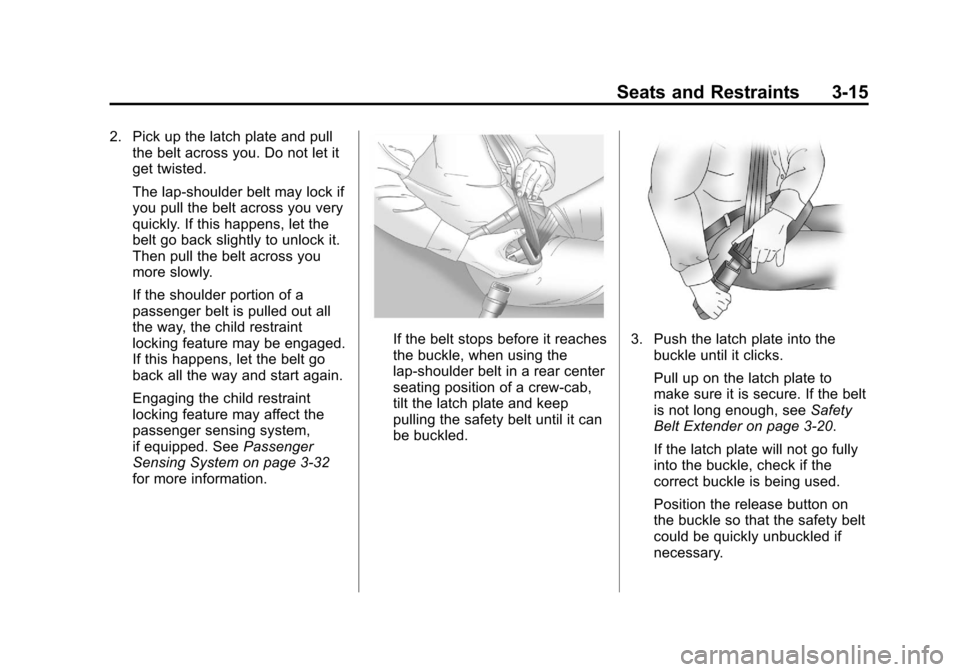
2. Pick up the latch plate and pullthe belt across you. Do not let it
get twisted.
The lap-shoulder belt may lock if
you pull the belt across you very
quickly. If this happens, let the
belt go back slightly to unlock it.
Then pull the belt across you
more slowly.
If the shoulder portion of a
passenger belt is pulled out all
the way, the child restraint
locking feature may be engaged.
If this happens, let the belt go
back all the way and start again.
Engaging the child restraint
locking feature may affect the
passenger sensing system,
if equipped. See Passenger
Sensing System on page 3‑32
for more information.
If the belt stops before it reaches
the buckle, when using the
lap-shoulder belt in a rear center
seating position of a crew-cab,
tilt the latch plate and keep
pulling the safety belt until it can
be buckled.3. Push the latch plate into the
buckle until it clicks.
Pull up on the latch plate to
make sure it is secure. If the belt
is not long enough, see Safety
Belt Extender on page 3‑20.
If the latch plate will not go fully
into the buckle, check if the
correct buckle is being used.
Position the release button on
the buckle so that the safety belt
could be quickly unbuckled if
necessary.
Page 137 of 542
Black plate (7,1)Chevrolet Silverado Owner Manual - 2013 - crc2 - 8/13/12
Instruments and Controls 5-7
2. Press the vehicle informationbutton until PRESS
VTO
CALIBRATE COMPASS
displays. Or, if the vehicle does
not have DIC buttons, press the
trip odometer reset stem until
CALIBRATE COMPASS
displays.
3. Press the set/reset button to start the compass calibration. Or,
if the vehicle does not have DIC
buttons, press and hold the trip
odometer reset stem for
two seconds to start the
compass calibration.
4. The DIC will display CALIBRATING: DRIVE IN
CIRCLES. Drive the vehicle in
tight circles at less than 8 km/h
(5 mph) to complete the
calibration. The DIC will display
CALIBRATION COMPLETE for a
few seconds when the
calibration is complete. The DIC
display will then return to the
previous menu.Clock
AM-FM Radio and AM‐FM
Radio with CD Player
To set the clock:
1. Turn the ignition key to ACC/ACCESSORY or ON/RUN, then
press the
Obutton to turn the
radio on.
2. Press the
Hbutton until the hour
numbers begin to flash, then
turn the
fknob to increase or
decrease the hour.
3. Press the
Hbutton until the
minute numbers begin to flash,
then turn the
fknob to increase
or decrease the minutes.
4. Press the
Hbutton until the
12HR or 24HR time format
begins to flash, then turn the
f
knob to change the time format. 5. Press the
Hbutton again until
the clock display stops flashing
to set the currently displayed
time, or wait until the flashing
stops after five seconds and the
current time displayed
automatically sets.
MP3 Radios with a Single CD
or a Single CD and DVD Player
To adjust the time and date:
1. Turn the ignition key to ACC/ ACCESSORY or ON/RUN, then
press the
Obutton to turn the
radio on.
2. Press the
Hbutton to display
HR, MIN, MM, DD, YYYY (hour,
minute, month, day, and year).
3. Press the softkey located under any one of the tabs to change
that setting.
4. To increase the time or date, do one of the following:
.Press the softkey below the
selected tab.
Page 156 of 542
Black plate (26,1)Chevrolet Silverado Owner Manual - 2013 - crc2 - 8/13/12
5-26 Instruments and Controls
If it does not, have the vehicle
serviced by your dealer. If the
system is working normally, the
indicator light then goes off.
Press and release the Traction
Control System (TCS)/StabiliTrak
button to turn off TCS, and a
message displays in the DIC.
Press and briefly hold the TCS/
StabiliTrak button to turn off the
StabiliTrak system; the StabiliTrak
Off light comes on and a message
appears in the Driver Information
Center (DIC).
If the StabiliTrak/TCS system is off,
the system does not assist in
controlling the vehicle. Turn on the
StabiliTrak/TCS system and the
indicator light turns off.
SeeStabiliTrak
®System on
page 9‑56, and Ride Control System
Messages on page 5‑42 for more
information.
Traction Control System
(TCS)/StabiliTrak®Light
The TCS/StabiliTrak light comes on
briefly when the engine is started.
If the light does not come on or
stays on, have the vehicle serviced
by the dealer. If the system is
working normally, the indicator light
turns off.
If the light comes on and stays on
while driving, and a message
displays in the Driver Information
Center (DIC), have the vehicle
serviced by the dealer. See Ride
Control System Messages on
page 5‑42 for more information. If the light flashes while driving, this
means that StabiliTrak or TCS is
assisting in controlling the vehicle.
See
StabiliTrak
®System on
page 9‑56 for more information.
Tire Pressure Light
For vehicles with the Tire Pressure
Monitor System (TPMS), this light
comes on briefly when the engine is
started. It provides information
about tire pressures and the TPMS.
When the Light Is On Steady
This indicates that one or more of
the tires are significantly
underinflated.
A Driver Information Center (DIC)
tire pressure message may also
display. See Tire Messages on
page 5‑44. Stop as soon as
Page 161 of 542

Black plate (31,1)Chevrolet Silverado Owner Manual - 2013 - crc2 - 8/13/12
Instruments and Controls 5-31
activated, the display will show 8 km
(5 miles). As the vehicle begins
moving, the display will then
increase to 8.2 km (5.1 miles),
8.4 km (5.2 miles), etc.
Fuel Range
Press the trip/fuel button until FUEL
RANGE displays. This display
shows the approximate number of
remaining kilometers (km) or miles
the vehicle can be driven without
refueling. The display will show
LOW if the fuel level is low.
The fuel range estimate is based on
an average of the vehicle's fuel
economy over recent driving history
and the amount of fuel remaining in
the fuel tank. This estimate will
change if driving conditions change.
For example, if driving in traffic and
making frequent stops, this display
may read one number, but if the
vehicle is driven on a freeway, the
number may change even though
the same amount of fuel is in the
fuel tank. This is because different
driving conditions produce differentfuel economies. Generally, freeway
driving produces better fuel
economy than city driving. Fuel
range cannot be reset.
Average Economy
Press the trip/fuel button until AVG
ECONOMY displays. This display
shows the approximate average
liters per 100 kilometers (L/100 km)
or miles per gallon (mpg). This
number is calculated based on the
number of L/100 km (mpg) recorded
since the last time this menu item
was reset. To reset AVG
ECONOMY, press and hold the set/
reset button.
Fuel Used
Press the trip/fuel button until FUEL
USED displays. This display shows
the number of liters (L) or
gallons (gal) of fuel used since the
last reset of this menu item. To reset
the fuel used information, press and
hold the set/reset button while FUEL
USED is displayed.
Speedometer
The speedometer shows how fast
the vehicle is moving in either
kilometers per hour (km/h) or miles
per hour (mph). The speedometer
cannot be reset.
Timer
Press the trip/fuel button until
TIMER displays. This display can be
used as a timer.
To start the timer, press the set/
reset button while TIMER is
displayed. The display will show the
amount of time that has passed
since the timer was last reset, not
including time the ignition is off.
Time will continue to be counted as
long as the ignition is on, even if
another display is being shown on
the DIC. The timer will record up to
99 hours, 59 minutes, and
59 seconds (99:59:59) after which
the display will return to zero.
To stop the timer, press the set/reset
button briefly while TIMER is
displayed.
Page 172 of 542
Black plate (42,1)Chevrolet Silverado Owner Manual - 2013 - crc2 - 8/13/12
5-42 Instruments and Controls
Object Detection System
Messages
PARK ASST BLOCKED SEE
OWNERS MANUAL
This message displays if there is
something interfering with the park
assist system. SeeUltrasonic
Parking Assist on page 9‑62 for
more information.
PARK ASSIST OFF
After the vehicle has been started,
this message displays to remind the
driver that the URPA system has
been turned off. Press the set/reset
button or the trip odometer reset
stem to acknowledge this message
and clear it from the DIC display. To
turn the URPA system back on, see
Ultrasonic Parking Assist on
page 9‑62.
SERVICE PARK ASSIST
This message displays if there is a
problem with the Ultrasonic Rear
Parking Assist (URPA) system. Do
not use this system to help you park. See
Ultrasonic Parking Assist
on page 9‑62 for more information.
See your dealer for service.
Ride Control System
Messages
SERVICE STABILITRAK
If the vehicle has StabiliTrak and
this message displays, it means
there may be a problem with the
StabiliTrak system. If you see this
message, try to reset the system.
Stop; turn off the engine for at least
15 seconds; then start the engine
again. If this message still comes
on, it means there is a problem. You
should see your dealer for service.
The vehicle is safe to drive;
however, you do not have the
benefit of StabiliTrak, so reduce
your speed and drive accordingly.
SERVICE TRACTION
CONTROL
If the vehicle has StabiliTrak, this
message displays when there is a
problem with the Traction Control System (TCS). When this message
displays, the system will not limit
wheel spin. Adjust your driving
accordingly. See your dealer for
service. See
StabiliTrak
®System on
page 9‑56 for more information.
STABILITRAK INITIALIZING
If the vehicle has StabiliTrak, this
message may come on if the
StabiliTrak system has not fully
initialized because of road
conditions or the incorrect tire size.
When the StabiliTrak system is fully
initialized, the message will turn off.
SeeStabiliTrak
®System on
page 9‑56 for more information.
If this message continues to be
displayed for multiple ignition cycles
and on different road surfaces, see
your dealer for service.
TRACTION XX
STABILITRAK XX
This message displays when the
traction control and/or StabiliTrak
systems have been turned on or off.
Adjust your driving accordingly. To
Page 218 of 542
Black plate (18,1)Chevrolet Silverado Owner Manual - 2013 - crc2 - 8/13/12
7-18 Infotainment System
If the surface of a CD is soiled,
clean it with a soft, lint‐free cloth or
dampen a clean, soft cloth in a mild,
neutral detergent solution mixed
with water. Make sure the wiping
process starts from the center to
the edge.
Inserting a CD (Single CD
Player)
Insert a CD partway into the slot,
label side up. The player pulls it in
and the CD should begin playing.
Inserting a CD(s) (Six-Disc CD
Player)
LOAD^:Press to load CDs into
the CD player. This CD player holds
up to six CDs.
To insert one CD:
1. Press and release the LOAD button.
2. Wait for the message to insert the disc. 3. Load a CD. Insert the CD
partway into the slot, label side
up. The player pulls the CD in.
To insert multiple CDs:
1. Press and hold the LOAD button for two seconds. A beep sounds
and Load All Discs displays.
2. Wait for the message on when to insert the discs. The CD player
takes up to six CDs.
3. Press the LOAD button again to cancel loading more CDs.
Ejecting a CD (Single CD
Player)
ZEJECT: Press and release to
eject the disc. Remove the CD
when Remove Disc displays. If the
disc is not removed, after several
seconds the disc is automatically
pulled back into the player.
Ejecting a CD (Six-Disc CD
Player)
ZEJECT: Press and release to
eject the disc that is currently
playing. Remove the CD when
Remove Disc displays. If the disc is
not removed, after several seconds
the disc is automatically pulled back
into the player.
To eject all CDs, press and hold the
ZEJECT button for two seconds.
Playing a CD
If the ignition or radio is turned off
with a CD in the player, it stays in
the player. When the ignition or
radio is turned on, the CD starts
playing where it stopped, if it was
the last selected audio source. The
CD is controlled by the buttons on
the radio faceplate or by the RSA
unit. See Rear Seat Audio (RSA)
System on page 7‑48 for more
information.
Page 225 of 542
Black plate (25,1)Chevrolet Silverado Owner Manual - 2013 - crc2 - 8/13/12
Infotainment System 7-25
Inserting a Disc
Insert a disc partway into either slot,
label side up. The player pulls it in
and the disc should begin playing.
(Loading a disc into the system,
depending on media type and
format, ranges from 5 to 20 seconds
for a CD, and up to 30 seconds for a
DVD to begin playing.)
Ejecting a Disc
ZCD (Eject):Press and release
to eject the disc that is currently
playing. The CD ejects from the
bottom slot. A beep sounds and
Ejecting Disc displays. Once the
disc is ejected, Remove Disc
displays. The disc can be removed.
If the disc is not removed, after
several seconds the disc
automatically pulls back into the
player.
ZDVD (Eject): Press and
release to eject the disc that is
currently playing in the top slot.
A beep sounds and Ejecting Disc
displays. If loading and reading of a disc
cannot be completed, due to
unknown format, etc., and the disc
fails to eject, press and hold for
more than five seconds to force the
disc to eject.
Playing a CD (in Either the
DVD or CD Slot)
If the ignition or radio is turned off
with a CD in the player, it stays in
the player. When the ignition or
radio is turned on, the CD starts
playing where it stopped, if it was
the last selected audio source. The
CD is controlled by the buttons on
the radio faceplate or by the RSA
unit. See
Rear Seat Audio (RSA)
System on page 7‑48 for more
information. The DVD/CD decks
(the upper slot is the DVD deck and
the lower slot is the CD deck) of the
radio are compatible with most
audio CDs, CD-Rs, CD-RWs,
and MP3s. When a CD is inserted, the text tab
DVD or CD symbol displays on the
left side of the radio display. As
each new track starts to play, the
track number displays.
The CD player can play the smaller
8 cm (3 in) single CDs with an
adapter ring. Full-size CDs and the
smaller CDs are loaded in the same
manner.
DVD/CD AUX (Auxiliary):
Press to
cycle through DVD, CD, or Auxiliary
when listening to the radio. The
DVD/CD text tab and a message
showing the track or chapter
number will display when a disc is in
either slot. Press the DVD/CD AUX
button again and the system
automatically searches for an
auxiliary input device; see Auxiliary
Devices on page 7‑34 for more
information. If a portable audio
player is not connected, “No Aux
Input Device” displays. If a disc is in
both the DVD slot and the CD slot,
the DVD/CD AUX button cycles
between the two sources and does
not indicate “No Aux Input Device.”