trailer CHEVROLET SILVERADO 2013 2.G Owners Manual
[x] Cancel search | Manufacturer: CHEVROLET, Model Year: 2013, Model line: SILVERADO, Model: CHEVROLET SILVERADO 2013 2.GPages: 542, PDF Size: 7.91 MB
Page 9 of 542

Black plate (3,1)Chevrolet Silverado Owner Manual - 2013 - crc2 - 8/13/12
In Brief 1-3
A.Air Vents on page 8‑10.
B. Turn and Lane‐Change Lever. See Turn and Lane-Change
Signals on page 6‑5.
Windshield Wiper/Washer on
page 5‑4.
C. Driver Information Center (DIC) Buttons. See Driver Information
Center (DIC) on page 5‑29.
D. Hazard Warning Flashers on
page 6‑5 (Out of View).
E. Instrument Cluster on
page 5‑11.
F. Shift Lever. See Automatic
Transmission on page 9‑33.
Tow/Haul Selector Button (If
Equipped). See Tow/Haul Mode
on page 9‑38.
Range Selection Mode (Allison
Transmission and Hydra-Matic
®
6‐Speed Button) (If Equipped).
See Manual Mode on
page 9‑37.
G. Infotainment on page 7‑1. H.
Instrument Panel Storage on
page 4‑1.
I. Integrated Trailer Brake Controller (If Equipped). See
Trailer Towing on page 9‑77.
J. Exterior Lamp Controls on
page 6‑1.
K. Data Link Connector (DLC) (Out of View). See Malfunction
Indicator Lamp on page 5‑21.
L. Hood Release. See Hood on
page 10‑4.
M. Parking Brake on page 9‑54.
N. Dome Lamps on page 6‑7.
Fog Lamps on page 6‑6 (If
Equipped).
O. Cruise Control on page 9‑59.
P. Steering Wheel Adjustment on
page 5‑2.
Q. Horn on page 5‑4.
R. Steering Wheel Controls on
page 5‑2 (If Equipped). S. Automatic Transfer Case
Control (If Equipped). See
Four-Wheel Drive on
page 10‑29.
T. Ashtray (If Equipped). See Ashtrays on page 5‑10 and
Cigarette Lighter on page 5‑9.
U. StabiliTrak
®System on
page 9‑56 (If Equipped).
Ultrasonic Parking Assist on
page 9‑62 (If Equipped).
Pedal Adjust Button (If
Equipped). See Adjustable
Throttle and Brake Pedal on
page 9‑24.
Exhaust Brake (If Equipped).
See “Brakes” in the Duramax
diesel supplement.
V. Power Outlets on page 5‑9.
Page 12 of 542

Black plate (6,1)Chevrolet Silverado Owner Manual - 2013 - crc2 - 8/13/12
1-6 In Brief
A.Air Vents on page 8‑10.
B. Turn and Lane‐Change Lever. See Turn and Lane-Change
Signals on page 6‑5.
Windshield Wiper/Washer on
page 5‑4.
C. Instrument Cluster on
page 5‑11.
D. Hazard Warning Flashers on
page 6‑5 (Out of View).
E. Shift Lever. See Automatic
Transmission on page 9‑33.
Range Selection Mode (If
Equipped). See Manual Mode
on page 9‑37.
F. Tow/Haul Mode on page 9‑38 (If
Equipped).
G. Driver Information Center (DIC) Buttons. See Driver Information
Center (DIC) on page 5‑29. H.
Infotainment on page 7‑1.
I. Exterior Lamp Controls on
page 6‑1.
J. Integrated Trailer Brake Controller (If Equipped). See
Trailer Towing on page 9‑77.
K. Dome Lamps on page 6‑7.
L. Automatic Transfer Case Control (If Equipped). See
Four-Wheel Drive on
page 10‑29.
M. Data Link Connector (DLC) (Out of View). See Malfunction
Indicator Lamp on page 5‑21.
N. Hood Release. See Hood on
page 10‑4.
O. Parking Brake on page 9‑54.
P. Cruise Control on page 9‑59.
Q. Steering Wheel Adjustment on
page 5‑2. R.
Horn on page 5‑4.
S. Steering Wheel Controls on
page 5‑2.
T. Climate Control Systems (with
Air Conditioning) on page 8‑1 or
Climate Control Systems (with
Heater Only) on page 8‑4 (If
Equipped).
Dual Automatic Climate Control
System on page 8‑5 (If
Equipped).
U. Power Outlets on page 5‑9.
Cigarette Lighter (If Equipped).
See Ashtrays on page 5‑10 and
Cigarette Lighter on page 5‑9.
Page 21 of 542
Black plate (15,1)Chevrolet Silverado Owner Manual - 2013 - crc2 - 8/13/12
In Brief 1-15
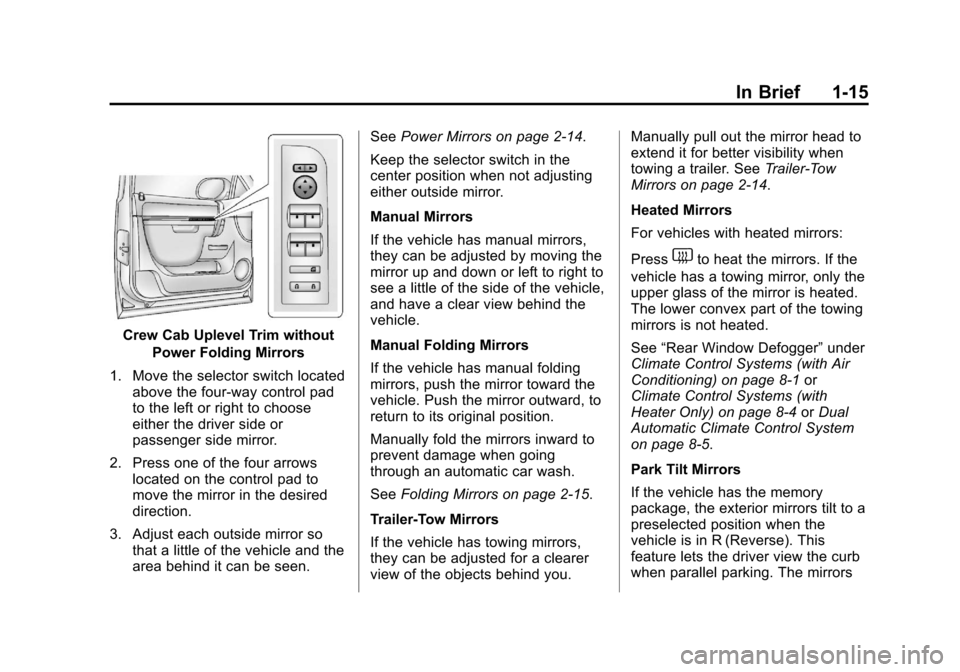
Crew Cab Uplevel Trim withoutPower Folding Mirrors
1. Move the selector switch located above the four-way control pad
to the left or right to choose
either the driver side or
passenger side mirror.
2. Press one of the four arrows located on the control pad to
move the mirror in the desired
direction.
3. Adjust each outside mirror so that a little of the vehicle and the
area behind it can be seen. See
Power Mirrors on page 2‑14.
Keep the selector switch in the
center position when not adjusting
either outside mirror.
Manual Mirrors
If the vehicle has manual mirrors,
they can be adjusted by moving the
mirror up and down or left to right to
see a little of the side of the vehicle,
and have a clear view behind the
vehicle.
Manual Folding Mirrors
If the vehicle has manual folding
mirrors, push the mirror toward the
vehicle. Push the mirror outward, to
return to its original position.
Manually fold the mirrors inward to
prevent damage when going
through an automatic car wash.
See Folding Mirrors on page 2‑15.
Trailer-Tow Mirrors
If the vehicle has towing mirrors,
they can be adjusted for a clearer
view of the objects behind you. Manually pull out the mirror head to
extend it for better visibility when
towing a trailer. See
Trailer-Tow
Mirrors on page 2‑14.
Heated Mirrors
For vehicles with heated mirrors:
Press
1to heat the mirrors. If the
vehicle has a towing mirror, only the
upper glass of the mirror is heated.
The lower convex part of the towing
mirrors is not heated.
See “Rear Window Defogger” under
Climate Control Systems (with Air
Conditioning) on page 8‑1 or
Climate Control Systems (with
Heater Only) on page 8‑4 orDual
Automatic Climate Control System
on page 8‑5.
Park Tilt Mirrors
If the vehicle has the memory
package, the exterior mirrors tilt to a
preselected position when the
vehicle is in R (Reverse). This
feature lets the driver view the curb
when parallel parking. The mirrors
Page 29 of 542
Black plate (23,1)Chevrolet Silverado Owner Manual - 2013 - crc2 - 8/13/12
In Brief 1-23
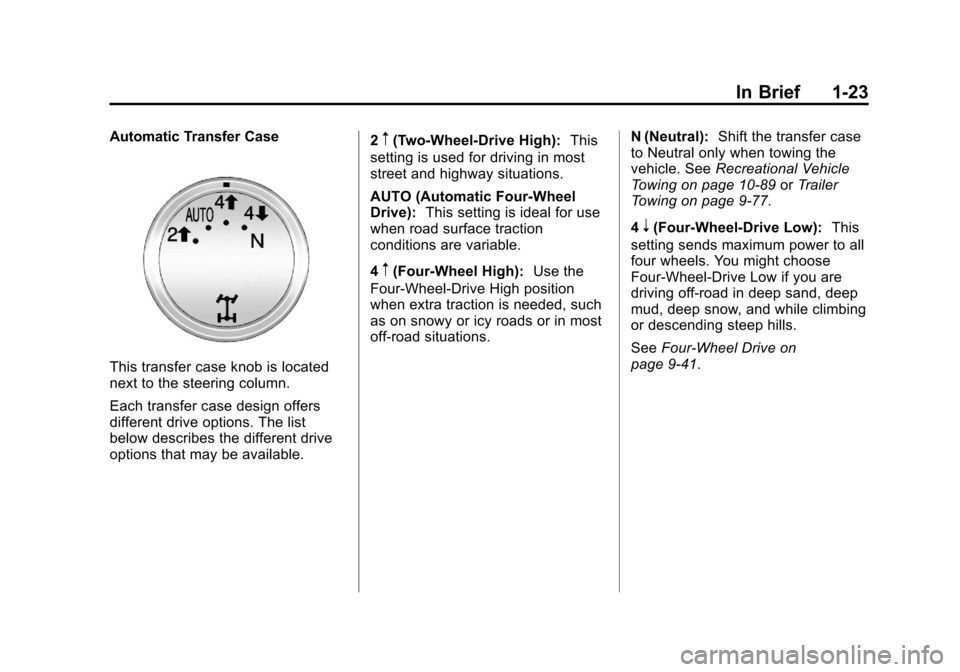
Automatic Transfer Case
This transfer case knob is located
next to the steering column.
Each transfer case design offers
different drive options. The list
below describes the different drive
options that may be available.2
m(Two-Wheel-Drive High):
This
setting is used for driving in most
street and highway situations.
AUTO (Automatic Four-Wheel
Drive): This setting is ideal for use
when road surface traction
conditions are variable.
4
m(Four-Wheel High): Use the
Four-Wheel-Drive High position
when extra traction is needed, such
as on snowy or icy roads or in most
off-road situations. N (Neutral):
Shift the transfer case
to Neutral only when towing the
vehicle. See Recreational Vehicle
Towing on page 10‑89 orTrailer
Towing on page 9‑77.
4
n(Four-Wheel-Drive Low): This
setting sends maximum power to all
four wheels. You might choose
Four-Wheel-Drive Low if you are
driving off-road in deep sand, deep
mud, deep snow, and while climbing
or descending steep hills.
See Four-Wheel Drive on
page 9‑41.
Page 34 of 542
Black plate (28,1)Chevrolet Silverado Owner Manual - 2013 - crc2 - 8/13/12
1-28 In Brief
3:Press to display the
odometer, trip odometer, fuel range,
average economy, fuel used, timer,
instantaneous economy and Active
Fuel Management
®indicator, and
transmission temperature. The
compass and outside air
temperature will also be shown in
the display. The temperature will be
shown in °C or °F depending on the
units selected.
T: Press to display the oil life,
units, tire pressure readings for
vehicles with the Tire Pressure
Monitor System (TPMS), trailer
brake gain and output information
for vehicles with the Integrated
Trailer Brake Control (ITBC) system,
engine hours, compass zone
setting, and compass recalibration.
U: Press to customize the feature
settings on your vehicle. See
Vehicle Personalization (With DIC
Buttons) on page 5‑46 for more
information.
V: Press to set or reset certain
functions and to turn off or
acknowledge messages on the DIC.
For more information, see Driver
Information Center (DIC) on
page 5‑29.
Vehicle Customization
Some vehicle features can be
programmed by using the DIC
buttons next to the steering wheel.
These features include:
.Language
.Door Lock and Unlock Settings
.RKE Lock and Unlock Feedback
.Lighting
.Chime Volume
.Memory Features
See Vehicle Personalization (With
DIC Buttons) on page 5‑46.
Rear Vision
Camera (RVC)
If available, the RVC displays a view
of the area behind the vehicle when
the vehicle is shifted into
R (Reverse). This is displayed on
the inside rearview mirror or the
navigation screen, if equipped.
To clean the camera lens, near the
tailgate handle, rinse it with water
and wipe it with a soft cloth.
For more information, see Rear
Vision Camera (RVC) on page 9‑64.
Ultrasonic Parking Assist
If available, this system uses
sensors on the rear bumper to
assist with parking and avoiding
objects while in R (Reverse).
It operates at speeds less than
8 km/h (5 mph). URPA uses audible
beeps to provide distance and
system information.
Keep the sensors on the vehicle's
rear bumper clean to ensure proper
operation.
Page 41 of 542
Black plate (1,1)Chevrolet Silverado Owner Manual - 2013 - crc2 - 8/13/12
Keys, Doors, and Windows 2-1
Keys, Doors, and
Windows
Keys and Locks
Keys . . . . . . . . . . . . . . . . . . . . . . . . . . 2-1
Remote Keyless Entry (RKE)System . . . . . . . . . . . . . . . . . . . . . . 2-2
Remote Keyless Entry (RKE) System Operation . . . . . . . . . . . 2-2
Remote Vehicle Start . . . . . . . . . 2-4
Door Locks . . . . . . . . . . . . . . . . . . . 2-6
Power Door Locks . . . . . . . . . . . . 2-7
Delayed Locking . . . . . . . . . . . . . . 2-7
Automatic Door Locks . . . . . . . . . 2-8
Lockout Protection . . . . . . . . . . . . 2-8
Safety Locks . . . . . . . . . . . . . . . . . . 2-8
Doors
Rear Doors (Extended Cab) . . . . . . . . . . . . . . 2-9
Tailgate . . . . . . . . . . . . . . . . . . . . . . . 2-9
Vehicle Security
Vehicle Security . . . . . . . . . . . . . . 2-10
Vehicle Alarm System . . . . . . . 2-10
Immobilizer . . . . . . . . . . . . . . . . . . 2-12
Immobilizer Operation . . . . . . . 2-12
Exterior Mirrors
Convex Mirrors . . . . . . . . . . . . . . 2-13
Manual Mirrors . . . . . . . . . . . . . . . 2-14
Trailer-Tow Mirrors . . . . . . . . . . . 2-14
Power Mirrors . . . . . . . . . . . . . . . . 2-14
Folding Mirrors . . . . . . . . . . . . . . . 2-15
Heated Mirrors . . . . . . . . . . . . . . . 2-16
Park Tilt Mirrors . . . . . . . . . . . . . . 2-17
Interior Mirrors
Manual Rearview Mirror . . . . . . 2-17
Automatic Dimming Rearview Mirror . . . . . . . . . . . . . . . . . . . . . . . 2-17
Windows
Windows . . . . . . . . . . . . . . . . . . . . . 2-18
Manual Windows . . . . . . . . . . . . 2-18
Power Windows . . . . . . . . . . . . . 2-18
Rear Windows . . . . . . . . . . . . . . . 2-20
Sun Visors . . . . . . . . . . . . . . . . . . . 2-20
Roof
Sunroof (Extended Cab) . . . . . 2-20
Sunroof (Crew Cab) . . . . . . . . . 2-21
Keys and Locks
Keys
{WARNING
Leaving children in a vehicle with
the ignition key is dangerous and
children or others could be
seriously injured or killed. They
could operate the power windows
or other controls or make the
vehicle move. The windows will
function with the keys in the
ignition, and children or others
could be caught in the path of a
closing window. Do not leave
children in a vehicle with the
ignition key.
Page 54 of 542
Black plate (14,1)Chevrolet Silverado Owner Manual - 2013 - crc2 - 8/13/12
2-14 Keys, Doors, and Windows
Manual Mirrors
If the vehicle has manual mirrors,
they can be adjusted by moving the
mirror up and down or left to right to
see a little of the side of the vehicle,
and have a clear view behind the
vehicle.
Using hood-mounted air deflectors
and add-on convex mirror
attachments could decrease mirror
performance.
Trailer-Tow Mirrors
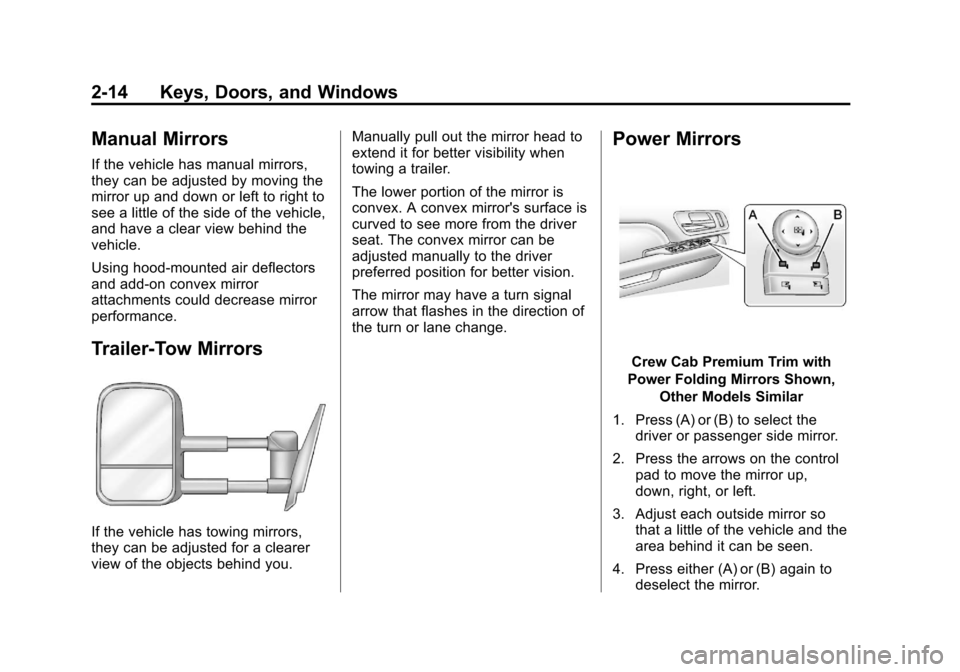
If the vehicle has towing mirrors,
they can be adjusted for a clearer
view of the objects behind you.Manually pull out the mirror head to
extend it for better visibility when
towing a trailer.
The lower portion of the mirror is
convex. A convex mirror's surface is
curved to see more from the driver
seat. The convex mirror can be
adjusted manually to the driver
preferred position for better vision.
The mirror may have a turn signal
arrow that flashes in the direction of
the turn or lane change.
Power Mirrors
Crew Cab Premium Trim with
Power Folding Mirrors Shown, Other Models Similar
1. Press (A) or (B) to select the driver or passenger side mirror.
2. Press the arrows on the control pad to move the mirror up,
down, right, or left.
3. Adjust each outside mirror so that a little of the vehicle and the
area behind it can be seen.
4. Press either (A) or (B) again to deselect the mirror.
Page 152 of 542
Black plate (22,1)Chevrolet Silverado Owner Manual - 2013 - crc2 - 8/13/12
5-22 Instruments and Controls
Malfunctions often are indicated by
the system before any problem is
apparent. Being aware of the light
can prevent more serious damage
to the vehicle. This system also
assists the service technician in
correctly diagnosing any
malfunction.
Notice:If the vehicle is
continually driven with this light
on, the emission controls might
not work as well, the vehicle fuel
economy might not be as good,
and the engine might not run as
smoothly. This could lead to
costly repairs that might not be
covered by the vehicle warranty.
Notice: Modifications made to the
engine, transmission, exhaust,
intake, or fuel system of the
vehicle or the replacement of the
original tires with other than
those of the same Tire
Performance Criteria (TPC) can
affect the vehicle's emission
controls and can cause this light
to come on. Modifications to
these systems could lead to costly repairs not covered by the
vehicle warranty. This could also
result in a failure to pass a
required Emission Inspection/
Maintenance test. See
Accessories and Modifications on
page 10‑3.
This light comes on during a
malfunction in one of two ways:
Light Flashing:
A misfire condition
has been detected. A misfire
increases vehicle emissions and
could damage the emission control
system on the vehicle. Diagnosis
and service might be required.
To prevent more serious damage to
the vehicle:
.Reduce vehicle speed.
.Avoid hard accelerations.
.Avoid steep uphill grades.
.If towing a trailer, reduce the
amount of cargo being hauled as
soon as it is possible. If the light continues to flash, find a
safe place to stop and park the
vehicle. Turn the vehicle off, wait at
least 10 seconds, and restart the
engine. If the light is still flashing,
follow the previous steps and see
your dealer for service as soon as
possible.
Light On Steady:
An emission
control system malfunction has
been detected on the vehicle.
Diagnosis and service might be
required.
The following may correct an
emission control system
malfunction:
.Check that the fuel cap is fully
installed. See Filling the Tank on
page 9‑72. The diagnostic
system can determine if the fuel
cap has been left off or
improperly installed. A loose or
missing fuel cap allows fuel to
evaporate into the atmosphere.
A few driving trips with the cap
properly installed should turn the
light off.
Page 160 of 542
Black plate (30,1)Chevrolet Silverado Owner Manual - 2013 - crc2 - 8/13/12
5-30 Instruments and Controls
The temperature will be shown in °C
or °F depending on the units
selected.
T(Vehicle Information):Press
this button to display the oil life,
units, tire pressure readings for
vehicles with the Tire Pressure
Monitor System (TPMS), trailer
brake gain and output information
for vehicles with the Integrated
Trailer Brake Control (ITBC) system,
engine hours, compass zone
setting, and compass recalibration.
U(Customization): Press this
button to customize the feature
settings on the vehicle. See Vehicle
Personalization (With DIC Buttons)
on page 5‑46 for more information.
V(Set/Reset):Press this button to
set or reset certain functions and to
turn off or acknowledge messages
on the DIC.
Trip/Fuel Menu Items (with DIC
Buttons)
3(Trip/Fuel): Press this button
to scroll through the following menu
items:
Odometer
Press the trip/fuel button until
ODOMETER displays. This display
shows the distance the vehicle has
been driven in either kilometers (km)
or miles. Pressing the trip odometer
reset stem will also display the
odometer.
To switch between metric and
English measurements, see “Units”
later in this section.
Trip Odometer
Press the trip/fuel button until TRIP
displays. This display shows the
current distance traveled in either
kilometers (km) or miles since the
last reset for the trip odometer.
Pressing the trip odometer reset
stem will also display the trip
odometer. The trip odometer can be reset to
zero by pressing the set/reset
button while the trip odometer is
displayed. You can also reset the
trip odometer while it is displayed by
pressing and holding the trip
odometer reset stem.
The trip odometer has a feature
called the retro-active reset. This
can be used to set the trip odometer
to the number of miles (kilometers)
driven since the ignition was last
turned on. This can be used if the
trip odometer is not reset at the
beginning of the trip.
To use the retro-active reset feature,
press and hold the set/reset button
for at least four seconds. The trip
odometer will display the number of
kilometers (km) or miles driven since
the ignition was last turned on and
the vehicle was moving. Once the
vehicle begins moving, the trip
odometer will accumulate mileage.
For example, if the vehicle was
driven 8 km (5 miles) before it is
started again, and then the
retro-active reset feature is
Page 163 of 542
Black plate (33,1)Chevrolet Silverado Owner Manual - 2013 - crc2 - 8/13/12
Instruments and Controls 5-33
been changed. It cannot be reset
accurately until the next oil change.
To reset the engine oil life system,
seeEngine Oil Life System on
page 10‑9.
Units
Press the vehicle information button
until UNITS displays. This display
allows you to select between metric
or English units of measurement.
Once in this display, press the set/
reset button to select between
METRIC or ENGLISH units. All of
the vehicle information will then be
displayed in the unit of
measurement selected.
Tire Pressure
If the vehicle has the Tire Pressure
Monitor System (TPMS), the
pressure for each tire can be viewed
in the DIC. The tire pressure will be
shown in either kilopascals (kPa) or
pounds per square inch (psi). Press
the vehicle information button until
the DIC displays FRONT
TIRES kPa (PSI) LEFT ##
RIGHT ##. Press the vehicle information button again until the
DIC displays REAR TIRES kPa
(PSI) LEFT ## RIGHT ##.
If a low tire pressure condition is
detected by the system while
driving, a message advising you to
add pressure in a specific tire will
appear in the display. See
Tire
Pressure on page 10‑56 andTire
Messages on page 5‑44 for more
information.
If the tire pressure display shows
dashes instead of a value, there
may be a problem with the vehicle.
If this consistently occurs, see your
dealer for service.
Trailer Gain and Output
On vehicles with the Integrated
Trailer Brake Control (ITBC) system,
the trailer brake display appears in
the DIC. Press the vehicle
information button until TRAILER
GAIN and OUTPUT display. TRAILER GAIN shows the trailer
gain setting. This setting can be
adjusted from 0.0 to 10.0 with either
a trailer connected or disconnected.
OUTPUT shows the power output to
the trailer any time a trailer with
electric brakes is connected. Output
is displayed in 0 to 10 bars. Dashes
may appear in the OUTPUT display.
To adjust trailer gain see
“Integrated
Trailer Brake Control System” under
Towing Equipment on page 9‑93 for
more information.
Battery
This display shows the current
battery voltage. If the voltage is in
the normal range, the value will
display. For example, the display
may read BATTERY 13 VOLTS.
Your vehicle's charging system
regulates voltage based on the state
of the battery. The battery voltage
may fluctuate when viewing this
information on the DIC. This is
normal.