turn signal CHEVROLET SILVERADO 2014 2.G Owner's Manual
[x] Cancel search | Manufacturer: CHEVROLET, Model Year: 2014, Model line: SILVERADO, Model: CHEVROLET SILVERADO 2014 2.GPages: 546, PDF Size: 8.08 MB
Page 338 of 546
Black plate (70,1)Chevrolet Silverado Owner Manual (GMNA-Localizing-U.S./Canada/Mexico-
5853506) - 2014 - crc 2nd - 5/15/13
9-70 Driving and Operating
Cleaning the System
If the FCA system does not seem to
operate properly, cleaning the
outside of the windshield in front of
the camera sensor may correct the
issue.
Lane Departure
Warning (LDW)
If equipped, LDW may help avoid
crashes due to unintentional lane
departures. It may provide a
warning if the vehicle is crossing a
detected lane marking without using
a turn signal in the lane departure
direction. LDW uses a camera
sensor to detect the lane markings.
It only operates at speeds of
56 km/h (35 mph) or greater.
When the vehicle crosses a
detected lane marking, the LDW
indicator will flash and either three
beeps will be sounded from the left
or right side, or three Safety Alert
Seat pulses will occur on the left or
right side of the seat, depending on
the lane departure direction. LDWwill not warn if the turn signal is on
in the departure direction, or if a
sharp maneuver is made.
{Warning
The LDW system is an aid to help
the vehicle stay in the driving
lane. It does not steer the vehicle.
The LDW system may not:
.Provide enough time to avoid
a crash.
.Detect lane markings under
bad weather conditions or if
the windshield is dirty.
.Detect lane markings and will
not detect road edges.
.Warn that the vehicle is
crossing a lane marking if the
system does not detect the
lane marking.
If LDW only detects lane
markings on one side of the road,
it will only warn you when (Continued)
Warning (Continued)
departing the lane on the side
where it has detected a lane
marker. Even with LDW, always
keep your attention on the road
and maintain proper vehicle
position within the lane, or vehicle
damage, injury, or death could
occur. Always keep the
windshield clean and do not use
LDW in bad weather conditions.
How the System Works
The LDW camera sensor is on the
windshield ahead of the rearview
mirror.
To turn LDW on and off, press
@on
the center stack. The control
indicator will light when LDW is on.
Page 339 of 546
Black plate (71,1)Chevrolet Silverado Owner Manual (GMNA-Localizing-U.S./Canada/Mexico-
5853506) - 2014 - crc 2nd - 5/15/13
Driving and Operating 9-71
When the vehicle is started, the
LDW indicator on the instrument
cluster will come on briefly.
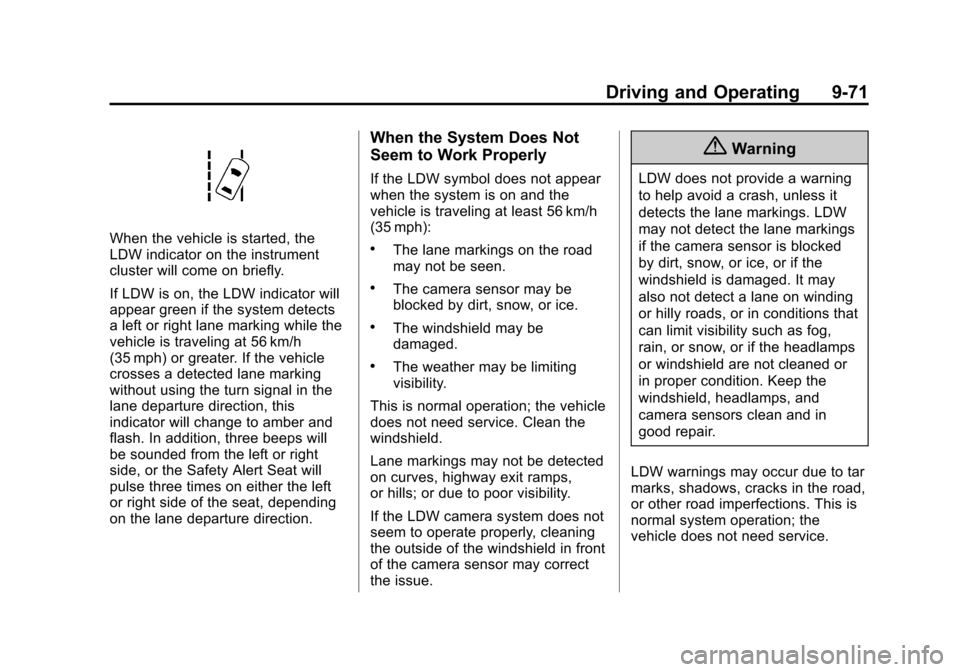
If LDW is on, the LDW indicator will
appear green if the system detects
a left or right lane marking while the
vehicle is traveling at 56 km/h
(35 mph) or greater. If the vehicle
crosses a detected lane marking
without using the turn signal in the
lane departure direction, this
indicator will change to amber and
flash. In addition, three beeps will
be sounded from the left or right
side, or the Safety Alert Seat will
pulse three times on either the left
or right side of the seat, depending
on the lane departure direction.
When the System Does Not
Seem to Work Properly
If the LDW symbol does not appear
when the system is on and the
vehicle is traveling at least 56 km/h
(35 mph):
.The lane markings on the road
may not be seen.
.The camera sensor may be
blocked by dirt, snow, or ice.
.The windshield may be
damaged.
.The weather may be limiting
visibility.
This is normal operation; the vehicle
does not need service. Clean the
windshield.
Lane markings may not be detected
on curves, highway exit ramps,
or hills; or due to poor visibility.
If the LDW camera system does not
seem to operate properly, cleaning
the outside of the windshield in front
of the camera sensor may correct
the issue.
{Warning
LDW does not provide a warning
to help avoid a crash, unless it
detects the lane markings. LDW
may not detect the lane markings
if the camera sensor is blocked
by dirt, snow, or ice, or if the
windshield is damaged. It may
also not detect a lane on winding
or hilly roads, or in conditions that
can limit visibility such as fog,
rain, or snow, or if the headlamps
or windshield are not cleaned or
in proper condition. Keep the
windshield, headlamps, and
camera sensors clean and in
good repair.
LDW warnings may occur due to tar
marks, shadows, cracks in the road,
or other road imperfections. This is
normal system operation; the
vehicle does not need service.
Page 347 of 546
Black plate (79,1)Chevrolet Silverado Owner Manual (GMNA-Localizing-U.S./Canada/Mexico-
5853506) - 2014 - crc 2nd - 5/15/13
Driving and Operating 9-79
Making Turns
{Caution
Making very sharp turns while
trailering could cause the trailer to
come in contact with the vehicle.
The vehicle could be damaged.
Avoid making very sharp turns
while trailering.
When turning with a trailer, make
wider turns than normal. Do this so
the trailer will not strike soft
shoulders, curbs, road signs, trees,
or other objects. Avoid jerky or
sudden maneuvers. Signal well in
advance.
If the trailer turn signal bulbs burn
out, the arrows on the instrument
cluster will still flash for turns. It is
important to check occasionally to
be sure the trailer bulbs are still
working.
Driving on Grades
Reduce speed and shift to a lower
gear before starting down a long or
steep downgrade. If the
transmission is not shifted down, the
brakes might get hot and no longer
work well.
Vehicles can tow in D (Drive). Shift
the transmission to a lower gear if
the transmission shifts too often
under heavy loads and/or hilly
conditions.
The Tow/Haul Mode may be used if
the transmission shifts too often.
See Tow/Haul Mode on page 9-39.
When towing at high altitude on
steep uphill grades, consider the
following: Engine coolant will boil at
a lower temperature than at normal
altitudes. If the engine is turned off
immediately after towing at high
altitude on steep uphill grades, the
vehicle may show signs similar to
engine overheating. To avoid this,
let the engine run while parked,
preferably on level ground, with the
transmission in P (Park) for a few minutes before turning the engine
off. If the overheat warning comes
on, see
Engine Overheating on
page 10-24.
Parking on Hills
{Warning
Parking the vehicle on a hill with
the trailer attached can be
dangerous. If something goes
wrong, the rig could start to move.
People can be injured, and both
the vehicle and the trailer can be
damaged. When possible, always
park the rig on a flat surface.
If parking the rig on a hill:
1. Press the brake pedal, but do not shift into P (Park) yet. Turn
the wheels into the curb if facing
downhill or into traffic if facing
uphill.
2. Have someone place chocks under the trailer wheels.
Page 363 of 546
Black plate (95,1)Chevrolet Silverado Owner Manual (GMNA-Localizing-U.S./Canada/Mexico-
5853506) - 2014 - crc 2nd - 5/15/13
Driving and Operating 9-95
Basic Trailer Wiring
All regular, double cab, and crew
cab pickups have a seven-wire
trailer towing harness.
For vehicles not equipped with
heavy duty trailering, the harness is
secured to the vehicle's frame
behind the spare tire mount. The
harness requires the installation of a
trailer connector, which is available
through your dealer.
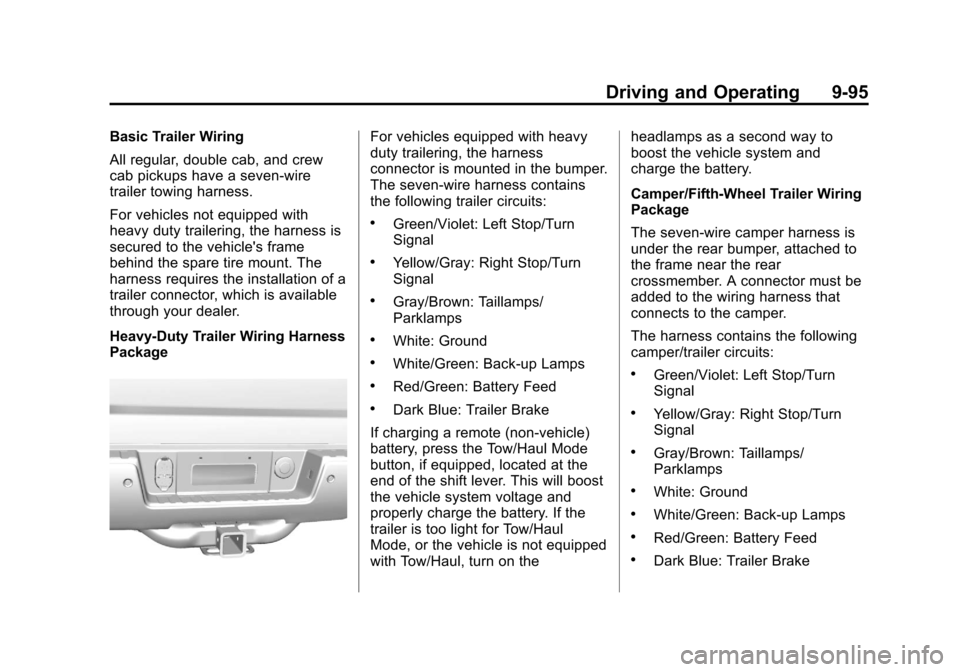
Heavy-Duty Trailer Wiring Harness
PackageFor vehicles equipped with heavy
duty trailering, the harness
connector is mounted in the bumper.
The seven-wire harness contains
the following trailer circuits:
.Green/Violet: Left Stop/Turn
Signal
.Yellow/Gray: Right Stop/Turn
Signal
.Gray/Brown: Taillamps/
Parklamps
.White: Ground
.White/Green: Back-up Lamps
.Red/Green: Battery Feed
.Dark Blue: Trailer Brake
If charging a remote (non-vehicle)
battery, press the Tow/Haul Mode
button, if equipped, located at the
end of the shift lever. This will boost
the vehicle system voltage and
properly charge the battery. If the
trailer is too light for Tow/Haul
Mode, or the vehicle is not equipped
with Tow/Haul, turn on the headlamps as a second way to
boost the vehicle system and
charge the battery.
Camper/Fifth-Wheel Trailer Wiring
Package
The seven-wire camper harness is
under the rear bumper, attached to
the frame near the rear
crossmember. A connector must be
added to the wiring harness that
connects to the camper.
The harness contains the following
camper/trailer circuits:
.Green/Violet: Left Stop/Turn
Signal
.Yellow/Gray: Right Stop/Turn
Signal
.Gray/Brown: Taillamps/
Parklamps
.White: Ground
.White/Green: Back-up Lamps
.Red/Green: Battery Feed
.Dark Blue: Trailer Brake
Page 375 of 546
Black plate (1,1)Chevrolet Silverado Owner Manual (GMNA-Localizing-U.S./Canada/Mexico-
5853506) - 2014 - crc 2nd - 5/15/13
Vehicle Care 10-1
Vehicle Care
General Information
General Information . . . . . . . . . . 10-2
California Proposition65 Warning . . . . . . . . . . . . . . . . . 10-2
California Perchlorate Materials Requirements . . . . 10-3
Accessories and Modifications . . . . . . . . . . . . . . . 10-3
Vehicle Checks
Doing Your OwnService Work . . . . . . . . . . . . . . . 10-3
Hood . . . . . . . . . . . . . . . . . . . . . . . . 10-4
Engine Compartment Overview . . . . . . . . . . . . . . . . . . . 10-5
Engine Oil . . . . . . . . . . . . . . . . . . 10-10
Engine Oil Life System . . . . . 10-13
Automatic Transmission Fluid . . . . . . . . . . . . . . . . . . . . . . 10-14
Manual Transmission Fluid . . . . . . . . . . . . . . . . . . . . . . 10-17
Hydraulic Clutch . . . . . . . . . . . . 10-18
Engine Air Cleaner/Filter . . . . 10-18
Cooling System . . . . . . . . . . . . 10-19
Engine Coolant . . . . . . . . . . . . . 10-21
Engine Overheating . . . . . . . . 10-24 Overheated Engine
Protection Operating Mode
(6.0L V8 Engine Only) . . . . . 10-26
Engine Fan . . . . . . . . . . . . . . . . . 10-26
Power Steering Fluid (4.3L V6, 5.3L V8, and 6.2L
V8 Engines) . . . . . . . . . . . . . . . 10-27
Power Steering Fluid (6.0L V8 and 6.6L
V8 Engines) . . . . . . . . . . . . . . . 10-27
Washer Fluid . . . . . . . . . . . . . . . 10-28
Brakes . . . . . . . . . . . . . . . . . . . . . 10-29
Brake Fluid . . . . . . . . . . . . . . . . . 10-30
Battery . . . . . . . . . . . . . . . . . . . . . 10-31
Four-Wheel Drive . . . . . . . . . . . 10-32
Front Axle . . . . . . . . . . . . . . . . . . 10-33
Rear Axle . . . . . . . . . . . . . . . . . . 10-34
Noise Control System . . . . . . 10-35
Starter Switch Check . . . . . . . 10-36
Automatic Transmission Shift Lock Control Function
Check . . . . . . . . . . . . . . . . . . . . . 10-37
Ignition Transmission Lock Check . . . . . . . . . . . . . . . . . . . . . 10-37
Park Brake and P (Park) Mechanism Check . . . . . . . . 10-38
Wiper Blade Replacement . . . . . . . . . . . . . . 10-38
Glass Replacement . . . . . . . . 10-39
Headlamp Aiming
Headlamp Aiming . . . . . . . . . . 10-39
Bulb Replacement
Bulb Replacement . . . . . . . . . . 10-39
Halogen Bulbs . . . . . . . . . . . . . . 10-39
Headlamps, Front Turn Signal, Sidemarker, and
Parking Lamps . . . . . . . . . . . . 10-40
Fog Lamps . . . . . . . . . . . . . . . . . 10-40
Taillamps (Chassis Cab Models) . . . . . . . . . . . . . . . . . . . 10-41
Taillamps, Turn Signal, Stoplamps, and Back-Up
Lamps . . . . . . . . . . . . . . . . . . . . 10-41
Center High-Mounted Stoplamp (CHMSL) and
Cargo Lamp . . . . . . . . . . . . . . 10-42
License Plate Lamp . . . . . . . . 10-42
Replacement Bulbs . . . . . . . . . 10-42
Electrical System
Electrical System Overload . . . . . . . . . . . . . . . . . . 10-43
Fuses . . . . . . . . . . . . . . . . . . . . . . 10-43
Page 414 of 546
Black plate (40,1)Chevrolet Silverado Owner Manual (GMNA-Localizing-U.S./Canada/Mexico-
5853506) - 2014 - crc 2nd - 5/15/13
10-40 Vehicle Care
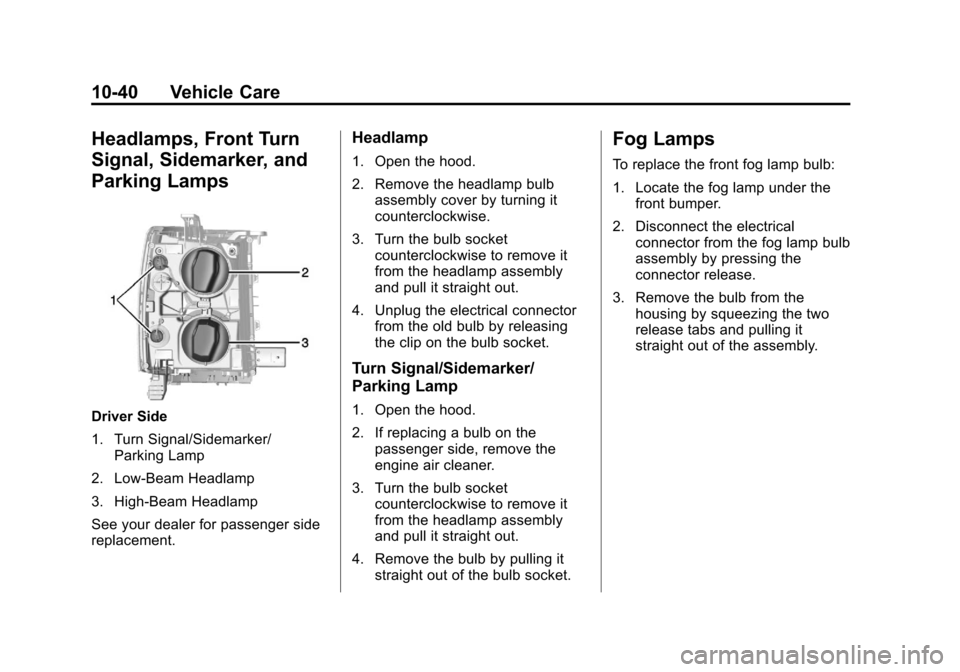
Headlamps, Front Turn
Signal, Sidemarker, and
Parking Lamps
Driver Side
1. Turn Signal/Sidemarker/Parking Lamp
2. Low-Beam Headlamp
3. High-Beam Headlamp
See your dealer for passenger side
replacement.
Headlamp
1. Open the hood.
2. Remove the headlamp bulb assembly cover by turning it
counterclockwise.
3. Turn the bulb socket counterclockwise to remove it
from the headlamp assembly
and pull it straight out.
4. Unplug the electrical connector from the old bulb by releasing
the clip on the bulb socket.
Turn Signal/Sidemarker/
Parking Lamp
1. Open the hood.
2. If replacing a bulb on the
passenger side, remove the
engine air cleaner.
3. Turn the bulb socket counterclockwise to remove it
from the headlamp assembly
and pull it straight out.
4. Remove the bulb by pulling it straight out of the bulb socket.
Fog Lamps
To replace the front fog lamp bulb:
1. Locate the fog lamp under thefront bumper.
2. Disconnect the electrical connector from the fog lamp bulb
assembly by pressing the
connector release.
3. Remove the bulb from the housing by squeezing the two
release tabs and pulling it
straight out of the assembly.
Page 415 of 546
Black plate (41,1)Chevrolet Silverado Owner Manual (GMNA-Localizing-U.S./Canada/Mexico-
5853506) - 2014 - crc 2nd - 5/15/13
Vehicle Care 10-41
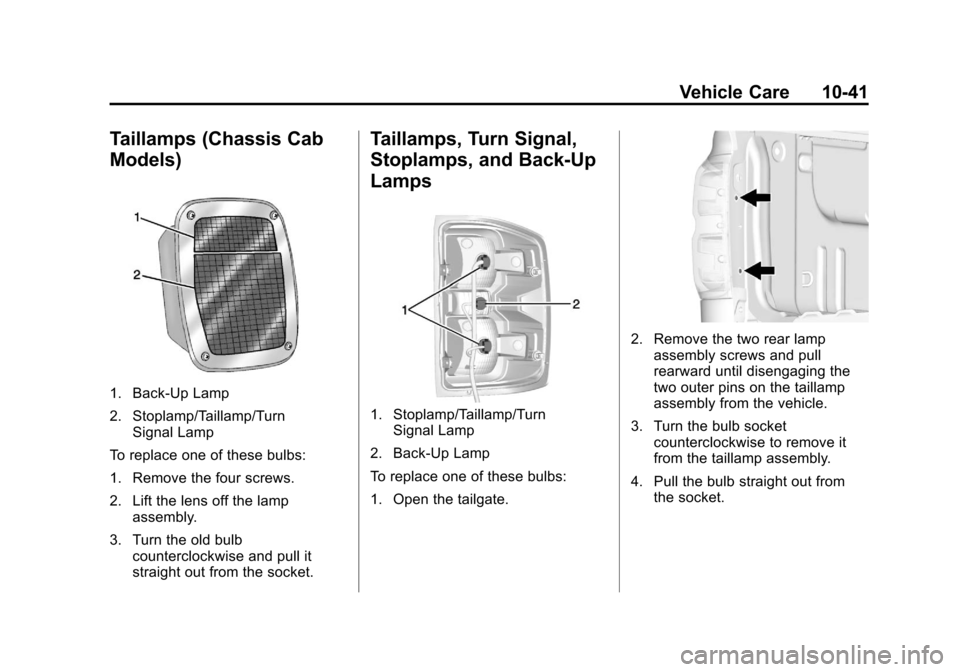
Taillamps (Chassis Cab
Models)
1. Back-Up Lamp
2. Stoplamp/Taillamp/TurnSignal Lamp
To replace one of these bulbs:
1. Remove the four screws.
2. Lift the lens off the lamp assembly.
3. Turn the old bulb counterclockwise and pull it
straight out from the socket.
Taillamps, Turn Signal,
Stoplamps, and Back-Up
Lamps
1. Stoplamp/Taillamp/Turn
Signal Lamp
2. Back-Up Lamp
To replace one of these bulbs:
1. Open the tailgate.
2. Remove the two rear lamp assembly screws and pull
rearward until disengaging the
two outer pins on the taillamp
assembly from the vehicle.
3. Turn the bulb socket counterclockwise to remove it
from the taillamp assembly.
4. Pull the bulb straight out from the socket.
Page 417 of 546
Black plate (43,1)Chevrolet Silverado Owner Manual (GMNA-Localizing-U.S./Canada/Mexico-
5853506) - 2014 - crc 2nd - 5/15/13
Vehicle Care 10-43
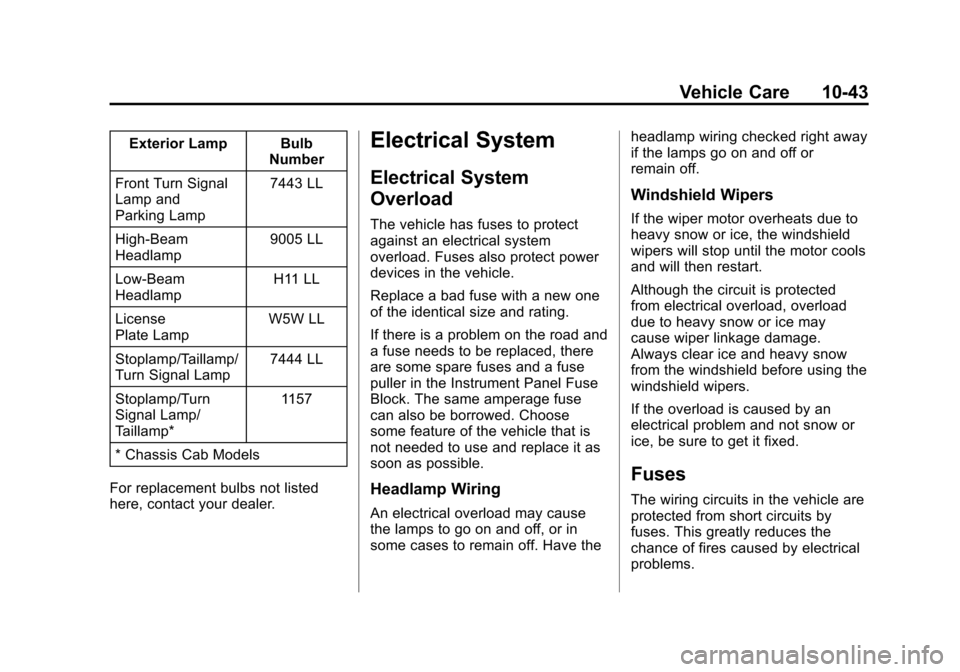
Exterior Lamp BulbNumber
Front Turn Signal
Lamp and
Parking Lamp 7443 LL
High-Beam
Headlamp 9005 LL
Low-Beam
Headlamp H11 LL
License
Plate Lamp W5W LL
Stoplamp/Taillamp/
Turn Signal Lamp 7444 LL
Stoplamp/Turn
Signal Lamp/
Taillamp* 1157
* Chassis Cab Models
For replacement bulbs not listed
here, contact your dealer.Electrical System
Electrical System
Overload
The vehicle has fuses to protect
against an electrical system
overload. Fuses also protect power
devices in the vehicle.
Replace a bad fuse with a new one
of the identical size and rating.
If there is a problem on the road and
a fuse needs to be replaced, there
are some spare fuses and a fuse
puller in the Instrument Panel Fuse
Block. The same amperage fuse
can also be borrowed. Choose
some feature of the vehicle that is
not needed to use and replace it as
soon as possible.
Headlamp Wiring
An electrical overload may cause
the lamps to go on and off, or in
some cases to remain off. Have the headlamp wiring checked right away
if the lamps go on and off or
remain off.
Windshield Wipers
If the wiper motor overheats due to
heavy snow or ice, the windshield
wipers will stop until the motor cools
and will then restart.
Although the circuit is protected
from electrical overload, overload
due to heavy snow or ice may
cause wiper linkage damage.
Always clear ice and heavy snow
from the windshield before using the
windshield wipers.
If the overload is caused by an
electrical problem and not snow or
ice, be sure to get it fixed.
Fuses
The wiring circuits in the vehicle are
protected from short circuits by
fuses. This greatly reduces the
chance of fires caused by electrical
problems.
Page 439 of 546
Black plate (65,1)Chevrolet Silverado Owner Manual (GMNA-Localizing-U.S./Canada/Mexico-
5853506) - 2014 - crc 2nd - 5/15/13
Vehicle Care 10-65
add air until the recommended
pressure is reached. If the
inflation pressure is high, press
on the metal stem in the center
of the tire valve to release air.
Re-check the tire pressure with
the tire gauge.
Return the valve caps on the
valve stems to prevent leaks
and keep out dirt and moisture.
Tire Pressure Monitor
System
The Tire Pressure Monitor System
(TPMS) uses radio and sensor
technology to check tire pressure
levels. The TPMS sensors monitor
the air pressure in your tires and
transmit tire pressure readings to a
receiver located in the vehicle.
Each tire, including the spare (if
provided), should be checked
monthly when cold and inflated to
the inflation pressure recommended
by the vehicle manufacturer on thevehicle placard or tire inflation
pressure label. (If your vehicle has
tires of a different size than the size
indicated on the vehicle placard or
tire inflation pressure label, you
should determine the proper tire
inflation pressure for those tires.)
As an added safety feature, your
vehicle has been equipped with a
tire pressure monitoring system
(TPMS) that illuminates a low tire
pressure telltale when one or more
of your tires is significantly
under-inflated.
Accordingly, when the low tire
pressure telltale illuminates, you
should stop and check your tires as
soon as possible, and inflate them
to the proper pressure. Driving on a
significantly under-inflated tire
causes the tire to overheat and can
lead to tire failure. Under-inflation
also reduces fuel efficiency and tire
tread life, and may affect the
vehicle's handling and stopping
ability.
Please note that the TPMS is not a
substitute for proper tire
maintenance, and it is the driver's
responsibility to maintain correct tire
pressure, even if under-inflation has
not reached the level to trigger
illumination of the TPMS low tire
pressure telltale.
Your vehicle has also been
equipped with a TPMS malfunction
indicator to indicate when the
system is not operating properly.
The TPMS malfunction indicator is
combined with the low tire pressure
telltale. When the system detects a
malfunction, the telltale will flash for
approximately one minute and then
remain continuously illuminated.
This sequence will continue upon
subsequent vehicle start-ups as
long as the malfunction exists.
When the malfunction indicator is
illuminated, the system may not be
able to detect or signal low tire
pressure as intended. TPMS
malfunctions may occur for a variety
of reasons, including the installation
of replacement or alternate tires or
Page 442 of 546
Black plate (68,1)Chevrolet Silverado Owner Manual (GMNA-Localizing-U.S./Canada/Mexico-
5853506) - 2014 - crc 2nd - 5/15/13
10-68 Vehicle Care
.Operating electronic devices or
being near facilities using radio
wave frequencies similar to the
TPMS could cause the TPMS
sensors to malfunction.
If the TPMS is not functioning
properly, it cannot detect or signal a
low tire condition. See your dealer
for service if the TPMS malfunction
light and DIC message come on
and stay on.
TPMS Sensor Matching
Process
Each TPMS sensor has a unique
identification code. The identification
code needs to be matched to a new
tire/wheel position after rotating the
vehicle’s tires or replacing one or
more of the TPMS sensors. Also,
the TPMS sensor matching process
should be performed after replacing
a spare tire with a road tire
containing the TPMS sensor. The
malfunction light and the DIC
message should go off at the next
ignition cycle. The sensors are
matched to the tire/wheel positions, using a TPMS relearn tool, in the
following order: driver side front tire,
passenger side front tire, passenger
side rear tire, and driver side rear.
See your dealer for service or to
purchase a relearn tool.
There are two minutes to match the
first tire/wheel position, and
five minutes overall to match all four
tire/wheel positions. If it takes
longer, the matching process stops
and must be restarted.
The TPMS sensor matching
process is:
1. Set the parking brake.
2. Turn the ignition to ON/RUN with
the engine off.
3. Uplevel DIC Only: Make sure the Tire Pressure info page option is
turned on. The info pages on the
DIC can be turned on and off
through the Settings menu. See
Driver Information Center (DIC)
(Base Level) on page 5-30 or
Driver Information Center (DIC)
(Uplevel) on page 5-32. 4. If the vehicle has an uplevel
DIC, use the DIC controls on the
right side of the steering wheel
to scroll to the Tire Pressure
screen under the DIC info page.
If the vehicle has a base level
DIC, use the trip odometer reset
stem to scroll to the Tire
Pressure screen.
5. If the vehicle has an uplevel DIC, press and hold the
V(Set/
Reset) button located in the
center of the DIC controls.
If the vehicle has a base level
DIC, press and hold the trip
odometer reset stem for about
five seconds. A message asking
if the process should begin
should appear. Select yes and
press the trip odometer reset
stem to confirm the selection.
The horn sounds twice to signal
the receiver is in relearn mode
and the TIRE LEARNING
ACTIVE message displays on
the DIC screen.