check oil CHEVROLET SILVERADO 2014 2.G Owners Manual
[x] Cancel search | Manufacturer: CHEVROLET, Model Year: 2014, Model line: SILVERADO, Model: CHEVROLET SILVERADO 2014 2.GPages: 546, PDF Size: 8.08 MB
Page 153 of 546
Black plate (15,1)Chevrolet Silverado Owner Manual (GMNA-Localizing-U.S./Canada/Mexico-
5853506) - 2014 - crc 2nd - 5/15/13
Instruments and Controls 5-15
Engine Oil Pressure
Gauge
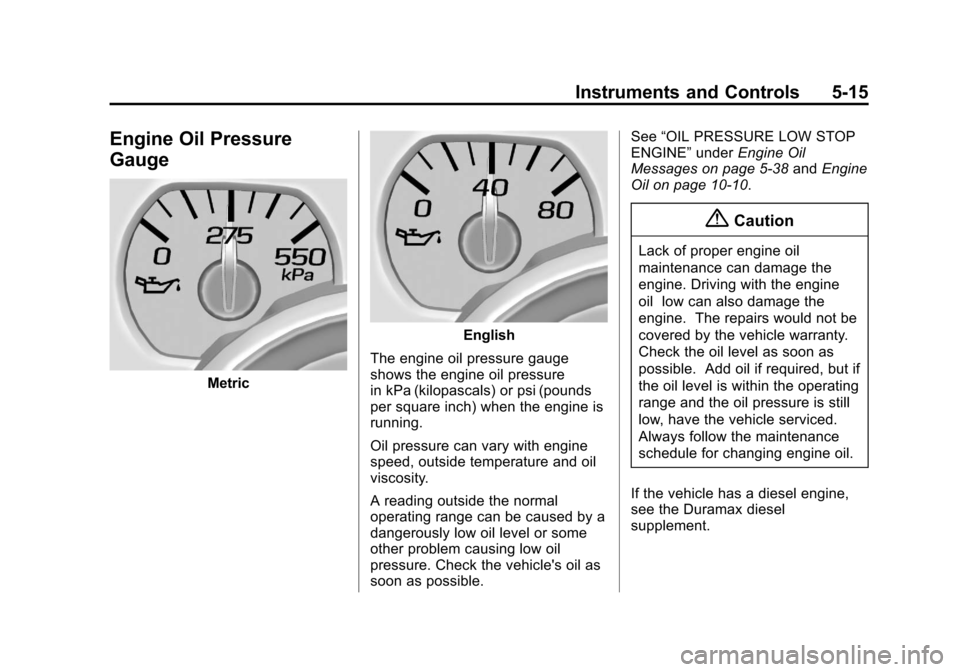
Metric
English
The engine oil pressure gauge
shows the engine oil pressure
in kPa (kilopascals) or psi (pounds
per square inch) when the engine is
running.
Oil pressure can vary with engine
speed, outside temperature and oil
viscosity.
A reading outside the normal
operating range can be caused by a
dangerously low oil level or some
other problem causing low oil
pressure. Check the vehicle's oil as
soon as possible. See
“OIL PRESSURE LOW STOP
ENGINE” underEngine Oil
Messages on page 5-38 andEngine
Oil on page 10-10.
{Caution
Lack of proper engine oil
maintenance can damage the
engine. Driving with the engine
oil low can also damage the
engine. The repairs would not be
covered by the vehicle warranty.
Check the oil level as soon as
possible. Add oil if required, but if
the oil level is within the operating
range and the oil pressure is still
low, have the vehicle serviced.
Always follow the maintenance
schedule for changing engine oil.
If the vehicle has a diesel engine,
see the Duramax diesel
supplement.
Page 171 of 546
Black plate (33,1)Chevrolet Silverado Owner Manual (GMNA-Localizing-U.S./Canada/Mexico-
5853506) - 2014 - crc 2nd - 5/15/13
Instruments and Controls 5-33
6. PressVwhile an item is
highlighted to select or deselect
that item. When an item is
selected, a checkmark will
appear next to it.
DIC Info Pages
The following is the list of all
possible DIC info page displays.
Some may not be available for your
particular vehicle. Some items may
not be turned on by default but can
be turned on through the Settings
app. See “DIC Info Page Options”
earlier in this section.
Speed: Shows the vehicle speed in
either kilometers per hour (km/h) or
miles per hour (mph).
Trip A or Trip B: Shows the
current distance traveled, in either
kilometers (km) or miles (mi), since
the trip odometer was last reset. Also shows the approximate
average liters per 100 kilometers
(L/100 km) or miles per
gallon (mpg). This number is
calculated based on the number of
L/100 km (mpg) recorded since the
last time this menu item was reset.
Press and holdVwhile this display
is active to reset the trip odometer
and the average fuel economy.
Fuel Range: Shows the
approximate distance the vehicle
can be driven without refueling.
LOW will be displayed when the
vehicle is low on fuel. The fuel
range estimate is based on an
average of the vehicle's fuel
economy over recent driving history
and the amount of fuel remaining in
the fuel tank.
Oil Life: Shows an estimate of the
oil's remaining useful life.
If REMAINING OIL LIFE 99% is
displayed, that means 99% of the
current oil life remains. When the remaining oil life is low,
the CHANGE ENGINE OIL SOON
message will appear on the display.
See
Engine Oil Messages on
page 5-38. The oil should be
changed as soon as possible. See
Engine Oil on page 10-10. In
addition to the engine oil life system
monitoring the oil life, additional
maintenance is recommended in the
Maintenance Schedule. See
Maintenance Schedule on
page 11-3.
The Oil Life display must be reset
after each oil change. It will not
reset itself. Do not to reset the Oil
Life display at any time other than
when the oil has just been changed.
It cannot be reset accurately until
the next oil change. To reset the
engine oil life system, press and
hold
Vfor several seconds while
the Oil Life display is active. See
Engine Oil Life System on
page 10-13.
Page 176 of 546
Black plate (38,1)Chevrolet Silverado Owner Manual (GMNA-Localizing-U.S./Canada/Mexico-
5853506) - 2014 - crc 2nd - 5/15/13
5-38 Instruments and Controls
Engine Oil Messages
CHANGE ENGINE OIL SOON
This message displays when the
engine oil needs to be changed.
When you change the engine oil, be
sure to reset the CHANGE ENGINE
OIL SOON message. SeeEngine
Oil Life System on page 10-13 for
information on how to reset the
message. See Engine Oil on
page 10-10 andMaintenance
Schedule on page 11-3.
ENGINE OIL LOW ADD OIL
On some vehicles, this message
displays when the engine oil level
may be too low. Check the oil level
before filling to the recommended
level. If the oil is not low and this
message remains on, take the
vehicle to your dealer for service.
See Engine Oil on page 10-10.
ENGINE OIL HOT IDLE
ENGINE
This message displays when the
engine oil becomes hotter than the
normal operating temperature. Stop
and allow the vehicle to idle until it
cools down. See Engine Coolant
Temperature Gauge on page 5-16.
OIL PRESSURE LOW STOP
ENGINE
This message displays if low oil
pressure levels occur. Stop the
vehicle as soon as safely possible
and do not operate it until the cause
of the low oil pressure has been
corrected. Check the oil as soon as
possible and have the vehicle
serviced by your dealer. See Engine
Oil on page 10-10.
Engine Power Messages
ENGINE POWER IS REDUCED
This message displays and a chime
may sound when the cooling system
temperature gets too hot and the
engine further enters the engine
coolant protection mode. See
Engine Overheating on page 10-24
for more information.
This message also displays when
the vehicle's engine power is
reduced. Reduced engine power
can affect the vehicle's ability to
accelerate. If this message is on,
but there is no reduction in
performance, proceed to your
destination. The performance may
be reduced the next time the vehicle
is driven. The vehicle may be driven
at a reduced speed while this
message is on, but acceleration and
speed may be reduced. Anytime
this message stays on, the vehicle
should be taken to your dealer for
service as soon as possible.
Page 347 of 546
Black plate (79,1)Chevrolet Silverado Owner Manual (GMNA-Localizing-U.S./Canada/Mexico-
5853506) - 2014 - crc 2nd - 5/15/13
Driving and Operating 9-79
Making Turns
{Caution
Making very sharp turns while
trailering could cause the trailer to
come in contact with the vehicle.
The vehicle could be damaged.
Avoid making very sharp turns
while trailering.
When turning with a trailer, make
wider turns than normal. Do this so
the trailer will not strike soft
shoulders, curbs, road signs, trees,
or other objects. Avoid jerky or
sudden maneuvers. Signal well in
advance.
If the trailer turn signal bulbs burn
out, the arrows on the instrument
cluster will still flash for turns. It is
important to check occasionally to
be sure the trailer bulbs are still
working.
Driving on Grades
Reduce speed and shift to a lower
gear before starting down a long or
steep downgrade. If the
transmission is not shifted down, the
brakes might get hot and no longer
work well.
Vehicles can tow in D (Drive). Shift
the transmission to a lower gear if
the transmission shifts too often
under heavy loads and/or hilly
conditions.
The Tow/Haul Mode may be used if
the transmission shifts too often.
See Tow/Haul Mode on page 9-39.
When towing at high altitude on
steep uphill grades, consider the
following: Engine coolant will boil at
a lower temperature than at normal
altitudes. If the engine is turned off
immediately after towing at high
altitude on steep uphill grades, the
vehicle may show signs similar to
engine overheating. To avoid this,
let the engine run while parked,
preferably on level ground, with the
transmission in P (Park) for a few minutes before turning the engine
off. If the overheat warning comes
on, see
Engine Overheating on
page 10-24.
Parking on Hills
{Warning
Parking the vehicle on a hill with
the trailer attached can be
dangerous. If something goes
wrong, the rig could start to move.
People can be injured, and both
the vehicle and the trailer can be
damaged. When possible, always
park the rig on a flat surface.
If parking the rig on a hill:
1. Press the brake pedal, but do not shift into P (Park) yet. Turn
the wheels into the curb if facing
downhill or into traffic if facing
uphill.
2. Have someone place chocks under the trailer wheels.
Page 348 of 546
Black plate (80,1)Chevrolet Silverado Owner Manual (GMNA-Localizing-U.S./Canada/Mexico-
5853506) - 2014 - crc 2nd - 5/15/13
9-80 Driving and Operating
3. When the wheel chocks are inplace, release the regular brakes
until the chocks absorb the load.
4. Reapply the brake pedal. Then apply the parking brake and shift
into P (Park).
5. Release the brake pedal.
Leaving After Parking on a Hill
1. Apply and hold the brake pedal.
2. Start the engine.
3. Shift into a gear.
4. Release the parking brake.
5. Let up on the brake pedal.
6. Drive slowly until the trailer is clear of the chocks.
7. Stop and have someone pick up and store the chocks.
Maintenance when Trailer
Towing
The vehicle needs service more
often when pulling a trailer. See
Maintenance Schedule on
page 11-3. Things that are
especially important in trailer
operation are automatic
transmission fluid, engine oil, axle
lubricant, belts, cooling system, and
brake system. It is a good idea to
inspect these before and during
the trip.
Check periodically to see that all
hitch nuts and bolts are tight.
Trailer Towing
If the vehicle has a diesel engine,
see the Duramax diesel
supplement.
If the vehicle is bi-fuel, see the
bi-fuel supplement.
Do not tow a trailer during break-in.
See New Vehicle Break-In on
page 9-24.
{Warning
The driver can lose control when
pulling a trailer if the correct
equipment is not used or the
vehicle is not driven properly. For
example, if the trailer is too
heavy, the brakes may not work
well or even at all. The driver and
passengers could be seriously
injured. The vehicle may also be
damaged; the resulting repairs
would not be covered by the
vehicle warranty. Pull a trailer
only if all the steps in this section
have been followed. Ask your
dealer for advice and information
about towing a trailer with the
vehicle.
Page 375 of 546
Black plate (1,1)Chevrolet Silverado Owner Manual (GMNA-Localizing-U.S./Canada/Mexico-
5853506) - 2014 - crc 2nd - 5/15/13
Vehicle Care 10-1
Vehicle Care
General Information
General Information . . . . . . . . . . 10-2
California Proposition65 Warning . . . . . . . . . . . . . . . . . 10-2
California Perchlorate Materials Requirements . . . . 10-3
Accessories and Modifications . . . . . . . . . . . . . . . 10-3
Vehicle Checks
Doing Your OwnService Work . . . . . . . . . . . . . . . 10-3
Hood . . . . . . . . . . . . . . . . . . . . . . . . 10-4
Engine Compartment Overview . . . . . . . . . . . . . . . . . . . 10-5
Engine Oil . . . . . . . . . . . . . . . . . . 10-10
Engine Oil Life System . . . . . 10-13
Automatic Transmission Fluid . . . . . . . . . . . . . . . . . . . . . . 10-14
Manual Transmission Fluid . . . . . . . . . . . . . . . . . . . . . . 10-17
Hydraulic Clutch . . . . . . . . . . . . 10-18
Engine Air Cleaner/Filter . . . . 10-18
Cooling System . . . . . . . . . . . . 10-19
Engine Coolant . . . . . . . . . . . . . 10-21
Engine Overheating . . . . . . . . 10-24 Overheated Engine
Protection Operating Mode
(6.0L V8 Engine Only) . . . . . 10-26
Engine Fan . . . . . . . . . . . . . . . . . 10-26
Power Steering Fluid (4.3L V6, 5.3L V8, and 6.2L
V8 Engines) . . . . . . . . . . . . . . . 10-27
Power Steering Fluid (6.0L V8 and 6.6L
V8 Engines) . . . . . . . . . . . . . . . 10-27
Washer Fluid . . . . . . . . . . . . . . . 10-28
Brakes . . . . . . . . . . . . . . . . . . . . . 10-29
Brake Fluid . . . . . . . . . . . . . . . . . 10-30
Battery . . . . . . . . . . . . . . . . . . . . . 10-31
Four-Wheel Drive . . . . . . . . . . . 10-32
Front Axle . . . . . . . . . . . . . . . . . . 10-33
Rear Axle . . . . . . . . . . . . . . . . . . 10-34
Noise Control System . . . . . . 10-35
Starter Switch Check . . . . . . . 10-36
Automatic Transmission Shift Lock Control Function
Check . . . . . . . . . . . . . . . . . . . . . 10-37
Ignition Transmission Lock Check . . . . . . . . . . . . . . . . . . . . . 10-37
Park Brake and P (Park) Mechanism Check . . . . . . . . 10-38
Wiper Blade Replacement . . . . . . . . . . . . . . 10-38
Glass Replacement . . . . . . . . 10-39
Headlamp Aiming
Headlamp Aiming . . . . . . . . . . 10-39
Bulb Replacement
Bulb Replacement . . . . . . . . . . 10-39
Halogen Bulbs . . . . . . . . . . . . . . 10-39
Headlamps, Front Turn Signal, Sidemarker, and
Parking Lamps . . . . . . . . . . . . 10-40
Fog Lamps . . . . . . . . . . . . . . . . . 10-40
Taillamps (Chassis Cab Models) . . . . . . . . . . . . . . . . . . . 10-41
Taillamps, Turn Signal, Stoplamps, and Back-Up
Lamps . . . . . . . . . . . . . . . . . . . . 10-41
Center High-Mounted Stoplamp (CHMSL) and
Cargo Lamp . . . . . . . . . . . . . . 10-42
License Plate Lamp . . . . . . . . 10-42
Replacement Bulbs . . . . . . . . . 10-42
Electrical System
Electrical System Overload . . . . . . . . . . . . . . . . . . 10-43
Fuses . . . . . . . . . . . . . . . . . . . . . . 10-43
Page 380 of 546

Black plate (6,1)Chevrolet Silverado Owner Manual (GMNA-Localizing-U.S./Canada/Mexico-
5853506) - 2014 - crc 2nd - 5/15/13
10-6 Vehicle Care
1. Positive (+) Terminal. SeeJump
Starting on page 10-92.
2. Battery on page 10-31.
3. Coolant Surge Tank and Pressure Cap. See Cooling
System on page 10-19.
4. Engine Air Cleaner/Filter on
page 10-18.
5. Automatic Transmission Dipstick (If Equipped). See “How to
Check Automatic Transmission
Fluid” under Automatic
Transmission Fluid on
page 10-14.
6. Remote Negative (–) Location. See Jump Starting on
page 10-92.
7. Engine Cooling Fans (Out of View). See Cooling System on
page 10-19.
8. Engine Oil Fill Cap. See “When
to Add Engine Oil” underEngine
Oil on page 10-10. 9. Engine Oil Dipstick. See
“Checking Engine Oil” under
Engine Oil on page 10-10.
10. Brake Fluid Reservoir. See Brake Fluid on page 10-30.
11. Windshield Washer Fluid Reservoir. See “Adding Washer
Fluid” under Washer Fluid on
page 10-28.
12. Clutch Fluid Reservoir (If Equipped). See Hydraulic
Clutch on page 10-18.
13. Engine Compartment Fuse
Block on page 10-44.
Page 382 of 546

Black plate (8,1)Chevrolet Silverado Owner Manual (GMNA-Localizing-U.S./Canada/Mexico-
5853506) - 2014 - crc 2nd - 5/15/13
10-8 Vehicle Care
1. Positive (+) Terminal. SeeJump
Starting on page 10-92.
2. Battery on page 10-31.
3. Coolant Surge Tank and Pressure Cap. See Cooling
System on page 10-19.
4. Engine Air Cleaner/Filter on
page 10-18.
5. Automatic Transmission Dipstick. See “How to Check
Automatic Transmission Fluid”
under Automatic Transmission
Fluid on page 10-14.
6. Remote Negative (–) Location (Out of View). See Jump Starting
on page 10-92.
7. Engine Cooling Fans (Out of View). See Cooling System on
page 10-19.
8. Engine Oil Fill Cap. See “When
to Add Engine Oil” underEngine
Oil on page 10-10.
9. Engine Oil Dipstick. See “Checking Engine Oil” under
Engine Oil on page 10-10. 10. Windshield Washer Fluid
Reservoir. See “Adding Washer
Fluid” under Washer Fluid on
page 10-28.
11. Brake Fluid Reservoir. See Brake Fluid on page 10-30.
12. Engine Compartment Fuse
Block on page 10-44.
Page 384 of 546
Black plate (10,1)Chevrolet Silverado Owner Manual (GMNA-Localizing-U.S./Canada/Mexico-
5853506) - 2014 - crc 2nd - 5/15/13
10-10 Vehicle Care
1. Positive (+) Terminal. SeeJump
Starting on page 10-92.
2. Battery on page 10-31.
3. Coolant Surge Tank and Pressure Cap. See Cooling
System on page 10-19.
4. Engine Air Cleaner/Filter on
page 10-18.
5. Automatic Transmission Dipstick. See “How to Check
Automatic Transmission Fluid”
under Automatic Transmission
Fluid on page 10-14.
6. Engine Oil Dipstick. See “Checking Engine Oil” under
Engine Oil on page 10-10.
7. Engine Oil Fill Cap. See “When
to Add Engine Oil” underEngine
Oil on page 10-10.
8. Engine Cooling Fan (Out of View). See Cooling System on
page 10-19. 9. Remote Negative (–) Location.
See Jump Starting on
page 10-92.
10. Power Steering Fluid Reservoir. See Power Steering
Fluid (6.0L V8 and 6.6L
V8 Engines) on page 10-27 or
Power Steering Fluid (4.3L V6,
5.3L V8, and 6.2L V8 Engines)
on page 10-27.
11. Windshield Washer Fluid Reservoir. See “Adding Washer
Fluid” under Washer Fluid on
page 10-28.
12. Brake Fluid Reservoir. See Brake Fluid on page 10-30.
13. Auxiliary Battery (If Equipped). SeeBattery on page 10-31.
14. Engine Compartment Fuse
Block on page 10-44.
If the vehicle has a diesel engine
and/or an Allison Transmission, see
the Duramax diesel supplement.Engine Oil
For diesel engine vehicles, see
“Engine Oil” in the Duramax diesel
supplement.
To ensure proper engine
performance and long life, careful
attention must be paid to engine oil.
Following these simple, but
important steps will help protect
your investment:
.Always use engine oil approved
to the proper specification and of
the proper viscosity grade. See
“Selecting the Right Engine Oil”
in this section.
.Check the engine oil level
regularly and maintain the
proper oil level. See “Checking
Engine Oil” and“When to Add
Engine Oil” in this section.
.Change the engine oil at the
appropriate time. See Engine Oil
Life System on page 10-13.
.Always dispose of engine oil
properly. See “What to Do with
Used Oil” in this section.
Page 385 of 546
Black plate (11,1)Chevrolet Silverado Owner Manual (GMNA-Localizing-U.S./Canada/Mexico-
5853506) - 2014 - crc 2nd - 5/15/13
Vehicle Care 10-11
Checking Engine Oil
It is a good idea to check the engine
oil level at each fuel fill. In order to
get an accurate reading, the vehicle
must be on level ground. The
engine oil dipstick handle is a loop.
SeeEngine Compartment Overview
on page 10-5 for the location of the
engine oil dipstick.
If a low oil message displays on the
DIC, it is important to park on level
ground to accurately measure the
oil level on the dipstick. Idling the
vehicle on steep grades for a long
time can influence the level sensing
accuracy.
Obtaining an accurate oil level
reading is essential:
1. If the engine has been running recently, turn off the engine and
allow several minutes for the oil
to drain back into the oil pan.
Checking the oil level too soon
after engine shutoff will not
provide an accurate oil level
reading.{Warning
The engine oil dipstick handle
may be hot; it could burn you.
Use a towel or glove to touch the
dipstick handle.
2. Pull out the dipstick and clean it with a paper towel or cloth, then
push it back in all the way.
Remove it again, keeping the tip
down, and check the level.
When to Add Engine Oil
If the oil is below the cross-hatched
area at the tip of the dipstick, add
1 L (1 qt) of the recommended oil
and then recheck the level. See
“Selecting the Right Engine Oil” in
this section for an explanation of what kind of oil to use. For engine
oil crankcase capacity, see
Capacities and Specifications on
page 12-2.
{Caution
Do not add too much oil. Oil
levels above or below the
acceptable operating range
shown on the dipstick are harmful
to the engine. If you find that you
have an oil level above the
operating range, i.e., the engine
has so much oil that the oil level
gets above the cross-hatched
area that shows the proper
operating range, the engine could
be damaged. You should drain
out the excess oil or limit driving
of the vehicle and seek a service
professional to remove the
excess amount of oil.
See Engine Compartment Overview
on page 10-5 for the location of the
engine oil fill cap.