spare wheel CHEVROLET SILVERADO 2014 2.G Owners Manual
[x] Cancel search | Manufacturer: CHEVROLET, Model Year: 2014, Model line: SILVERADO, Model: CHEVROLET SILVERADO 2014 2.GPages: 546, PDF Size: 8.08 MB
Page 274 of 546
Black plate (6,1)Chevrolet Silverado Owner Manual (GMNA-Localizing-U.S./Canada/Mexico-
5853506) - 2014 - crc 2nd - 5/15/13
9-6 Driving and Operating
If the vehicle starts to slide, follow
these suggestions:
.Ease your foot off the
accelerator pedal and steer the
way you want the vehicle to go.
The vehicle may straighten out.
Be ready for a second skid if it
occurs.
.Slow down and adjust your
driving according to weather
conditions. Stopping distance
can be longer and vehicle
control can be affected when
traction is reduced by water,
snow, ice, gravel, or other
material on the road. Learn to
recognize warning clues—such
as enough water, ice, or packed
snow on the road to make a
mirrored surface —and slow
down when you have any doubt.
.Try to avoid sudden steering,
acceleration, or braking,
including reducing vehicle speed
by shifting to a lower gear. Any
sudden changes could cause
the tires to slide. Remember: Antilock brakes help
avoid only the braking skid.
Off-Road Driving
Four-wheel-drive vehicles can be
used for off-road driving. Vehicles
without four-wheel drive and
vehicles not equipped with All
Terrain (AT) or On-Off Road (OOR)
tires must not be driven off-road
except on a level, solid surface. For
more contact information about the
original equipment tires, see the
Limited Warranty and Owner
Assistance Information manual.
One of the best ways for successful
off-road driving is to control the
speed.
{Warning
When driving off-road, bouncing
and quick changes in direction
can easily throw you out of
position. This could cause you to
(Continued)
Warning (Continued)
lose control and crash. You and
your passengers should always
wear safety belts.
Before Driving Off-Road
.Have all necessary maintenance
and service work completed.
.Fuel the vehicle, fill fluid levels,
and check inflation pressure in
all tires, including the spare,
if equipped.
.Read all the information about
four-wheel-drive vehicles in this
manual.
.Remove any underbody air
deflector, if equipped. Re-attach
the air deflector after off-road
driving.
.Know the local laws that apply to
off-road driving.
Page 363 of 546
Black plate (95,1)Chevrolet Silverado Owner Manual (GMNA-Localizing-U.S./Canada/Mexico-
5853506) - 2014 - crc 2nd - 5/15/13
Driving and Operating 9-95
Basic Trailer Wiring
All regular, double cab, and crew
cab pickups have a seven-wire
trailer towing harness.
For vehicles not equipped with
heavy duty trailering, the harness is
secured to the vehicle's frame
behind the spare tire mount. The
harness requires the installation of a
trailer connector, which is available
through your dealer.
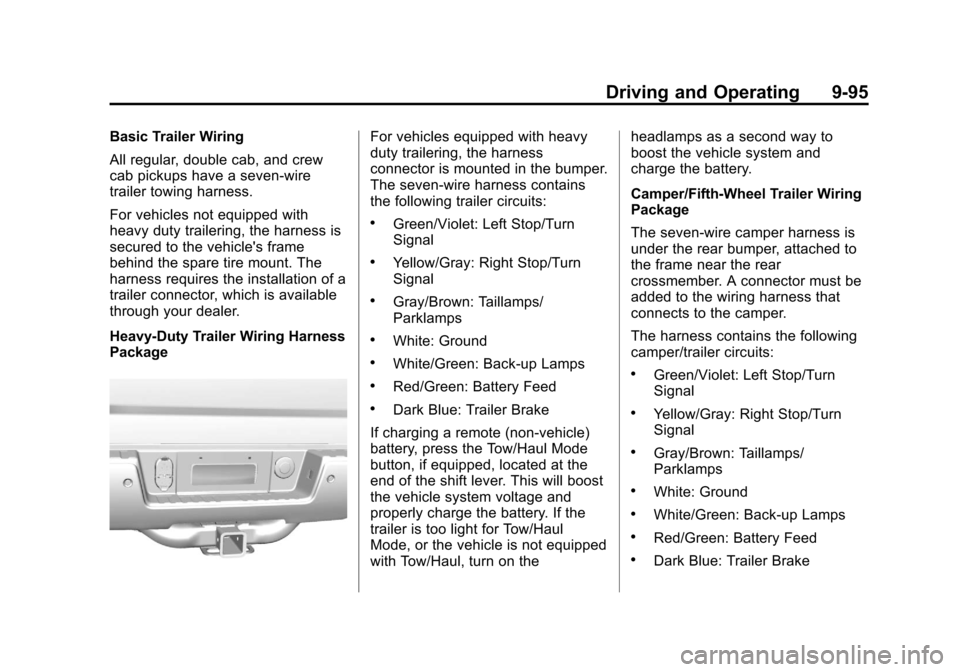
Heavy-Duty Trailer Wiring Harness
PackageFor vehicles equipped with heavy
duty trailering, the harness
connector is mounted in the bumper.
The seven-wire harness contains
the following trailer circuits:
.Green/Violet: Left Stop/Turn
Signal
.Yellow/Gray: Right Stop/Turn
Signal
.Gray/Brown: Taillamps/
Parklamps
.White: Ground
.White/Green: Back-up Lamps
.Red/Green: Battery Feed
.Dark Blue: Trailer Brake
If charging a remote (non-vehicle)
battery, press the Tow/Haul Mode
button, if equipped, located at the
end of the shift lever. This will boost
the vehicle system voltage and
properly charge the battery. If the
trailer is too light for Tow/Haul
Mode, or the vehicle is not equipped
with Tow/Haul, turn on the headlamps as a second way to
boost the vehicle system and
charge the battery.
Camper/Fifth-Wheel Trailer Wiring
Package
The seven-wire camper harness is
under the rear bumper, attached to
the frame near the rear
crossmember. A connector must be
added to the wiring harness that
connects to the camper.
The harness contains the following
camper/trailer circuits:
.Green/Violet: Left Stop/Turn
Signal
.Yellow/Gray: Right Stop/Turn
Signal
.Gray/Brown: Taillamps/
Parklamps
.White: Ground
.White/Green: Back-up Lamps
.Red/Green: Battery Feed
.Dark Blue: Trailer Brake
Page 376 of 546
Black plate (2,1)Chevrolet Silverado Owner Manual (GMNA-Localizing-U.S./Canada/Mexico-
5853506) - 2014 - crc 2nd - 5/15/13
10-2 Vehicle Care
Engine Compartment FuseBlock . . . . . . . . . . . . . . . . . . . . . 10-44
Instrument Panel Fuse Block (Left) . . . . . . . . . . . . . . . 10-48
Instrument Panel Fuse Block
(Right) . . . . . . . . . . . . . . . . . . . . 10-51
Wheels and Tires
Tires . . . . . . . . . . . . . . . . . . . . . . . . 10-54
All-Season Tires . . . . . . . . . . . . 10-55
Winter Tires . . . . . . . . . . . . . . . . 10-55
Low-Profile Tires . . . . . . . . . . . 10-56
All-Terrain Tires . . . . . . . . . . . . 10-56
Tire Sidewall Labeling . . . . . . 10-56
Tire Designations . . . . . . . . . . . 10-59
Tire Terminology andDefinitions . . . . . . . . . . . . . . . . 10-60
Tire Pressure . . . . . . . . . . . . . . . 10-63
Tire Pressure Monitor System . . . . . . . . . . . . . . . . . . . 10-65
Tire Pressure Monitor Operation . . . . . . . . . . . . . . . . . 10-66
Tire Inspection . . . . . . . . . . . . . . 10-69
Tire Rotation . . . . . . . . . . . . . . . 10-69
Dual Tire Rotation . . . . . . . . . . 10-71
When It Is Time for New Tires . . . . . . . . . . . . . . . . . . . . . . 10-72
Buying New Tires . . . . . . . . . . . 10-73 Different Size Tires and
Wheels . . . . . . . . . . . . . . . . . . . 10-74
Uniform Tire Quality Grading . . . . . . . . . . . . . . . . . . . 10-75
Wheel Alignment and Tire
Balance . . . . . . . . . . . . . . . . . . . 10-76
Wheel Replacement . . . . . . . . 10-77
Tire Chains . . . . . . . . . . . . . . . . . 10-78
If a Tire Goes Flat . . . . . . . . . . 10-79
Tire Changing . . . . . . . . . . . . . . 10-80
Full-Size Spare Tire . . . . . . . . 10-91
Jump Starting
Jump Starting . . . . . . . . . . . . . . 10-92
Towing the Vehicle
Towing the Vehicle . . . . . . . . . 10-96
Recreational Vehicle Towing . . . . . . . . . . . . . . . . . . . . 10-97
Appearance Care
Exterior Care . . . . . . . . . . . . . . . 10-99
Interior Care . . . . . . . . . . . . . . . 10-104
Floor Mats . . . . . . . . . . . . . . . . 10-107
General Information
For service and parts needs, visit
your dealer. You will receive
genuine GM parts and GM-trained
and supported service people.
Genuine GM parts have one of
these marks:
California Proposition
65 Warning
Most motor vehicles, including this
one, contain and/or emit chemicals
known to the State of California to
Page 424 of 546
Black plate (50,1)Chevrolet Silverado Owner Manual (GMNA-Localizing-U.S./Canada/Mexico-
5853506) - 2014 - crc 2nd - 5/15/13
10-50 Vehicle Care
The vehicle may not be equipped
with all of the fuses, relays, and
features shown.Number Usage
1 Accessory Power Outlet 2
2 SEO Retained Accessory Power
3 Universal Garage Door Opener/Inside
Rearview Mirror
6 Body Control Module 3
7 Body Control Module 5
8 Driver Window Switch/Mirror Switch
9 Body Control Module 7
11 Accessory Power Outlets
12 Retained Accessory Power/Accessory Number Usage
13 Discrete Logic Ignition Switch
14 Switch Backlighting
17 Body Control Module 1
19 Spare
20 Spare
22 Heater, Ventilation and Air Conditioning/
Auxiliary Heater,
Ventilation and Air
Conditioning Ignition
23 Instrument Cluster Ignition/Sensing
Diagnostic Module
Ignition
24 Spare
25 Airbag/Info
26 Passive Entry Passive Start/Heater,
Ventilation and Air
Conditioning Number Usage
27 Spare
28 Spare
29 Park Enable/ Electrically Adjustable
Pedals
30 SEO
31 Accessory/Run Crank
32 Heated Steering Wheel
33 Spare
34 Instrument Cluster
36 Spare
37 Spare
40 Left Doors
41 Driver Power Seat
43 Left Front Heated/ Cooled Seat
44 Amplifier
45 Spare
Page 427 of 546
Black plate (53,1)Chevrolet Silverado Owner Manual (GMNA-Localizing-U.S./Canada/Mexico-
5853506) - 2014 - crc 2nd - 5/15/13
Vehicle Care 10-53
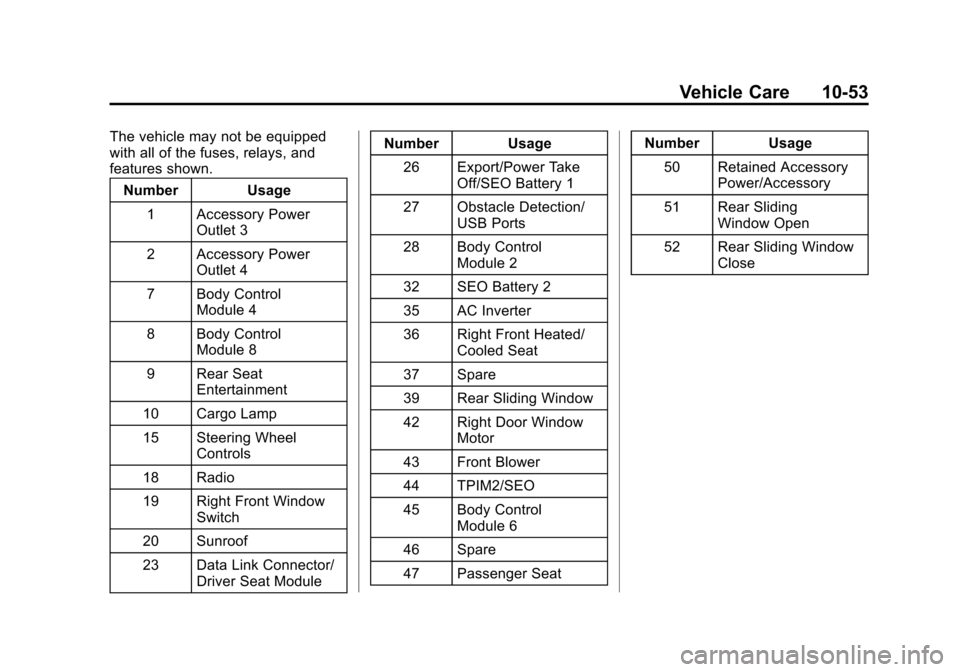
The vehicle may not be equipped
with all of the fuses, relays, and
features shown.Number Usage
1 Accessory Power Outlet 3
2 Accessory Power Outlet 4
7 Body Control Module 4
8 Body Control Module 8
9 Rear Seat Entertainment
10 Cargo Lamp
15 Steering Wheel Controls
18 Radio
19 Right Front Window Switch
20 Sunroof
23 Data Link Connector/ Driver Seat Module Number Usage
26 Export/Power Take Off/SEO Battery 1
27 Obstacle Detection/ USB Ports
28 Body Control Module 2
32 SEO Battery 2
35 AC Inverter
36 Right Front Heated/ Cooled Seat
37 Spare
39 Rear Sliding Window
42 Right Door Window Motor
43 Front Blower
44 TPIM2/SEO
45 Body Control Module 6
46 Spare
47 Passenger Seat Number Usage
50 Retained Accessory Power/Accessory
51 Rear Sliding Window Open
52 Rear Sliding Window Close
Page 430 of 546
Black plate (56,1)Chevrolet Silverado Owner Manual (GMNA-Localizing-U.S./Canada/Mexico-
5853506) - 2014 - crc 2nd - 5/15/13
10-56 Vehicle Care
Low-Profile Tires
If the vehicle has P275/55R20,
P285/50R20, or P285/45R22
size tires, they are classified as
low-profile tires.
{Caution
Low-profile tires are more
susceptible to damage from
road hazards or curb impact
than standard profile tires. Tire
and/or wheel assembly damage
can occur when coming into
contact with road hazards like
potholes, or sharp edged
objects, or when sliding into a
curb. The warranty does not
cover this type of damage.
Keep tires set to the correct
inflation pressure and when
possible, avoid contact with
curbs, potholes, and other road
hazards.
All-Terrain Tires
This vehicle may have All-Terrain
Tires. These tires provide good
performance on most road surfaces,
weather conditions, and for off-road
driving. SeeOff-Road Driving on
page 9-6.
The tread pattern on these tires may
wear more quickly than other tires.
Consider rotating the tires more
frequently than at 12 000 km
(7,500 mi) intervals if irregular wear
is noted when the tires are
inspected. See Tire Inspection on
page 10-69.
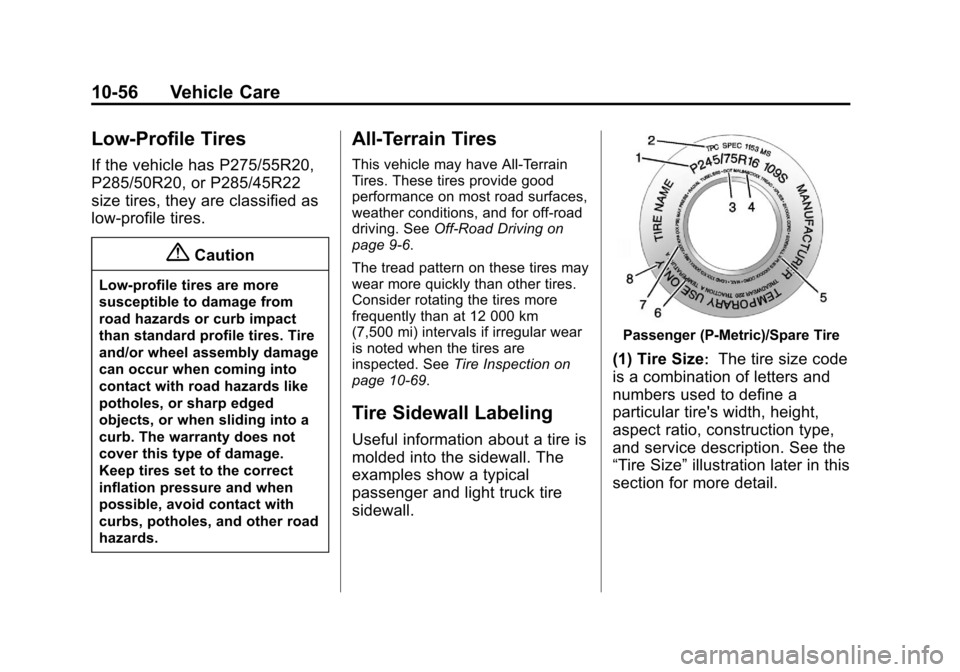
Tire Sidewall Labeling
Useful information about a tire is
molded into the sidewall. The
examples show a typical
passenger and light truck tire
sidewall.
Passenger (P-Metric)/Spare Tire
(1) Tire Size:The tire size code
is a combination of letters and
numbers used to define a
particular tire's width, height,
aspect ratio, construction type,
and service description. See the
“Tire Size” illustration later in this
section for more detail.
Page 440 of 546
Black plate (66,1)Chevrolet Silverado Owner Manual (GMNA-Localizing-U.S./Canada/Mexico-
5853506) - 2014 - crc 2nd - 5/15/13
10-66 Vehicle Care
wheels on the vehicle that prevent
the TPMS from functioning properly.
Always check the TPMS malfunction
telltale after replacing one or more
tires or wheels on your vehicle to
ensure that the replacement or
alternate tires and wheels allow the
TPMS to continue to function
properly.
SeeTire Pressure Monitor
Operation on page 10-66.
See Radio Frequency Statement on
page 13-15.
Tire Pressure Monitor
Operation
This vehicle may have a Tire
Pressure Monitor System (TPMS).
The TPMS is designed to warn the
driver when a low tire pressure
condition exists. TPMS sensors are
mounted onto each tire and wheel
assembly, excluding the spare tire
and wheel assembly. The TPMS
sensors monitor the air pressure in the tires and transmit the tire
pressure readings to a receiver
located in the vehicle.
When a low tire pressure condition
is detected, the TPMS illuminates
the low tire pressure warning light
located on the instrument cluster.
If the warning light comes on, stop
as soon as possible and inflate the
tires to the recommended pressure
shown on the Tire and Loading
Information label. See
Vehicle Load
Limits on page 9-16.
A message to check the pressure in
a specific tire displays in the Driver
Information Center (DIC). The low
tire pressure warning light and the
DIC warning message come on at
each ignition cycle until the tires are
inflated to the correct inflation
pressure. If the vehicle has DIC buttons, tire pressure levels can be
viewed. For additional information
and details about the DIC operation
and displays, see
Driver Information
Center (DIC) (Base Level) on
page 5-30 orDriver Information
Center (DIC) (Uplevel) on page 5-32
and Tire Messages on page 5-42.
The low tire pressure warning light
may come on in cool weather when
the vehicle is first started, and then
turn off as the vehicle is driven. This
could be an early indicator that the
air pressure is getting low and
needs to be inflated to the proper
pressure.
A Tire and Loading Information label
shows the size of the original
equipment tires and the correct
inflation pressure for the tires when
they are cold. See Vehicle Load
Limits on page 9-16, for an example
of the Tire and Loading Information
label and its location. Also see Tire
Pressure on page 10-63.
Page 441 of 546
Black plate (67,1)Chevrolet Silverado Owner Manual (GMNA-Localizing-U.S./Canada/Mexico-
5853506) - 2014 - crc 2nd - 5/15/13
Vehicle Care 10-67
The TPMS can warn about a low
tire pressure condition but it does
not replace normal tire
maintenance. SeeTire Inspection
on page 10-69, Tire Rotation on
page 10-69 andTires on
page 10-54.
{Caution
Tire sealant materials are not all
the same. A non-approved tire
sealant could damage the TPMS
sensors. TPMS sensor damage
caused by using an incorrect tire
sealant is not covered by the
vehicle warranty. Always use only
the GM approved tire sealant
available through your dealer or
included in the vehicle.
TPMS Malfunction Light and
Message
The TPMS will not function properly
if one or more of the TPMS sensors
are missing or inoperable. When the
system detects a malfunction, the
low tire pressure warning light
flashes for about one minute and
then stays on for the remainder of
the ignition cycle. A DIC warning
message also displays. The
malfunction light and DIC warning
message come on at each ignition
cycle until the problem is corrected.
Some of the conditions that can
cause these to come on are:
.One of the road tires has been
replaced with the spare tire. The
spare tire does not have a
TPMS sensor. The malfunction
light and the DIC message
should go off after the road tire
is replaced and the sensor
matching process is performed
successfully. See "TPMS Sensor
Matching Process" later in this
section.
.The TPMS sensor matching
process was not done or not
completed successfully after
rotating the tires. The
malfunction light and the DIC
message should go off after
successfully completing the
sensor matching process. See
"TPMS Sensor Matching
Process" later in this section.
.One or more TPMS sensors are
missing or damaged. The
malfunction light and the DIC
message should go off when the
TPMS sensors are installed and
the sensor matching process is
performed successfully. See
your dealer for service.
.Replacement tires or wheels do
not match the original equipment
tires or wheels. Tires and wheels
other than those recommended
could prevent the TPMS from
functioning properly. See Buying
New Tires on page 10-73.
Page 442 of 546
Black plate (68,1)Chevrolet Silverado Owner Manual (GMNA-Localizing-U.S./Canada/Mexico-
5853506) - 2014 - crc 2nd - 5/15/13
10-68 Vehicle Care
.Operating electronic devices or
being near facilities using radio
wave frequencies similar to the
TPMS could cause the TPMS
sensors to malfunction.
If the TPMS is not functioning
properly, it cannot detect or signal a
low tire condition. See your dealer
for service if the TPMS malfunction
light and DIC message come on
and stay on.
TPMS Sensor Matching
Process
Each TPMS sensor has a unique
identification code. The identification
code needs to be matched to a new
tire/wheel position after rotating the
vehicle’s tires or replacing one or
more of the TPMS sensors. Also,
the TPMS sensor matching process
should be performed after replacing
a spare tire with a road tire
containing the TPMS sensor. The
malfunction light and the DIC
message should go off at the next
ignition cycle. The sensors are
matched to the tire/wheel positions, using a TPMS relearn tool, in the
following order: driver side front tire,
passenger side front tire, passenger
side rear tire, and driver side rear.
See your dealer for service or to
purchase a relearn tool.
There are two minutes to match the
first tire/wheel position, and
five minutes overall to match all four
tire/wheel positions. If it takes
longer, the matching process stops
and must be restarted.
The TPMS sensor matching
process is:
1. Set the parking brake.
2. Turn the ignition to ON/RUN with
the engine off.
3. Uplevel DIC Only: Make sure the Tire Pressure info page option is
turned on. The info pages on the
DIC can be turned on and off
through the Settings menu. See
Driver Information Center (DIC)
(Base Level) on page 5-30 or
Driver Information Center (DIC)
(Uplevel) on page 5-32. 4. If the vehicle has an uplevel
DIC, use the DIC controls on the
right side of the steering wheel
to scroll to the Tire Pressure
screen under the DIC info page.
If the vehicle has a base level
DIC, use the trip odometer reset
stem to scroll to the Tire
Pressure screen.
5. If the vehicle has an uplevel DIC, press and hold the
V(Set/
Reset) button located in the
center of the DIC controls.
If the vehicle has a base level
DIC, press and hold the trip
odometer reset stem for about
five seconds. A message asking
if the process should begin
should appear. Select yes and
press the trip odometer reset
stem to confirm the selection.
The horn sounds twice to signal
the receiver is in relearn mode
and the TIRE LEARNING
ACTIVE message displays on
the DIC screen.
Page 443 of 546
Black plate (69,1)Chevrolet Silverado Owner Manual (GMNA-Localizing-U.S./Canada/Mexico-
5853506) - 2014 - crc 2nd - 5/15/13
Vehicle Care 10-69
6. Start with the driver sidefront tire.
7. Place the relearn tool against the tire sidewall, near the valve
stem. Then press the button to
activate the TPMS sensor.
A horn chirp confirms that the
sensor identification code has
been matched to this tire and
wheel position.
8. Proceed to the passenger side front tire, and repeat the
procedure in Step 7.
9. Proceed to the passenger side rear tire, and repeat the
procedure in Step 7.
10. Proceed to the driver side rear tire, and repeat the procedure
in Step 7. The horn sounds two
times to indicate the sensor
identification code has been
matched to the driver side rear
tire, and the TPMS sensor
matching process is no longer
active. The TIRE LEARNING
ACTIVE message on the DIC
display screen goes off. 11. Turn the ignition switch to
LOCK/OFF.
12. Set all four tires to the recommended air pressure
level as indicated on the Tire
and Loading Information label.
Tire Inspection
We recommend that the tires,
including the spare tire, if the
vehicle has one, be inspected
for signs of wear or damage at
least once a month.
Replace the tire if:
.The indicators at three or
more places around the tire
can be seen.
.There is cord or fabric
showing through the tire's
rubber.
.The tread or sidewall is
cracked, cut, or snagged
deep enough to show cord or
fabric.
.The tire has a bump, bulge,
or split.
.The tire has a puncture, cut,
or other damage that cannot
be repaired well because of
the size or location of the
damage.
Tire Rotation
Tires should be rotated every
12 000 km (7,500 mi). See
Maintenance Schedule on
page 11-3.
Tires are rotated to achieve a
uniform wear for all tires. The
first rotation is the most
important.
Anytime unusual wear is
noticed, rotate the tires as soon
as possible, check for proper tire
inflation pressure, and check for
damaged tires or wheels. If the
unusual wear continues after the
rotation, check the wheel
alignment.