buttons CHEVROLET SILVERADO 2016 3.G Owners Manual
[x] Cancel search | Manufacturer: CHEVROLET, Model Year: 2016, Model line: SILVERADO, Model: CHEVROLET SILVERADO 2016 3.GPages: 533, PDF Size: 8.17 MB
Page 14 of 533
Chevrolet Silverado Owner Manual (GMNA-Localizing-U.S./Canada/Mexico-
9159338) - 2016 - crc - 10/21/15
In Brief 13
To return the seatback to the upright
position:1. Lift the lever fully without applying pressure to the
seatback, and the seatback will
return to the upright position.
2. Push and pull on the seatback to make sure it is locked.
See Reclining Seatbacks 061.
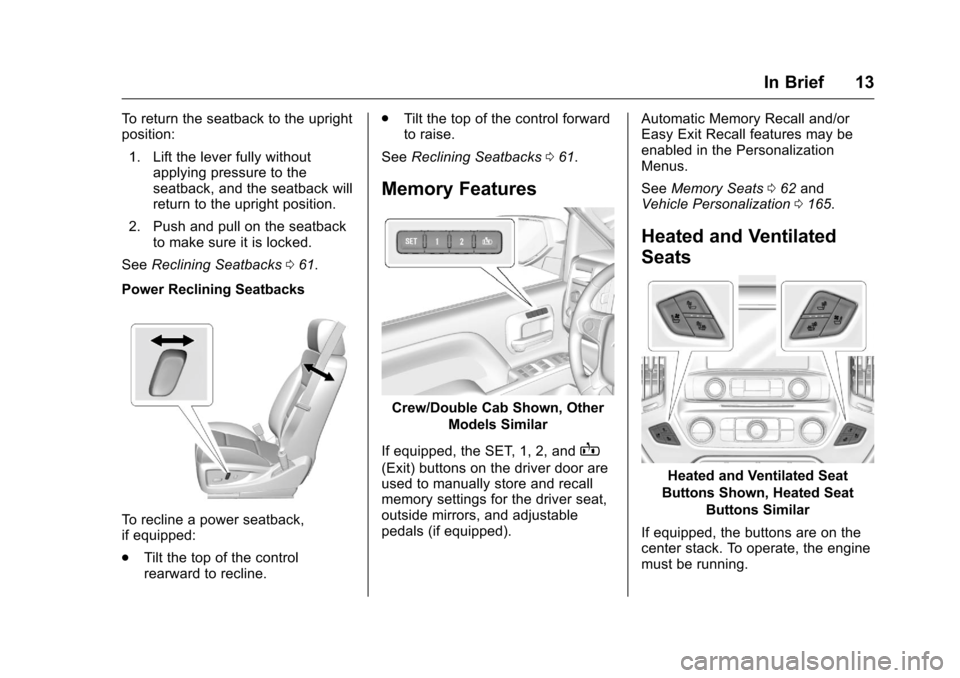
Power Reclining Seatbacks
To recline a power seatback,
if equipped:
. Tilt the top of the control
rearward to recline. .
Tilt the top of the control forward
to raise.
See Reclining Seatbacks 061.
Memory Features
Crew/Double Cab Shown, Other
Models Similar
If equipped, the SET, 1, 2, and
B
(Exit) buttons on the driver door are
used to manually store and recall
memory settings for the driver seat,
outside mirrors, and adjustable
pedals (if equipped). Automatic Memory Recall and/or
Easy Exit Recall features may be
enabled in the Personalization
Menus.
See
Memory Seats 062 and
Vehicle Personalization 0165.
Heated and Ventilated
Seats
Heated and Ventilated Seat
Buttons Shown, Heated Seat Buttons Similar
If equipped, the buttons are on the
center stack. To operate, the engine
must be running.
Page 23 of 533
Chevrolet Silverado Owner Manual (GMNA-Localizing-U.S./Canada/Mexico-
9159338) - 2016 - crc - 10/21/15
22 In Brief
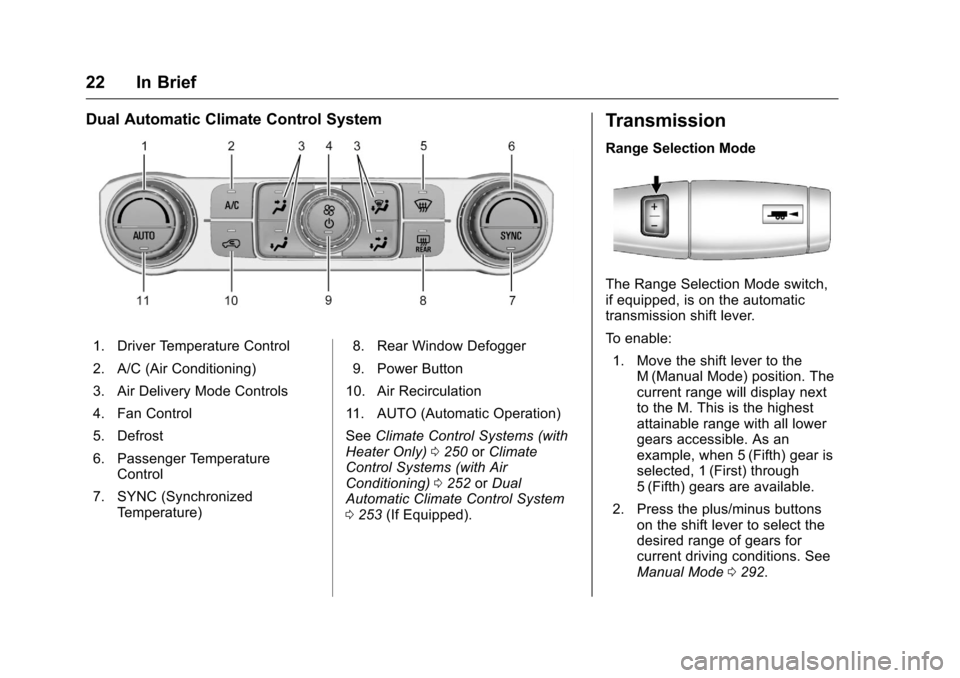
Dual Automatic Climate Control System
1. Driver Temperature Control
2. A/C (Air Conditioning)
3. Air Delivery Mode Controls
4. Fan Control
5. Defrost
6. Passenger TemperatureControl
7. SYNC (Synchronized Temperature) 8. Rear Window Defogger
9. Power Button
10. Air Recirculation
11. AUTO (Automatic Operation)
See Climate Control Systems (with
Heater Only) 0250 orClimate
Control Systems (with Air
Conditioning) 0252 orDual
Automatic Climate Control System
0 253 (If Equipped).
Transmission
Range Selection Mode
The Range Selection Mode switch,
if equipped, is on the automatic
transmission shift lever.
To enable:
1. Move the shift lever to the M (Manual Mode) position. The
current range will display next
to the M. This is the highest
attainable range with all lower
gears accessible. As an
example, when 5 (Fifth) gear is
selected, 1 (First) through
5 (Fifth) gears are available.
2. Press the plus/minus buttons on the shift lever to select the
desired range of gears for
current driving conditions. See
Manual Mode 0292.
Page 30 of 533
Chevrolet Silverado Owner Manual (GMNA-Localizing-U.S./Canada/Mexico-
9159338) - 2016 - crc - 10/21/15
In Brief 29
SeeAssistance Systems for Parking
or Backing 0314.
Power Outlets
Accessory power outlets can be
used to plug in electrical equipment,
such as a cell phone, MP3
player, etc.
The vehicle may have up to four
accessory power outlets.
Vehicles with a Center Console
.
One or two in front of the
cupholders on the center
console.
. One inside the center console.
. One on the rear of the center
console.
Vehicles with Bench Seats
. One on the center stack below
the climate control system.
. One or two in the storage area
on the bench seat.
Lift the cover to access and replace
when not in use.
See Power Outlets 0128.
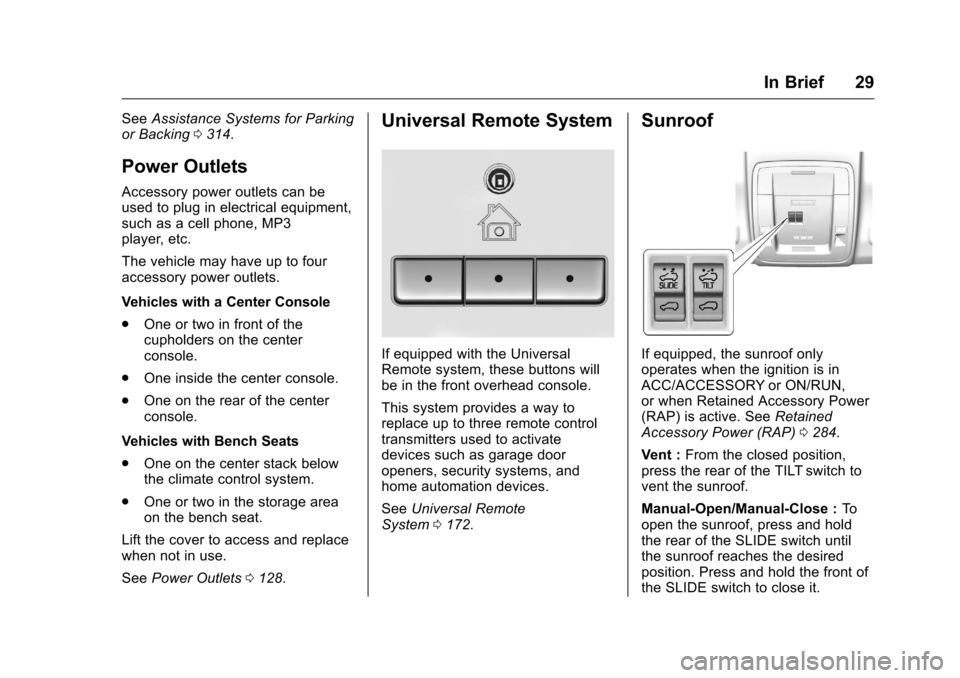
Universal Remote System
If equipped with the Universal
Remote system, these buttons will
be in the front overhead console.
This system provides a way to
replace up to three remote control
transmitters used to activate
devices such as garage door
openers, security systems, and
home automation devices.
See Universal Remote
System 0172.
Sunroof
If equipped, the sunroof only
operates when the ignition is in
ACC/ACCESSORY or ON/RUN,
or when Retained Accessory Power
(RAP) is active. See Retained
Accessory Power (RAP) 0284.
Vent : From the closed position,
press the rear of the TILT switch to
vent the sunroof.
Manual-Open/Manual-Close : To
open the sunroof, press and hold
the rear of the SLIDE switch until
the sunroof reaches the desired
position. Press and hold the front of
the SLIDE switch to close it.
Page 32 of 533
Chevrolet Silverado Owner Manual (GMNA-Localizing-U.S./Canada/Mexico-
9159338) - 2016 - crc - 10/21/15
In Brief 31
in the instrument cluster and the
appropriate DIC message
displays. SeeRide Control
System Messages 0159.
. Press and release
gagain to
turn on both systems.
StabiliTrak will automatically turn on
if the vehicle exceeds 56 km/h
(35 mph). Traction control will
remain off.
See Traction Control/Electronic
Stability Control 0308.
Tire Pressure Monitor
This vehicle may have a Tire
Pressure Monitor System (TPMS).
The low tire pressure warning light
alerts to a significant loss in
pressure of one of the vehicle's
tires. If the warning light comes on,
stop as soon as possible and inflate the tires to the recommended
pressure shown on the Tire and
Loading Information label. See
Vehicle Load Limits
0272. The
warning light will remain on until the
tire pressure is corrected.
The low tire pressure warning light
may come on in cool weather when
the vehicle is first started, and then
turn off as the vehicle is driven. This
may be an early indicator that the
tire pressures are getting low and
the tires need to be inflated to the
proper pressure.
The TPMS does not replace normal
monthly tire maintenance. Maintain
the correct tire pressures.
See Tire Pressure Monitor
System 0417.
Engine Oil Life System
The engine oil life system calculates
engine oil life based on vehicle use
and, on most vehicles, displays a
DIC message when it is necessary
to change the engine oil and filter.
The oil life system should be reset
to 100% only following an oil
change. Resetting the Oil Life System
To reset the engine oil life system:
1. Display OIL LIFE REMAINING on the DIC. See Driver
Information Center (DIC) (Base
Level) 0150 orDriver
Information Center (DIC)
(Uplevel) 0152. If the vehicle
does not have DIC buttons, the
vehicle must be in P (Park) to
access this display.
2. Press and hold the
Vbutton on
the DIC, or the trip odometer
reset stem if the vehicle does
not have DIC buttons, for
several seconds. The oil life
will change to 100%.
The oil life system can also be reset
as follows:
1. Turn the ignition to ON/RUN with the engine off.
2. Fully press the accelerator pedal slowly three times within
five seconds.
Page 52 of 533
Chevrolet Silverado Owner Manual (GMNA-Localizing-U.S./Canada/Mexico-
9159338) - 2016 - crc - 10/21/15
Keys, Doors, and Windows 51
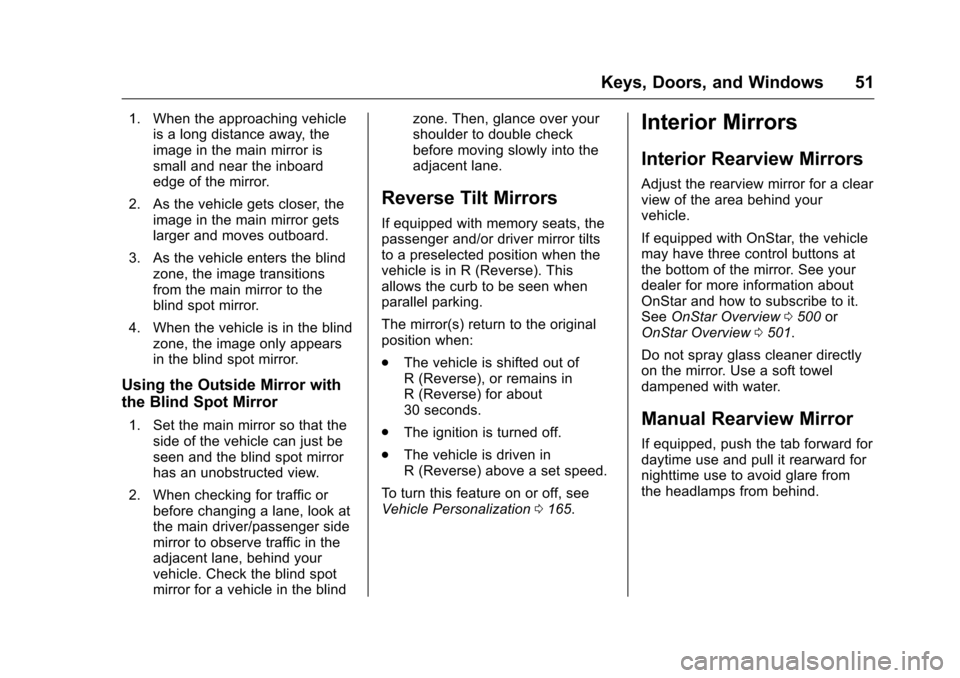
1. When the approaching vehicleis a long distance away, the
image in the main mirror is
small and near the inboard
edge of the mirror.
2. As the vehicle gets closer, the image in the main mirror gets
larger and moves outboard.
3. As the vehicle enters the blind zone, the image transitions
from the main mirror to the
blind spot mirror.
4. When the vehicle is in the blind zone, the image only appears
in the blind spot mirror.
Using the Outside Mirror with
the Blind Spot Mirror
1. Set the main mirror so that theside of the vehicle can just be
seen and the blind spot mirror
has an unobstructed view.
2. When checking for traffic or before changing a lane, look at
the main driver/passenger side
mirror to observe traffic in the
adjacent lane, behind your
vehicle. Check the blind spot
mirror for a vehicle in the blind zone. Then, glance over your
shoulder to double check
before moving slowly into the
adjacent lane.
Reverse Tilt Mirrors
If equipped with memory seats, the
passenger and/or driver mirror tilts
to a preselected position when the
vehicle is in R (Reverse). This
allows the curb to be seen when
parallel parking.
The mirror(s) return to the original
position when:
.
The vehicle is shifted out of
R (Reverse), or remains in
R (Reverse) for about
30 seconds.
. The ignition is turned off.
. The vehicle is driven in
R (Reverse) above a set speed.
To turn this feature on or off, see
Vehicle Personalization 0165.
Interior Mirrors
Interior Rearview Mirrors
Adjust the rearview mirror for a clear
view of the area behind your
vehicle.
If equipped with OnStar, the vehicle
may have three control buttons at
the bottom of the mirror. See your
dealer for more information about
OnStar and how to subscribe to it.
See OnStar Overview 0500 or
OnStar Overview 0501.
Do not spray glass cleaner directly
on the mirror. Use a soft towel
dampened with water.
Manual Rearview Mirror
If equipped, push the tab forward for
daytime use and pull it rearward for
nighttime use to avoid glare from
the headlamps from behind.
Page 63 of 533
Chevrolet Silverado Owner Manual (GMNA-Localizing-U.S./Canada/Mexico-
9159338) - 2016 - crc - 10/21/15
62 Seats and Restraints
To return the seatback to the upright
position:1. Lift the lever fully without applying pressure to the
seatback, and the seatback will
return to the upright position.
2. Push and pull on the seatback to make sure it is locked.
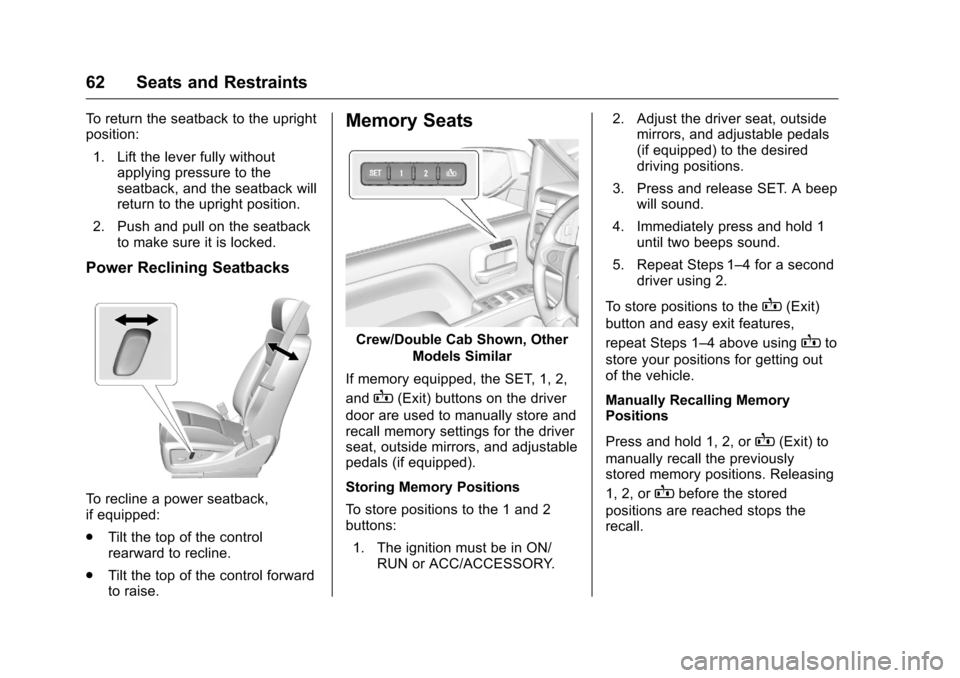
Power Reclining Seatbacks
To recline a power seatback,
if equipped:
.Tilt the top of the control
rearward to recline.
. Tilt the top of the control forward
to raise.
Memory Seats
Crew/Double Cab Shown, Other
Models Similar
If memory equipped, the SET, 1, 2,
and
B(Exit) buttons on the driver
door are used to manually store and
recall memory settings for the driver
seat, outside mirrors, and adjustable
pedals (if equipped).
Storing Memory Positions
To store positions to the 1 and 2
buttons:
1. The ignition must be in ON/ RUN or ACC/ACCESSORY. 2. Adjust the driver seat, outside
mirrors, and adjustable pedals
(if equipped) to the desired
driving positions.
3. Press and release SET. A beep will sound.
4. Immediately press and hold 1 until two beeps sound.
5. Repeat Steps 1–4 for a second driver using 2.
To store positions to the
B(Exit)
button and easy exit features,
repeat Steps 1–4 above using
Bto
store your positions for getting out
of the vehicle.
Manually Recalling Memory
Positions
Press and hold 1, 2, or
B(Exit) to
manually recall the previously
stored memory positions. Releasing
1, 2, or
Bbefore the stored
positions are reached stops the
recall.
Page 65 of 533
Chevrolet Silverado Owner Manual (GMNA-Localizing-U.S./Canada/Mexico-
9159338) - 2016 - crc - 10/21/15
64 Seats and Restraints
Warning (Continued)
heat, such as a blanket, cushion,
cover, or similar item. This may
cause the seat heater to
overheat. An overheated seat
heater may cause a burn or may
damage the seat.
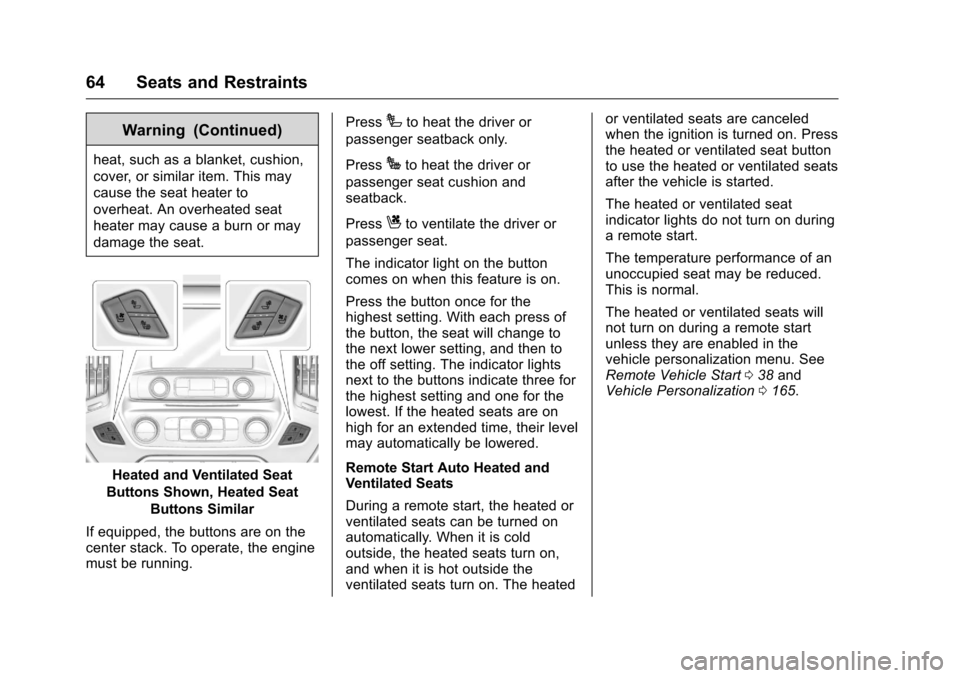
Heated and Ventilated Seat
Buttons Shown, Heated Seat Buttons Similar
If equipped, the buttons are on the
center stack. To operate, the engine
must be running. Press
Ito heat the driver or
passenger seatback only.
Press
Jto heat the driver or
passenger seat cushion and
seatback.
Press
Cto ventilate the driver or
passenger seat.
The indicator light on the button
comes on when this feature is on.
Press the button once for the
highest setting. With each press of
the button, the seat will change to
the next lower setting, and then to
the off setting. The indicator lights
next to the buttons indicate three for
the highest setting and one for the
lowest. If the heated seats are on
high for an extended time, their level
may automatically be lowered.
Remote Start Auto Heated and
Ventilated Seats
During a remote start, the heated or
ventilated seats can be turned on
automatically. When it is cold
outside, the heated seats turn on,
and when it is hot outside the
ventilated seats turn on. The heated or ventilated seats are canceled
when the ignition is turned on. Press
the heated or ventilated seat button
to use the heated or ventilated seats
after the vehicle is started.
The heated or ventilated seat
indicator lights do not turn on during
a remote start.
The temperature performance of an
unoccupied seat may be reduced.
This is normal.
The heated or ventilated seats will
not turn on during a remote start
unless they are enabled in the
vehicle personalization menu. See
Remote Vehicle Start
038 and
Vehicle Personalization 0165.
Page 107 of 533
Chevrolet Silverado Owner Manual (GMNA-Localizing-U.S./Canada/Mexico-
9159338) - 2016 - crc - 10/21/15
106 Seats and Restraints
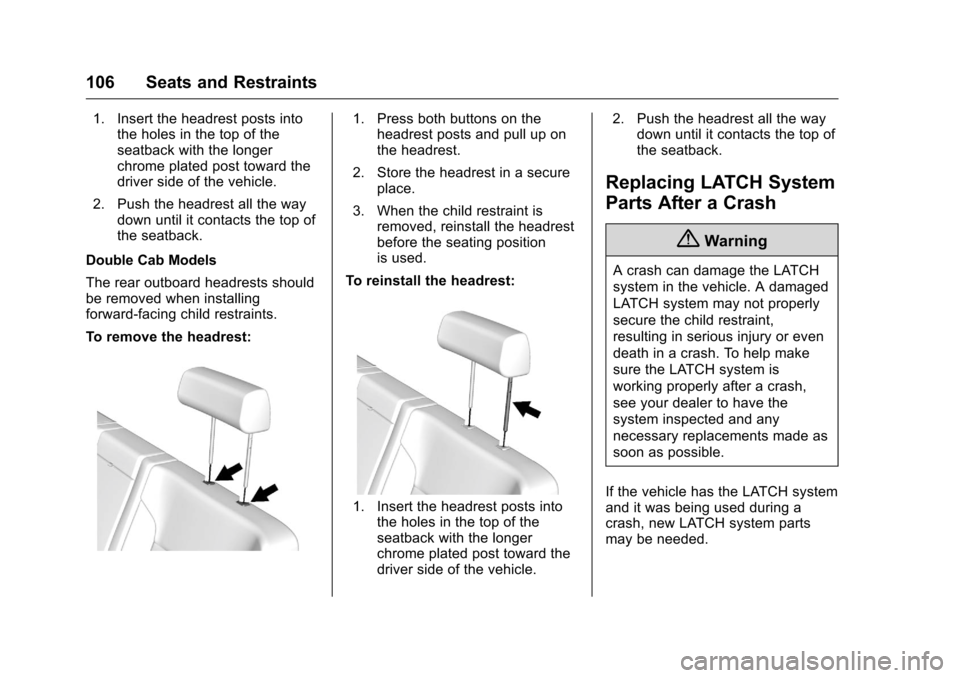
1. Insert the headrest posts intothe holes in the top of the
seatback with the longer
chrome plated post toward the
driver side of the vehicle.
2. Push the headrest all the way down until it contacts the top of
the seatback.
Double Cab Models
The rear outboard headrests should
be removed when installing
forward-facing child restraints.
To remove the headrest:1. Press both buttons on the headrest posts and pull up on
the headrest.
2. Store the headrest in a secure place.
3. When the child restraint is removed, reinstall the headrest
before the seating position
is used.
To reinstall the headrest:
1. Insert the headrest posts into the holes in the top of the
seatback with the longer
chrome plated post toward the
driver side of the vehicle. 2. Push the headrest all the way
down until it contacts the top of
the seatback.
Replacing LATCH System
Parts After a Crash
{Warning
A crash can damage the LATCH
system in the vehicle. A damaged
LATCH system may not properly
secure the child restraint,
resulting in serious injury or even
death in a crash. To help make
sure the LATCH system is
working properly after a crash,
see your dealer to have the
system inspected and any
necessary replacements made as
soon as possible.
If the vehicle has the LATCH system
and it was being used during a
crash, new LATCH system parts
may be needed.
Page 173 of 533
Chevrolet Silverado Owner Manual (GMNA-Localizing-U.S./Canada/Mexico-
9159338) - 2016 - crc - 10/21/15
172 Instruments and Controls
Rear Park Assist Symbols
Select to turn Off or On. See
Assistance Systems for Parking or
Backing0314.
Return to Factory Settings
Select and the following may
display:
.
Restore Vehicle Settings
. Clear All Private Data
. Restore Radio Settings
Restore Vehicle Settings
This allows selection of restoring
vehicle settings.
Select Restore or Cancel. Clear All Private Data
This allows selection to clear all
private information from the vehicle.
Select Delete or Cancel.
Restore Radio Settings
This allows selection to restore
radio settings.
Select Restore or Cancel.
Software Information
Select to view the infotainment
system current software information.
Universal Remote
System
See
Radio Frequency Statement
0 496 orRadio Frequency
Statement 0496.
Universal Remote System
Programming
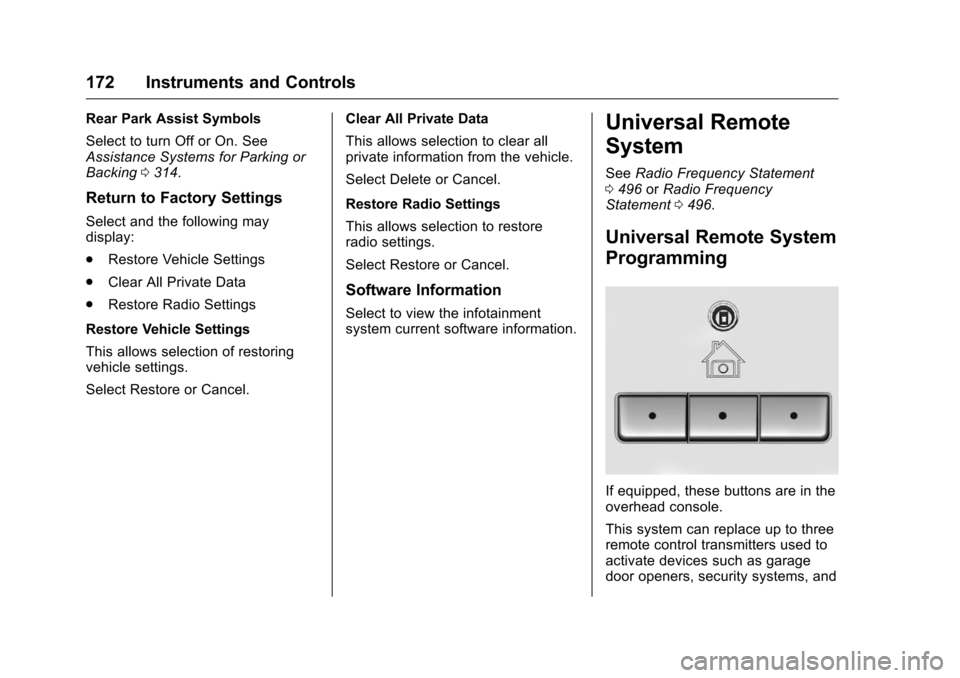
If equipped, these buttons are in the
overhead console.
This system can replace up to three
remote control transmitters used to
activate devices such as garage
door openers, security systems, and
Page 174 of 533
Chevrolet Silverado Owner Manual (GMNA-Localizing-U.S./Canada/Mexico-
9159338) - 2016 - crc - 10/21/15
Instruments and Controls 173
home automation devices. These
instructions refer to a garage door
opener, but can be used for other
devices.
Do not use the Universal Remote
system with any garage door opener
that does not have the stop and
reverse feature. This includes any
garage door opener model
manufactured before April 1, 1982.
Read the instructions completely
before programming the Universal
Remote system. It may help to have
another person assist with the
programming process.
Keep the original hand-held
transmitter for use in other vehicles
as well as for future programming.
Erase the programming when
vehicle ownership is terminated.
See“Erasing Universal Remote
System Buttons” later in this
section.
To program a garage door opener,
park outside directly in line with and
facing the garage door opener
receiver. Clear all people and
objects near the garage door. Make sure the hand-held transmitter
has a new battery for quick and
accurate transmission of the
radio-frequency signal.
Programming the Universal
Remote System
For questions or help programming
the Universal Remote system, call
1-800-355-3515 or see
www.homelink.com.
Programming involves
time-sensitive actions, and may time
out causing the procedure to be
repeated.
To program up to three devices:
1. Hold the end of the hand-held transmitter about 3 to 8 cm (1
to 3 in) away from the
Universal Remote system
buttons with the indicator light
in view. The hand-held
transmitter was supplied by the
manufacturer of the garage
door opener receiver.
2. At the same time, press and hold both the hand-held
transmitter button and one of
the three Universal Remote system buttons to be used to
operate the garage door. Do
not release either button until
the indicator light goes from a
slow to a rapid flashing light.
Then release both buttons.
Some garage door openers
may require substitution of
Step 2 with the procedure
under
“Radio Signals for
Canada and Some Gate
Operators” later in this section.
3. Press and hold the newly programmed Universal Remote
system button for five seconds
while watching the indicator
light and garage door
activation.
.If the indicator light stays on
continuously or the garage
door moves when the
button is pressed, then
programming is complete.
There is no need to
complete Steps 4–6.
. If the indicator light does
not come on or the garage
door does not move, a
second button press may