brakes CHEVROLET SILVERADO 2020 Get To Know Guide
[x] Cancel search | Manufacturer: CHEVROLET, Model Year: 2020, Model line: SILVERADO, Model: CHEVROLET SILVERADO 2020Pages: 24, PDF Size: 4.67 MB
Page 17 of 24

17F Optional equipment
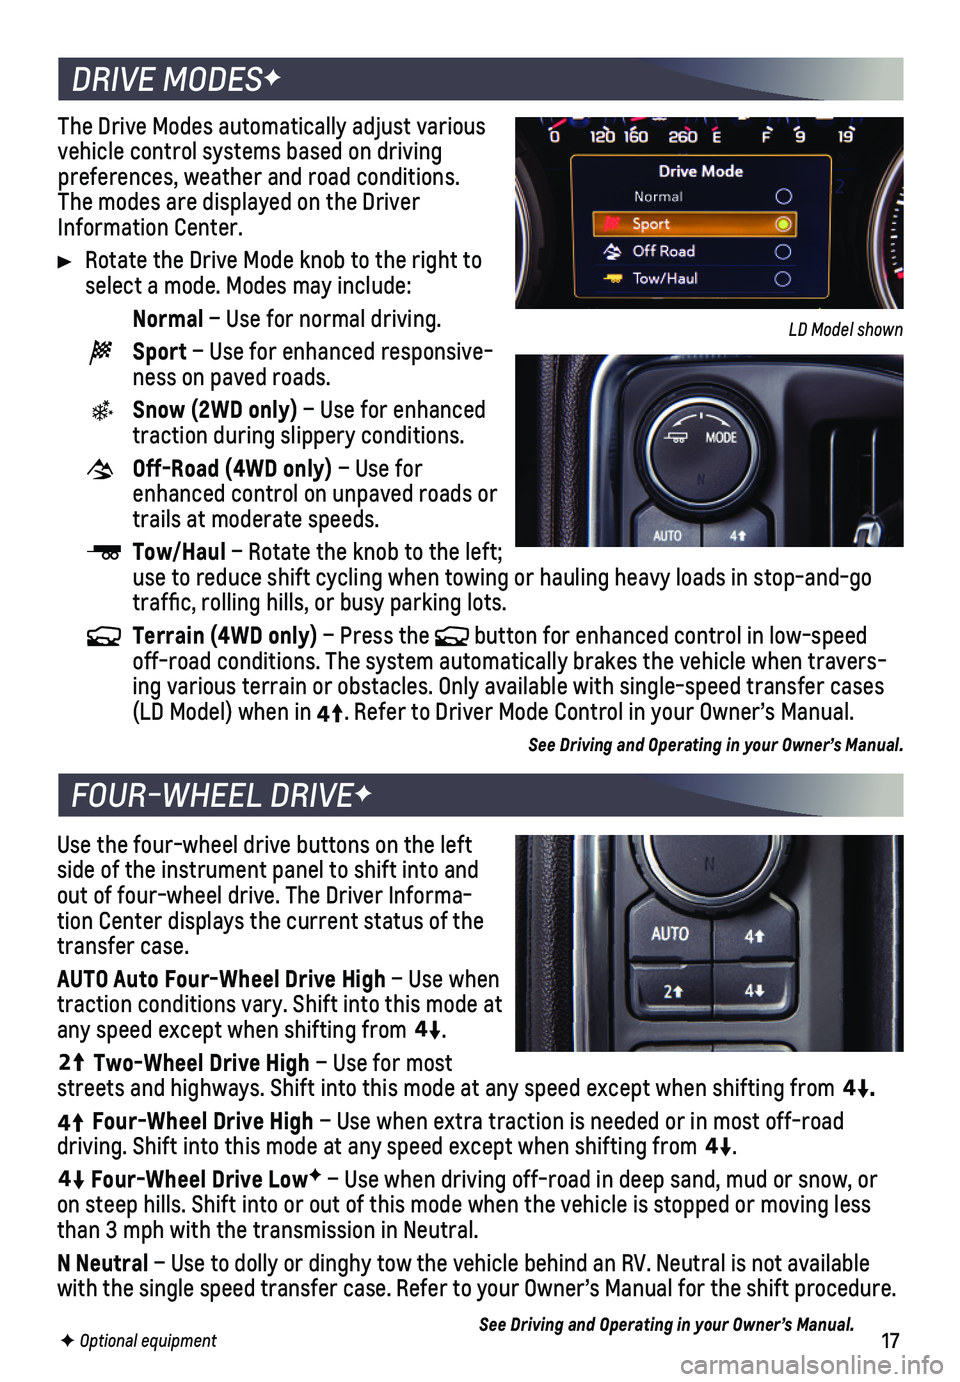
The Drive Modes automatically adjust various vehicle control systems based on driving preferences, weather and road conditions. The modes are displayed on the Driver Information Center.
Rotate the Drive Mode knob to the right to select a mode. Modes may include:
Normal – Use for normal driving.
Sport – Use for enhanced responsive-ness on paved roads.
Snow (2WD only) – Use for enhanced traction during slippery conditions.
Off-Road (4WD only) – Use for enhanced control on unpaved roads or trails at moderate speeds.
Tow/Haul – Rotate the knob to the left; use to reduce shift cycling when towing or hauling heavy loads in stop-a\
nd-go traffic, rolling hills, or busy parking lots.
Terrain (4WD only) – Press the button for enhanced control in low-speed off-road conditions. The system automatically brakes the vehicle when tr\
avers-ing various terrain or obstacles. Only available with single-speed trans\
fer cases (LD Model) when in4
4
2
. Refer to Driver Mode Control in your Owner’s Manual.
See Driving and Operating in your Owner’s Manual.
Use the four-wheel drive buttons on the left side of the instrument panel to shift into and out of four-wheel drive. The Driver Informa-tion Center displays the current status of the transfer case.
AUTO Auto Four-Wheel Drive High – Use when traction conditions vary. Shift into this mode at any speed except when shifting from
4
4
2
.
44
2
Two-Wheel Drive High – Use for most streets and highways. Shift into this mode at any speed except when shif\
ting from
44
2
.
4
4
2
Four-Wheel Drive High – Use when extra traction is needed or in most off-road
driving. Shift into this mode at any speed except when shifting from
44
2
.
44
2
Four-Wheel Drive LowF – Use when driving off-road in deep sand, mud or snow, or on steep hills. Shift into or out of this mode when the vehicle is stopp\
ed or moving less than 3 mph with the transmission in Neutral.
N Neutral – Use to dolly or dinghy tow the vehicle behind an RV. Neutral is no\
t available with the single speed transfer case. Refer to your Owner’s Manual for\
the shift procedure.
See Driving and Operating in your Owner’s Manual.
DRIVE MODESF
FOUR-WHEEL DRIVEF
LD Model shown
Page 18 of 24

18F Optional equipment
DRIVER ASSISTANCE SYSTEMSF
Safety or driver assistance features are no substitute for the driver’\
s responsibility to operate the vehicle in a safe manner. The driver should remain attentive to traffic, surroundings and road conditions at all times. Read your Owner’s Manual for important feature limitations and information.
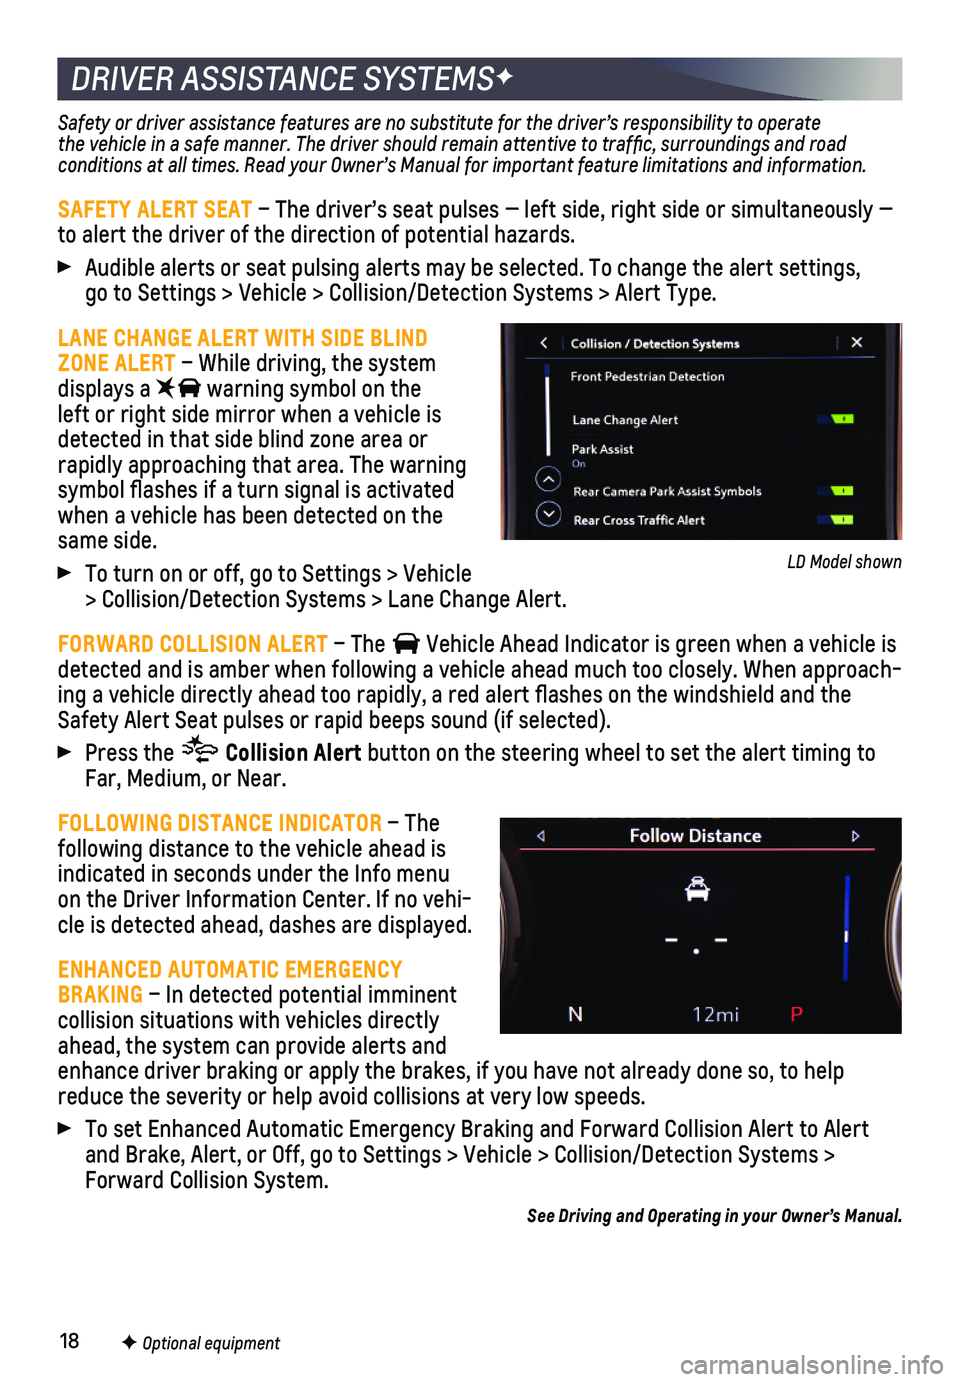
SAFETY ALERT SEAT – The driver’s seat pulses — left side, right side or simultan\
eously — to alert the driver of the direction of potential hazards.
Audible alerts or seat pulsing alerts may be selected. To change the ale\
rt settings, go to Settings > Vehicle > Collision/Detection Systems > Alert Type.
LANE CHANGE ALERT WITH SIDE BLIND ZONE ALERT – While driving, the system displays a warning symbol on the left or right side mirror when a vehicle is detected in that side blind zone area or rapidly approaching that area. The warning symbol flashes if a turn signal is activated when a vehicle has been detected on the same side.
To turn on or off, go to Settings > Vehicle > Collision/Detection Systems > Lane Change Alert.
FORWARD COLLISION ALERT – The Vehicle Ahead Indicator is green when a vehicle is detected and is amber when following a vehicle ahead much too closely. W\
hen approach-ing a vehicle directly ahead too rapidly, a red alert flashes on the w\
indshield and the Safety Alert Seat pulses or rapid beeps sound (if selected).
Press the Collision Alert button on the steering wheel to set the alert timing to Far, Medium, or Near.
FOLLOWING DISTANCE INDICATOR – The following distance to the vehicle ahead is
indicated in seconds under the Info menu on the Driver Information Center. If no vehi-cle is detected ahead, dashes are displayed.
ENHANCED AUTOMATIC EMERGENCY BRAKING – In detected potential imminent collision situations with vehicles directly ahead, the system can provide alerts and enhance driver braking or apply the brakes, if you have not already done\
so, to help reduce the severity or help avoid collisions at very low speeds.
To set Enhanced Automatic Emergency Braking and Forward Collision Alert \
to Alert and Brake, Alert, or Off, go to Settings > Vehicle > Collision/Detection\
Systems > Forward Collision System.
See Driving and Operating in your Owner’s Manual.
LD Model shown
Page 21 of 24

21F Optional equipment
REAR CAMERA MIRRORF
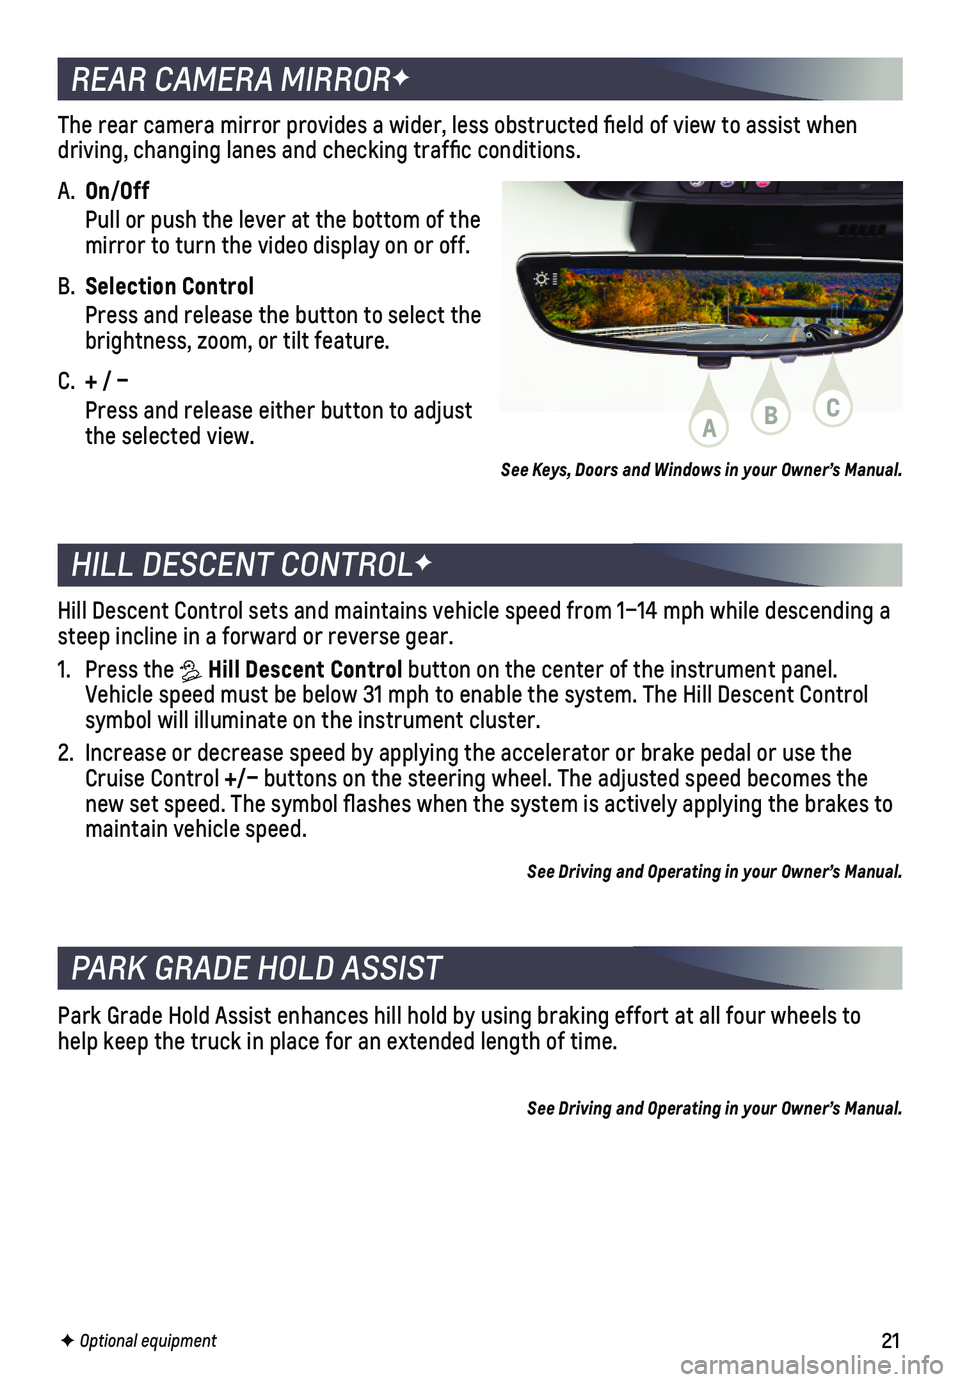
The rear camera mirror provides a wider, less obstructed field of view\
to assist when driving, changing lanes and checking traffic conditions.
A. On/Off
Pull or push the lever at the bottom of the mirror to turn the video display on or off.
B. Selection Control
Press and release the button to select the brightness, zoom, or tilt feature.
C. + / –
Press and release either button to adjust the selected view.
PARK GRADE HOLD ASSIST
Park Grade Hold Assist enhances hill hold by using braking effort at all\
four wheels to help keep the truck in place for an extended length of time.
See Driving and Operating in your Owner’s Manual.
HILL DESCENT CONTROLF
Hill Descent Control sets and maintains vehicle speed from 1–14 mph w\
hile descending a steep incline in a forward or reverse gear.
1. Press the Hill Descent Control button on the center of the instrument panel. Vehicle speed must be below 31 mph to enable the system. The Hill Descen\
t Control symbol will illuminate on the instrument cluster.
2. Increase or decrease speed by applying the accelerator or brake pedal or\
use the Cruise Control +/– buttons on the steering wheel. The adjusted speed becomes the new set speed. The symbol flashes when the system is actively applying\
the brakes to maintain vehicle speed.
See Driving and Operating in your Owner’s Manual.
See Keys, Doors and Windows in your Owner’s Manual.
ABC
Page 23 of 24

23
TRAILERINGF
TRAILERING APP
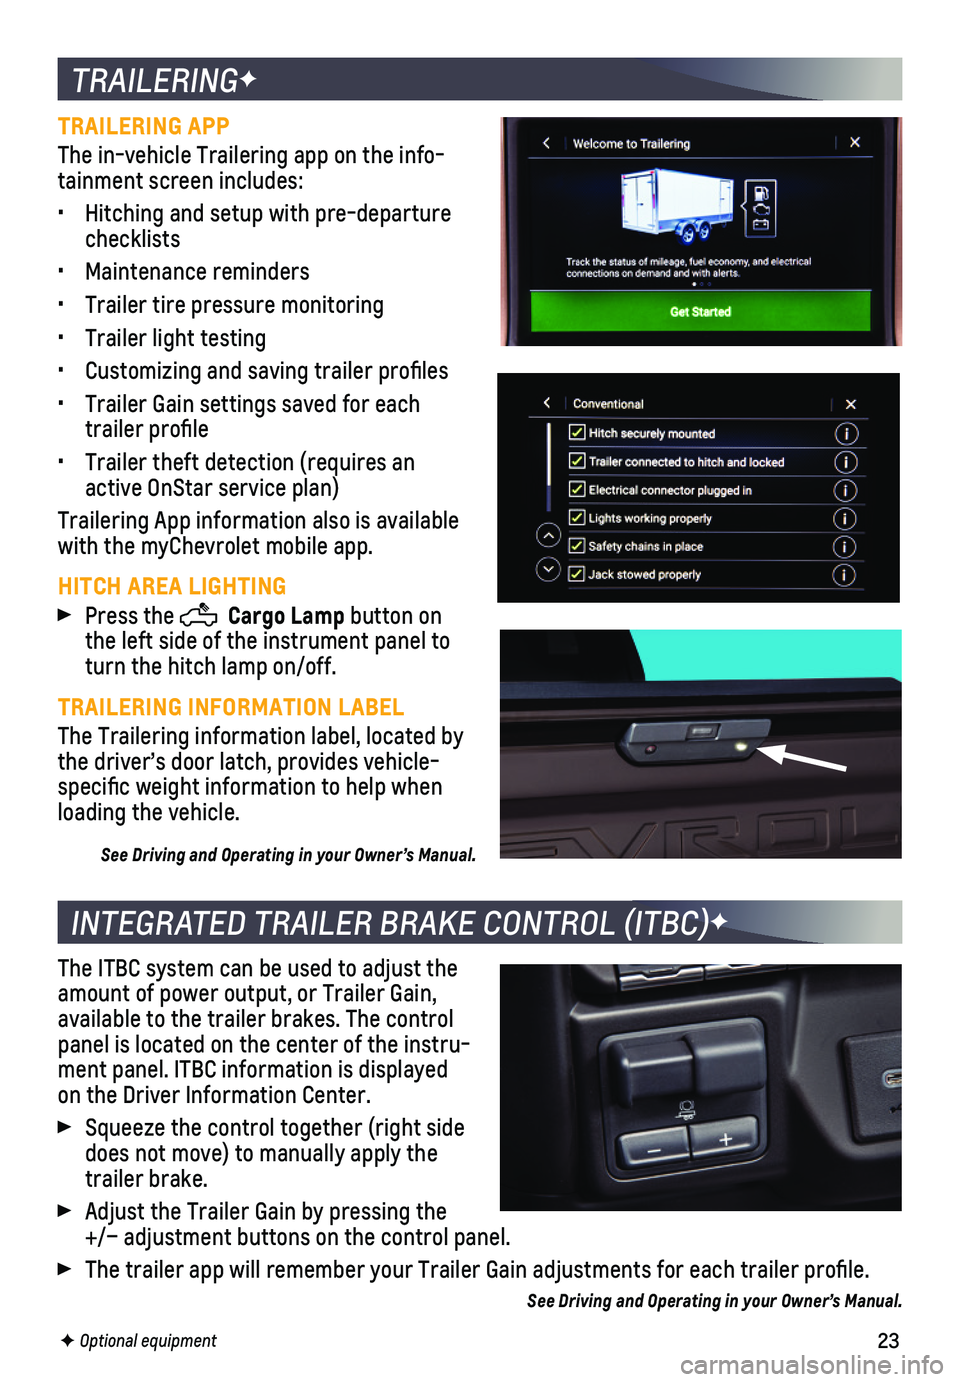
The in-vehicle Trailering app on the info-tainment screen includes:
• Hitching and setup with pre-departure checklists
• Maintenance reminders
• Trailer tire pressure monitoring
• Trailer light testing
• Customizing and saving trailer profiles
• Trailer Gain settings saved for each trailer profile
• Trailer theft detection (requires an active OnStar service plan)
Trailering App information also is available with the myChevrolet mobile app.
HITCH AREA LIGHTING
Press the Cargo Lamp button on the left side of the instrument panel to turn the hitch lamp on/off.
TRAILERING INFORMATION LABEL
The Trailering information label, located by the driver’s door latch, provides vehicle-specific weight information to help when loading the vehicle.
See Driving and Operating in your Owner’s Manual.
INTEGRATED TRAILER BRAKE CONTROL (ITBC)F
The ITBC system can be used to adjust the amount of power output, or Trailer Gain, available to the trailer brakes. The control panel is located on the center of the instru-ment panel. ITBC information is displayed on the Driver Information Center.
Squeeze the control together (right side does not move) to manually apply the trailer brake.
Adjust the Trailer Gain by pressing the +/– adjustment buttons on the control panel.
The trailer app will remember your Trailer Gain adjustments for each tra\
iler profile.
See Driving and Operating in your Owner’s Manual.
F Optional equipment