CHEVROLET SILVERADO 2020 Owner's Manual
Manufacturer: CHEVROLET, Model Year: 2020, Model line: SILVERADO, Model: CHEVROLET SILVERADO 2020Pages: 495, PDF Size: 8.09 MB
Page 251 of 495
Chevrolet Silverado Owner Manual (GMNA-Localizing-U.S./Canada/Mexico-
13337620) - 2020 - CTC - 1/27/20
250 Driving and Operating
ACC may occasionally provide an
alert and/or braking that is
considered unnecessary. It could
respond to vehicles in different
lanes or stationary objects when
entering or exiting a curve. This is
normal operation. The vehicle does
not need service.
Other Vehicle Lane Changes
ACC will not detect a vehicle ahead
until it is completely in the lane. The
brakes may need to be manually
applied.Objects Not Directly in Front of
Your Vehicle
The detection of objects in front of
the vehicle may not be possible if:
.
The vehicle or object ahead is
not within your lane.
. The vehicle ahead is shifted, not
centered, or is shifted to one
side of the lane.
Driving in Narrow Lanes
Vehicles in adjacent traffic lanes or
roadside objects may be incorrectly
detected when located along the
roadway.
Do Not Use ACC on Hills and
When Towing a Trailer
Do not use ACC when driving on
steep hills or when towing a trailer.
ACC will not detect a vehicle in the
lane while driving on steep hills.
If the brakes are applied, ACC
disengages.
Disengaging ACC
There are three ways to
disengage ACC:
. Step lightly on the brake pedal.
. Press
*.
. Press
J.
Erasing Speed Memory
The ACC set speed is erased from
memory if
Jis pressed or if the
ignition is turned off.
Weather Conditions Affecting ACC
If the interior temperature is
extremely high, the instrument
cluster may indicate that ACC is
temporarily unavailable. This can be
caused by extreme hot weather
conditions with direct sunlight on the
Page 252 of 495
Chevrolet Silverado Owner Manual (GMNA-Localizing-U.S./Canada/Mexico-
13337620) - 2020 - CTC - 1/27/20
Driving and Operating 251
front camera. ACC will return to
normal operation once the cabin
temperature is lower.
Conditions that are associated with
low visibility, such as fog, rain,
snow, or road spray, may limit ACC
performance. Water droplets from
rain or snow that remain on the
windshield may also limit ACC’s
ability to detect objects.
Lighting Conditions Affecting ACC
The ACC front camera can be
affected by poor lighting conditions,
and ACC may have limited
performance when:
.There are changes in brightness,
such as entering and exiting
tunnels, bridges, and
overpasses.
. Low sun angles cause the
camera to not detect objects,
or it is more difficult to detect
objects in the same traffic lane.
. Lighting is poor in the evening or
early morning .
There are multiple changes in
brightness or shadows along the
vehicle roadway.
. In a tunnel without the
headlamps on, or in a tunnel
when there is a vehicle in front
that does not have its
taillamps on.
. Subjected to strong light from
opposing lane traffic in the front
of the vehicle, such as
high-beam headlamps from
oncoming traffic.
Accessory Installations and
Vehicle Modifications
Do not install or place any object
around the front camera windshield
area that would obstruct the front
camera view.
Do not install objects on top of the
vehicle that overhang and obstruct
the front camera, such as a canoe,
kayak, or other items that can be
transported on the vehicle roof.
Do not modify the hood, headlamps,
or fog lamps, as this may limit the
camera’s ability to detect an object. Cleaning the Sensing System
The camera sensor on the
windshield behind the rearview
mirror can become blocked by
snow, ice, dirt, mud, or debris. This
area needs to be cleaned for ACC
to operate properly.
The vehicle headlamps may need to
be cleaned due to dirt, snow, or ice.
Objects that are not illuminated
correctly may be difficult to detect.
If ACC will not operate, regular
cruise control may be available. See
“Switching Between ACC and
Regular Cruise Control”
previously
in this section. Always consider
driving conditions before using
either cruise control system.
For cleaning instructions, see
“Washing the Vehicle” under
Exterior Care 0424.
Page 253 of 495
Chevrolet Silverado Owner Manual (GMNA-Localizing-U.S./Canada/Mexico-
13337620) - 2020 - CTC - 1/27/20
252 Driving and Operating
Driver Assistance
Systems
This vehicle may have features that
work together to help avoid crashes
or reduce crash damage while
driving, backing, and parking. Read
this entire section before using
these systems.
{Warning
Do not rely on the Driver
Assistance Systems. These
systems do not replace the need
for paying attention and driving
safely. You may not hear or feel
alerts or warnings provided by
these systems. Failure to use
proper care when driving may
result in injury, death, or vehicle
damage. SeeDefensive Driving
0 184.
Under many conditions, these
systems will not: (Continued)
Warning (Continued)
.Detect children,
pedestrians, bicyclists,
or animals.
. Detect vehicles or objects
outside the area monitored
by the system.
. Work at all driving speeds.
. Warn you or provide you
with enough time to avoid a
crash.
. Work under poor visibility or
bad weather conditions.
. Work if the detection sensor
is not cleaned or is covered
by ice, snow, mud, or dirt.
. Work if the detection sensor
is covered up, such as with
a sticker, magnet, or metal
plate.
. Work if the area surrounding
the detection sensor is
damaged or not properly
repaired.
(Continued)
Warning (Continued)
Complete attention is always
required while driving, and you
should be ready to take action
and apply the brakes and/or steer
the vehicle to avoid crashes.
Audible or Safety Alert Seat
Some driver assistance features
alert the driver of obstacles by
beeping. To change the volume of
the warning chime, see “Comfort
and Convenience” underVehicle
Personalization 0153.
If equipped with the Safety Alert
Seat, the driver seat cushion may
provide a vibrating pulse alert
instead of beeping. To change this,
see “Collision/Detection Systems”
under Vehicle Personalization
0 153.
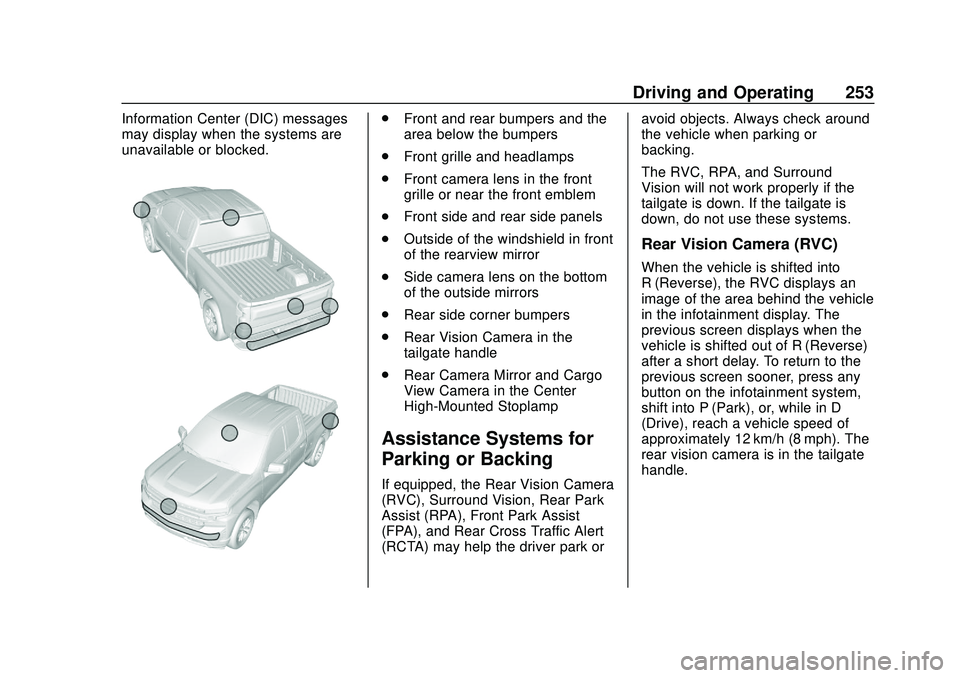
Cleaning
Depending on vehicle options, keep
these areas of the vehicle clean to
ensure the best driver assistance
feature performance. Driver
Page 254 of 495
Chevrolet Silverado Owner Manual (GMNA-Localizing-U.S./Canada/Mexico-
13337620) - 2020 - CTC - 1/27/20
Driving and Operating 253
Information Center (DIC) messages
may display when the systems are
unavailable or blocked..Front and rear bumpers and the
area below the bumpers
. Front grille and headlamps
. Front camera lens in the front
grille or near the front emblem
. Front side and rear side panels
. Outside of the windshield in front
of the rearview mirror
. Side camera lens on the bottom
of the outside mirrors
. Rear side corner bumpers
. Rear Vision Camera in the
tailgate handle
. Rear Camera Mirror and Cargo
View Camera in the Center
High-Mounted Stoplamp
Assistance Systems for
Parking or Backing
If equipped, the Rear Vision Camera
(RVC), Surround Vision, Rear Park
Assist (RPA), Front Park Assist
(FPA), and Rear Cross Traffic Alert
(RCTA) may help the driver park or avoid objects. Always check around
the vehicle when parking or
backing.
The RVC, RPA, and Surround
Vision will not work properly if the
tailgate is down. If the tailgate is
down, do not use these systems.
Rear Vision Camera (RVC)
When the vehicle is shifted into
R (Reverse), the RVC displays an
image of the area behind the vehicle
in the infotainment display. The
previous screen displays when the
vehicle is shifted out of R (Reverse)
after a short delay. To return to the
previous screen sooner, press any
button on the infotainment system,
shift into P (Park), or, while in D
(Drive), reach a vehicle speed of
approximately 12 km/h (8 mph). The
rear vision camera is in the tailgate
handle.
Page 255 of 495
Chevrolet Silverado Owner Manual (GMNA-Localizing-U.S./Canada/Mexico-
13337620) - 2020 - CTC - 1/27/20
254 Driving and Operating
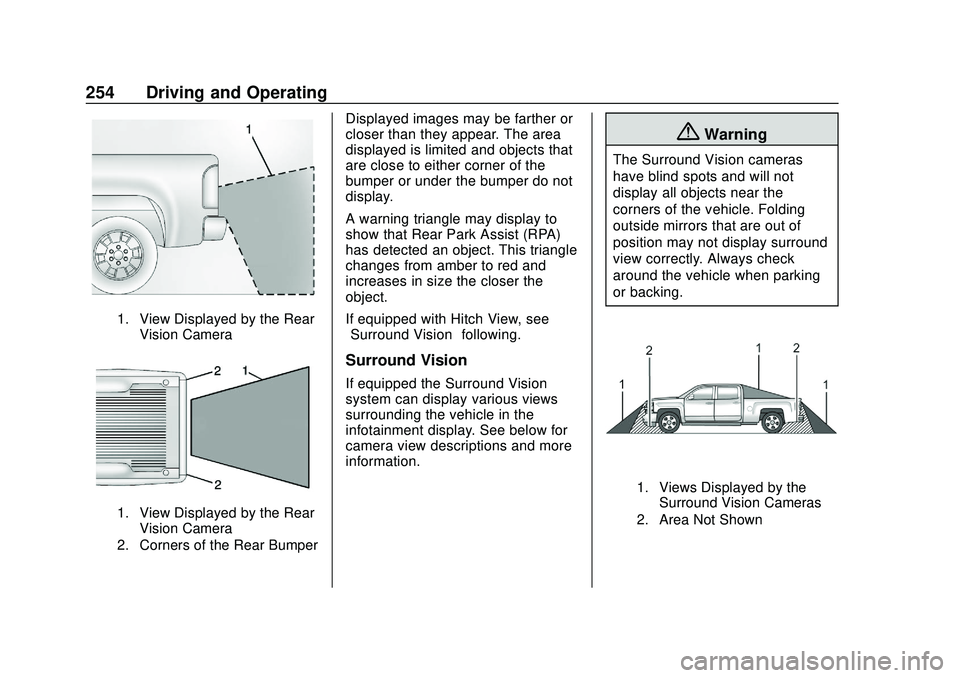
1. View Displayed by the RearVision Camera
1. View Displayed by the RearVision Camera
2. Corners of the Rear Bumper
Displayed images may be farther or
closer than they appear. The area
displayed is limited and objects that
are close to either corner of the
bumper or under the bumper do not
display.
A warning triangle may display to
show that Rear Park Assist (RPA)
has detected an object. This triangle
changes from amber to red and
increases in size the closer the
object.
If equipped with Hitch View, see
“Surround Vision” following.
Surround Vision
If equipped the Surround Vision
system can display various views
surrounding the vehicle in the
infotainment display. See below for
camera view descriptions and more
information.
{Warning
The Surround Vision cameras
have blind spots and will not
display all objects near the
corners of the vehicle. Folding
outside mirrors that are out of
position may not display surround
view correctly. Always check
around the vehicle when parking
or backing.
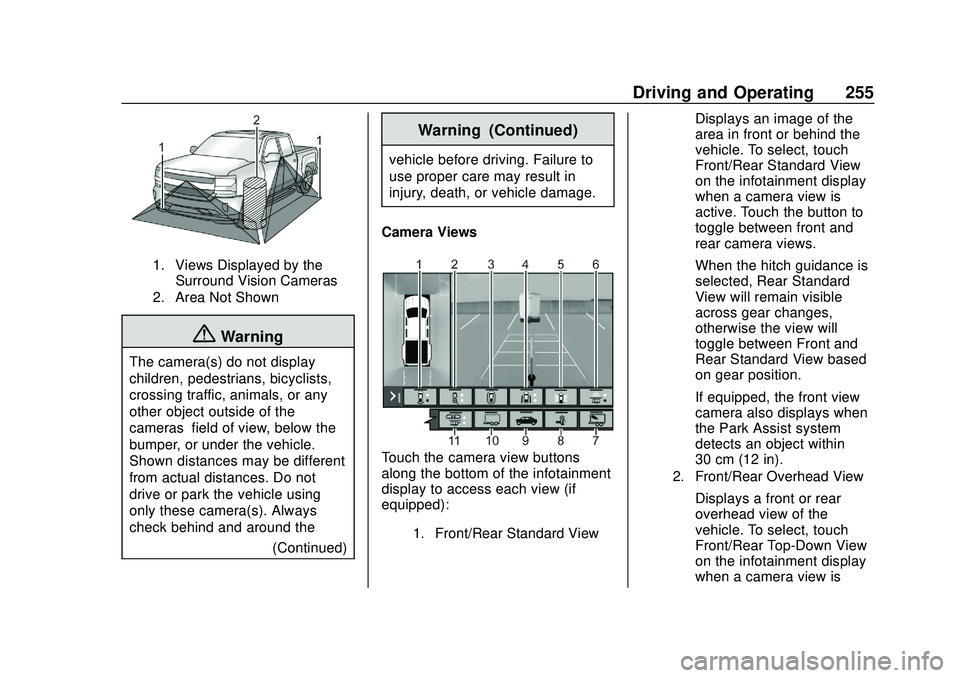
1. Views Displayed by the
Surround Vision Cameras
2. Area Not Shown
Page 256 of 495
Chevrolet Silverado Owner Manual (GMNA-Localizing-U.S./Canada/Mexico-
13337620) - 2020 - CTC - 1/27/20
Driving and Operating 255
1. Views Displayed by theSurround Vision Cameras
2. Area Not Shown
{Warning
The camera(s) do not display
children, pedestrians, bicyclists,
crossing traffic, animals, or any
other object outside of the
cameras’ field of view, below the
bumper, or under the vehicle.
Shown distances may be different
from actual distances. Do not
drive or park the vehicle using
only these camera(s). Always
check behind and around the
(Continued)
Warning (Continued)
vehicle before driving. Failure to
use proper care may result in
injury, death, or vehicle damage.
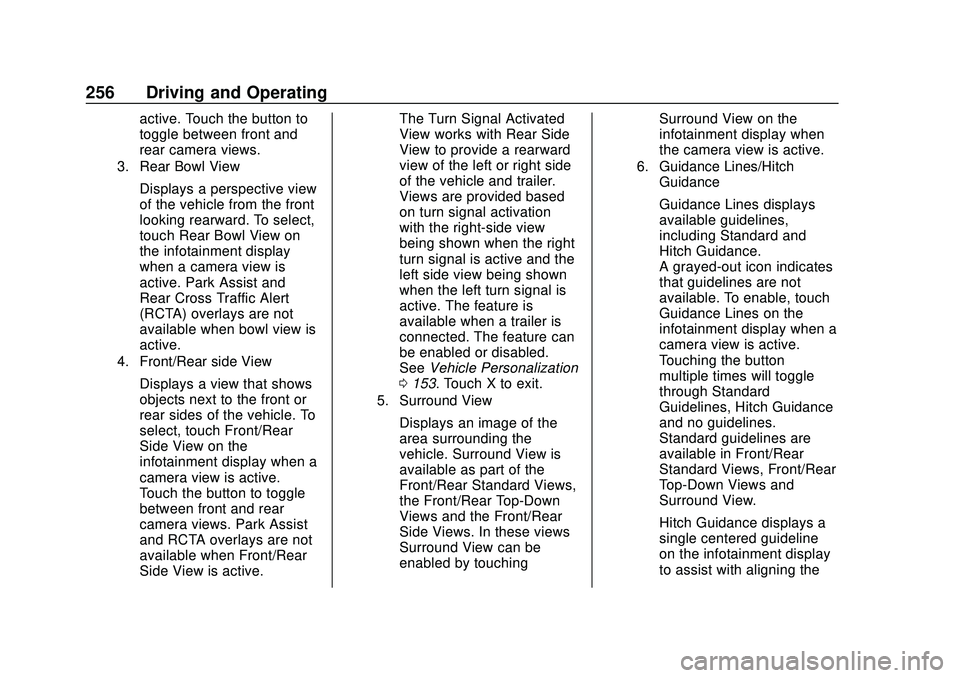
Camera Views
Touch the camera view buttons
along the bottom of the infotainment
display to access each view (if
equipped):
1. Front/Rear Standard View
Displays an image of the
area in front or behind the
vehicle. To select, touch
Front/Rear Standard View
on the infotainment display
when a camera view is
active. Touch the button to
toggle between front and
rear camera views.
When the hitch guidance is
selected, Rear Standard
View will remain visible
across gear changes,
otherwise the view will
toggle between Front and
Rear Standard View based
on gear position.
If equipped, the front view
camera also displays when
the Park Assist system
detects an object within
30 cm (12 in).
2. Front/Rear Overhead View
Displays a front or rear
overhead view of the
vehicle. To select, touch
Front/Rear Top-Down View
on the infotainment display
when a camera view is
Page 257 of 495
Chevrolet Silverado Owner Manual (GMNA-Localizing-U.S./Canada/Mexico-
13337620) - 2020 - CTC - 1/27/20
256 Driving and Operating
active. Touch the button to
toggle between front and
rear camera views.
3. Rear Bowl View
Displays a perspective view
of the vehicle from the front
looking rearward. To select,
touch Rear Bowl View on
the infotainment display
when a camera view is
active. Park Assist and
Rear Cross Traffic Alert
(RCTA) overlays are not
available when bowl view is
active.
4. Front/Rear side View
Displays a view that shows
objects next to the front or
rear sides of the vehicle. To
select, touch Front/Rear
Side View on the
infotainment display when a
camera view is active.
Touch the button to toggle
between front and rear
camera views. Park Assist
and RCTA overlays are not
available when Front/Rear
Side View is active.The Turn Signal Activated
View works with Rear Side
View to provide a rearward
view of the left or right side
of the vehicle and trailer.
Views are provided based
on turn signal activation
with the right-side view
being shown when the right
turn signal is active and the
left side view being shown
when the left turn signal is
active. The feature is
available when a trailer is
connected. The feature can
be enabled or disabled.
See
Vehicle Personalization
0 153. Touch X to exit.
5. Surround View
Displays an image of the
area surrounding the
vehicle. Surround View is
available as part of the
Front/Rear Standard Views,
the Front/Rear Top-Down
Views and the Front/Rear
Side Views. In these views
Surround View can be
enabled by touching Surround View on the
infotainment display when
the camera view is active.
6. Guidance Lines/Hitch
Guidance
Guidance Lines displays
available guidelines,
including Standard and
Hitch Guidance.
A grayed-out icon indicates
that guidelines are not
available. To enable, touch
Guidance Lines on the
infotainment display when a
camera view is active.
Touching the button
multiple times will toggle
through Standard
Guidelines, Hitch Guidance
and no guidelines.
Standard guidelines are
available in Front/Rear
Standard Views, Front/Rear
Top-Down Views and
Surround View.
Hitch Guidance displays a
single centered guideline
on the infotainment display
to assist with aligning the
Page 258 of 495
Chevrolet Silverado Owner Manual (GMNA-Localizing-U.S./Canada/Mexico-
13337620) - 2020 - CTC - 1/27/20
Driving and Operating 257
vehicle’s hitch ball with a
trailer coupler. Touch the
Hitch Guidance icon, then
align the trailer guidance
line over the trailer coupler.
Continuously steer the
vehicle to keep the
guideline centered on the
coupler when backing. Park
Assist overlays will not
display when the trailer
guidance line is active.
Hitch Guidance is available
in Rear Standard View.
{Warning
Use Hitch Guidance only to help
back the vehicle to a trailer hitch
or, when traveling above 12 km/h
(8 mph), to briefly check the
status of your trailer. Do not use
for any other purpose, such as
making lane change decisions.
Before making a lane change,
always check the mirrors and
glance over your shoulder.
Improper use could result in
serious injury to you or others.
7. Interior Trailer View
Provides a view of the
interior of the trailer. The
feature is available when a
trailer is connected. The
feature requires user
installation of an accessory
trailer camera on the
interior of the trailer per the
accessory trailer camera
installation instructions (see
your dealer for accessory
trailer camera(s) and
information). To select,
touch Interior Trailer View
on the infotainment display
when a camera view is
active. To access this view
when in a forward gear
above 12 km/h (8 mph),
touch CAMERA on the
infotainment display and
touch the Interior Trailer
View icon. The view will
close after 8 seconds and
can be closed early by
touching X.
8. Hitch View
Assists with connecting to a
trailer by providing a
zoomed-in view of the hitch
to help align the vehicle’s
hitch ball with the trailer
coupler, or to monitor the
trailer connection. To select,
touch Hitch View on the
infotainment display when a
camera view is active. To
access this view when in a
forward gear above 12 km/h
(8 mph), touch CAMERA on
the infotainment display
and touch the Cargo Bed
View icon. The view will
close after 8 seconds and
can be closed early by
touching X. Shifting into
P (Park) while in this view
will automatically engage
the Electric Parking
Brake (EPB).
9. Bed View
Provides a view of the truck
bed and the area behind
the vehicle to assist in
cargo or hitch monitoring or
Page 259 of 495
Chevrolet Silverado Owner Manual (GMNA-Localizing-U.S./Canada/Mexico-
13337620) - 2020 - CTC - 1/27/20
258 Driving and Operating
hitching to a fifth wheel or
gooseneck trailer. To select,
touch Bed View on the
infotainment display when a
camera view is active. To
access this view when in a
forward gear above 12 km/h
(8 mph), touch CAMERA on
the infotainment display
and touch the Bed View
icon. The view will close
after 8 seconds and can be
closed early by touching X.
10. Transparent Trailer View
Provides a view that allows
the driver to virtually“see
through” the trailer. The
feature is available when a
compatible trailer is
connected and a profile is
configured and selected via
the Trailering App. See
Trailering App 0306. The
feature requires user
installation of an accessory
trailer camera on the rear
exterior surface of the
trailer per the accessory
trailer camera installation
instructions (see your dealer for accessory trailer
camera(s) and information).
To select, touch
Transparent Trailer View on
the infotainment display
when a camera view is
active. To access this view
when in a forward gear
above 12 km/h (8 mph),
touch CAMERA on the
infotainment display and
touch the Transparent
Trailer View icon. Touch X
to exit.
When the system is
calibrated and the trailer
position is known, one of
three views will be shown;
Transparent Trailer View,
Left Transparent Trailer
View or Right Transparent
Trailer View. The
Transparent Trailer View is
shown when the position of
the trailer is relatively
straight behind the vehicle.
The Left or Right
Transparent Trailer View is
shown when the position of
the trailer is too far to the
left or right. When the
system is not calibrated or
trailer position is not known
the Transparent Trailer
Picture-in-Picture View will
be shown.
11. Rear Trailer View/Rear Side
View with Available
Articulation Functionality/
Picture-in-Picture Side View
.Rear Trailer View
provides a view of the
area behind the trailer.
the feature is available
when a trailer is
connected. The feature
requires user installation
of an accessory trailer
camera on the rear
exterior surface of the
trailer per the accessory
trailer camera
installation instructions
(see your dealer for
accessory trailer
camera(s) and
information). To select,
touch Rear Trailer View/
Rear Side View with
Available Articulation
Page 260 of 495
Chevrolet Silverado Owner Manual (GMNA-Localizing-U.S./Canada/Mexico-
13337620) - 2020 - CTC - 1/27/20
Driving and Operating 259
Functionality/
Picture-in-Pictue Side
View on the
infotainment display
when a camera view is
active. Each touch will
toggle through the Rear
Trailer View, Trailer Tow
Mirror View and Combo
View. To access this
view when in a forward
gear above 12 km/h
(8 mph), touch
CAMERA on the
infotainment display and
touch the Interior Rear
Trailer View/Rear Side
View with Available
Articulation
Functionality/
Picture-in-Picture Side
View icon. Touch X
to exit.
. Rear Side View with
Available Articulation
Functionality provides a
rearward split view of
the left and right sides
of the vehicle and trailer.
When in a forward gear the view well
automatically pan to
show more of the left or
right side based on the
position of the trailer.
The feature is available
when a trailer is
connected. To select,
touch Rear trailer View/
Rear Side View with
Available Articulation
Functionality/
Picture-in-Picture Side
View on the
infotainment display
when a camera view is
active. Each touch will
toggle through the Rear
Trailer View, trailer tow
Mirror view and Combo
View. To access this
view when in a forward
gear above 12 km/h
(8 mph), Touch
CAMERA on the
infotainment display and
touch the Rear Trailer
View/Rear Side View
with Available
Articulation
Functionality/
Picture-in-Picture Side
icon. Touch X to exit.
. Provides a rearward
split view of the left and
right sides of the vehicle
and trailer with an
overlay view of the area
behind the trailer. The
feature is available
when a trailer is
connected. the feature
requires user installation
of an accessory trailer
camera on the rear
exterior surface of the
trailer per the accessory
trailer camera
installation instructions
(see your dealer for
accessory trailer
camera(s) and
information). To select,
touch Rear Trailer View/
Rear Side View with
Available Articulation
Functionality/
Picture-in-Picture Side
view on the infotainment
display when a camera