Direct current CHEVROLET SILVERADO 2024 Owners Manual
[x] Cancel search | Manufacturer: CHEVROLET, Model Year: 2024, Model line: SILVERADO, Model: CHEVROLET SILVERADO 2024Pages: 433, PDF Size: 14.15 MB
Page 8 of 433

Chevrolet Silverado 2500 HD/3500 HD Owner Manual (GMNA-Localizing-U.
S./Canada/Mexico-16908339) - 2024 - CRC - 12/5/22
6 Introduction
1. Tow/Haul Mode (On Some Models). SeeDriver Mode Control 0232.
Automatic Transfer Case Control (If
Equipped). See Four-Wheel Drive 0221.
Driver Mode Control 0232 (If Equipped).
2. Air Vents 0190.
3. Turn Signal Lever. See Turn and
Lane-Change Signals 0142.
Windshield Wiper/Washer 0101.
4. Head-Up Display (HUD) 0130 (If
Equipped).
5. Instrument Cluster (Base Level) 0107 or
Instrument Cluster (Uplevel) 0108.
6. Shift Lever. See Automatic Transmission
0 218.
Range Selection Mode. See Manual Mode
0 220.
7. Light Sensor. See Automatic Headlamp
System 0140.
Vehicle Alarm System. See Vehicle
Security 029.
8. Infotainment Controls. See Overview
(Uplevel Radio) 0150 or
Overview (Base Radio) 0149.
9. Upper Glove Box. See Glove Box094.
10. Lower Glove Box. See Glove Box094. 11.
Climate Control Systems 0185 (If
Equipped).
Dual Automatic Climate Control System
0 187 (If Equipped).
12. Park Assist Switch (If Equipped). See Assistance Systems for Parking or Backing
0247.
Traction Control/Electronic Stability
Control 0230.
Hazard Warning Flashers 0141.
Hill Descent Control Switch (If Equipped).
See Hill Descent Control (HDC) 0231.
Power Assist Steps 028 (If Equipped).
Power Release Tailgate (If Equipped). See
Tailgate 021.
Express Window Down Button (If
Equipped). See Power Windows 039.
Tow/Haul Mode 0221 (On Some
Models).
Exhaust Brake (If Equipped). See Duramax
Diesel Supplement.
Power Take-Off (PTO) (If Equipped). See
Duramax Diesel Supplement.
13. Power Outlet (Alternating Current) (If Equipped). See Power Outlets0102.
14. Power Outlet (Direct Current). See Power
Outlets 0102. 15.
USB Port 0158.
16. Trailer Brake Control Panel (If Equipped). See“Integrated Trailer Brake Control
System” underTowing Equipment 0278.
17. ENGINE START/STOP. See Ignition
Positions 0211.
18. Steering Wheel Controls 0151.
Driver Information Center (DIC) Controls.
See Driver Information Center (DIC) (Base
Level) 0126 or
Driver Information Center (DIC) (Uplevel)
0 128.
19. Horn 0101.
20. Hood Release. See Hood0305.
21. Steering Wheel Adjustment 0100 (Out
of View).
22. Cruise Control 0233.
Adaptive Cruise Control (Camera) 0235
(If Equipped).
Forward Collision Alert (FCA) System
0 257 (If Equipped).
Heated Steering Wheel 0100 (If
Equipped).
23. Data Link Connector (DLC) (Out of View). SeeMalfunction Indicator Lamp (Check
Engine Light) 0117.
24. Electric Parking Brake 0228.
Page 111 of 433

Chevrolet Silverado 2500 HD/3500 HD Owner Manual (GMNA-Localizing-U.
S./Canada/Mexico-16908339) - 2024 - CRC - 12/15/22
Instruments and Controls 109
.Digital configuration displays the info
display areas on the far left and right
sides of the display. The DIC area is larger
and located in the center of the display.
.Clean configuration is a simplified display
that has a digital speed in the center. The
DIC area is located on the far right of the
display.
Cluster Menu
There are interactive display areas in the
instrument cluster. Locations vary by the
selected display layout.
Use the right steering wheel control to open
and scroll through the different items and
displays.Press
oorpto access the instrument
cluster applications. Use the thumbwheel to
scroll through the list of available
applications. Press the thumbwheel to select.
Not all applications or features are available
on all vehicles.
.Info App. This is where the selected Driver
Information Center (DIC) displays can be
viewed. See Driver Information Center
(DIC) (Base Level) 0126 orDriver
Information Center (DIC) (Uplevel) 0128.
.Audio
.Navigation
.Phone
.Options
Left/Right Side Info
Information displayed here can be
customized from the Options menu. See
“Options” below.
Compass : If equipped, shows the direction
the vehicle is heading. This info is the
default option for the left side.
Time & Outside Temperature : Displays the
current time and outside air temperature.
Tire Pressure : Shows the approximate
pressures of all four tires. Tire pressure is
displayed in either kilopascal (kPa) or in pounds per square inch (psi). If the pressure
is low, the value for that tire is shown in
amber.
Average Fuel Economy :
Displays the
approximate average liters per
100 kilometers (L/100 km), kilometers per
liter (km/L), or miles per gallon (mpg). This
number is calculated based on the value
recorded since the last time this menu item
was reset in the Fuel Economy info page.
This number reflects only the approximate
average fuel economy that the vehicle has
at that moment, and changes as driving
conditions change.
Transmission Fluid Temperature : Shows the
temperature of the automatic transmission
fluid in either degrees Celsius (°C) or degrees
Fahrenheit (°F).
Drive Mode Enhanced : Displays the state of
the drive mode, ride height, and transfer
case. This info is only available as a right
side option and is the default selection for
the right side.
None : Displays the info area as empty.
Page 157 of 433
Chevrolet Silverado 2500 HD/3500 HD Owner Manual (GMNA-Localizing-U.
S./Canada/Mexico-16908339) - 2024 - CRC - 12/5/22
Infotainment System 155
Fade/Balance :Touch to adjust using the
controls on the infotainment display or by
tapping/dragging the crosshair.
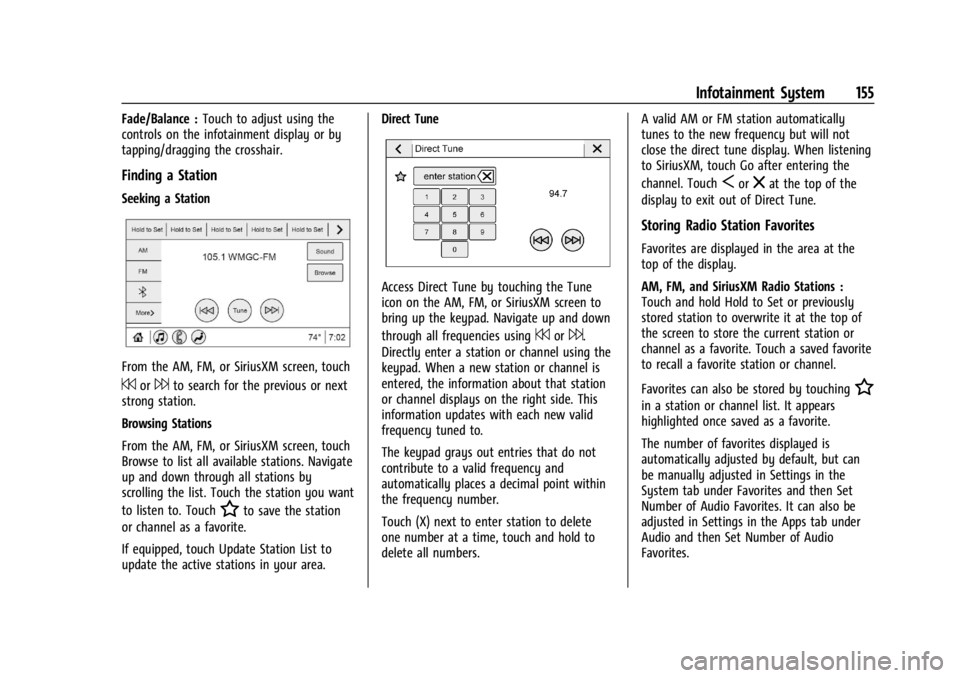
Finding a Station
Seeking a Station
From the AM, FM, or SiriusXM screen, touch
7or6to search for the previous or next
strong station.
Browsing Stations
From the AM, FM, or SiriusXM screen, touch
Browse to list all available stations. Navigate
up and down through all stations by
scrolling the list. Touch the station you want
to listen to. Touch
Hto save the station
or channel as a favorite.
If equipped, touch Update Station List to
update the active stations in your area. Direct Tune
Access Direct Tune by touching the Tune
icon on the AM, FM, or SiriusXM screen to
bring up the keypad. Navigate up and down
through all frequencies using
7or6.
Directly enter a station or channel using the
keypad. When a new station or channel is
entered, the information about that station
or channel displays on the right side. This
information updates with each new valid
frequency tuned to.
The keypad grays out entries that do not
contribute to a valid frequency and
automatically places a decimal point within
the frequency number.
Touch (X) next to enter station to delete
one number at a time, touch and hold to
delete all numbers. A valid AM or FM station automatically
tunes to the new frequency but will not
close the direct tune display. When listening
to SiriusXM, touch Go after entering the
channel. Touch
Sorzat the top of the
display to exit out of Direct Tune.
Storing Radio Station Favorites
Favorites are displayed in the area at the
top of the display.
AM, FM, and SiriusXM Radio Stations :
Touch and hold Hold to Set or previously
stored station to overwrite it at the top of
the screen to store the current station or
channel as a favorite. Touch a saved favorite
to recall a favorite station or channel.
Favorites can also be stored by touching
H
in a station or channel list. It appears
highlighted once saved as a favorite.
The number of favorites displayed is
automatically adjusted by default, but can
be manually adjusted in Settings in the
System tab under Favorites and then Set
Number of Audio Favorites. It can also be
adjusted in Settings in the Apps tab under
Audio and then Set Number of Audio
Favorites.
Page 162 of 433
Chevrolet Silverado 2500 HD/3500 HD Owner Manual (GMNA-Localizing-U.
S./Canada/Mexico-16908339) - 2024 - CRC - 12/5/22
160 Infotainment System
Navigation
Using the Navigation System
The Navigation software is provided by
Google Maps. The information provided in
this section is a general overview and is
subject to change. For the latest functional
information, see g.co/mapsincar.
Accept the Terms and Conditions to use.
Internet Connectivity
Google Maps relies on a subscription data
plan for full functionality, including
availability of offline maps. With an
applicable connected services plan, Google
Maps can be used offline when driving
through connectivity dead zones by
auto-downloading offline maps prior to
going offline.
Profiles
Sign in to a Google Account for personalized
service. Information available in the Google
Account will be shown.
To log into a profile, see Accounts under
Settings (Uplevel Radio)0177 or
Settings (Base Radio) 0175. Voice Assistant
If equipped, Google Maps can be controlled
by voice commands, see Google Assistant
under
Voice Recognition 0163.
Language and Units
To change the language and units, see
Settings (Uplevel Radio) 0177 or
Settings (Base Radio) 0175.
Mute Settings
During active route guidance, Google Maps
can give audible voice directions, traffic
alerts, or can be muted. In the Google Maps
app, touch Settings, then Mute settings to
access the options. Alternatively, audible
voice directions and traffic alerts can be
muted by touching the sound icon on the
turn card during active navigation.
Compass
The Google Maps orientation can be
changed between the direction currently
traveling and pointing North. Touch the
compass to switch between these options.
To recenter the map to the current location,
touch the location icon.
Maps
Auto-downloaded Maps
Google Maps downloads maps automatically
for use when not connected to the Internet.
Offline maps make map data available to
vehicle features regardless of connectivity.
These offline maps are only available with
an applicable connected services plan.
To turn on auto-download: 1. Open Google Maps.
2. Touch the settings icon.
3. Touch Privacy center, then select Offline maps.
4. Select Auto-download offline maps.
5. Check the Internet connection and wait for the download to finish.
Downloading Offline Maps 1. Open Google Maps.
2. Touch Settings, then Offline maps.
3. Touch the Select your own map square icon.
4. Adjust the map to cover the desired area to download.
5. Touch Download.
Page 163 of 433
Chevrolet Silverado 2500 HD/3500 HD Owner Manual (GMNA-Localizing-U.
S./Canada/Mexico-16908339) - 2024 - CRC - 12/5/22
Infotainment System 161
Navigation Symbols
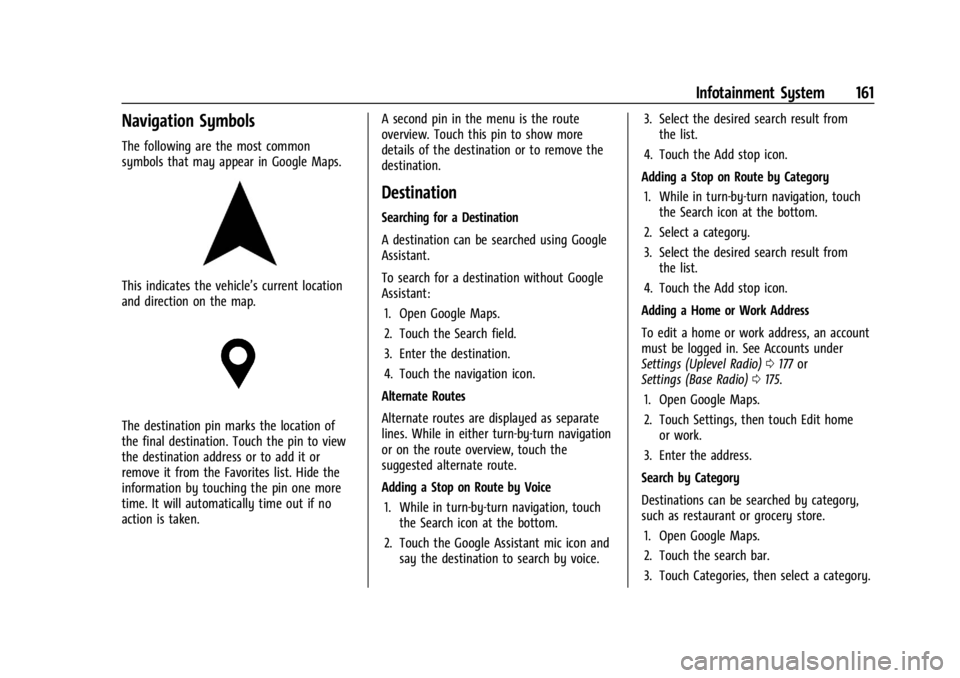
The following are the most common
symbols that may appear in Google Maps.
This indicates the vehicle’s current location
and direction on the map.
The destination pin marks the location of
the final destination. Touch the pin to view
the destination address or to add it or
remove it from the Favorites list. Hide the
information by touching the pin one more
time. It will automatically time out if no
action is taken.A second pin in the menu is the route
overview. Touch this pin to show more
details of the destination or to remove the
destination.
Destination
Searching for a Destination
A destination can be searched using Google
Assistant.
To search for a destination without Google
Assistant:
1. Open Google Maps.
2. Touch the Search field.
3. Enter the destination.
4. Touch the navigation icon.
Alternate Routes
Alternate routes are displayed as separate
lines. While in either turn-by-turn navigation
or on the route overview, touch the
suggested alternate route.
Adding a Stop on Route by Voice 1. While in turn-by-turn navigation, touch the Search icon at the bottom.
2. Touch the Google Assistant mic icon and say the destination to search by voice. 3. Select the desired search result from
the list.
4. Touch the Add stop icon.
Adding a Stop on Route by Category 1. While in turn-by-turn navigation, touch the Search icon at the bottom.
2. Select a category.
3. Select the desired search result from the list.
4. Touch the Add stop icon.
Adding a Home or Work Address
To edit a home or work address, an account
must be logged in. See Accounts under
Settings (Uplevel Radio) 0177 or
Settings (Base Radio) 0175.
1. Open Google Maps.
2. Touch Settings, then touch Edit home or work.
3. Enter the address.
Search by Category
Destinations can be searched by category,
such as restaurant or grocery store. 1. Open Google Maps.
2. Touch the search bar.
3. Touch Categories, then select a category.
Page 164 of 433
Chevrolet Silverado 2500 HD/3500 HD Owner Manual (GMNA-Localizing-U.
S./Canada/Mexico-16908339) - 2024 - CRC - 12/5/22
162 Infotainment System
4. Touch the desired location, then touchthe navigation icon.
Avoid Tolls, Highways, or Ferries 1. Open Google Maps.
2. Touch the settings icon.
3. Select Route options.
4. Select the desired options and then touch X to close.
An Alternative Way for General Route
Options 1. During active route guidance, touch Route Overview.
2. Select Route options.
3. Select the desired option and then touch X to close.
Traffic Layers 1. Open Google Maps.
2. Touch the settings icon.
3. Toggle between Traffic on or off.
Global Positioning System (GPS)
The current position of the vehicle is
determined by using satellite signals and
various vehicle signals. At times, other interference such as the
satellite condition, road configuration,
condition of the vehicle, and/or other
circumstances can affect the navigation
system's ability to determine the accurate
position of the vehicle.
This system might not be available or
interference can occur if any of the
following are true:
.Signals are obstructed by tall buildings,
trees, large trucks, or a tunnel.
.Satellites are being repaired or improved.
For more information if the GPS is not
functioning properly, see Problems with
Route Guidance 0163.
Vehicle Positioning
At times, the position of the vehicle on the
map could be inaccurate due to one or more
of the following reasons:
.The road system has changed.
.The vehicle is driving on slippery road
surfaces such as sand, gravel, or snow.
.The vehicle is traveling on winding roads
or long, straight roads.
.The vehicle is approaching a tall building
or a large vehicle.
.The surface streets run parallel to a
freeway.
.The vehicle has been transferred by a
vehicle carrier or a ferry.
.The current position calibration is set
incorrectly.
.The vehicle is traveling at high speed.
.The vehicle changes directions more than
once, or the vehicle is turning on a turn
table in a parking lot.
.The vehicle is entering and/or exiting a
parking lot, garage, or a lot with a roof.
.The GPS signal is not received.
.A roof carrier is installed on the vehicle.
.Tire chains are installed on the vehicle.
.The tires are replaced or worn.
.The tire pressure for the tires is incorrect.
.This is the first navigation use after the
map data is updated.
.The 12-volt battery has been disconnected
for several days.
.The vehicle is driving in heavy traffic
where driving is at low speeds, and the
vehicle is stopped and started repeatedly.
Page 166 of 433
Chevrolet Silverado 2500 HD/3500 HD Owner Manual (GMNA-Localizing-U.
S./Canada/Mexico-16908339) - 2024 - CRC - 12/5/22
164 Infotainment System
Direct commands are more clearly
understood by the system. An example of a
direct command is“Dial
If a cell phone number was saved with a
name and a place, the direct command
should include both. For example “Call
Voice Recognition for the Radio
When voice is started, the voice recognition
commands for AM, FM, SiriusXM (if
equipped), and media apps (if supported) are
available.
“Play
radio station frequency identified in the
command (like “nine fifty”).
“Play
radio station frequency identified in the
command (like “one oh one point one”).
“Play channel
SiriusXM” :Tune to the SiriusXM radio
station channel number identified in the
command. This command may require an
online connection.
“Play
Tune to the SiriusXM radio station channel
name identified in the command. This
command may require an online connection. “Play
Page 187 of 433
Chevrolet Silverado 2500 HD/3500 HD Owner Manual (GMNA-Localizing-U.
S./Canada/Mexico-16908339) - 2024 - CRC - 12/5/22
Climate Controls 185
Climate Controls
Climate Control Systems
Climate Control Systems . . . . . . . . . . . . . . . 185
Dual Automatic Climate ControlSystem . . . . . . . . . . . . . . . . . . . . . . . . . . . . . . 187
Air Vents
Air Vents . . . . . . . . . . . . . . . . . . . . . . . . . . . . . . 190
Maintenance
Passenger Compartment Air Filter . . . . . 190
Service . . . . . . . . . . . . . . . . . . . . . . . . . . . . . . . . . 191
Climate Control Systems
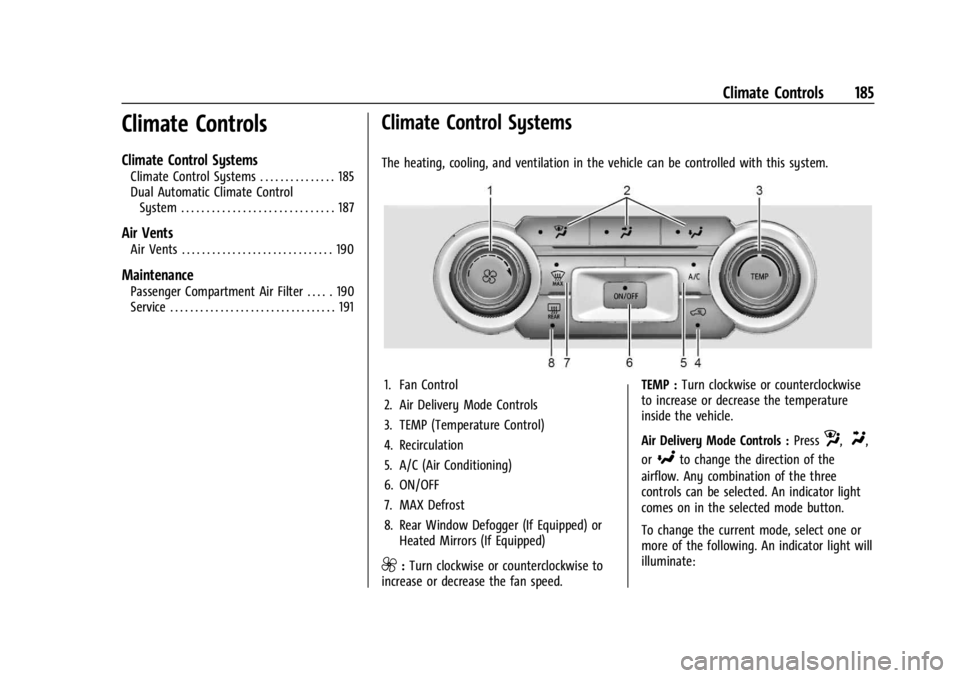
The heating, cooling, and ventilation in the vehicle can be controlled with this system.
1. Fan Control
2. Air Delivery Mode Controls
3. TEMP (Temperature Control)
4. Recirculation
5. A/C (Air Conditioning)
6. ON/OFF
7. MAX Defrost
8. Rear Window Defogger (If Equipped) or Heated Mirrors (If Equipped)
9:Turn clockwise or counterclockwise to
increase or decrease the fan speed. TEMP :
Turn clockwise or counterclockwise
to increase or decrease the temperature
inside the vehicle.
Air Delivery Mode Controls : Press
z,Y,
or
[to change the direction of the
airflow. Any combination of the three
controls can be selected. An indicator light
comes on in the selected mode button.
To change the current mode, select one or
more of the following. An indicator light will
illuminate:
Page 190 of 433
Chevrolet Silverado 2500 HD/3500 HD Owner Manual (GMNA-Localizing-U.
S./Canada/Mexico-16908339) - 2024 - CRC - 12/5/22
188 Climate Controls
The fan, air delivery mode, air conditioning,
driver and passenger temperatures, and Sync
settings can be controlled by touching
CLIMATE on the infotainment home screen.
A selection can then be made on the front
climate control page displayed.
The fan speed setting appears briefly on the
display screen when the center stack climate
controls are adjusted.
Automatic Operation
The system automatically controls the fan
speed, air delivery, air conditioning, and
recirculation in order to heat or cool the
vehicle to the desired temperature.
When AUTO is lit, all four functions operate
automatically. Each function can also be
manually set and the selected setting is
displayed. Functions not manually set will
continue to be automatically controlled,
even if the AUTO indicator is not lit.
For automatic operation:1. Press AUTO.
2. Set the temperature. Allow the system time to stabilize. Adjust the temperature
as needed for best comfort. To improve fuel efficiency and to cool the
vehicle faster, recirculation may be
automatically selected in warm weather.
The recirculation light will not come on
when automatically controlled. See
@
under
“Manual Operation” for more details.
Manual Operation
9:Press to increase or decrease the fan
speed. The fan speed setting appears on the
main display. Pressing either button cancels
automatic fan control and the fan is
controlled manually.
Press AUTO to return to automatic
operation.
Driver and Passenger Temperature Control :
The temperature can be adjusted separately
for the driver and passenger.
Turn the knob clockwise or counterclockwise
to increase or decrease the driver or
passenger temperature setting. The driver
side or passenger side temperature display
shows the temperature setting increasing or
decreasing. SYNC :
Press to link the passenger
temperature setting to the driver setting.
The SYNC indicator light will turn on. When
the passenger setting is adjusted, the SYNC
indicator light will turn off.
Air Delivery Mode Control : Press
z,Y,
or
[to change the direction of the
airflow. Any combination of the three
controls can be selected. An indicator light
comes on in the selected mode button.
Changing the mode cancels the automatic
operation and the system goes into manual
mode. Press AUTO to return to automatic
operation.
To change the current mode, select one or
more of the following:
z: Air is directed to the windshield,
outboard A/C outlets, and side window
outlets.
Y: Air is directed to the A/C outlets.
[:Air is directed to the floor outlets,
with some air directed to the windshield,
outboard A/C outlets, and side window
outlets.
Page 237 of 433
Chevrolet Silverado 2500 HD/3500 HD Owner Manual (GMNA-Localizing-U.
S./Canada/Mexico-16908339) - 2024 - CRC - 12/12/22
Driving and Operating 235
Reducing Speed While Using Cruise Control
If cruise control is already activated:
.Press and hold SET–down until the
desired lower speed is reached, then
release it.
.To decrease vehicle speed in small
increments, briefly press SET– down. For
each press, the vehicle goes about 1 km/h
(1 mph) slower.
The speedometer reading can be displayed
in either English or metric units. See
Instrument Cluster (Base Level) 0107 or
Instrument Cluster (Uplevel) 0108. The
increment value used depends on the units
displayed.
Passing Another Vehicle While Using Cruise
Control
Use the accelerator pedal to increase the
vehicle speed. When you take your foot off
the accelerator pedal, the vehicle will slow
down to the previously set cruise speed.
While pressing the accelerator pedal or
shortly following the release to override
cruise control, briefly pressing SET– will
result in cruise control set to the current
vehicle speed. Using Cruise Control on Hills
How well cruise control works on a hill
depends on the vehicle speed, the load, and
the steepness of the hill. When going up a
steep hill, you may have to apply the
accelerator pedal to maintain the set speed.
While going downhill, cruise braking helps
maintain driver selected speed.
Cruise Grade Braking is enabled when the
vehicle is started and cruise control is active.
It assists in maintaining driver selected
speed when driving on downhill grades by
using the engine and transmission to slow
the vehicle.
For other forms of descent control, see
Hill
Descent Control (HDC) 0231, Automatic
Transmission 0218, and Tow/Haul Mode
0 221.
Ending Cruise Control
There are four ways to end cruise control:
.Lightly apply the brake pedal.
.Press*.
.Shift the transmission to N (Neutral).
.Press5. Erasing Speed Memory
The cruise control set speed is erased from
memory if
5is pressed or the ignition is
turned off.
Adaptive Cruise Control (Camera)
If equipped, Adaptive Cruise Control (ACC)
allows the cruise control set speed and
following gap to be selected. Read this
entire section before using this system. The
following gap is the following time between
your vehicle and a vehicle detected directly
ahead in your path, moving in the same
direction. If no vehicle is detected in your
path, ACC works like regular cruise control.
ACC uses a windshield mounted front
camera sensor.
See Radio Frequency Statement 0407.
If a vehicle is detected in your path, ACC can
apply acceleration or limited, moderate
braking to maintain the selected following
gap. To disengage ACC, apply the brake.
If ACC is controlling the vehicle speed when
the Traction Control System (TCS) or
StabiliTrak/Electronic Stability Control (ESC)
system activates, ACC may automatically
disengage. See Traction Control/Electronic
Stability Control 0230. When road