center console CHEVROLET SILVERADO 2024 Owners Manual
[x] Cancel search | Manufacturer: CHEVROLET, Model Year: 2024, Model line: SILVERADO, Model: CHEVROLET SILVERADO 2024Pages: 433, PDF Size: 14.15 MB
Page 11 of 433

Chevrolet Silverado 2500 HD/3500 HD Owner Manual (GMNA-Localizing-U.
S./Canada/Mexico-16908339) - 2024 - CRC - 12/5/22
Introduction 9
1.Head-Up Display (HUD) 0130 (If
Equipped).
2. Air Vents 0190.
3. Turn Signal Lever. See Turn and
Lane-Change Signals 0142.
Windshield Wiper/Washer 0101.
4. Instrument Cluster (Base Level) 0107 or
Instrument Cluster (Uplevel) 0108.
5. Shift Lever. See Automatic Transmission
0 218.
Range Selection Mode. See Manual Mode
0 220.
6. Infotainment System. See Overview
(Uplevel Radio) 0150 or
Overview (Base Radio) 0149.
7. Light Sensor. See Automatic Headlamp
System 0140.
Vehicle Alarm System. See Vehicle
Security 029.
8. Upper Glove Box. See Glove Box094.
9. Lower Glove Box. See Glove Box094.
10. Upper Glove Box Button. See Glove Box
0 94.
11. Power Release Tailgate (If Equipped). See Tailgate 021.
Hazard Warning Flashers 0141. Traction Control/Electronic Stability
Control
0230.
Hill Descent Control Switch (If Equipped).
See Hill Descent Control (HDC) 0231.
Power Assist Steps 028 (If Equipped).
Express Window Down Button (If
Equipped). See Power Windows 039.
Tow/Haul Mode 0221 (On Some
Models).
Exhaust Brake (If Equipped). See Duramax
Diesel Supplement.
Power Take-Off (PTO) (If Equipped). See
Duramax Diesel Supplement.
12. USB Port 0158.
13. Climate Control Systems 0185 (If
Equipped).
Dual Automatic Climate Control System
0 187 (If Equipped).
Heated and Ventilated Front Seats 050
(If Equipped).
14. Front Center Console Storage.
15. Cupholders 094.
16. Trailer Brake Control Panel (If Equipped). See“Integrated Trailer Brake Control
System” underTowing Equipment 0278. 17. ENGINE START/STOP. See
Ignition
Positions 0211.
18. Steering Wheel Controls 0151.
Driver Information Center (DIC) Controls.
See Driver Information Center (DIC) (Base
Level) 0126 or
Driver Information Center (DIC) (Uplevel)
0 128.
19. Horn 0101.
20. Steering Wheel Adjustment 0100 (Out
of View).
21. Hood Release. See Hood0305.
22. Cruise Control 0233.
Adaptive Cruise Control (Camera) 0235
(If Equipped).
Forward Collision Alert (FCA) System
0 257 (If Equipped).
Heated Steering Wheel 0100 (If
Equipped).
23. Fog Lamps 0142 (If Equipped).
Instrument Panel Illumination Control
0 144.
Exterior Cargo Lamps 0144.
Exterior Lamp Controls 0138.
Task Lighting 0143 (If Equipped).
Page 33 of 433
Chevrolet Silverado 2500 HD/3500 HD Owner Manual (GMNA-Localizing-U.
S./Canada/Mexico-16908339) - 2024 - CRC - 12/5/22
Keys, Doors, and Windows 31
The security light, in the instrument cluster,
comes on if there is a problem with arming
or disarming the theft-deterrent system.
The system has one or more remote keys
matched to an immobilizer control unit in
your vehicle. Only a correctly matched
remote key will start the vehicle. If the
remote key is ever damaged, you may not
be able to start your vehicle.
When trying to start the vehicle, the
security light may come on briefly when the
ignition is turned on. If the engine does not
start and the security light stays on, there is
a problem with the system. Turn the
ignition off and try again.
If the vehicle will not change ignition modes
(accessory mode, on, off), and the remote
key appears to be undamaged, try another
remote key. Or, you may try placing the
remote key in the remote key pocket
located in the center console. SeeRemote
Key Operation 012.
If the ignition mode will not change with
the other remote key or with the remote
key in the remote key pocket, your vehicle
needs service. If the ignition does change
modes, the first remote key may be faulty. See your dealer who can service the
theft-deterrent system and have a new
remote key programmed to the vehicle.
It is possible for the immobilizer system to
learn new or replacement remote keys. Up
to eight remote keys can be programmed
for the vehicle. To program additional
remote keys, see "Programming Remote
Keys to the Vehicle" under
Remote Key
Operation 012.
Do not leave the remote key or device that
disarms or deactivates the vehicle theft
system in the vehicle.
Exterior Mirrors
Convex Mirrors
{Warning
A convex mirror can make things, like
other vehicles, look farther away than
they really are. If you cut too sharply
into the right lane, you could hit a
vehicle on the right. Check the inside
mirror or glance over your shoulder
before changing lanes. Standard Mirrors
If equipped, the passenger side mirror is
convex shaped. A convex mirror surface is
curved so more can be seen from the
driver seat.
Trailer-Tow Mirrors
The upper portion of both the driver and
passenger mirrors is flat.
The lower portion of both the driver and
passenger mirrors is convex. A convex mirror
surface is curved so more can be seen from
the driver seat. The lower portion is
adjusted manually.
Manual Mirrors
If equipped, adjust manual mirrors by
moving the mirror up and down or left to
right to see a little of the side of the vehicle
and to have a clear view behind the vehicle.
Using hood-mounted air deflectors and
add-on convex mirror attachments could
decrease mirror performance.
Page 54 of 433
Chevrolet Silverado 2500 HD/3500 HD Owner Manual (GMNA-Localizing-U.
S./Canada/Mexico-16908339) - 2024 - CRC - 12/5/22
52 Seats and Restraints
The feature can be turned on or off. Select
Settings > Vehicle > Rear Seat Reminder >
ON or OFF.
Folding the Rear Seat Cushion
Either side of the rear seat cushion can be
folded up for added cargo space.
Caution
Folding a rear seat with the seat belts
still fastened may cause damage to the
seat or the seat belts. Always unbuckle
the seat belts and return them to their
normal stowed position before folding a
rear seat.
Make sure that nothing is on the seat
cushion.
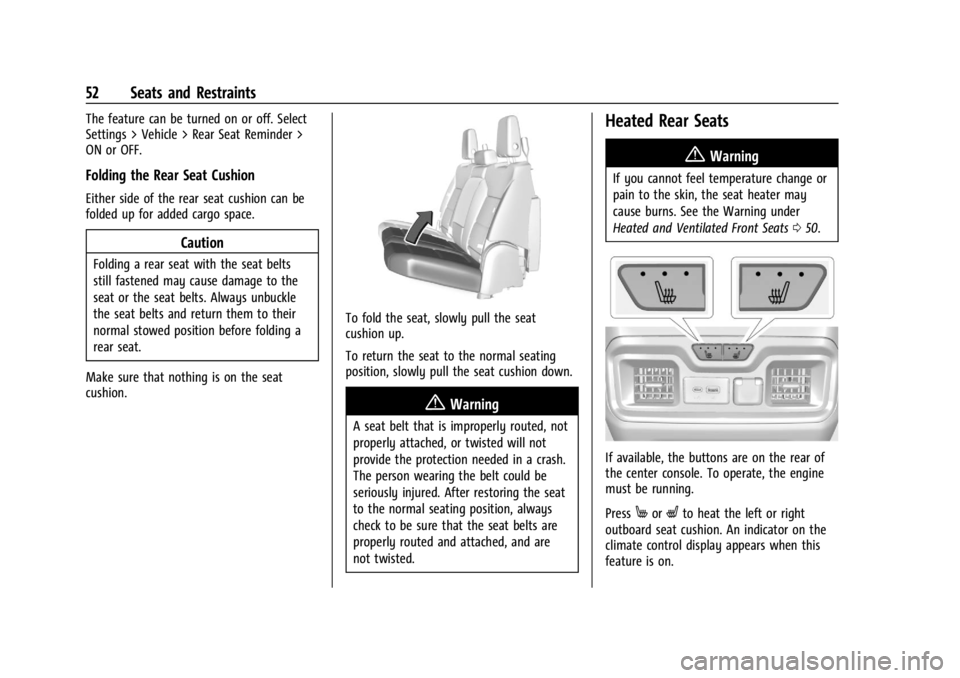
To fold the seat, slowly pull the seat
cushion up.
To return the seat to the normal seating
position, slowly pull the seat cushion down.
{Warning
A seat belt that is improperly routed, not
properly attached, or twisted will not
provide the protection needed in a crash.
The person wearing the belt could be
seriously injured. After restoring the seat
to the normal seating position, always
check to be sure that the seat belts are
properly routed and attached, and are
not twisted.
Heated Rear Seats
{Warning
If you cannot feel temperature change or
pain to the skin, the seat heater may
cause burns. See the Warning under
Heated and Ventilated Front Seats 050.
If available, the buttons are on the rear of
the center console. To operate, the engine
must be running.
Press
MorLto heat the left or right
outboard seat cushion. An indicator on the
climate control display appears when this
feature is on.
Page 96 of 433
Chevrolet Silverado 2500 HD/3500 HD Owner Manual (GMNA-Localizing-U.
S./Canada/Mexico-16908339) - 2024 - CRC - 12/5/22
94 Storage
Storage
Storage Compartments
Storage Compartments . . . . . . . . . . . . . . . . . 94
Glove Box . . . . . . . . . . . . . . . . . . . . . . . . . . . . . . 94
Cupholders . . . . . . . . . . . . . . . . . . . . . . . . . . . . . 94
Underseat Storage . . . . . . . . . . . . . . . . . . . . . . 95
Rear Storage . . . . . . . . . . . . . . . . . . . . . . . . . . . 95
Center Console Storage . . . . . . . . . . . . . . . . 96
Floor Console Storage . . . . . . . . . . . . . . . . . . 96
Additional Storage Features
Cargo Tie-Downs . . . . . . . . . . . . . . . . . . . . . . . 97
Storage Compartments{
Warning
Do not store heavy or sharp objects in
storage compartments. In a crash, these
objects may cause the cover to open and
could result in injury.
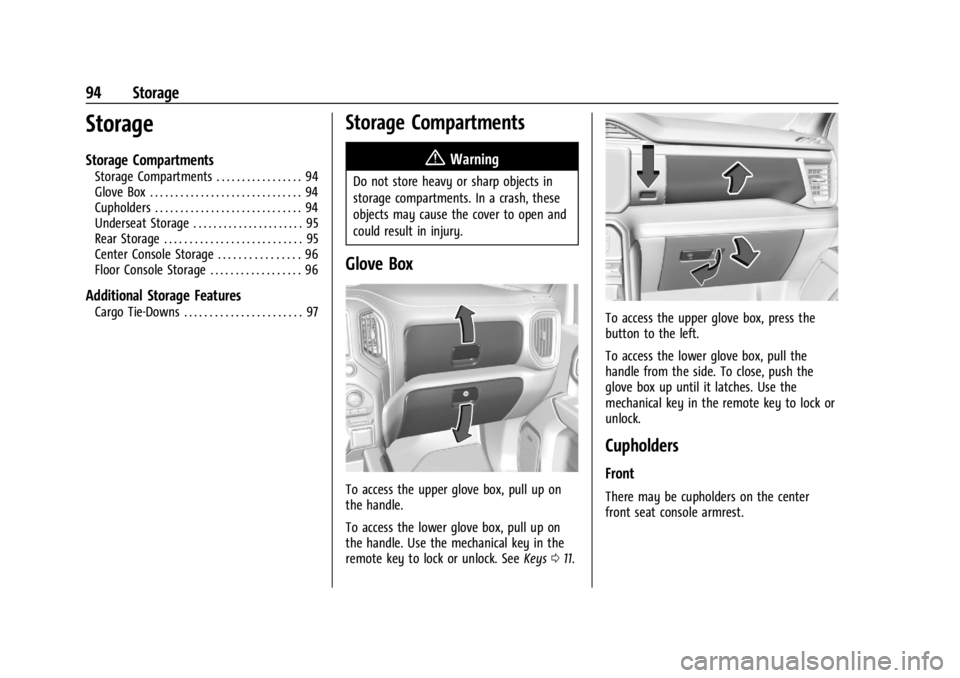
Glove Box
To access the upper glove box, pull up on
the handle.
To access the lower glove box, pull up on
the handle. Use the mechanical key in the
remote key to lock or unlock. See Keys011.
To access the upper glove box, press the
button to the left.
To access the lower glove box, pull the
handle from the side. To close, push the
glove box up until it latches. Use the
mechanical key in the remote key to lock or
unlock.
Cupholders
Front
There may be cupholders on the center
front seat console armrest.
Page 98 of 433
Chevrolet Silverado 2500 HD/3500 HD Owner Manual (GMNA-Localizing-U.
S./Canada/Mexico-16908339) - 2024 - CRC - 12/5/22
96 Storage
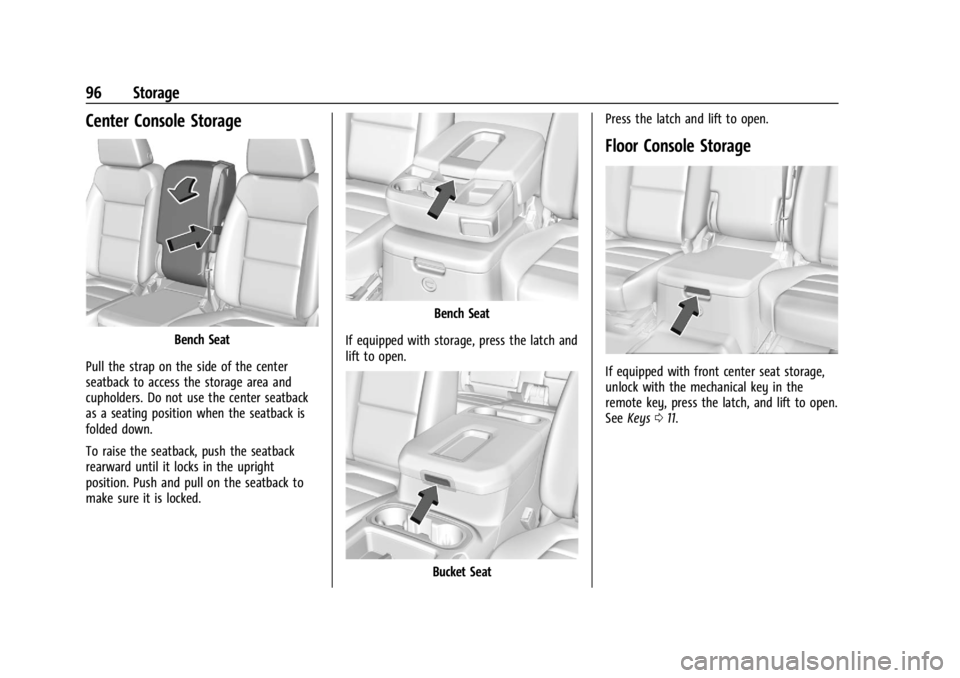
Center Console Storage
Bench Seat
Pull the strap on the side of the center
seatback to access the storage area and
cupholders. Do not use the center seatback
as a seating position when the seatback is
folded down.
To raise the seatback, push the seatback
rearward until it locks in the upright
position. Push and pull on the seatback to
make sure it is locked.
Bench Seat
If equipped with storage, press the latch and
lift to open.
Bucket Seat Press the latch and lift to open.
Floor Console Storage
If equipped with front center seat storage,
unlock with the mechanical key in the
remote key, press the latch, and lift to open.
See
Keys 011.
Page 104 of 433

Chevrolet Silverado 2500 HD/3500 HD Owner Manual (GMNA-Localizing-U.
S./Canada/Mexico-16908339) - 2024 - CRC - 12/15/22
102 Instruments and Controls
If the ignition is turned off while the wipers
are performing wipes due to windshield
washing, the wipers continue to run until
they reach the base of the windshield.
Rain Sense
If equipped with Rain Sense and the feature
is turned on, a sensor near the top center of
the windshield detects the amount of water
on the windshield and controls the
frequency of the windshield wiper based on
the current sensitivity setting.
Keep this area of the windshield clear of
debris to allow for best system performance.
To turn the Rain Sense feature on or off, see
“Rain Sense Wipers”under Settings >
Vehicle > Comfort and Convenience > Rain
Sense > Enable/Disable.
If Rain Sense is enabled in Settings, turning
the wiper lever to INT will activate Rain
Sense. Front Surround Vision Camera Wash
If equipped, pressLon the windshield
wiper lever to spray washer fluid on the
front surround vision camera lens. See
Surround Vision System 0248.
Compass
The vehicle may have a compass display on
the Driver Information Center (DIC). The
compass receives its heading and other
information from the Global Positioning
System (GPS) antenna, Electronic Stability
Control (ESC), and vehicle speed information.
The compass system is designed to operate
for a certain number of miles or degrees of
turn before needing a signal from the GPS
satellites. When the compass display shows
CAL, drive the vehicle for a short distance in
an open area where it can receive a GPS
signal. The compass system will
automatically determine when a GPS signal
is restored and provide a heading again.
Clock
Set the time and date using the
infotainment system. See "Time/Date" under
Settings (Uplevel Radio) 0177 or
Settings (Base Radio) 0175.
Power Outlets
Accessory power outlets can be used to plug
in electrical equipment, such as a cell phone
or MP3 player.
Rear of Front Center Console
The vehicle has one accessory power outlet
under the climate control system and one
accessory power outlet on the rear of the
center console, if equipped, or on the rear of
the bench seat, if equipped.
Page 106 of 433

Chevrolet Silverado 2500 HD/3500 HD Owner Manual (GMNA-Localizing-U.
S./Canada/Mexico-16908339) - 2024 - CRC - 12/15/22
104 Instruments and Controls
An indicator light on the outlet illuminates
when power is provided to the outlet and
no system fault is detected. The outlets will
not operate when the ignition is off, the
DC/AC switch is not pressed, or the plug is
not fully seated into the outlet.
If equipment is connected using more than
400 watts or a system fault is detected, a
protection circuit shuts off the power supply
and the indicator light turns off.
Do not use a power outlet with a missing or
damaged cover.
The power outlet is not designed for the
following, and may not work properly if
they are plugged in:
.Equipment with high initial peak wattage,
such as compressor-driven refrigerators
and electric power tools
.Other equipment requiring an extremely
stable power supply, such as
microcomputer-controlled electric blankets
and touch sensor lamps
.Medical equipment
Wireless Charging
If equipped and enabled, the vehicle has
wireless charging on the center console in
front of the cupholders. The system
operates at 145 kHz and wirelessly charges
one Qi compatible smartphone. The power
output of the system is capable of charging
at a rate up to 3 amp (15 W), as requested
by the compatible smartphone. SeeRadio
Frequency Statement 0407.
{Warning
Wireless charging may affect the
operation of an implanted pacemaker or
other medical devices. If you have one, it
is recommended to consult with your
doctor before using the wireless charging
system.
The vehicle must be on, in ACC/ACCESSORY,
or Retained Accessory Power (RAP) must be
active. The wireless charging feature may
not correctly indicate charging when the
vehicle is in RAP, during a Bluetooth phone
call, or when phone projection (e.g. Apple
CarPlay / Android Auto) is active. See
Retained Accessory Power (RAP) 0214. The operating temperature is
−40 °C (−40 °F)
to 85 °C (185 °F) for the charging system and
0 °C (32 °F) to 35 °C (95 °F) for the phone.
A charging stopped alert may be displayed
on the infotainment screen, if the wireless
charger or smartphone are outside of
normal operating temperature. Charging will
automatically resume when a normal
operating temperature is reached.
{Warning
Remove all objects from the charger
before charging your compatible
smartphone. Objects, such as coins, keys,
rings, paper clips, or cards, between the
smartphone and charger may become
very hot.
On the rare occasion that the charging
system does not detect an object, and
the object gets wedged between the
smartphone and charger, remove the
smartphone and allow the object to cool
before removing it from the charger, to
prevent burns.
Page 118 of 433
Chevrolet Silverado 2500 HD/3500 HD Owner Manual (GMNA-Localizing-U.
S./Canada/Mexico-16908339) - 2024 - CRC - 12/15/22
116 Instruments and Controls
When the vehicle is started, these lights
come on solid to remind rear passengers to
fasten their seat belts. Then each light may
stay on solid or flash, and a chime may
come on if the rear passenger remains
unbuckled, or becomes unbuckled, when the
vehicle is moving. An X indicates the seat
belt is not buckled. A check mark indicates
the seat belt is buckled.
If all rear seat positions are buckled, neither
the chime nor the lights will come on.
For information on the front seat belt
reminder lights, see "Driver Seat Belt
Reminder Light" and "Front Passenger Seat
Belt Reminder Light" listed previously.
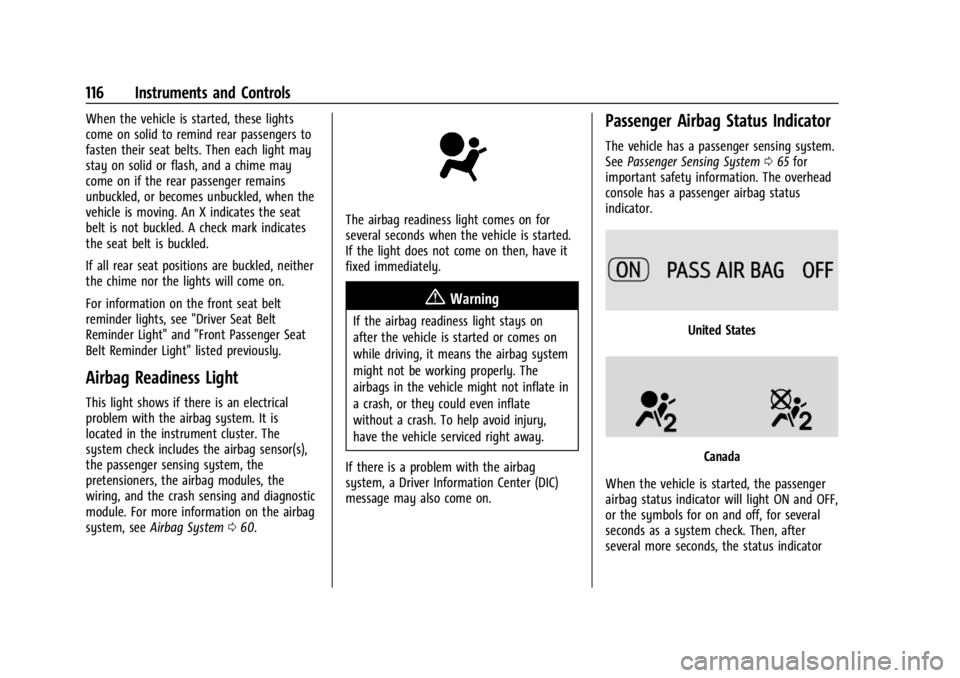
Airbag Readiness Light
This light shows if there is an electrical
problem with the airbag system. It is
located in the instrument cluster. The
system check includes the airbag sensor(s),
the passenger sensing system, the
pretensioners, the airbag modules, the
wiring, and the crash sensing and diagnostic
module. For more information on the airbag
system, seeAirbag System 060.
The airbag readiness light comes on for
several seconds when the vehicle is started.
If the light does not come on then, have it
fixed immediately.
{Warning
If the airbag readiness light stays on
after the vehicle is started or comes on
while driving, it means the airbag system
might not be working properly. The
airbags in the vehicle might not inflate in
a crash, or they could even inflate
without a crash. To help avoid injury,
have the vehicle serviced right away.
If there is a problem with the airbag
system, a Driver Information Center (DIC)
message may also come on.
Passenger Airbag Status Indicator
The vehicle has a passenger sensing system.
See Passenger Sensing System 065 for
important safety information. The overhead
console has a passenger airbag status
indicator.
United States
Canada
When the vehicle is started, the passenger
airbag status indicator will light ON and OFF,
or the symbols for on and off, for several
seconds as a system check. Then, after
several more seconds, the status indicator
Page 288 of 433
Chevrolet Silverado 2500 HD/3500 HD Owner Manual (GMNA-Localizing-U.
S./Canada/Mexico-16908339) - 2024 - CRC - 12/12/22
286 Driving and Operating
Warning (Continued)
injury, death, or property damage. Only
use the ITBC system with electric or
electric over hydraulic trailer brake
systems.
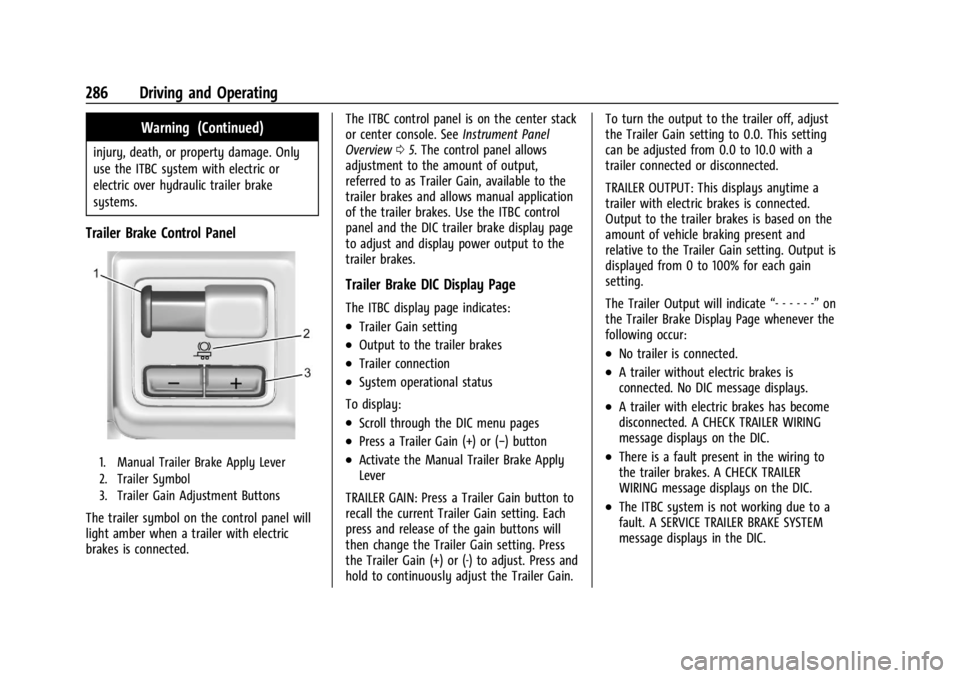
Trailer Brake Control Panel
1. Manual Trailer Brake Apply Lever
2. Trailer Symbol
3. Trailer Gain Adjustment Buttons
The trailer symbol on the control panel will
light amber when a trailer with electric
brakes is connected.The ITBC control panel is on the center stack
or center console. See
Instrument Panel
Overview 05. The control panel allows
adjustment to the amount of output,
referred to as Trailer Gain, available to the
trailer brakes and allows manual application
of the trailer brakes. Use the ITBC control
panel and the DIC trailer brake display page
to adjust and display power output to the
trailer brakes.
Trailer Brake DIC Display Page
The ITBC display page indicates:
.Trailer Gain setting
.Output to the trailer brakes
.Trailer connection
.System operational status
To display:
.Scroll through the DIC menu pages
.Press a Trailer Gain (+) or (−) button
.Activate the Manual Trailer Brake Apply
Lever
TRAILER GAIN: Press a Trailer Gain button to
recall the current Trailer Gain setting. Each
press and release of the gain buttons will
then change the Trailer Gain setting. Press
the Trailer Gain (+) or (-) to adjust. Press and
hold to continuously adjust the Trailer Gain. To turn the output to the trailer off, adjust
the Trailer Gain setting to 0.0. This setting
can be adjusted from 0.0 to 10.0 with a
trailer connected or disconnected.
TRAILER OUTPUT: This displays anytime a
trailer with electric brakes is connected.
Output to the trailer brakes is based on the
amount of vehicle braking present and
relative to the Trailer Gain setting. Output is
displayed from 0 to 100% for each gain
setting.
The Trailer Output will indicate
“- - - - - -”on
the Trailer Brake Display Page whenever the
following occur:
.No trailer is connected.
.A trailer without electric brakes is
connected. No DIC message displays.
.A trailer with electric brakes has become
disconnected. A CHECK TRAILER WIRING
message displays on the DIC.
.There is a fault present in the wiring to
the trailer brakes. A CHECK TRAILER
WIRING message displays on the DIC.
.The ITBC system is not working due to a
fault. A SERVICE TRAILER BRAKE SYSTEM
message displays in the DIC.
Page 422 of 433

Chevrolet Silverado 2500 HD/3500 HD Owner Manual (GMNA-Localizing-U.
S./Canada/Mexico-16908339) - 2024 - CRC - 12/5/22
420 Index
Camera (cont'd)Truck Bed . . . . . . . . . . . . . . . . . . . . . . . . . . . . . . . 38
Canadian Vehicle Owners . . . . . . . . . . . . . . . . . . .2
Capacities and Specifications . . . . . . . . . . . . . 396
Carbon Monoxide Engine Exhaust . . . . . . . . . . . . . . . . . . . . . . . . . 217
Tailgate . . . . . . . . . . . . . . . . . . . . . . . . . . . . . . . . . . 21
Winter Driving . . . . . . . . . . . . . . . . . . . . . . . . . 202
Cargo Tie-Downs . . . . . . . . . . . . . . . . . . . . . . . . . . . . . . 97
Caution, Danger, and Warning . . . . . . . . . . . . . .2
Center High-Mounted Stoplamp (CHMSL)and Cargo Lamp . . . . . . . . . . . . . . . . . . . . . 329
Seat . . . . . . . . . . . . . . . . . . . . . . . . . . . . . . . . . . . . 45
Center Console
Storage . . . . . . . . . . . . . . . . . . . . . . . . . . . . . . . . . 96
Chains, Tire . . . . . . . . . . . . . . . . . . . . . . . . . . . . . . 358
Charging System Light . . . . . . . . . . . . . . . . . . . . . . . . . . . 117
Wireless . . . . . . . . . . . . . . . . . . . . . . . . . . . . . . . 104
Check Engine Light (Malfunction Indicator) . . . . . . . . . . . . . . . . . . . . . . . . . . . . . . . 117
Child Restraints Infants and Young Children . . . . . . . . . . . . . 72
Lower Anchors and Tethers forChildren . . . . . . . . . . . . . . . . . . . . . . . . . . . . . . . 77
Older Children . . . . . . . . . . . . . . . . . . . . . . . . . . . 71 Child Restraints (cont'd)
Securing . . . . . . . . . . . . . . . . . . . . . . . . . 87, 91, 93
Systems . . . . . . . . . . . . . . . . . . . . . . . . . . . . . . . . 74
Child Safety Locks . . . . . . . . . . . . . . . . . . . . . . . . 20
Circuit Breakers . . . . . . . . . . . . . . . . . . . . . . . . . . 332
Cleaning Exterior Care . . . . . . . . . . . . . . . . . . . . . . . . . . . 377
Interior Care . . . . . . . . . . . . . . . . . . . . . . . . . . . 382
Climate Control Systems . . . . . . . . . . . . . . . . . .185 Air Conditioning . . . . . . . . . . . . . . . . . . . . . . . 185
Dual Automatic . . . . . . . . . . . . . . . . . . . . . . . . 187
Heating . . . . . . . . . . . . . . . . . . . . . . . . . . . . . . . . 185
Clock . . . . . . . . . . . . . . . . . . . . . . . . . . . . . . . . . . . . 102
Cluster, Instrument . . . . . . . . . . . . . . . . . .107, 108
Collision Alert Forward (FCA) System . . . . . . . . . . . . . . . . . 257
Collision Damage Repair . . . . . . . . . . . . . . . . . 405
Compartments Storage . . . . . . . . . . . . . . . . . . . . . . . . . . . . . . . . . 94
Compass . . . . . . . . . . . . . . . . . . . . . . . . . . . . . . . . . 102
Connected Services Connections . . . . . . . . . . . . . . . . . . . . . . . . . . . 415
Diagnostics . . . . . . . . . . . . . . . . . . . . . . . . . . . . 417
Navigation . . . . . . . . . . . . . . . . . . . . . . . . . . . . . 415
Connections Connected Services . . . . . . . . . . . . . . . . . . . . 415
Control Hill Descent . . . . . . . . . . . . . . . . . . . . . . . . . . . . 231 Control (cont'd)
Traction and Electronic Stability . . . . . . . 230
Control Light Hill Descent . . . . . . . . . . . . . . . . . . . . . . . . . . . . . 121
Control of a Vehicle . . . . . . . . . . . . . . . . . . . . . 194
Controls Steering Wheel . . . . . . . . . . . . . . . . . . . . . . . . . 151
Convex Mirrors . . . . . . . . . . . . . . . . . . . . . . . . . . . . 31
Coolant Engine Temperature Gauge . . . . . . . . . . . . . 113
Engine Temperature Warning Light . . . . 123
Cooling . . . . . . . . . . . . . . . . . . . . . . . . . . . . . . 185, 187
Cooling System . . . . . . . . . . . . . . . . . . . . . . . . . . . 313
Courtesy Transportation Program . . . . . . . . 404
Cruise Control . . . . . . . . . . . . . . . . . . . . . . . . . . . 233 Adaptive . . . . . . . . . . . . . . . . . . . . . . . . . . . . . . . 235
Light . . . . . . . . . . . . . . . . . . . . . . . . . . . . . . . . . . . 126
Cupholders . . . . . . . . . . . . . . . . . . . . . . . . . . . . . . . 94
Customer Assistance Offices . . . . . . . . . . . . . . . . . . . . . . . . . . . . . . . . . 401
Text Telephone (TTY) Users . . . . . . . . . . . . 401
Customer Information Publications Ordering Information . . . . . 406
Customer Satisfaction Procedure . . . . . . . . . 399
Cybersecurity . . . . . . . . . . . . . . . . . . . . . . . . . . . . 408