key battery CHEVROLET SILVERADO 2500 2023 User Guide
[x] Cancel search | Manufacturer: CHEVROLET, Model Year: 2023, Model line: SILVERADO 2500, Model: CHEVROLET SILVERADO 2500 2023Pages: 441, PDF Size: 14.4 MB
Page 228 of 441
Chevrolet Silverado 2500 HD/3500 HD Owner Manual (GMNA-Localizing-U.
S./Canada/Mexico-15546003) - 2022 - CRC - 5/5/21
Driving and Operating 227
Caution (Continued)
.Avoid making hard stops for the first
300 km (200 mi) or so. During this
time the new brake linings are not yet
broken in. Hard stops with new linings
can mean premature wear and earlier
replacement. Follow this breaking-in
guideline every time you get new
brake linings.
.Do not tow a trailer during break-in.
SeeTrailer Towing 0278 for the trailer
towing capabilities of the vehicle and
more information.
Following break-in, engine speed and load
can be gradually increased.
On new vehicles, the various mechanical and
electrical systems experience a “break-in”
period during the first 6,400 km
(4,000 miles) of routine driving. As the
vehicle is driven, the mechanical systems
adjust to provide optimal fuel economy and
transmission shift performance.
Electrical systems will adapt and calibrate
during the break-in period. A one-time
occurrence of clicks and similar vehicle
noises is normal during this process. Normal driving charges the vehicle’s battery
to achieve the best operation of the vehicle,
including fuel economy.
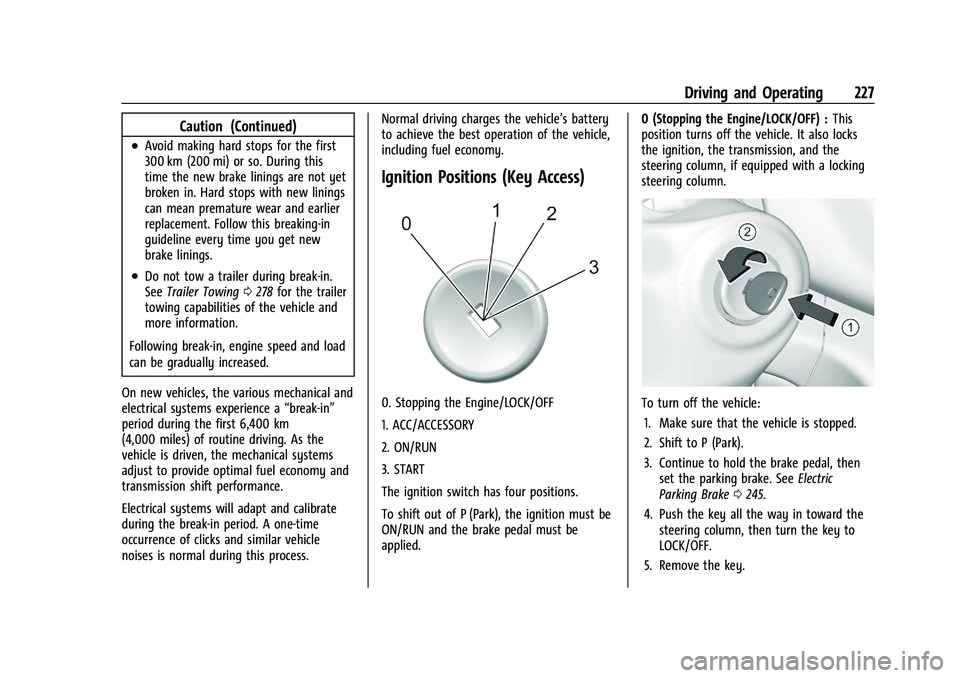
Ignition Positions (Key Access)
0. Stopping the Engine/LOCK/OFF
1. ACC/ACCESSORY
2. ON/RUN
3. START
The ignition switch has four positions.
To shift out of P (Park), the ignition must be
ON/RUN and the brake pedal must be
applied.
0 (Stopping the Engine/LOCK/OFF) :
This
position turns off the vehicle. It also locks
the ignition, the transmission, and the
steering column, if equipped with a locking
steering column.To turn off the vehicle:
1. Make sure that the vehicle is stopped.
2. Shift to P (Park).
3. Continue to hold the brake pedal, then set the parking brake. See Electric
Parking Brake 0245.
4. Push the key all the way in toward the steering column, then turn the key to
LOCK/OFF.
5. Remove the key.
Page 229 of 441
Chevrolet Silverado 2500 HD/3500 HD Owner Manual (GMNA-Localizing-U.
S./Canada/Mexico-15546003) - 2022 - CRC - 5/5/21
228 Driving and Operating
6. Release the brake pedal.
See your dealer if the key can be removed
in any other position.
Retained Accessory Power (RAP) will remain
active. See Retained Accessory Power (RAP)
0 232.
A warning chime will sound when the driver
door is opened and the key is in the
ignition.
If equipped with a locking steering column,
the steering can bind with the front wheels
turned off center, which may prevent key
rotation out of LOCK/OFF. If this happens,
move the steering wheel from right to left
while turning the key to ACC/ACCESSORY.
If this does not work, then the vehicle needs
service.
{Warning
Turning off the vehicle while moving may
cause loss of power assist in the brake
and steering systems and disable the
airbags. While driving, turn off the
vehicle only in an emergency.
In an emergency, if the vehicle cannot be
pulled over and must be turned off while
driving: 1. Push the key all the way in toward the
steering column, then turn the key to
ACC/ACCESSORY.
2. Brake using firm and steady pressure. Do not pump the brakes repeatedly. This
may deplete power assist, requiring
increased brake pedal force.
3. Shift the vehicle to N (Neutral). This can be done while the vehicle is moving.
Continue braking and steer the vehicle to
a safe location.
4. Come to a complete stop.
5. Shift to P (Park).
6. Push the key all the way in toward the steering column (1), then turn the
ignition to LOCK/OFF (2).
7. Set the parking brake. See Electric
Parking Brake 0245.
8. Remove the key.
9. Release the brake pedal.
Caution
Use the correct key, make sure it is all
the way in —or pushed all the way in
toward the steering column when turning
off the vehicle —and turn it only with
your hand. 1 (ACC/ACCESSORY) :
This position allows
features such as the infotainment system to
operate while the vehicle is off. It also
unlocks the steering column, if equipped
with a locking steering column. Use this
position if the vehicle must be pushed or
towed. See Retained Accessory Power (RAP)
0 232.
From ON/RUN, push the key all the way in
toward the steering column, then turn the
key to ACC/ACCESSORY.
If the key is left in ACC/ACCESSORY with the
engine off, the battery could drain and the
vehicle may not start.
A warning chime will sound when the driver
door is opened and the key is in the
ignition.
2 (ON/RUN) : This position can be used to
operate the electrical accessories and to
display some instrument cluster warning
and indicator lights. This position can also
be used for service and diagnostics, and to
verify the proper operation of the
malfunction indicator lamp as may be
required for emission inspection purposes.
The switch stays in this position when the
engine is running. The transmission is also
unlocked in this position.
Page 230 of 441
Chevrolet Silverado 2500 HD/3500 HD Owner Manual (GMNA-Localizing-U.
S./Canada/Mexico-15546003) - 2022 - CRC - 5/5/21
Driving and Operating 229
If the key is left in ON/RUN with the engine
off, the battery could drain and the vehicle
may not start.
3 (START) :This is the position that starts
the engine. When the engine starts, release
the key. The ignition returns to ON/RUN for
driving.
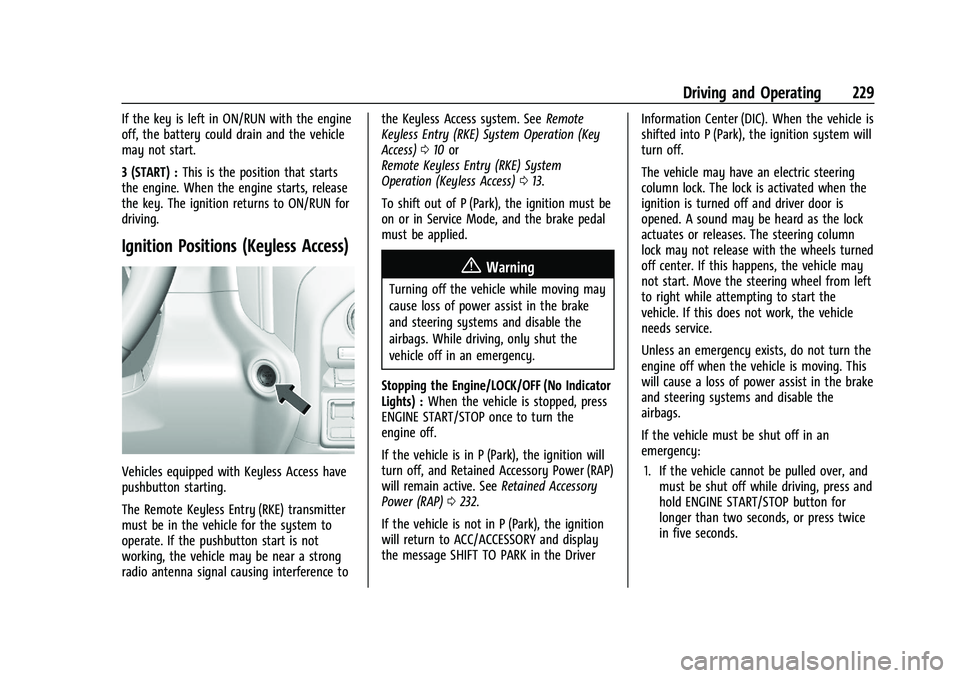
Ignition Positions (Keyless Access)
Vehicles equipped with Keyless Access have
pushbutton starting.
The Remote Keyless Entry (RKE) transmitter
must be in the vehicle for the system to
operate. If the pushbutton start is not
working, the vehicle may be near a strong
radio antenna signal causing interference to the Keyless Access system. See
Remote
Keyless Entry (RKE) System Operation (Key
Access) 010 or
Remote Keyless Entry (RKE) System
Operation (Keyless Access) 013.
To shift out of P (Park), the ignition must be
on or in Service Mode, and the brake pedal
must be applied.
{Warning
Turning off the vehicle while moving may
cause loss of power assist in the brake
and steering systems and disable the
airbags. While driving, only shut the
vehicle off in an emergency.
Stopping the Engine/LOCK/OFF (No Indicator
Lights) : When the vehicle is stopped, press
ENGINE START/STOP once to turn the
engine off.
If the vehicle is in P (Park), the ignition will
turn off, and Retained Accessory Power (RAP)
will remain active. See Retained Accessory
Power (RAP) 0232.
If the vehicle is not in P (Park), the ignition
will return to ACC/ACCESSORY and display
the message SHIFT TO PARK in the Driver Information Center (DIC). When the vehicle is
shifted into P (Park), the ignition system will
turn off.
The vehicle may have an electric steering
column lock. The lock is activated when the
ignition is turned off and driver door is
opened. A sound may be heard as the lock
actuates or releases. The steering column
lock may not release with the wheels turned
off center. If this happens, the vehicle may
not start. Move the steering wheel from left
to right while attempting to start the
vehicle. If this does not work, the vehicle
needs service.
Unless an emergency exists, do not turn the
engine off when the vehicle is moving. This
will cause a loss of power assist in the brake
and steering systems and disable the
airbags.
If the vehicle must be shut off in an
emergency:
1. If the vehicle cannot be pulled over, and must be shut off while driving, press and
hold ENGINE START/STOP button for
longer than two seconds, or press twice
in five seconds.
Page 232 of 441
Chevrolet Silverado 2500 HD/3500 HD Owner Manual (GMNA-Localizing-U.
S./Canada/Mexico-15546003) - 2022 - CRC - 5/5/21
Driving and Operating 231
Starting Procedure
1. For Key Access vehicles, turn the ignitionkey to Start. When the engine starts, let
go of the key. For Keyless Access
vehicles, the RKE transmitter must be in
the vehicle. Press ENGINE START/STOP
with the brake pedal applied. When the
engine begins cranking, let go of the
button.
The driver may observe a minor, and
temporary, brake pedal kickback when
starting the vehicle. This is normal.
The idle speed will go down as the
engine gets warm. Do not race the
engine immediately after starting it.
Operate the engine and transmission
gently to allow the oil to warm up and
lubricate all moving parts.
When the low fuel warning light is on
and the FUEL LEVEL LOW message is
displayed in the Driver Information
Center (DIC), hold the ignition switch in
the START position to continue engine
cranking.Caution
Cranking the engine for long periods of
time, by returning the ignition to the
START position immediately after
cranking has ended, can overheat and
damage the cranking motor, and drain
the battery. Wait at least 15 seconds
between each try, to let the cranking
motor cool down.
2. If the engine does not start after five to 10 seconds, especially in very cold
weather (below −18 °C or 0 °F), it could
be flooded with too much gasoline. Try
pushing the accelerator pedal all the way
to the floor and holding it there while
holding the key in START or ENGINE
START/STOP for up to a maximum of
15 seconds. Wait at least 15 seconds
between each try, to allow the cranking
motor to cool down. When the engine
starts, let go of the key or button and
accelerator. If the vehicle starts briefly
but then stops again, do the same thing.
This clears the extra gasoline from the
engine. Do not race the engine
immediately after starting it. Operate the engine and transmission gently until
the oil warms up and lubricates all
moving parts.
Engine Heater
If equipped, the engine heater can provide
easier starting and better fuel economy
during engine warm-up in cold weather
conditions at or below
−18 °C (0 °F). Vehicles
with an engine heater should be plugged in
at least four hours before starting. An
internal thermostat in the plug-end of the
cord may exist, which will prevent engine
heater operation at temperatures above
−18 °C (0 °F).
{Warning
Do not plug in the engine block heater
while the vehicle is parked in a garage or
under a carport. Property damage or
personal injury may result. Always park
the vehicle in a clear open area away
from buildings or structures.
Page 326 of 441
Chevrolet Silverado 2500 HD/3500 HD Owner Manual (GMNA-Localizing-U.
S./Canada/Mexico-15546003) - 2022 - CRC - 5/5/21
Vehicle Care 325
Extended Storage: Remove the black,
negative (−) cable from the battery or use a
battery trickle charger.
Negative Battery Cable Disconnection
{Warning
Before disconnecting the negative battery
cable, turn off all features, turn the
ignition off, and remove the key,
if equipped, from the vehicle. If this is
not done, you or others could be injured,
and the vehicle could be damaged.
Caution
If the battery is disconnected with the
ignition on or the vehicle in Retained
Accessory Power (RAP), the OnStar
back-up battery will be permanently
discharged and will need to be replaced.
1. Make sure the lamps, features, and accessories are turned off.
2. Turn the ignition off and remove the key, if equipped.
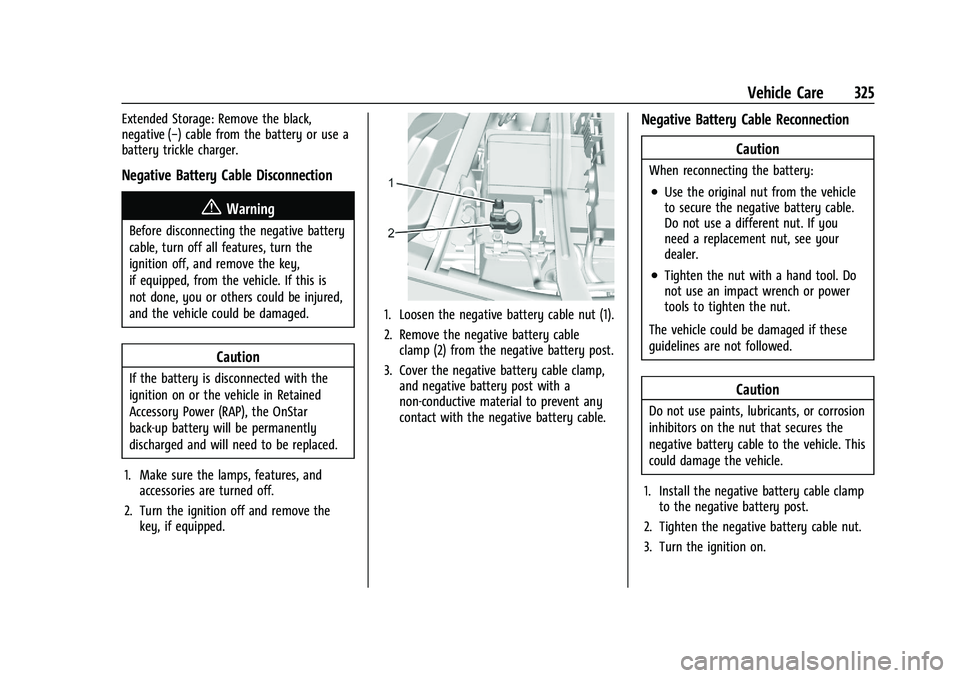
1. Loosen the negative battery cable nut (1).
2. Remove the negative battery cableclamp (2) from the negative battery post.
3. Cover the negative battery cable clamp, and negative battery post with a
non-conductive material to prevent any
contact with the negative battery cable.
Negative Battery Cable Reconnection
Caution
When reconnecting the battery:
.Use the original nut from the vehicle
to secure the negative battery cable.
Do not use a different nut. If you
need a replacement nut, see your
dealer.
.Tighten the nut with a hand tool. Do
not use an impact wrench or power
tools to tighten the nut.
The vehicle could be damaged if these
guidelines are not followed.
Caution
Do not use paints, lubricants, or corrosion
inhibitors on the nut that secures the
negative battery cable to the vehicle. This
could damage the vehicle.
1. Install the negative battery cable clamp to the negative battery post.
2. Tighten the negative battery cable nut.
3. Turn the ignition on.
Page 381 of 441
Chevrolet Silverado 2500 HD/3500 HD Owner Manual (GMNA-Localizing-U.
S./Canada/Mexico-15546003) - 2022 - CRC - 5/5/21
380 Vehicle Care
To dinghy tow:1. Position the vehicle being towed behind the tow vehicle, facing forward and on a
level surface.
2. Securely attach the vehicle being towed to the tow vehicle.
3. Apply the parking brake and start the engine.
4. Shift the transfer case to N (Neutral). See “Shifting into N (Neutral)” under
Four-Wheel Drive 0240.
5. With the engine running, release the parking brake and verify that the
transfer case is in N (Neutral) by shifting
the transmission to D (Drive) and then to
R (Reverse). There should be no
movement while shifting the
transmission.
6. Shift the transmission to D (Drive).
7. If equipped with an ignition key, turn the ignition to ACC/ACCESSORY.
If equipped with Keyless Access, turn the
engine off. Disregard the Shift to P (Park)
DIC message. See Ignition Positions
(Keyless Access) 0229 or
Ignition Positions (Key Access) 0227.{Warning
To avoid death, serious injury,
or property damage, before dinghy
towing the vehicle, always disconnect and
secure the negative battery cable and
cover the negative battery post and cable
with a non-conductive material. If the
battery is left connected or the battery
cable contacts the post, the Electric
Parking Brake may activate during
towing, which could cause a crash.
8. Disconnect the negative (–) battery cable. See “Negative Battery Cable
Disconnection” inBattery - North
America 0324.
9. Shift the transmission to P (Park).
Caution
If the steering column is locked, vehicle
damage may occur.
10. Move the steering wheel to make sure the steering column is unlocked.
11. If the vehicle has an ignition key, keep it in the towed vehicle in ACC/ACCESSORY
to prevent the steering column from
locking. If the vehicle is equipped with Keyless Access, keep the RKE transmitter
outside of the vehicle and manually lock
the doors. Access the vehicle by using
the key in the door lock. See
Door Locks
0 21.
Disconnecting the Towed Vehicle
Before disconnecting from the tow vehicle: 1. Park on a level surface. Secure the vehicle with wheel blocks.
2. Re-connect the negative (–) battery. See Battery - North America 0324.
3. Turn on the ignition with the engine off. For vehicles with a key, turn the ignition
to ON/RUN with the engine off. If the
vehicle is equipped with Keyless Access,
with your foot off the brake pedal, press
and hold ENGINE START/STOP for
five seconds until the green light comes
on in the button. See Ignition Positions
(Keyless Access) 0229 or
Ignition Positions (Key Access) 0227.
4. Set the parking brake. See Electric
Parking Brake 0245.
5. Disconnect from the tow vehicle.
6. Shift the transmission to N (Neutral).
Page 422 of 441
Chevrolet Silverado 2500 HD/3500 HD Owner Manual (GMNA-Localizing-U.
S./Canada/Mexico-15546003) - 2022 - CRC - 5/5/21
OnStar 421
Or
.Give OnStar Turn-by-Turn Navigation voice
commands.
.Obtain and customize the Wi-Fi hotspot
name or SSID and password, if equipped.
Press
Qto connect to an Advisor to:
.Verify account information or update
contact information.
.Get driving directions.
.Receive a Diagnostic check of the vehicle's
key operating systems.
.Receive Roadside Assistance.
.Manage Wi-Fi Settings, if equipped.
Press
>to get a priority connection to an
OnStar Advisor available 24/7 to:
.Get help for an emergency.
.Be a Good Samaritan or respond to an
AMBER Alert.
.Get assistance in severe weather or other
crisis situations and find evacuation
routes.
OnStar Services
Emergency
Emergency Services require an active safety
and security plan. With Automatic Crash
Response, built-in sensors can automatically
alert a specially trained OnStar Advisor who
is immediately connected in to the vehicle
to help.
Press
>for a priority connection to an
OnStar Advisor who can contact emergency
service providers, direct them to your exact
location, and relay important information.
With OnStar Crisis Assist, specially trained
Advisors are available 24 hours a day, 7 days
a week, to provide a central point of
contact, assistance, and information during a
crisis.
With Roadside Assistance, Advisors can
locate a nearby service provider to help with
a flat tire, a battery jump, or an empty
gas tank.
Security
If equipped, OnStar provides these services:
.With Stolen Vehicle Assistance, OnStar
Advisors can use GPS to pinpoint the
vehicle and help authorities quickly
recover it.
.With Remote Ignition Block, if equipped,
OnStar can block the engine from being
restarted.
.With Stolen Vehicle Slowdown,
if equipped, OnStar can work with law
enforcement to gradually slow the
vehicle down.
Theft Alarm Notification
If equipped, if the doors are locked and the
vehicle alarm sounds, a notification by text,
e-mail, or phone call will be sent. If the
vehicle is stolen, an OnStar Advisor can work
with authorities to recover the vehicle.
OnStar Additional
Information
In-Vehicle Audio Messages
Audio messages may play important
information at the following times:
.Prior to vehicle purchase. PressQto set
up an account.
Page 434 of 441
Chevrolet Silverado 2500 HD/3500 HD Owner Manual (GMNA-Localizing-U.
S./Canada/Mexico-15546003) - 2022 - CRC - 5/5/21
Index 433
High-Beam On Light . . . . . . . . . . . . . . . . . . . . . . 123
Hill and Mountain Roads . . . . . . . . . . . . . . . . .218
Hill Descent Control (HDC) . . . . . . . . . . . . . . . 248
Hill Descent Control Light . . . . . . . . . . . . . . . . . 119
Hill Start Assist (HSA) . . . . . . . . . . . . . . . . . . . . 246
Hood . . . . . . . . . . . . . . . . . . . . . . . . . . . . . . . . . . . . 308
Horn . . . . . . . . . . . . . . . . . . . . . . . . . . . . . . . . . . . . . 102
How to Wear Seat Belts Properly . . . . . . . . . 56
HVAC . . . . . . . . . . . . . . . . . . . . . . . . . . . . . . . 202, 204
I
If the System Needs Service . . . . . . . . . . . . . . 173
Ignition Positions . . . . . . . . . . . . . . . . . . . .227, 229
Ignition Transmission Lock Check . . . . . . . . 328
Immobilizer . . . . . . . . . . . . . . . . . . . . . . . . . . . . . . . .33
IndicatorVehicle Ahead . . . . . . . . . . . . . . . . . . . . . . . . . . 119
Infants and Young Children, Restraints . . . . 74
Information Publication Ordering . . . . . . . . . . . . . . . . . . . 416
Infotainment System . . . . . . . . . . . . . . . . . . . . 419
Instrument Cluster . . . . . . . . . . . . . . . . . . . . . . . 107
Instrument Panel Overview . . . . . . . . . . . . . . . . 4
Interior Rearview Mirrors . . . . . . . . . . . . . . . . . 38
Introduction . . . . . . . . . . . . . . . . . . . . . . . . . . . 1, 148
J
Jack
Auxiliary . . . . . . . . . . . . . . . . . . . . . . . . . . . . . . . . 161
Jump Starting - North America . . . . . . . . . . . 374
K
Keyless Entry Remote (RKE) System . . . . . . . . . . . . . . . . 10, 13
Keys . . . . . . . . . . . . . . . . . . . . . . . . . . . . . . . . . . . . . 7, 9
L
Labeling, Tire Sidewall . . . . . . . . . . . . . . . . . . . 345
Lamps Auxiliary Roof Mounted Lamp . . . . . . . . . 144
Daytime Running (DRL) . . . . . . . . . . . . . . . . . 141
Dome . . . . . . . . . . . . . . . . . . . . . . . . . . . . . . . . . . 145
Exterior Cargo . . . . . . . . . . . . . . . . . . . . . . . . . 144
Exterior Controls . . . . . . . . . . . . . . . . . . . . . . . 139
Exterior Lamps Off Reminder . . . . . . . . . . . 141
Exterior Lighting Battery Saver . . . . . . . . 147
License Plate . . . . . . . . . . . . . . . . . . . . . . . . . . . 334
Malfunction Indicator (CheckEngine) . . . . . . . . . . . . . . . . . . . . . . . . . . . . . . . 116
On Reminder . . . . . . . . . . . . . . . . . . . . . . . . . . 123
Reading . . . . . . . . . . . . . . . . . . . . . . . . . . . . . . . . 146
Lane Change Alert (LCA) . . . . . . . . . . . . . . . . . 266
Lane Departure Warning (LDW) . . . . . . . . . . 268
Lane Departure Warning Light . . . . . . . . . . . . 119
Lap-Shoulder Belt . . . . . . . . . . . . . . . . . . . . . . . . . 58 LATCH System
Replacing Parts after a Crash . . . . . . . . . . . 89
LATCH, Lower Anchors and Tethers for Children . . . . . . . . . . . . . . . . . . . . . . . . . . . . . . . . . 79
LED Lighting . . . . . . . . . . . . . . . . . . . . . . . . . . . . . . 331
Lighting Entry . . . . . . . . . . . . . . . . . . . . . . . . . . . . . . . . . . 146
Exit . . . . . . . . . . . . . . . . . . . . . . . . . . . . . . . . . . . . 146
Illumination Control . . . . . . . . . . . . . . . . . . . 145
LED . . . . . . . . . . . . . . . . . . . . . . . . . . . . . . . . . . . . 331
Task . . . . . . . . . . . . . . . . . . . . . . . . . . . . . . . . . . . 144
Lights Airbag Readiness . . . . . . . . . . . . . . . . . . . . . . . 114
Antilock Brake System (ABS)Warning . . . . . . . . . . . . . . . . . . . . . . . . . . . . . . 118
Brake System Warning . . . . . . . . . . . . . . . . . 117
Charging System . . . . . . . . . . . . . . . . . . . . . . . 116
Check Engine (Malfunction
Indicator) . . . . . . . . . . . . . . . . . . . . . . . . . . . . . 116
Cruise Control . . . . . . . . . . . . . . . . . . . . . . . . . 123
Door Ajar . . . . . . . . . . . . . . . . . . . . . . . . . . . . . . 123
Driver Mode Control . . . . . . . . . . . . . . . . . . . . 121
Electric Parking Brake . . . . . . . . . . . . . . . . . . . 118
Electronic Stability Control (ESC), Off . . . . . . . . . . . . . . . . . . . . . . . . . . . . 120
Engine Coolant Temperature Warning . . . . . . . . . . . . . . . . . . . . . . . . . . . . . . 121
Engine Oil Pressure . . . . . . . . . . . . . . . . . . . . 122