coolant temperature CHEVROLET SILVERADO 2500 2023 Owners Manual
[x] Cancel search | Manufacturer: CHEVROLET, Model Year: 2023, Model line: SILVERADO 2500, Model: CHEVROLET SILVERADO 2500 2023Pages: 441, PDF Size: 14.4 MB
Page 3 of 441
Chevrolet Silverado 2500 HD/3500 HD Owner Manual (GMNA-Localizing-U.
S./Canada/Mexico-15546003) - 2022 - CRC - 5/12/21
2 Introduction
Helm, Incorporated
Attention: Customer Service
47911 Halyard Drive
Plymouth, MI 48170
USA
Using this Manual
To quickly locate information about the
vehicle, use the Index in the back of the
manual. It is an alphabetical list of what is
in the manual and the page number where
it can be found.
Danger, Warning, and Caution
Warning messages found on vehicle labels
and in this manual describe hazards and
what to do to avoid or reduce them.
{Danger
Danger indicates a hazard with a high
level of risk which will result in serious
injury or death.
{Warning
Warning indicates a hazard that could
result in injury or death.
Caution
Caution indicates a hazard that could
result in property or vehicle damage.
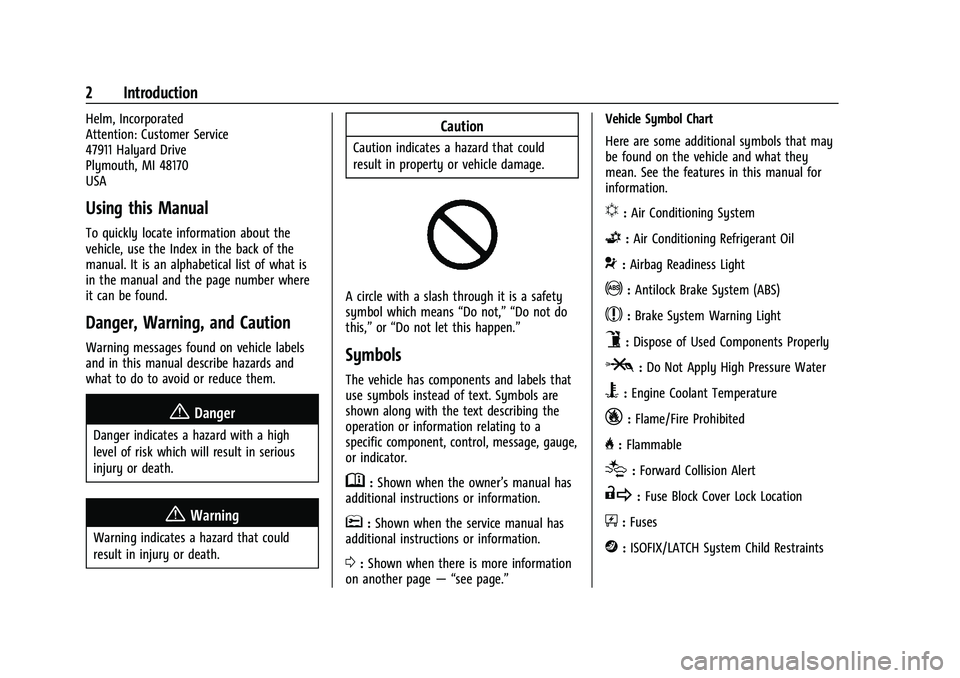
A circle with a slash through it is a safety
symbol which means“Do not,” “Do not do
this,” or“Do not let this happen.”
Symbols
The vehicle has components and labels that
use symbols instead of text. Symbols are
shown along with the text describing the
operation or information relating to a
specific component, control, message, gauge,
or indicator.
M:Shown when the owner’s manual has
additional instructions or information.
*: Shown when the service manual has
additional instructions or information.
0: Shown when there is more information
on another page — “see page.” Vehicle Symbol Chart
Here are some additional symbols that may
be found on the vehicle and what they
mean. See the features in this manual for
information.
u:
Air Conditioning System
G:Air Conditioning Refrigerant Oil
9:Airbag Readiness Light
!:Antilock Brake System (ABS)
$:Brake System Warning Light
9:Dispose of Used Components Properly
P:Do Not Apply High Pressure Water
B:Engine Coolant Temperature
_:Flame/Fire Prohibited
H: Flammable
[:Forward Collision Alert
R:Fuse Block Cover Lock Location
+:Fuses
j:ISOFIX/LATCH System Child Restraints
Page 21 of 441
Chevrolet Silverado 2500 HD/3500 HD Owner Manual (GMNA-Localizing-U.
S./Canada/Mexico-15546003) - 2022 - CRC - 5/12/21
20 Keys, Doors, and Windows
4. Remove the battery.
5. Insert the new battery, positive sidetoward the back cover. Replace with a
CR2032 or equivalent battery.
6. Ensure that the silicone mat is correctly positioned with no gaps or wrinkles.
7. Set transmitter button side down on a hard surface and press the other half
straight down to force the halves
together.
8. Insert the key back into the RKE transmitter.
Remote Vehicle Start
If equipped with the remote start feature,
the climate control system will come on
when the vehicle is started remotely,
depending on the outside temperature.
The rear defog and heated and ventilated
seats, if equipped, may also come on. See
Heated and Ventilated Front Seats 053 and
Vehicle Personalization 0131.
If equipped, the automatic heated steering
wheel may also come on. See Heated
Steering Wheel 0101. Laws in some communities may restrict the
use of remote starters. Check local
regulations for any requirements on remote
starting of vehicles.
Do not use remote start if the vehicle is low
on fuel. The vehicle may run out of fuel.
The vehicle cannot be remote started if:
.The RKE transmitter is inside the vehicle
or if the key is in the ignition.
.The hood is not closed.
.There is an emission control system
malfunction and the lamp is on.
.The ignition is in any mode other
than off.
.The hazard warning flashers are on.
.Two remote starts or a remote start with
an extension have been used.
.The vehicle is not in P (Park).
The engine will turn off during a remote
vehicle start if:
.The coolant temperature gets too high.
.The oil pressure gets low.
The RKE transmitter range may be reduced
while the vehicle is running. Other conditions can affect the performance
of the transmitter. See
Remote Keyless Entry
(RKE) System 010.
Starting the Engine Using Remote Start
1. Press and release
Q.
2. Immediately press and hold
/until the
turn signal lamps flash or for at least
four seconds.
When the vehicle starts, the parking
lamps will turn on. The doors will be
locked and the climate control system
may come on.
The engine will continue to run for
15 minutes. After 30 seconds, repeat
Steps 1 and 2 for a 15-minute time
extension.
Turn the ignition on to operate the vehicle.
Extending Engine Run Time
The engine run time can be extended by
15 minutes, for a total of 30 minutes,
if during the first 15 minutes Steps 1 and 2
are repeated while the engine is still
running. An extension can be requested
30 seconds after starting.
A maximum of two remote starts, or a
single start with an extension, is allowed
between ignition cycles.
Page 101 of 441
Chevrolet Silverado 2500 HD/3500 HD Owner Manual (GMNA-Localizing-U.
S./Canada/Mexico-15546003) - 2022 - CRC - 5/12/21
100 Instruments and Controls
Instruments and Controls
Controls
Steering Wheel Adjustment . . . . . . . . . . . . 101
Steering Wheel Controls . . . . . . . . . . . . . . . 101
Heated Steering Wheel . . . . . . . . . . . . . . . . 101
Horn . . . . . . . . . . . . . . . . . . . . . . . . . . . . . . . . . . 102
Windshield Wiper/Washer . . . . . . . . . . . . . 102
Compass . . . . . . . . . . . . . . . . . . . . . . . . . . . . . . . 103
Clock . . . . . . . . . . . . . . . . . . . . . . . . . . . . . . . . . . 103
Power Outlets . . . . . . . . . . . . . . . . . . . . . . . . . 103
Wireless Charging . . . . . . . . . . . . . . . . . . . . . 104
Warning Lights, Gauges, and Indicators
Warning Lights, Gauges, andIndicators . . . . . . . . . . . . . . . . . . . . . . . . . . . . 107
Instrument Cluster . . . . . . . . . . . . . . . . . . . . . 107
Speedometer . . . . . . . . . . . . . . . . . . . . . . . . . . . 111
Odometer . . . . . . . . . . . . . . . . . . . . . . . . . . . . . . 111
Trip Odometer . . . . . . . . . . . . . . . . . . . . . . . . . 111
Tachometer . . . . . . . . . . . . . . . . . . . . . . . . . . . . 111
Fuel Gauge . . . . . . . . . . . . . . . . . . . . . . . . . . . . . 111
Engine Oil Pressure Gauge . . . . . . . . . . . . . 112
Engine Coolant Temperature Gauge . . . . 113
Voltmeter Gauge . . . . . . . . . . . . . . . . . . . . . . . 113
Seat Belt Reminders . . . . . . . . . . . . . . . . . . . 114
Airbag Readiness Light . . . . . . . . . . . . . . . . . 114
Passenger Airbag Status Indicator . . . . . . 115
Charging System Light . . . . . . . . . . . . . . . . . 116 Malfunction Indicator Lamp (Check
Engine Light) . . . . . . . . . . . . . . . . . . . . . . . . . 116
Brake System Warning Light . . . . . . . . . . . 117
Electric Parking Brake Light . . . . . . . . . . . . 118
Service Electric Parking Brake Light . . . . 118
Antilock Brake System (ABS) Warning Light . . . . . . . . . . . . . . . . . . . . . . . . . . . . . . . . . 118
Four-Wheel-Drive Light . . . . . . . . . . . . . . . . . 119
Hill Descent Control Light . . . . . . . . . . . . . . 119
Lane Departure Warning (LDW) Light . . . . . . . . . . . . . . . . . . . . . . . . . . . . . . . . . 119
Vehicle Ahead Indicator . . . . . . . . . . . . . . . . 119
Traction Off Light . . . . . . . . . . . . . . . . . . . . . . 120
Traction Control System (TCS)/Electronic Stability Control Light . . . . . . . . . . . . . . . 120
Electronic Stability Control (ESC) Off Light . . . . . . . . . . . . . . . . . . . . . . . . . . . . . . . . . 120
Engine Coolant Temperature Warning Light . . . . . . . . . . . . . . . . . . . . . . . . . . . . . . . . . 121
Driver Mode Control Light . . . . . . . . . . . . . 121
Tire Pressure Light . . . . . . . . . . . . . . . . . . . . . 121
Engine Oil Pressure Light (Uplevel Cluster) . . . . . . . . . . . . . . . . . . . . . . . . . . . . . . 122
Low Fuel Warning Light . . . . . . . . . . . . . . . . 122
Security Light . . . . . . . . . . . . . . . . . . . . . . . . . . 122
High-Beam On Light . . . . . . . . . . . . . . . . . . . 123
Front Fog Lamp Light . . . . . . . . . . . . . . . . . . 123
Lamps On Reminder . . . . . . . . . . . . . . . . . . . 123
Cruise Control Light . . . . . . . . . . . . . . . . . . . . 123
Door Ajar Light . . . . . . . . . . . . . . . . . . . . . . . . 123
Information Displays
Driver Information Center (DIC) (Base Level) . . . . . . . . . . . . . . . . . . . . . . . . . . . . . . . . 124
Driver Information Center (DIC) (Midlevel and Uplevel) . . . . . . . . . . . . . . . 125
Head-Up Display (HUD) . . . . . . . . . . . . . . . . 127
Vehicle Messages
Vehicle Messages . . . . . . . . . . . . . . . . . . . . . . 130
Engine Power Messages . . . . . . . . . . . . . . . 130
Vehicle Speed Messages . . . . . . . . . . . . . . . 131
Vehicle Personalization
Vehicle Personalization . . . . . . . . . . . . . . . . . 131
Universal Remote System
Universal Remote System . . . . . . . . . . . . . . 135
Universal Remote System
Programming . . . . . . . . . . . . . . . . . . . . . . . . 135
Universal Remote System Operation . . . 137
Page 108 of 441
Chevrolet Silverado 2500 HD/3500 HD Owner Manual (GMNA-Localizing-U.
S./Canada/Mexico-15546003) - 2022 - CRC - 5/12/21
Instruments and Controls 107
Warning Lights, Gauges, and
Indicators
Warning lights and gauges can signal that
something is wrong before it becomes
serious enough to cause an expensive repair
or replacement. Paying attention to the
warning lights and gauges could prevent
injury.
Some warning lights come on briefly when
the engine is started to indicate they are
working. When one of the warning lights
comes on and stays on while driving,
or when one of the gauges shows there
may be a problem, check the section that
explains what to do. Waiting to do repairs
can be costly and even dangerous.
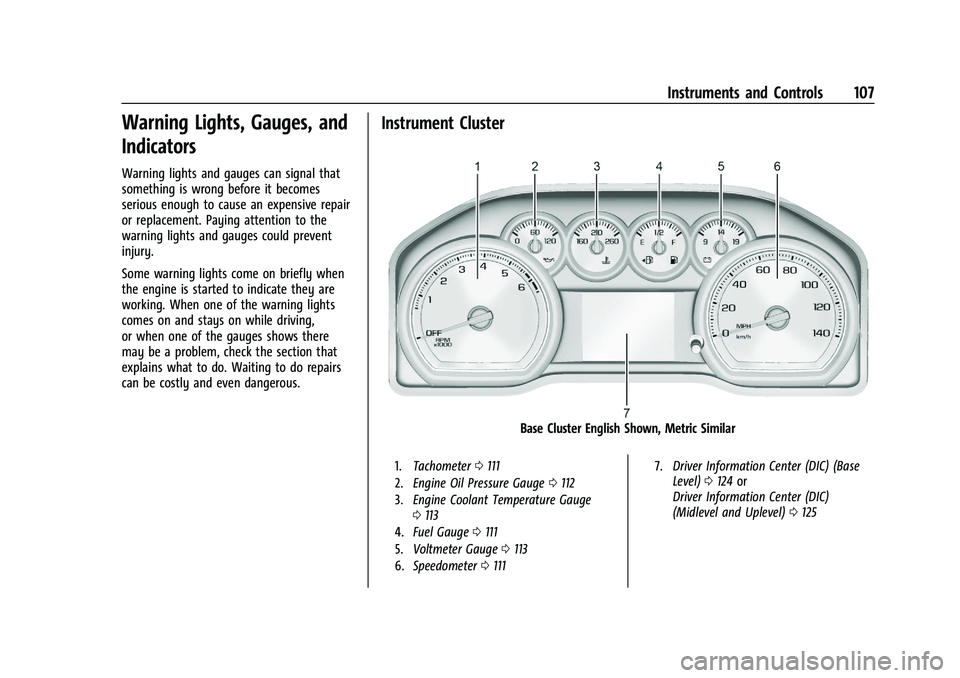
Instrument Cluster
Base Cluster English Shown, Metric Similar
1.Tachometer 0111
2. Engine Oil Pressure Gauge 0112
3. Engine Coolant Temperature Gauge
0113
4. Fuel Gauge 0111
5. Voltmeter Gauge 0113
6. Speedometer 0111 7.
Driver Information Center (DIC) (Base
Level) 0124 or
Driver Information Center (DIC)
(Midlevel and Uplevel) 0125
Page 109 of 441
Chevrolet Silverado 2500 HD/3500 HD Owner Manual (GMNA-Localizing-U.
S./Canada/Mexico-15546003) - 2022 - CRC - 5/12/21
108 Instruments and Controls
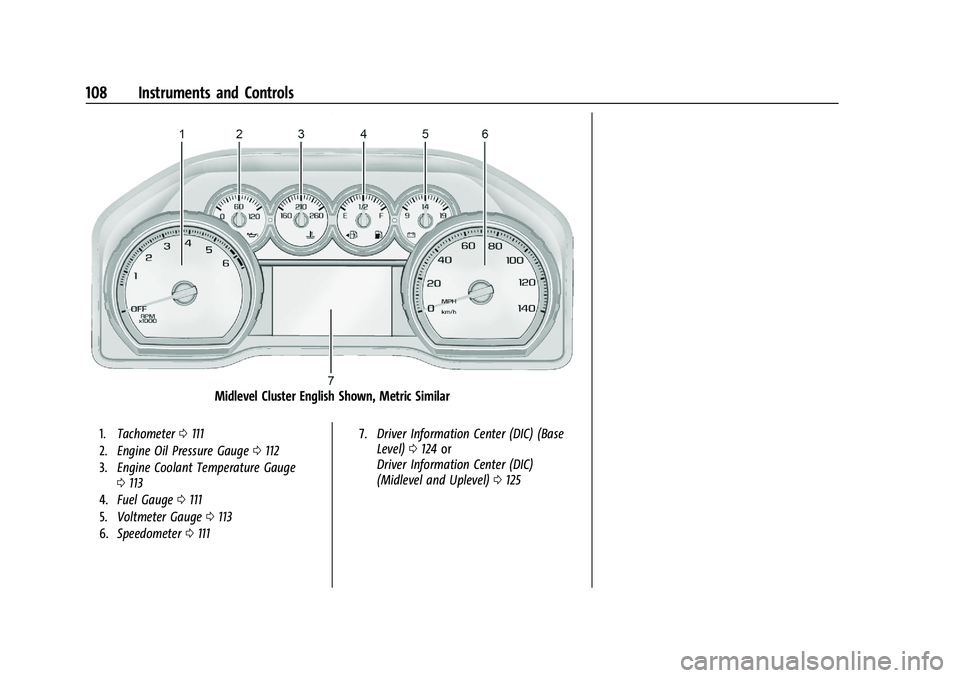
Midlevel Cluster English Shown, Metric Similar
1.Tachometer 0111
2. Engine Oil Pressure Gauge 0112
3. Engine Coolant Temperature Gauge
0113
4. Fuel Gauge 0111
5. Voltmeter Gauge 0113
6. Speedometer 0111 7.
Driver Information Center (DIC) (Base
Level) 0124 or
Driver Information Center (DIC)
(Midlevel and Uplevel) 0125
Page 110 of 441
Chevrolet Silverado 2500 HD/3500 HD Owner Manual (GMNA-Localizing-U.
S./Canada/Mexico-15546003) - 2022 - CRC - 5/12/21
Instruments and Controls 109
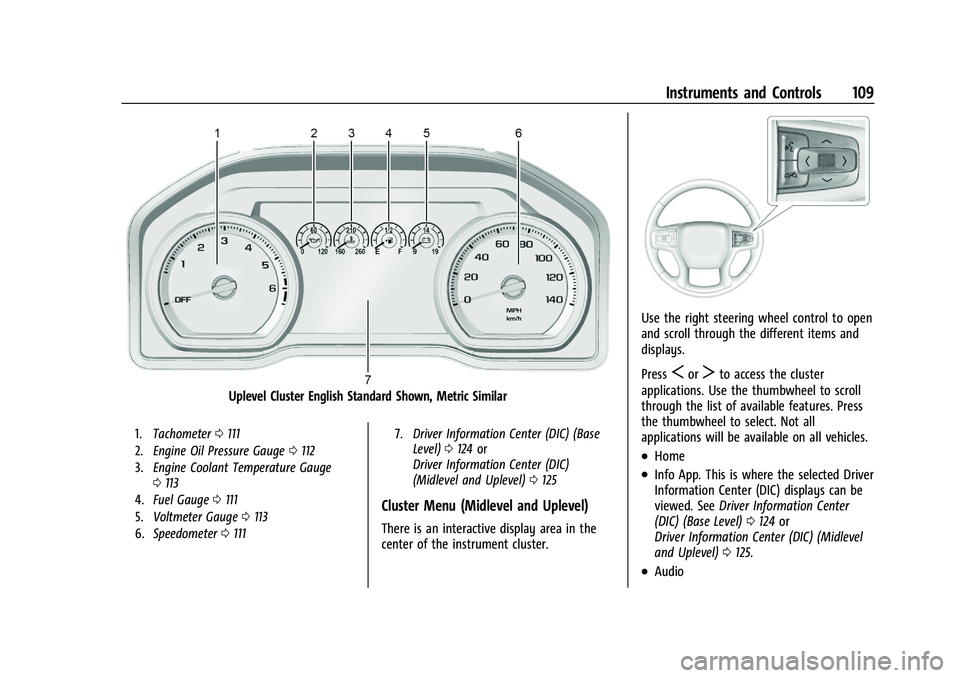
Uplevel Cluster English Standard Shown, Metric Similar
1.Tachometer 0111
2. Engine Oil Pressure Gauge 0112
3. Engine Coolant Temperature Gauge
0113
4. Fuel Gauge 0111
5. Voltmeter Gauge 0113
6. Speedometer 0111 7.
Driver Information Center (DIC) (Base
Level) 0124 or
Driver Information Center (DIC)
(Midlevel and Uplevel) 0125
Cluster Menu (Midlevel and Uplevel)
There is an interactive display area in the
center of the instrument cluster.
Use the right steering wheel control to open
and scroll through the different items and
displays.
Press
SorTto access the cluster
applications. Use the thumbwheel to scroll
through the list of available features. Press
the thumbwheel to select. Not all
applications will be available on all vehicles.
.Home
.Info App. This is where the selected Driver
Information Center (DIC) displays can be
viewed. See Driver Information Center
(DIC) (Base Level) 0124 or
Driver Information Center (DIC) (Midlevel
and Uplevel) 0125.
.Audio
Page 113 of 441
Chevrolet Silverado 2500 HD/3500 HD Owner Manual (GMNA-Localizing-U.
S./Canada/Mexico-15546003) - 2022 - CRC - 5/12/21
112 Instruments and Controls
.It takes a little more, or less fuel to fill up
than the gauge indicated. For example,
the gauge may have indicated the tank
was half full, but it actually took a little
more, or less than half the tank's capacity
to fill the tank.
.The gauge moves a little while turning a
corner, speeding up or braking.
.The gauge takes a few seconds to
stabilize after the ignition is turned on
and goes back to empty when the
ignition is turned off.
Engine Oil Pressure Gauge
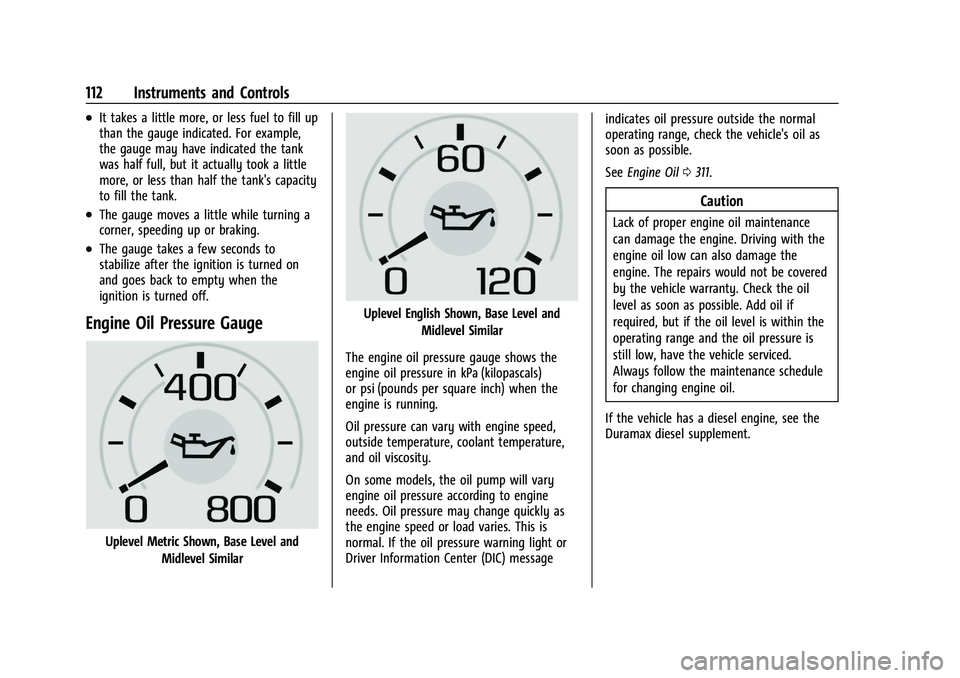
Uplevel Metric Shown, Base Level andMidlevel Similar
Uplevel English Shown, Base Level and
Midlevel Similar
The engine oil pressure gauge shows the
engine oil pressure in kPa (kilopascals)
or psi (pounds per square inch) when the
engine is running.
Oil pressure can vary with engine speed,
outside temperature, coolant temperature,
and oil viscosity.
On some models, the oil pump will vary
engine oil pressure according to engine
needs. Oil pressure may change quickly as
the engine speed or load varies. This is
normal. If the oil pressure warning light or
Driver Information Center (DIC) message indicates oil pressure outside the normal
operating range, check the vehicle's oil as
soon as possible.
See
Engine Oil 0311.
Caution
Lack of proper engine oil maintenance
can damage the engine. Driving with the
engine oil low can also damage the
engine. The repairs would not be covered
by the vehicle warranty. Check the oil
level as soon as possible. Add oil if
required, but if the oil level is within the
operating range and the oil pressure is
still low, have the vehicle serviced.
Always follow the maintenance schedule
for changing engine oil.
If the vehicle has a diesel engine, see the
Duramax diesel supplement.
Page 114 of 441
Chevrolet Silverado 2500 HD/3500 HD Owner Manual (GMNA-Localizing-U.
S./Canada/Mexico-15546003) - 2022 - CRC - 5/12/21
Instruments and Controls 113
Engine Coolant Temperature
Gauge
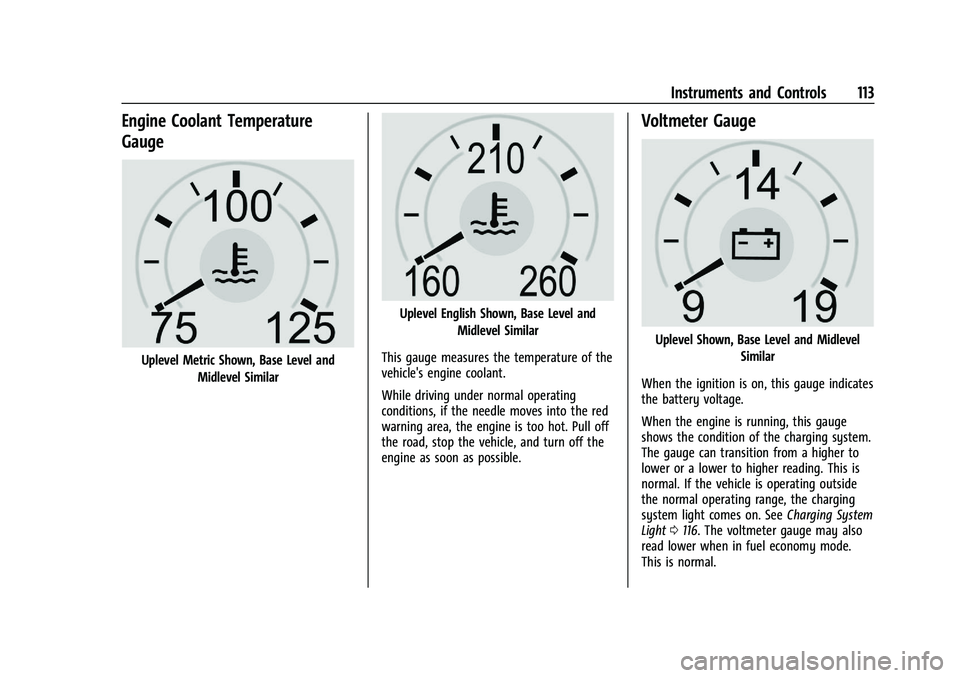
Uplevel Metric Shown, Base Level andMidlevel Similar
Uplevel English Shown, Base Level and Midlevel Similar
This gauge measures the temperature of the
vehicle's engine coolant.
While driving under normal operating
conditions, if the needle moves into the red
warning area, the engine is too hot. Pull off
the road, stop the vehicle, and turn off the
engine as soon as possible.
Voltmeter Gauge
Uplevel Shown, Base Level and Midlevel Similar
When the ignition is on, this gauge indicates
the battery voltage.
When the engine is running, this gauge
shows the condition of the charging system.
The gauge can transition from a higher to
lower or a lower to higher reading. This is
normal. If the vehicle is operating outside
the normal operating range, the charging
system light comes on. See Charging System
Light 0116. The voltmeter gauge may also
read lower when in fuel economy mode.
This is normal.
Page 122 of 441
Chevrolet Silverado 2500 HD/3500 HD Owner Manual (GMNA-Localizing-U.
S./Canada/Mexico-15546003) - 2022 - CRC - 5/12/21
Instruments and Controls 121
serviced by your dealer. If the system is
working normally, the indicator light then
turns off. This light comes on when the
Electronic Stability Control (ESC) system is
turned off. If ESC is off, the Traction Control
System (TCS) is also off. To turn ESC off and
on, seeTraction Control/Electronic Stability
Control 0247.
If ESC and TCS are off, the systems do not
assist in controlling the vehicle. Adjust
driving accordingly.
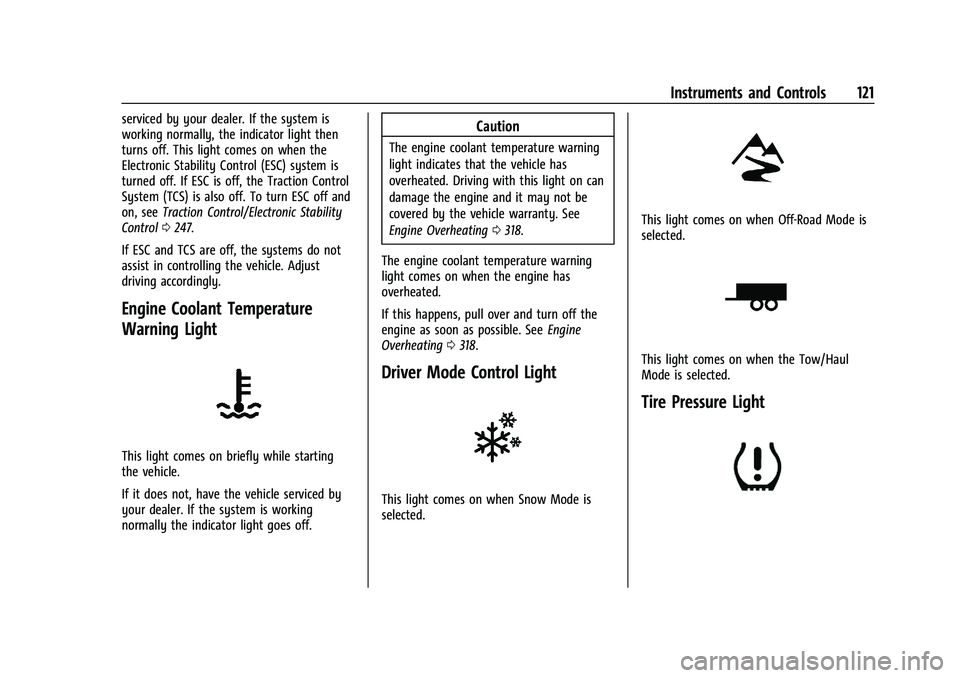
Engine Coolant Temperature
Warning Light
This light comes on briefly while starting
the vehicle.
If it does not, have the vehicle serviced by
your dealer. If the system is working
normally the indicator light goes off.
Caution
The engine coolant temperature warning
light indicates that the vehicle has
overheated. Driving with this light on can
damage the engine and it may not be
covered by the vehicle warranty. See
Engine Overheating 0318.
The engine coolant temperature warning
light comes on when the engine has
overheated.
If this happens, pull over and turn off the
engine as soon as possible. See Engine
Overheating 0318.
Driver Mode Control Light
This light comes on when Snow Mode is
selected.
This light comes on when Off-Road Mode is
selected.
This light comes on when the Tow/Haul
Mode is selected.
Tire Pressure Light
Page 277 of 441
Chevrolet Silverado 2500 HD/3500 HD Owner Manual (GMNA-Localizing-U.
S./Canada/Mexico-15546003) - 2022 - CRC - 5/5/21
276 Driving and Operating
Driving on Grades
Reduce speed and shift to a lower gear
before starting down a long or steep
downhill grade. If the transmission is not
shifted down, the brakes may overheat and
result in reduced braking efficiency.
The vehicle can tow in D (Drive). Shift the
transmission to a lower gear if the
transmission shifts too often under heavy
loads and/or hilly conditions.
When towing at higher altitudes, engine
coolant will boil at a lower temperature
than at lower altitudes. If the engine is
turned off immediately after towing at high
altitude on steep uphill grades, the vehicle
could show signs similar to engine
overheating. To avoid this, let the engine
run, preferably on level ground, with the
transmission in P (Park) for a few minutes
before turning the engine off. If the
overheat warning comes on, seeEngine
Overheating 0318.
Viewing Systems
If equipped, the viewing systems on the
vehicle can improve visibility while hitching,
backing, and driving with a trailer. See
Driver Assistance Systems 0252.
Parking on Hills
{Warning
To prevent serious injury or death,
always park your vehicle and trailer on a
level surface when possible.
When parking your vehicle and your trailer
on a hill: 1. Press the brake pedal, but do not shift into P (Park) yet. Turn the wheels into
the curb if facing downhill or into traffic
if facing uphill.
2. Have someone place chocks under the trailer wheels.
3. Gradually release the brake pedal to allow the chocks to absorb the load of
the trailer.
4. Reapply the brake pedal. Then apply the parking brake and shift into P (Park).
5. Release the brake pedal.
Leaving After Parking on a Hill
1. Apply and hold the brake pedal.
.Start the engine.
.Shift into a gear.
.Release the parking brake. 2. Let up on the brake pedal.
3. Drive slowly until the trailer is clear of
the chocks.
4. Stop and have someone pick up and store the chocks.
Launching and Retrieving a Boat
Backing the Trailer into the Water
{Warning
.Have all passengers get out of the
vehicle before backing onto the sloped
part of the ramp. Lower the driver and
passenger side windows before
backing onto the ramp. This will
provide a means of escape in the
unlikely event the vehicle slides into
the water.
.If the boat launch surface is slippery,
have the driver remain in the vehicle
with the brake pedal applied while the
boat is being launched. The boat
launch can be especially slippery at
low tide when part of the ramp was
previously submerged at high tide. Do
not back onto the ramp to launch the
boat if you are not sure the vehicle
can maintain traction.
(Continued)