torque CHEVROLET SILVERADO 2500 2023 Owners Manual
[x] Cancel search | Manufacturer: CHEVROLET, Model Year: 2023, Model line: SILVERADO 2500, Model: CHEVROLET SILVERADO 2500 2023Pages: 441, PDF Size: 14.4 MB
Page 235 of 441
Chevrolet Silverado 2500 HD/3500 HD Owner Manual (GMNA-Localizing-U.
S./Canada/Mexico-15546003) - 2022 - CRC - 5/5/21
234 Driving and Operating
Torque Lock
If you are parking on a hill and you do not
shift the transmission into P (Park) properly,
the weight of the vehicle may put too much
force on the parking pawl in the
transmission. You may find it difficult to pull
the shift lever out of P (Park). This is called
torque lock. To prevent torque lock, set the
parking brake and then shift into P (Park)
properly before you leave the driver seat.
When you are ready to drive, move the
shift lever out of P (Park) before you release
the parking brake.
If torque lock does occur, you may need to
have another vehicle push yours a little
uphill to take some of the pressure from the
parking pawl in the transmission. You will
then be able to pull the shift lever out of
P (Park).
Shifting out of Park
This vehicle is equipped with an electronic
shift lock release system. The system is
designed to prevent movement of the shift
lever out of P (Park), unless the brake pedal
is applied and the ignition is on or in
Service Mode.The shift lock release is always functional
except in the case of an uncharged or low
voltage
–less than 9 volt –battery.
If the vehicle has an uncharged or low
voltage battery, try charging or jump
starting the battery. See Jump Starting -
North America 0374.
To shift out of P (Park): 1. Apply the brake pedal.
2. Release the parking brake if it is applied. See Electric Parking Brake 0245.
3. Pull the shift lever toward you, then move it to the desired position, and
release.
If the vehicle still cannot be shifted out of
P (Park): 1. Ease the pressure on, or release the shift lever.
2. While holding the brake pedal, push the shift lever all the way into P (Park).
3. Pull the shift lever toward you, then move it to the desired position, and
release.
If there is still a problem shifting, have the
vehicle serviced soon.
Parking over Things That Burn
{Warning
Things that can burn could touch hot
exhaust parts under the vehicle and
ignite. Do not park over papers, leaves,
dry grass, or other things that can burn.
Extended Parking
It is best not to park with the vehicle
running. If the vehicle is left running, be
sure it will not move and there is adequate
ventilation.
See Shifting Into Park 0233 and
Engine Exhaust 0235.
If the vehicle is left parked and running with
the RKE transmitter outside the vehicle, it
will continue to run for up to 15 minutes.
If the vehicle is left parked and running with
the RKE transmitter inside the vehicle, it will
continue to run for up to 30 minutes.
The vehicle could turn off sooner if it is
parked on a hill, due to lack of
available fuel.
The timer will reset if the vehicle is taken
out of P (Park) while it is running.
Page 237 of 441
Chevrolet Silverado 2500 HD/3500 HD Owner Manual (GMNA-Localizing-U.
S./Canada/Mexico-15546003) - 2022 - CRC - 5/5/21
236 Driving and Operating
P :This position locks the rear wheels. Use
P (Park) when starting the engine because
the vehicle cannot move easily.
When parked on a hill, especially when the
vehicle has a heavy load, you might notice
an increase in the effort to shift out of
P (Park). See “Torque Lock” underShifting
Into Park 0233.
{Warning
It is dangerous to get out of the vehicle
if the shift lever is not fully in P (Park)
with the parking brake firmly set. The
vehicle can roll.
Do not leave the vehicle when the engine
is running. If you have left the engine
running, the vehicle can move suddenly.
You or others could be injured. To be
sure the vehicle will not move, even
when you are on fairly level ground,
always set the parking brake and move
the shift lever to P (Park). See Shifting
Into Park 0233 and
Driving Characteristics and Towing Tips
0 274.
{Warning
If equipped with four-wheel drive, the
vehicle will be free to roll if the transfer
case is in N (Neutral), even when the shift
lever is in P (Park). You or someone else
could be seriously injured. Be sure the
transfer case is in a drive gear —2
m, 4m,
or 4
n— or set the parking brake before
placing the transfer case in N (Neutral).
See Four-Wheel Drive 0240.
R : Use this gear to back up.
Caution
Shifting to R (Reverse) while the vehicle is
moving forward could damage the
transmission. The repairs would not be
covered by the vehicle warranty. Shift to
R (Reverse) only after the vehicle is
stopped. To rock the vehicle back and forth to get
out of snow, ice, or sand without damaging
the transmission, see
If the Vehicle Is Stuck
0 219.
N : In this position, the engine does not
connect with the wheels. To restart the
engine when the vehicle is already moving,
use N (Neutral) only.
Also, use N (Neutral) when the vehicle is
being towed.
{Warning
Shifting into a drive gear while the
engine is running at high speed is
dangerous. Unless your foot is firmly on
the brake pedal, the vehicle could move
very rapidly. You could lose control and
hit people or objects. Do not shift into a
drive gear while the engine is running at
high speed.
Page 243 of 441
Chevrolet Silverado 2500 HD/3500 HD Owner Manual (GMNA-Localizing-U.
S./Canada/Mexico-15546003) - 2022 - CRC - 5/5/21
242 Driving and Operating
based on driving conditions. This setting
provides slightly lower fuel economy
than 2
m.
4
m(Four-Wheel Drive High) : Use this
setting when extra traction is needed, such
as when driving on snowy or icy roads,
when off-roading, or when plowing snow.
4
n(Four-Wheel Drive Low) : This setting
engages the front axle and delivers extra
torque. Choose 4
nwhen driving off-road in
deep sand, deep mud, or deep snow, and
while climbing or descending steep hills.
While driving in 4
n, keep vehicle speed
below 72 km/h (45 mph).
Shifting into 4
nwill turn Traction Control
and StabiliTrak/ESC off. See Traction Control/
Electronic Stability Control 0247.
Shifts between 2
m, 4m, and AUTO
Any of these shifts can be made at normal
driving speed.
The actual 4x4 shift request is only made
after the button is released. The 4x4 graphic
will remain flashing until the shift request
has completed. A DIC message displays to
indicate that the 4x4 transfer case has been
requested to shift to the new desired state. Once the 4x4 shift has completed, the DIC
message disappears, the 4x4 graphic stops
flashing, and the current setting is indicated.
When a shift to 2
mis completed successfully
while in P (Park), the parking brake will
engage. To resume driving, shift the
transmission to the desired gear and
manually release the parking brake or press
the accelerator pedal to begin driving. See
Electric Parking Brake 0245.
If equipped, use 4
n, AUTO, or 4mto provide
additional traction when parking on a steep
grade with poor traction such as ice, snow,
mud, or gravel.
Shifting Into 4
n
1. The ignition must be on and the vehicle must be stopped or moving less than
5 km/h (3 mph) with the transmission in
N (Neutral). It is best for the vehicle to
be moving 1.6 to 3.2 km/h (1 to 2 mph).
2. Press 4
n. The actual 4x4 shift request is
only made after the button is released.
The 4x4 graphic will remain flashing
until the shift request has completed.
A DIC message displays to indicate that
the 4x4 transfer case has been requested
to shift to the new desired state. Once the 4x4 shift has completed, the
DIC message disappears, the 4x4 graphic
stops flashing and the current setting is
indicated.
If vehicle speed is higher when shift request
occurs, a DIC message displays. Reduce
vehicle speed.
If the transmission is not in N (Neutral)
when shift request occurs, a DIC message
displays. The vehicle will allow 20 seconds
for the shift to occur. After this time, a
graphic in the instrument cluster will
indicate that the transfer case is in 4
n.
Caution
Shifting the transmission into gear before
the requested mode indicator light has
stopped flashing could damage the
transfer case.
If the transmission is not shifted into
N (Neutral) or the vehicle has not slowed to
5 km/h (3 mph) within 20 seconds, the
transfer case will remain in its original state.
This will be indicated in the instrument
cluster.
Page 292 of 441
Chevrolet Silverado 2500 HD/3500 HD Owner Manual (GMNA-Localizing-U.
S./Canada/Mexico-15546003) - 2022 - CRC - 5/5/21
Driving and Operating 291
If either the CHECK TRAILER WIRING or
SERVICE TRAILER BRAKE SYSTEM message
displays while driving, the ITBC system may
not be fully functional or may not function
at all. When traffic conditions allow,
carefully pull the vehicle over to the side of
the road and turn the ignition off. Check the
wiring connection to the trailer and turn the
ignition back on. If either of these messages
continues, either the vehicle or trailer needs
service.
A GM dealer may be able to diagnose and
repair problems with the trailer. However,
any diagnosis and repair of the trailer is not
covered under the vehicle warranty. Contact
your trailer dealer for assistance with trailer
repairs and trailer warranty information.
Trailer Sway Control (TSC)
Vehicles with StabiliTrak/Electronic Stability
Control (ESC) have a Trailer Sway Control
(TSC) feature. Trailer sway is unintended
side-to-side motion of a trailer while towing.
If the vehicle is towing a trailer and the TSC
detects that sway is increasing, the vehicle
brakes are selectively applied at each wheel,
to help reduce excessive trailer sway.
If equipped with the Integrated Trailer BrakeControl (ITBC) system, and the trailer has an
electric brake system, StabiliTrak/ESC may
also apply the trailer brakes.
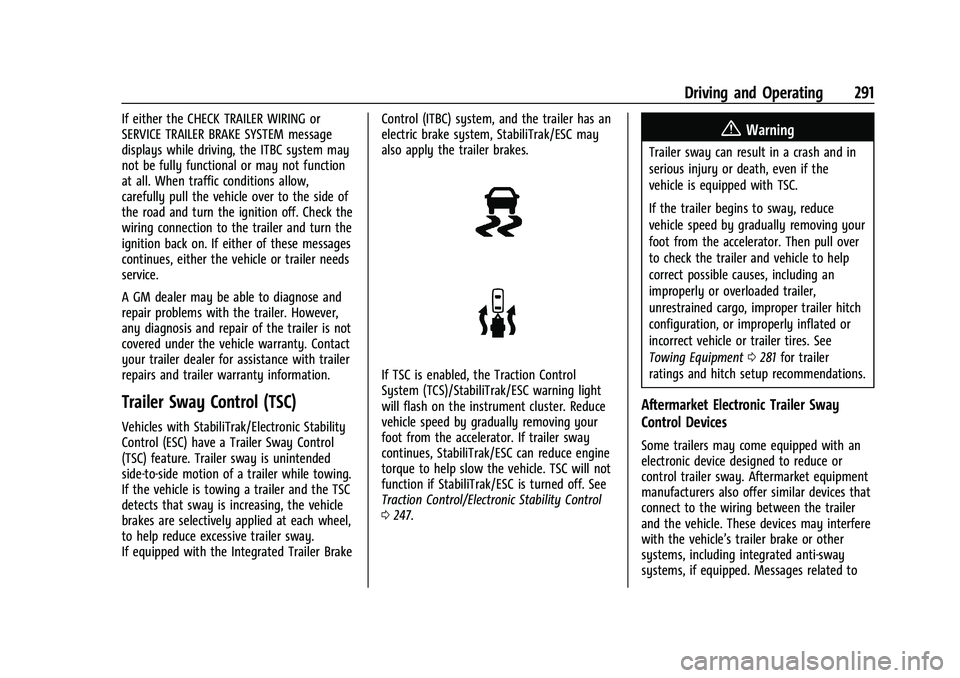
If TSC is enabled, the Traction Control
System (TCS)/StabiliTrak/ESC warning light
will flash on the instrument cluster. Reduce
vehicle speed by gradually removing your
foot from the accelerator. If trailer sway
continues, StabiliTrak/ESC can reduce engine
torque to help slow the vehicle. TSC will not
function if StabiliTrak/ESC is turned off. See
Traction Control/Electronic Stability Control
0
247.
{Warning
Trailer sway can result in a crash and in
serious injury or death, even if the
vehicle is equipped with TSC.
If the trailer begins to sway, reduce
vehicle speed by gradually removing your
foot from the accelerator. Then pull over
to check the trailer and vehicle to help
correct possible causes, including an
improperly or overloaded trailer,
unrestrained cargo, improper trailer hitch
configuration, or improperly inflated or
incorrect vehicle or trailer tires. See
Towing Equipment 0281 for trailer
ratings and hitch setup recommendations.
Aftermarket Electronic Trailer Sway
Control Devices
Some trailers may come equipped with an
electronic device designed to reduce or
control trailer sway. Aftermarket equipment
manufacturers also offer similar devices that
connect to the wiring between the trailer
and the vehicle. These devices may interfere
with the vehicle’s trailer brake or other
systems, including integrated anti-sway
systems, if equipped. Messages related to
Page 323 of 441
Chevrolet Silverado 2500 HD/3500 HD Owner Manual (GMNA-Localizing-U.
S./Canada/Mexico-15546003) - 2022 - CRC - 5/5/21
322 Vehicle Care
Caution (Continued)
.Do not use engine coolant (antifreeze)
in the windshield washer. It can
damage the windshield washer system
and paint.
.Do not mix water with ready-to-use
washer fluid. Water can cause the
solution to freeze and damage the
washer fluid tank and other parts of
the washer system.
.When using concentrated washer fluid,
follow the manufacturer instructions
for adding water.
.Fill the washer fluid tank only
three-quarters full when it is very cold.
This allows for fluid expansion if
freezing occurs, which could damage
the tank if it is completely full.
Brakes
Disc brake linings have built-in wear
indicators that make a high-pitched warning
sound when the brake linings are worn and
new linings are needed. The sound can come
and go or can be heard all the time when
the vehicle is moving, except when applying
the brake pedal firmly.
{Warning
The brake wear warning sound means
that soon the brakes will not work well.
That could lead to a crash. When the
brake wear warning sound is heard, have
the vehicle serviced.
Caution
Continuing to drive with worn-out brake
linings could result in costly brake
repairs.
Some driving conditions or climates can
cause a brake squeal when the brakes are
first applied, clearing up following several
applications. This does not mean something
is wrong with the brakes.
Properly torqued wheel nuts are necessary
to help prevent brake pulsation. When tires
are rotated, inspect brake linings for wear
and evenly tighten wheel nuts in the proper
sequence to torque specifications. See
Capacities and Specifications 0406.
Brake pads should be replaced as complete
axle sets.
Brake Pedal Travel
See your dealer if the brake pedal does not
return to normal height, or if there is a
rapid increase in pedal travel. This could be
a sign that brake service may be required.
Replacing Brake System Parts
Always replace brake system parts with
new, approved replacement parts. If this is
not done, the brakes may not work
properly. The braking performance can
change in many ways if the wrong brake
parts are installed or if parts are improperly
installed.
Brake Pad Life System
When to Change Brake Pads
This vehicle has a system that estimates the
remaining life of the front and rear brake
pads. Brake pad life is displayed in the
Driver Information Center (DIC), along with
a percentage for each axle. The system must
be reset every time the brake pads are
changed.
When the system has determined that the
brake pads need to be replaced, a message
will display, which may include mileage
remaining.
Page 357 of 441
Chevrolet Silverado 2500 HD/3500 HD Owner Manual (GMNA-Localizing-U.
S./Canada/Mexico-15546003) - 2022 - CRC - 5/5/21
356 Vehicle Care
.There is cord or fabric showing
through the tire's rubber.
.The tread or sidewall is cracked, cut,
or snagged deep enough to show
cord or fabric.
.The tire has a bump, bulge, or split.
.The tire has a puncture, cut, or other
damage that cannot be repaired well
because of the size or location of the
damage.
Tire Rotation
Tires should be rotated every 12 000 km
(7,500 mi). SeeMaintenance Schedule
0 392.
Tires are rotated to achieve a more
uniform wear for all tires. The first
rotation is the most important.
Anytime unusual wear is noticed, rotate
the tires as soon as possible, check for
proper tire inflation pressure, and check
for damaged tires or wheels. If the
unusual wear continues after the
rotation, check the wheel alignment. See
When It Is Time for New Tires
0 358 and
Wheel Replacement 0361.
If the full-size spare tire is part of the
tire rotation, make sure the tire rotated
into the spare position is stored
securely. Push, pull, and then try to
rotate or turn the tire. If it moves, use
the wheel wrench/hoist shaft to tighten
the cable. See Tire Changing0364.
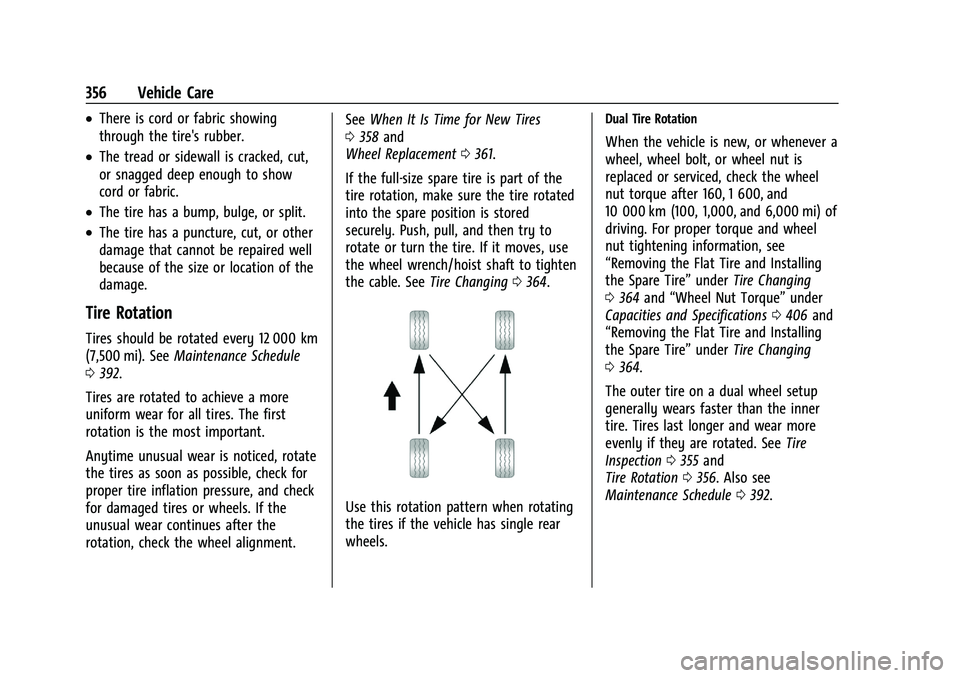
Use this rotation pattern when rotating
the tires if the vehicle has single rear
wheels.
Dual Tire Rotation
When the vehicle is new, or whenever a
wheel, wheel bolt, or wheel nut is
replaced or serviced, check the wheel
nut torque after 160, 1 600, and
10 000 km (100, 1,000, and 6,000 mi) of
driving. For proper torque and wheel
nut tightening information, see
“Removing the Flat Tire and Installing
the Spare Tire” underTire Changing
0 364 and “Wheel Nut Torque” under
Capacities and Specifications 0406 and
“Removing the Flat Tire and Installing
the Spare Tire” underTire Changing
0 364.
The outer tire on a dual wheel setup
generally wears faster than the inner
tire. Tires last longer and wear more
evenly if they are rotated. See Tire
Inspection 0355 and
Tire Rotation 0356. Also see
Maintenance Schedule 0392.
Page 358 of 441
Chevrolet Silverado 2500 HD/3500 HD Owner Manual (GMNA-Localizing-U.
S./Canada/Mexico-15546003) - 2022 - CRC - 5/5/21
Vehicle Care 357
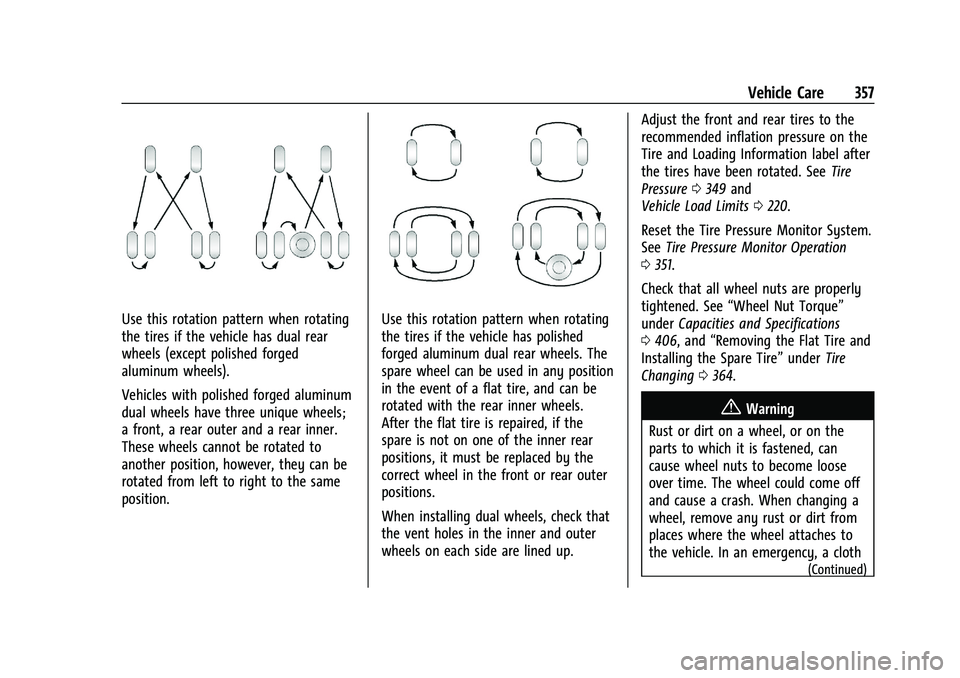
Use this rotation pattern when rotating
the tires if the vehicle has dual rear
wheels (except polished forged
aluminum wheels).
Vehicles with polished forged aluminum
dual wheels have three unique wheels;
a front, a rear outer and a rear inner.
These wheels cannot be rotated to
another position, however, they can be
rotated from left to right to the same
position.Use this rotation pattern when rotating
the tires if the vehicle has polished
forged aluminum dual rear wheels. The
spare wheel can be used in any position
in the event of a flat tire, and can be
rotated with the rear inner wheels.
After the flat tire is repaired, if the
spare is not on one of the inner rear
positions, it must be replaced by the
correct wheel in the front or rear outer
positions.
When installing dual wheels, check that
the vent holes in the inner and outer
wheels on each side are lined up.Adjust the front and rear tires to the
recommended inflation pressure on the
Tire and Loading Information label after
the tires have been rotated. See
Tire
Pressure 0349 and
Vehicle Load Limits 0220.
Reset the Tire Pressure Monitor System.
See Tire Pressure Monitor Operation
0 351.
Check that all wheel nuts are properly
tightened. See “Wheel Nut Torque”
under Capacities and Specifications
0 406, and “Removing the Flat Tire and
Installing the Spare Tire” underTire
Changing 0364.
{Warning
Rust or dirt on a wheel, or on the
parts to which it is fastened, can
cause wheel nuts to become loose
over time. The wheel could come off
and cause a crash. When changing a
wheel, remove any rust or dirt from
places where the wheel attaches to
the vehicle. In an emergency, a cloth
(Continued)
Page 370 of 441
Chevrolet Silverado 2500 HD/3500 HD Owner Manual (GMNA-Localizing-U.
S./Canada/Mexico-15546003) - 2022 - CRC - 5/5/21
Vehicle Care 369
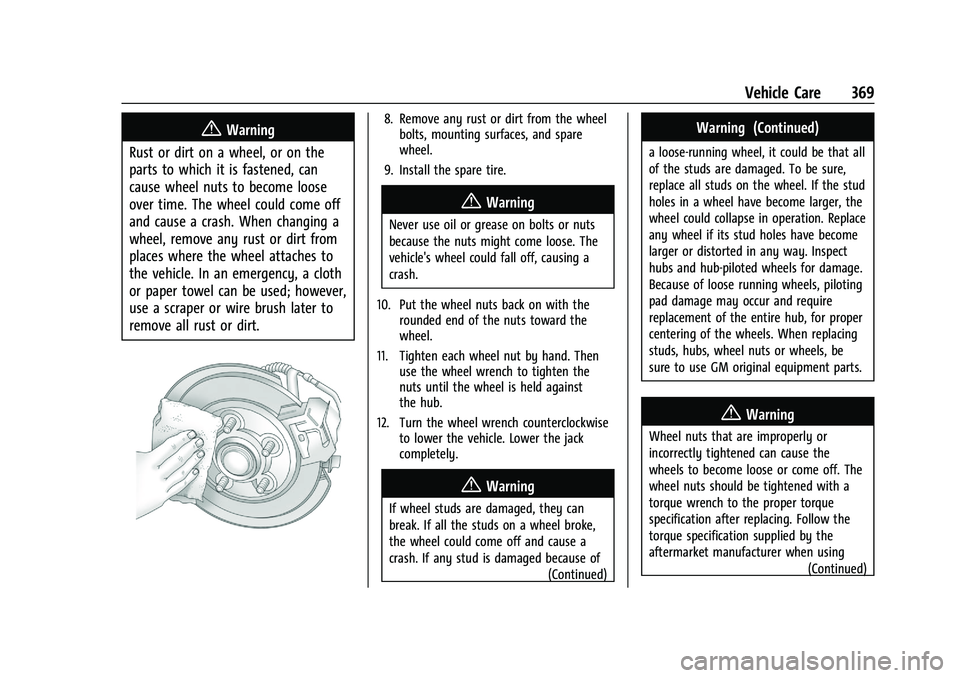
{Warning
Rust or dirt on a wheel, or on the
parts to which it is fastened, can
cause wheel nuts to become loose
over time. The wheel could come off
and cause a crash. When changing a
wheel, remove any rust or dirt from
places where the wheel attaches to
the vehicle. In an emergency, a cloth
or paper towel can be used; however,
use a scraper or wire brush later to
remove all rust or dirt.8. Remove any rust or dirt from the wheel bolts, mounting surfaces, and spare
wheel.
9. Install the spare tire.
{Warning
Never use oil or grease on bolts or nuts
because the nuts might come loose. The
vehicle's wheel could fall off, causing a
crash.
10. Put the wheel nuts back on with the rounded end of the nuts toward the
wheel.
11. Tighten each wheel nut by hand. Then use the wheel wrench to tighten the
nuts until the wheel is held against
the hub.
12. Turn the wheel wrench counterclockwise to lower the vehicle. Lower the jack
completely.
{Warning
If wheel studs are damaged, they can
break. If all the studs on a wheel broke,
the wheel could come off and cause a
crash. If any stud is damaged because of
(Continued)
Warning (Continued)
a loose-running wheel, it could be that all
of the studs are damaged. To be sure,
replace all studs on the wheel. If the stud
holes in a wheel have become larger, the
wheel could collapse in operation. Replace
any wheel if its stud holes have become
larger or distorted in any way. Inspect
hubs and hub‐piloted wheels for damage.
Because of loose running wheels, piloting
pad damage may occur and require
replacement of the entire hub, for proper
centering of the wheels. When replacing
studs, hubs, wheel nuts or wheels, be
sure to use GM original equipment parts.
{Warning
Wheel nuts that are improperly or
incorrectly tightened can cause the
wheels to become loose or come off. The
wheel nuts should be tightened with a
torque wrench to the proper torque
specification after replacing. Follow the
torque specification supplied by the
aftermarket manufacturer when using
(Continued)
Page 371 of 441
Chevrolet Silverado 2500 HD/3500 HD Owner Manual (GMNA-Localizing-U.
S./Canada/Mexico-15546003) - 2022 - CRC - 5/5/21
370 Vehicle Care
Warning (Continued)
accessory locking wheel nuts. See
Capacities and Specifications0406 for
original equipment wheel nut torque
specifications.
Caution
Improperly tightened wheel nuts can lead
to brake pulsation and rotor damage. To
avoid expensive brake repairs, evenly
tighten the wheel nuts in the proper
sequence and to the proper torque
specification. See Capacities and
Specifications 0406 for the wheel nut
torque specification.
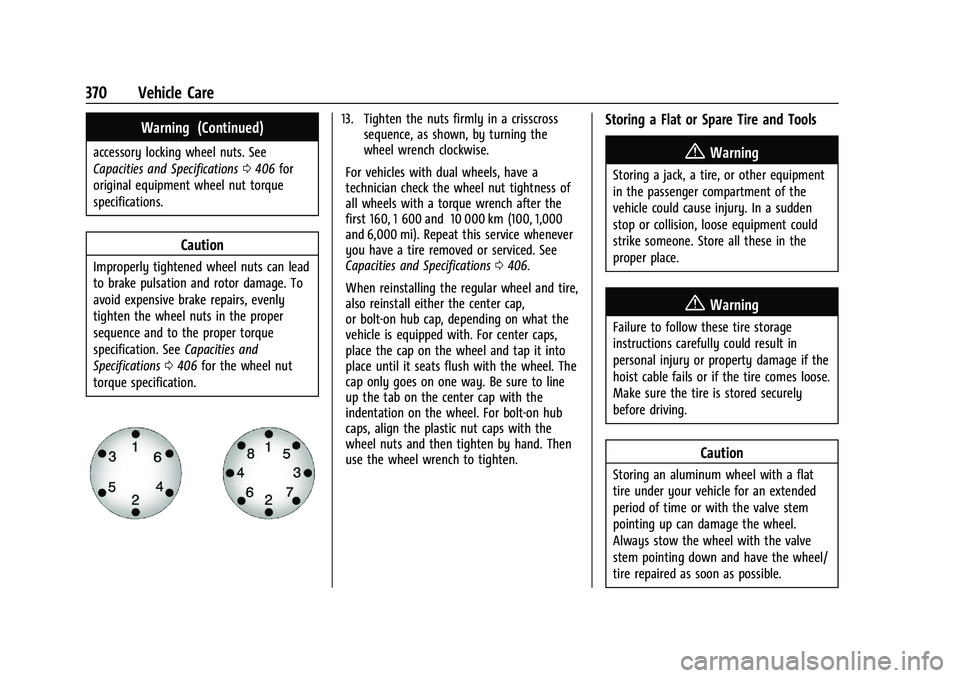
13. Tighten the nuts firmly in a crisscross sequence, as shown, by turning the
wheel wrench clockwise.
For vehicles with dual wheels, have a
technician check the wheel nut tightness of
all wheels with a torque wrench after the
first 160, 1 600 and 10 000 km (100, 1,000
and 6,000 mi). Repeat this service whenever
you have a tire removed or serviced. See
Capacities and Specifications 0406.
When reinstalling the regular wheel and tire,
also reinstall either the center cap,
or bolt-on hub cap, depending on what the
vehicle is equipped with. For center caps,
place the cap on the wheel and tap it into
place until it seats flush with the wheel. The
cap only goes on one way. Be sure to line
up the tab on the center cap with the
indentation on the wheel. For bolt-on hub
caps, align the plastic nut caps with the
wheel nuts and then tighten by hand. Then
use the wheel wrench to tighten.Storing a Flat or Spare Tire and Tools
{Warning
Storing a jack, a tire, or other equipment
in the passenger compartment of the
vehicle could cause injury. In a sudden
stop or collision, loose equipment could
strike someone. Store all these in the
proper place.
{Warning
Failure to follow these tire storage
instructions carefully could result in
personal injury or property damage if the
hoist cable fails or if the tire comes loose.
Make sure the tire is stored securely
before driving.
Caution
Storing an aluminum wheel with a flat
tire under your vehicle for an extended
period of time or with the valve stem
pointing up can damage the wheel.
Always stow the wheel with the valve
stem pointing down and have the wheel/
tire repaired as soon as possible.
Page 399 of 441
Chevrolet Silverado 2500 HD/3500 HD Owner Manual (GMNA-Localizing-U.
S./Canada/Mexico-15546003) - 2022 - CRC - 5/5/21
398 Service and Maintenance
and contaminate the fluid. Contaminated
fluid will decrease the life of the transfer
case and/or drive axles and should be
replaced.
(4)Or every five years, whichever comes
first. See Cooling System 0316.
(5) Or every 10 years, whichever comes first.
Inspect for fraying, excessive cracking,
or damage; replace, if needed.
(6) Replace brake fluid every five years. See
Brake Fluid 0323.
(7) Or every 12 months, whichever comes
first. See Wiper Blade Replacement 0328.
(8) Or every 10 years, whichever comes first.
See Gas Strut(s) 0329.
(9) Replace air conditioning desiccant every
seven years.
Special Application Services
.Vehicles with Dual Wheels: Check dual
wheel nut torque at 160, 1 600, and
10 000 km (100, 1,000, and 6,000 mi) of
driving. Repeat this service whenever a
tire/wheel is serviced or removed.
.Severe Commercial Use Vehicles Only:
Lubricate chassis components every oil
change.
.Have underbody flushing service
performed. See “Underbody Maintenance”
in Exterior Care 0381.
Additional Maintenance
and Care
Your vehicle is an important investment and
caring for it properly may help to avoid
future costly repairs. To maintain vehicle
performance, additional maintenance
services may be required.
It is recommended that your dealer perform
these services —their trained dealer
technicians know your vehicle best. Your
dealer can also perform a thorough
assessment with a multi-point inspection to
recommend when your vehicle may need
attention.
The following list is intended to explain the
services and conditions to look for that may
indicate services are required. Battery
The 12-volt battery supplies power to start
the engine and operate any additional
electrical accessories.
.To avoid break-down or failure to start
the vehicle, maintain a battery with full
cranking power.
.Trained dealer technicians have the
diagnostic equipment to test the battery
and ensure that the connections and
cables are corrosion-free.
Belts
.Belts may need replacing if they squeak
or show signs of cracking or splitting.
.Trained dealer technicians have access to
tools and equipment to inspect the belts
and recommend adjustment or
replacement when necessary.
Brakes
Brakes stop the vehicle and are crucial to
safe driving.
.Signs of brake wear may include chirping,
grinding, or squealing noises, or difficulty
stopping.