transmission oil CHEVROLET SILVERADO 2500 2023 Owners Manual
[x] Cancel search | Manufacturer: CHEVROLET, Model Year: 2023, Model line: SILVERADO 2500, Model: CHEVROLET SILVERADO 2500 2023Pages: 441, PDF Size: 14.4 MB
Page 128 of 441
Chevrolet Silverado 2500 HD/3500 HD Owner Manual (GMNA-Localizing-U.
S./Canada/Mexico-15546003) - 2022 - CRC - 5/12/21
Instruments and Controls 127
system. When the REPLACE AT NEXT OIL
CHANGE message displays, the engine air
filter should be replaced at the time of the
next oil change. When the REPLACE SOON
message displays, the engine air filter
should be replaced at the earliest
convenience.
The Air Filter Life display must be reset after
the engine air filter replacement. To reset,
seeEngine Air Filter Life System 0314.
Brake Pad Life : This displays an estimate of
the remaining life of the front and rear
brake pads. Messages will display based on
brake pad wear and the state of the system.
Reset the Brake Pad Life display after
replacing the brake pads. See Brake Pad Life
System 0322.
Fuel Economy : Displays average fuel
economy, the best fuel economy over the
selected distance, and a bar graph showing
instantaneous fuel economy.
Press the thumbwheel to change the
selected distance. Press and hold the
thumbwheel while this display is active to
reset the best fuel economy and average
fuel economy. This display can also be reset
by selecting reset in the menu. Engine Hours (Hourmeter) :
Shows the total
number of hours the engine has run. This
display also shows the engine idle hours.
Transmission Fluid Temperature : Shows the
temperature of the automatic transmission
fluid in either degrees Celsius (°C) or degrees
Fahrenheit (°F).
Trailer Brake : On vehicles with the
Integrated Trailer Brake Control (ITBC)
system, the trailer brake display appears in
the DIC.
TRAILER GAIN shows the trailer gain setting.
This setting can be adjusted from 0.0 to 10.0
with either a trailer connected or
disconnected.
TRAILER OUTPUT shows the power output to
the trailer any time a trailer with electric
brakes is connected. Output is displayed as a
bar graph. Dotted lines may appear in the
OUTPUT display if a trailer is not connected.
Off Road : Displays vehicle pitch and roll
information, road wheel angle, and
four-wheel drive (4WD) status.
Follow Distance : If equipped, the current
follow time to the vehicle ahead is displayed
as a time value on this page. Driver Assistance :
If equipped, shows
information for Lane Departure Warning
(LDW) and Forward Collision Alert (FCA).
Info Page Options : Scroll to choose which
info pages appear on the DIC. Press the
thumbwheel to select or deselect.
Blank Page : Shows no information.
Head-Up Display (HUD)
{Warning
If the HUD image is too bright or too
high in your field of view, it may take
you more time to see things you need to
see when it is dark outside. Be sure to
keep the HUD image dim and placed low
in your field of view.
If equipped with HUD, some information
about the operation of the vehicle is
projected onto the windshield. The image is
projected through the HUD lens on top of
the instrument panel. The information
appears as an image focused out toward the
front of the vehicle.
Page 232 of 441
Chevrolet Silverado 2500 HD/3500 HD Owner Manual (GMNA-Localizing-U.
S./Canada/Mexico-15546003) - 2022 - CRC - 5/5/21
Driving and Operating 231
Starting Procedure
1. For Key Access vehicles, turn the ignitionkey to Start. When the engine starts, let
go of the key. For Keyless Access
vehicles, the RKE transmitter must be in
the vehicle. Press ENGINE START/STOP
with the brake pedal applied. When the
engine begins cranking, let go of the
button.
The driver may observe a minor, and
temporary, brake pedal kickback when
starting the vehicle. This is normal.
The idle speed will go down as the
engine gets warm. Do not race the
engine immediately after starting it.
Operate the engine and transmission
gently to allow the oil to warm up and
lubricate all moving parts.
When the low fuel warning light is on
and the FUEL LEVEL LOW message is
displayed in the Driver Information
Center (DIC), hold the ignition switch in
the START position to continue engine
cranking.Caution
Cranking the engine for long periods of
time, by returning the ignition to the
START position immediately after
cranking has ended, can overheat and
damage the cranking motor, and drain
the battery. Wait at least 15 seconds
between each try, to let the cranking
motor cool down.
2. If the engine does not start after five to 10 seconds, especially in very cold
weather (below −18 °C or 0 °F), it could
be flooded with too much gasoline. Try
pushing the accelerator pedal all the way
to the floor and holding it there while
holding the key in START or ENGINE
START/STOP for up to a maximum of
15 seconds. Wait at least 15 seconds
between each try, to allow the cranking
motor to cool down. When the engine
starts, let go of the key or button and
accelerator. If the vehicle starts briefly
but then stops again, do the same thing.
This clears the extra gasoline from the
engine. Do not race the engine
immediately after starting it. Operate the engine and transmission gently until
the oil warms up and lubricates all
moving parts.
Engine Heater
If equipped, the engine heater can provide
easier starting and better fuel economy
during engine warm-up in cold weather
conditions at or below
−18 °C (0 °F). Vehicles
with an engine heater should be plugged in
at least four hours before starting. An
internal thermostat in the plug-end of the
cord may exist, which will prevent engine
heater operation at temperatures above
−18 °C (0 °F).
{Warning
Do not plug in the engine block heater
while the vehicle is parked in a garage or
under a carport. Property damage or
personal injury may result. Always park
the vehicle in a clear open area away
from buildings or structures.
Page 275 of 441
Chevrolet Silverado 2500 HD/3500 HD Owner Manual (GMNA-Localizing-U.
S./Canada/Mexico-15546003) - 2022 - CRC - 5/5/21
274 Driving and Operating
Driving Characteristics and
Towing Tips
{Warning
You can lose control when towing a
trailer if the correct equipment is not
used or the vehicle is not driven properly.
For example, if the trailer is too heavy or
the trailer brakes are inadequate for the
load, the vehicle may not stop as
expected. You and others could be
seriously injured. The vehicle may also be
damaged, and the repairs would not be
covered by the vehicle warranty. Pull a
trailer only if all the steps in this section
have been followed. Ask your dealer for
advice and information about towing a
trailer with the vehicle.
Driving with a Trailer
Trailering is different than just driving the
vehicle by itself. Trailering means changes in
handling, acceleration, braking, durability,
and fuel economy. Successful, safe trailering
takes correct equipment, and it has to be
used properly.The following information has many
time-tested, important trailering tips and
safety rules. Many of these are important
for your safety and that of your passengers.
Read this section carefully before pulling a
trailer.
When towing a trailer:
.Become familiar with and follow all state
and local laws that apply to trailer
towing. These requirements vary from
state to state.
.State laws may require the use of
extended side view mirrors. Even if not
required, you should install extended side
view mirrors if your visibility is limited or
restricted while towing.
.Do not tow a trailer during the first
800 km (500 mi) of vehicle use to prevent
damage to the engine, axle, or other
parts.
.It is recommended to perform the first oil
change before heavy towing.
.During the first 800 km (500 mi) of trailer
towing, do not drive over 80 km/h
(50 mph) and do not make starts at full
throttle.
.Vehicles can tow in D (Drive). Tow/Haul
Mode is recommended for heavier trailers.
See
Tow/Haul Mode 0240. If the transmission downshifts too often, a
lower gear may be selected using Manual
Mode. See
Manual Mode 0238.
If equipped, the following driver assistance
features should be turned off when towing
a trailer:
.Park Assist
.Automatic Parking Assist (APA)
.Reverse Automatic Braking (RAB)
If equipped, the following driver assistance
features should be turned to alert or off
when towing a trailer, unless equipped with
Super Cruise:
.Automatic Emergency Braking (AEB)
.Front Pedestrian Braking (FPB)
If equipped with Lane Change Alert (LCA),
the LCA detection zones that extend back
from the side of the vehicle do not move
further back when a trailer is towed. Use
caution while changing lanes when towing a
trailer.
If equipped with Rear Cross Traffic Alert
(RCTA), use caution while backing up when
towing a trailer, as the RCTA detection zones
that extend out from the back of the vehicle
do not move further back when a trailer is
towed.
Page 277 of 441
Chevrolet Silverado 2500 HD/3500 HD Owner Manual (GMNA-Localizing-U.
S./Canada/Mexico-15546003) - 2022 - CRC - 5/5/21
276 Driving and Operating
Driving on Grades
Reduce speed and shift to a lower gear
before starting down a long or steep
downhill grade. If the transmission is not
shifted down, the brakes may overheat and
result in reduced braking efficiency.
The vehicle can tow in D (Drive). Shift the
transmission to a lower gear if the
transmission shifts too often under heavy
loads and/or hilly conditions.
When towing at higher altitudes, engine
coolant will boil at a lower temperature
than at lower altitudes. If the engine is
turned off immediately after towing at high
altitude on steep uphill grades, the vehicle
could show signs similar to engine
overheating. To avoid this, let the engine
run, preferably on level ground, with the
transmission in P (Park) for a few minutes
before turning the engine off. If the
overheat warning comes on, seeEngine
Overheating 0318.
Viewing Systems
If equipped, the viewing systems on the
vehicle can improve visibility while hitching,
backing, and driving with a trailer. See
Driver Assistance Systems 0252.
Parking on Hills
{Warning
To prevent serious injury or death,
always park your vehicle and trailer on a
level surface when possible.
When parking your vehicle and your trailer
on a hill: 1. Press the brake pedal, but do not shift into P (Park) yet. Turn the wheels into
the curb if facing downhill or into traffic
if facing uphill.
2. Have someone place chocks under the trailer wheels.
3. Gradually release the brake pedal to allow the chocks to absorb the load of
the trailer.
4. Reapply the brake pedal. Then apply the parking brake and shift into P (Park).
5. Release the brake pedal.
Leaving After Parking on a Hill
1. Apply and hold the brake pedal.
.Start the engine.
.Shift into a gear.
.Release the parking brake. 2. Let up on the brake pedal.
3. Drive slowly until the trailer is clear of
the chocks.
4. Stop and have someone pick up and store the chocks.
Launching and Retrieving a Boat
Backing the Trailer into the Water
{Warning
.Have all passengers get out of the
vehicle before backing onto the sloped
part of the ramp. Lower the driver and
passenger side windows before
backing onto the ramp. This will
provide a means of escape in the
unlikely event the vehicle slides into
the water.
.If the boat launch surface is slippery,
have the driver remain in the vehicle
with the brake pedal applied while the
boat is being launched. The boat
launch can be especially slippery at
low tide when part of the ramp was
previously submerged at high tide. Do
not back onto the ramp to launch the
boat if you are not sure the vehicle
can maintain traction.
(Continued)
Page 307 of 441
Chevrolet Silverado 2500 HD/3500 HD Owner Manual (GMNA-Localizing-U.
S./Canada/Mexico-15546003) - 2022 - CRC - 5/5/21
306 Vehicle Care
Vehicle Care
General Information
General Information . . . . . . . . . . . . . . . . . . . 307
California Perchlorate MaterialsRequirements . . . . . . . . . . . . . . . . . . . . . . . . 307
Accessories and Modifications . . . . . . . . . 307
Vehicle Checks
Doing Your Own Service Work . . . . . . . . 308
Hood . . . . . . . . . . . . . . . . . . . . . . . . . . . . . . . . . . 308
Engine Compartment Overview . . . . . . . . 310
Engine Oil . . . . . . . . . . . . . . . . . . . . . . . . . . . . . . 311
Engine Oil Life System . . . . . . . . . . . . . . . . . 313
Automatic Transmission Fluid . . . . . . . . . . 314
Engine Air Filter Life System . . . . . . . . . . . 314
Engine Air Cleaner/Filter . . . . . . . . . . . . . . . 315
Cooling System . . . . . . . . . . . . . . . . . . . . . . . . 316
Engine Overheating . . . . . . . . . . . . . . . . . . . . 318
Overheated Engine Protection Operating Mode . . . . . . . . . . . . . . . . . . . . . 320
Engine Fan . . . . . . . . . . . . . . . . . . . . . . . . . . . . 320
Power Steering Fluid . . . . . . . . . . . . . . . . . . 320
Washer Fluid . . . . . . . . . . . . . . . . . . . . . . . . . . 321
Brakes . . . . . . . . . . . . . . . . . . . . . . . . . . . . . . . . . 322
Brake Pad Life System . . . . . . . . . . . . . . . . . 322
Brake Fluid . . . . . . . . . . . . . . . . . . . . . . . . . . . . 323
Battery - North America . . . . . . . . . . . . . . . 324
Four-Wheel Drive . . . . . . . . . . . . . . . . . . . . . . 326
Front Axle . . . . . . . . . . . . . . . . . . . . . . . . . . . . . 326 Rear Axle . . . . . . . . . . . . . . . . . . . . . . . . . . . . . . 326
Noise Control System . . . . . . . . . . . . . . . . . 326
Starter Switch Check . . . . . . . . . . . . . . . . . . . 327
Automatic Transmission Shift Lock
Control Function Check . . . . . . . . . . . . . . 328
Ignition Transmission Lock Check . . . . . . 328
Park Brake and P (Park) Mechanism Check . . . . . . . . . . . . . . . . . . . . . . . . . . . . . . . . 328
Wiper Blade Replacement . . . . . . . . . . . . . 328
Glass Replacement . . . . . . . . . . . . . . . . . . . . 329
Windshield Replacement . . . . . . . . . . . . . . 329
Gas Strut(s) . . . . . . . . . . . . . . . . . . . . . . . . . . . 329
Headlamp Aiming
Front Headlamp Aiming . . . . . . . . . . . . . . . 330
Bulb Replacement
Bulb Replacement . . . . . . . . . . . . . . . . . . . . . 330
Halogen Bulbs . . . . . . . . . . . . . . . . . . . . . . . . . 331
LED Lighting . . . . . . . . . . . . . . . . . . . . . . . . . . . 331
Headlamps, Front Turn Signal, Sidemarker, and Parking Lamps . . . . . . 331
Taillamps, Turn Signal, Stoplamps, and Back-Up Lamps . . . . . . . . . . . . . . . . . . . . . . . 332
Center High-Mounted Stoplamp (CHMSL) and Cargo Lamp . . . . . . . . . . . . 333
License Plate Lamp . . . . . . . . . . . . . . . . . . . . 334
Electrical System
Electrical System Overload . . . . . . . . . . . . 334
Fuses and Circuit Breakers . . . . . . . . . . . . . 336 Engine Compartment Fuse Block . . . . . . 336
Instrument Panel Fuse Block (Left) . . . . 339
Instrument Panel Fuse Block (Right) . . . 341
Wheels and Tires
Tires . . . . . . . . . . . . . . . . . . . . . . . . . . . . . . . . . . 344
All-Season Tires . . . . . . . . . . . . . . . . . . . . . . . 344
Winter Tires . . . . . . . . . . . . . . . . . . . . . . . . . . . 345
All-Terrain Tires . . . . . . . . . . . . . . . . . . . . . . . . 345
Tire Sidewall Labeling . . . . . . . . . . . . . . . . . 345
Tire Designations . . . . . . . . . . . . . . . . . . . . . . 346
Tire Terminology and Definitions . . . . . . 347
Tire Pressure . . . . . . . . . . . . . . . . . . . . . . . . . . 349
Tire Pressure Monitor System . . . . . . . . . 350
Tire Pressure Monitor Operation . . . . . . . 351
Tire Inspection . . . . . . . . . . . . . . . . . . . . . . . . . 355
Tire Rotation . . . . . . . . . . . . . . . . . . . . . . . . . . 356
When It Is Time for New Tires . . . . . . . . 358
Buying New Tires . . . . . . . . . . . . . . . . . . . . . 359
Different Size Tires and Wheels . . . . . . . 360
Uniform Tire Quality Grading . . . . . . . . . 360
Wheel Alignment and Tire Balance . . . . 361
Wheel Replacement . . . . . . . . . . . . . . . . . . . 361
Tire Chains . . . . . . . . . . . . . . . . . . . . . . . . . . . . 362
If a Tire Goes Flat . . . . . . . . . . . . . . . . . . . . . 363
Tire Changing . . . . . . . . . . . . . . . . . . . . . . . . . 364
Full-Size Spare Tire . . . . . . . . . . . . . . . . . . . . 374
Jump Starting
Jump Starting - North America . . . . . . . . 374
Page 315 of 441
Chevrolet Silverado 2500 HD/3500 HD Owner Manual (GMNA-Localizing-U.
S./Canada/Mexico-15546003) - 2022 - CRC - 5/5/21
314 Vehicle Care
The oil life system can also be reset as
follows:1. Display the oil life percentage on the DIC. See Driver Information Center (DIC)
(Base Level) 0124 or
Driver Information Center (DIC) (Midlevel
and Uplevel) 0125.
2. Fully press the accelerator pedal slowly three times within five seconds.
3. If the display changes to 100%, the system is reset.
If the vehicle has a CHANGE ENGINE OIL
SOON message and it comes back on when
the vehicle is started and/or the oil
life percentage is near 0%, the engine oil
life system has not been reset. Repeat the
procedure.
Automatic Transmission Fluid
When to Check and Change Automatic
Transmission Fluid
It is usually not necessary to check the
transmission fluid level. The only reason for
fluid loss is a transmission leak or
overheated transmission. This vehicle is not
equipped with a transmission fluid level
dipstick. There is a special procedure for
checking and changing the transmission fluid in these vehicles. Because this procedure is
difficult, this should be done at the dealer.
Contact the dealer for additional information
or the procedure can be found in the service
manual. See
Publication Ordering
Information 0416.
Caution
Use of the incorrect automatic
transmission fluid may damage the
vehicle, and the damage may not be
covered by the vehicle warranty. Always
use the correct automatic transmission
fluid. See Recommended Fluids and
Lubricants 0401.
Change the fluid and filter at the scheduled
maintenance intervals listed in Maintenance
Schedule 0392. Be sure to use the
transmission fluid listed in Recommended
Fluids and Lubricants 0401.
Engine Air Filter Life System
If equipped, this feature provides the engine
air filter’s remaining life and best timing for
a change. The timing to change an engine
air filter depends on driving and
environmental conditions.
When to Change the Engine Air Filter
When the Driver Information Center (DIC)
displays a message to replace the engine air
filter at the next oil change, follow this
timing.
When the DIC displays a message to replace
the engine air filter soon, replace the engine
air filter at the earliest convenience.
The system must be reset after the engine
air filter is changed.
If the DIC displays a message to check the
engine air filter system, see your dealer.
How to Reset the Engine Air Filter Life
System
To reset:
1. Place the vehicle in P (Park).
2. Display the Air Filter Life on the DIC. See Driver Information Center (DIC) (Base
Level) 0124 or
Driver Information Center (DIC) (Midlevel
and Uplevel) 0125.
3. Press
Ton the steering wheel, or press
the trip odometer reset stem if the
vehicle does not have DIC controls, to
move to the Reset/Disable display area.
Page 321 of 441
Chevrolet Silverado 2500 HD/3500 HD Owner Manual (GMNA-Localizing-U.
S./Canada/Mexico-15546003) - 2022 - CRC - 5/5/21
320 Vehicle Care
normal idle speed for at least five minutes
while the vehicle is parked. If the warning is
still there, turn off the engine and get
everyone out of the vehicle until it
cools down.
If there is no sign of steam, idle the engine
for five minutes while parked. If the warning
is still displayed, turn off the engine until it
cools down.
Overheated Engine Protection
Operating Mode
If an overheated engine condition exists and
the ENGINE POWER IS REDUCED message
displays, an overheat protection mode which
alternates firing groups of cylinders helps to
prevent engine damage. In this mode, a loss
in power and engine performance will be
noticed. This operating mode allows the
vehicle to be driven to a safe place in an
emergency. Driving extended distances and/
or towing a trailer in the overheat
protection mode should be avoided.
If the engine or transmission detects an
impending hot fluid condition, then the
transmission may force upshifts to limit
temperatures. Downshifts may also be
prevented in this instance. Normal operationmay continue unless the display indicates
there is a hot condition and engine should
be idled.
Caution
After driving in the overheated engine
protection operating mode, the engine oil
will be severely degraded. Any repairs
performed before the engine is cool may
cause engine damage. Allow the engine
to cool before attempting any repair.
Repair the cause of coolant loss, change
the oil, and reset the oil life system. See
Engine Oil
0311.
Engine Fan
If the vehicle has the Duramax diesel
engine, see the Duramax diesel supplement.
The vehicle has a clutched engine cooling
fan. When the clutch is engaged, the fan
spins faster to provide more air to cool the
engine. In most everyday driving conditions,
the fan is spinning slower and the clutch is
not fully engaged. This improves fuel
economy and reduces fan noise. Under
heavy vehicle loading, trailer towing, and/or
high outside temperatures, the fan speed
increases as the clutch more fully engages, so an increase in fan noise may be heard.
This is normal and should not be mistaken
as the transmission slipping or making extra
shifts. It is merely the cooling system
functioning properly. The fan will slow down
when additional cooling is not required and
the clutch partially disengages.
This fan noise may be heard when starting
the engine. It will go away as the fan clutch
partially disengages.
Power Steering Fluid
The power steering fluid reservoir is in the
engine compartment on the driver side of
the vehicle. See
Engine Compartment
Overview 0310 for reservoir location.
When to Check Power Steering Fluid
It is not necessary to regularly check power
steering fluid unless there is a leak
suspected in the system or an unusual noise
Page 348 of 441
Chevrolet Silverado 2500 HD/3500 HD Owner Manual (GMNA-Localizing-U.
S./Canada/Mexico-15546003) - 2022 - CRC - 5/5/21
Vehicle Care 347
(4) Construction Code:A letter code is
used to indicate the type of ply
construction in the tire. The letter R
means radial ply construction; the
letter D means diagonal or bias ply
construction.
(5) Rim Diameter
:Diameter of the
wheel in inches.
(6) Load Range
:Load Range.
(7) Service Description
:The service
description indicates the load index and
speed rating of a tire. If two numbers
are given as in the example, 120/116,
then this represents the load index for
single versus dual wheel usage (single/
dual). The speed rating is the maximum
speed a tire is certified to carry a load.
Tire Terminology and Definitions
Air Pressure:The amount of air inside
the tire pressing outward on each
square inch of the tire. Air pressure is
expressed in kPa (kilopascal) or psi
(pounds per square inch). Accessory Weight
:The combined
weight of optional accessories. Some
examples of optional accessories are
automatic transmission, power
windows, power seats, and air
conditioning.
Aspect Ratio
:The relationship of a
tire's height to its width.
Belt
:A rubber coated layer of cords
between the plies and the tread. Cords
may be made from steel or other
reinforcing materials.
Bead
:The tire bead contains steel
wires wrapped by steel cords that hold
the tire onto the rim.
Bias Ply Tire
:A pneumatic tire in which
the plies are laid at alternate angles
less than 90 degrees to the centerline
of the tread.
Cold Tire Pressure
:The amount of air
pressure in a tire, measured in kPa
(kilopascal) or psi (pounds per square
inch) before a tire has built up heat
from driving. See Tire Pressure0349. Curb Weight
:The weight of a motor
vehicle with standard and optional
equipment including the maximum
capacity of fuel, oil, and coolant, but
without passengers and cargo.
DOT Markings
:A code molded into the
sidewall of a tire signifying that the tire
is in compliance with the U.S.
Department of Transportation (DOT)
Motor Vehicle Safety Standards. The
DOT code includes the Tire Identification
Number (TIN), an alphanumeric
designator which can also identify the
tire manufacturer, production plant,
brand, and date of production.
GVWR
:Gross Vehicle Weight Rating.
See Vehicle Load Limits 0220.
GAWR FRT
:Gross Axle Weight Rating
for the front axle. See Vehicle Load
Limits 0220.
GAWR RR
:Gross Axle Weight Rating
for the rear axle. See Vehicle Load
Limits 0220.
Page 398 of 441
Chevrolet Silverado 2500 HD/3500 HD Owner Manual (GMNA-Localizing-U.
S./Canada/Mexico-15546003) - 2022 - CRC - 5/5/21
Service and Maintenance 397
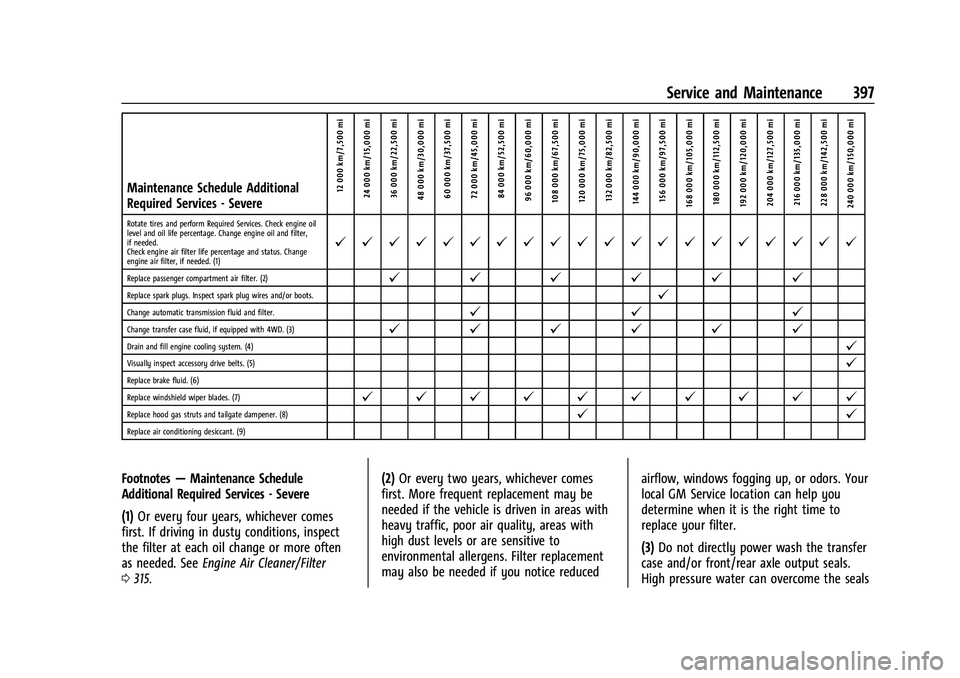
Maintenance Schedule Additional
Required Services - Severe12 000 km/7,500 mi
24 000 km/15,000 mi
36 000 km/22,500 mi
48 000 km/30,000 mi 60 000 km/37,500 mi
72 000 km/45,000 mi84 000 km/52,500 mi
96 000 km/60,000 mi
108 000 km/67,500 mi 120 000 km/75,000 mi 132 000 km/82,500 mi
144 000 km/90,000 mi 156 000 km/97,500 mi
168 000 km/105,000 mi 180 000 km/112,500 mi
192 000 km/120,000 mi 204 000 km/127,500 mi 216 000 km/135,000 mi
228 000 km/142,500 mi
240 000 km/150,000 mi
Rotate tires and perform Required Services. Check engine oil
level and oil life percentage. Change engine oil and filter,
if needed.
Check engine air filter life percentage and status. Change
engine air filter, if needed. (1)
@ @ @ @ @ @ @ @ @ @ @ @ @ @ @ @ @ @ @ @
Replace passenger compartment air filter. (2)@ @@@@@
Replace spark plugs. Inspect spark plug wires and/or boots.@
Change automatic transmission fluid and filter.@ @@
Change transfer case fluid, if equipped with 4WD. (3)@@@@@@
Drain and fill engine cooling system. (4)@
Visually inspect accessory drive belts. (5)@
Replace brake fluid. (6)
Replace windshield wiper blades. (7)
@ @ @ @ @ @ @ @ @ @
Replace hood gas struts and tailgate dampener. (8)@ @
Replace air conditioning desiccant. (9)
Footnotes—Maintenance Schedule
Additional Required Services - Severe
(1) Or every four years, whichever comes
first. If driving in dusty conditions, inspect
the filter at each oil change or more often
as needed. See Engine Air Cleaner/Filter
0 315. (2)
Or every two years, whichever comes
first. More frequent replacement may be
needed if the vehicle is driven in areas with
heavy traffic, poor air quality, areas with
high dust levels or are sensitive to
environmental allergens. Filter replacement
may also be needed if you notice reduced airflow, windows fogging up, or odors. Your
local GM Service location can help you
determine when it is the right time to
replace your filter.
(3)
Do not directly power wash the transfer
case and/or front/rear axle output seals.
High pressure water can overcome the seals
Page 402 of 441
Chevrolet Silverado 2500 HD/3500 HD Owner Manual (GMNA-Localizing-U.
S./Canada/Mexico-15546003) - 2022 - CRC - 5/5/21
Service and Maintenance 401
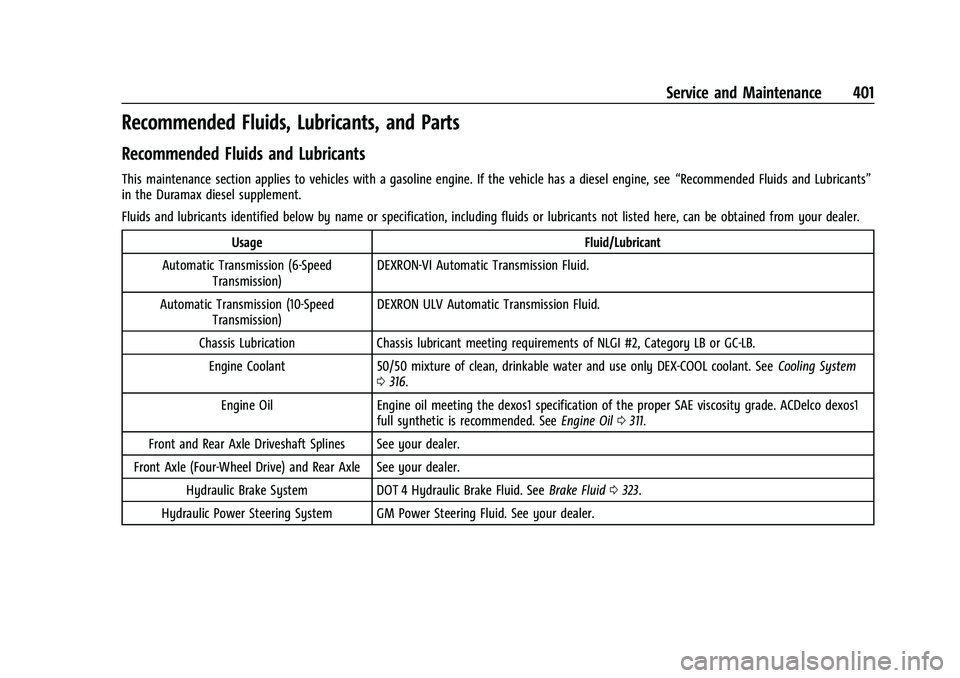
Recommended Fluids, Lubricants, and Parts
Recommended Fluids and Lubricants
This maintenance section applies to vehicles with a gasoline engine. If the vehicle has a diesel engine, see“Recommended Fluids and Lubricants”
in the Duramax diesel supplement.
Fluids and lubricants identified below by name or specification, including fluids or lubricants not listed here, can be obtained from your dealer.
Usage Fluid/Lubricant
Automatic Transmission (6-Speed Transmission) DEXRON-VI Automatic Transmission Fluid.
Automatic Transmission (10-Speed Transmission) DEXRON ULV Automatic Transmission Fluid.
Chassis Lubrication Chassis lubricant meeting requirements of NLGI #2, Category LB or GC-LB. Engine Coolant 50/50 mixture of clean, drinkable water and use only DEX-COOL coolant. See Cooling System
0 316.
Engine Oil Engine oil meeting the dexos1 specification of the proper SAE viscosity grade. ACDelco dexos1 full synthetic is recommended. See Engine Oil0311.
Front and Rear Axle Driveshaft Splines See your dealer.
Front Axle (Four-Wheel Drive) and Rear Axle See your dealer. Hydraulic Brake System DOT 4 Hydraulic Brake Fluid. See Brake Fluid0323.
Hydraulic Power Steering System GM Power Steering Fluid. See your dealer.