spare tire location CHEVROLET SONIC 2016 2.G Owners Manual
[x] Cancel search | Manufacturer: CHEVROLET, Model Year: 2016, Model line: SONIC, Model: CHEVROLET SONIC 2016 2.GPages: 353, PDF Size: 7.74 MB
Page 267 of 353
Chevrolet Sonic Owner Manual (GMNA-Localizing-U.S/Canada-9085902) -
2016 - CRC - 5/27/15
266 Vehicle Care
3. Press the MENU button todisplay the menu items in the
Driver Information
Center (DIC).
4. Use the thumbwheel to scroll to the Tire Learn menu item
screen.
5. Press and hold the SET/CLR button to begin the sensor
matching process.
6. The horn sounds twice to signal the receiver is in relearn
mode and the TIRE LEARN
message displays on the DIC
screen.
7. Start with the driver side front tire.
8. Place the relearn tool against the tire sidewall, near the valve
stem. Then press the button to
activate the TPMS sensor.
A horn chirp confirms that the
sensor identification code has
been matched to this tire and
wheel position.
9. Proceed to the passenger side front tire, and repeat the
procedure in Step 8. 10. Proceed to the passenger side
rear tire, and repeat the
procedure in Step 8.
11. Proceed to the driver side rear tire, and repeat the procedure
in Step 8. The horn sounds two
times to indicate the sensor
identification code has been
matched to the driver side rear
tire, and the TPMS sensor
matching process is no longer
active. The TIRE LEARN
message on the DIC display
screen goes off.
12. Turn the ignition to LOCK/OFF.
13. Set all four tires to the recommended air pressure
level as indicated on the Tire
and Loading Information label.
Tire Inspection
We recommend that the tires,
including the spare tire, if the
vehicle has one, be inspected
for signs of wear or damage at
least once a month. Replace the tire if:
.The indicators at three or
more places around the tire
can be seen.
.There is cord or fabric
showing through the tire's
rubber.
.The tread or sidewall is
cracked, cut, or snagged
deep enough to show cord or
fabric.
.The tire has a bump, bulge,
or split.
.The tire has a puncture, cut,
or other damage that cannot
be repaired well because of
the size or location of the
damage.
Tire Rotation
Tires should be rotated every
12 000 km (7,500 mi). See
Maintenance Schedule
0302.
Page 276 of 353
Chevrolet Sonic Owner Manual (GMNA-Localizing-U.S/Canada-9085902) -
2016 - CRC - 5/27/15
Vehicle Care 275
Tire Sealant and
Compressor Kit
{Warning
Idling a vehicle in an enclosed
area with poor ventilation is
dangerous. Engine exhaust may
enter the vehicle. Engine exhaust
contains carbon monoxide (CO)
which cannot be seen or smelled.
It can cause unconsciousness
and even death. Never run the
engine in an enclosed area that
has no fresh air ventilation. For
more information, seeEngine
Exhaust 0197.
{Warning
Overinflating a tire could cause
the tire to rupture and you or
others could be injured. Be sure
to read and follow the tire sealant
and compressor kit instructions
and inflate the tire to its
(Continued)
Warning (Continued)
recommended pressure. Do not
exceed the recommended
pressure.
{Warning
Storing the tire sealant and
compressor kit or other
equipment in the passenger
compartment of the vehicle could
cause injury. In a sudden stop or
collision, loose equipment could
strike someone. Store the tire
sealant and compressor kit in its
original location.
If this vehicle has a tire sealant and
compressor kit, there may not be a
spare tire or tire changing
equipment, and on some vehicles
there may not be a place to store
a tire.
The tire sealant and compressor
can be used to temporarily seal
punctures up to 6 mm (0.25 in) in the tread area of the tire. It can also
be used to inflate an
underinflated tire.
If the tire has been separated from
the wheel, has damaged sidewalls,
or has a large puncture, the tire is
too severely damaged for the tire
sealant and compressor kit to be
effective. See
Roadside Assistance
Program 0322.
Read and follow all of the tire
sealant and compressor kit
instructions.
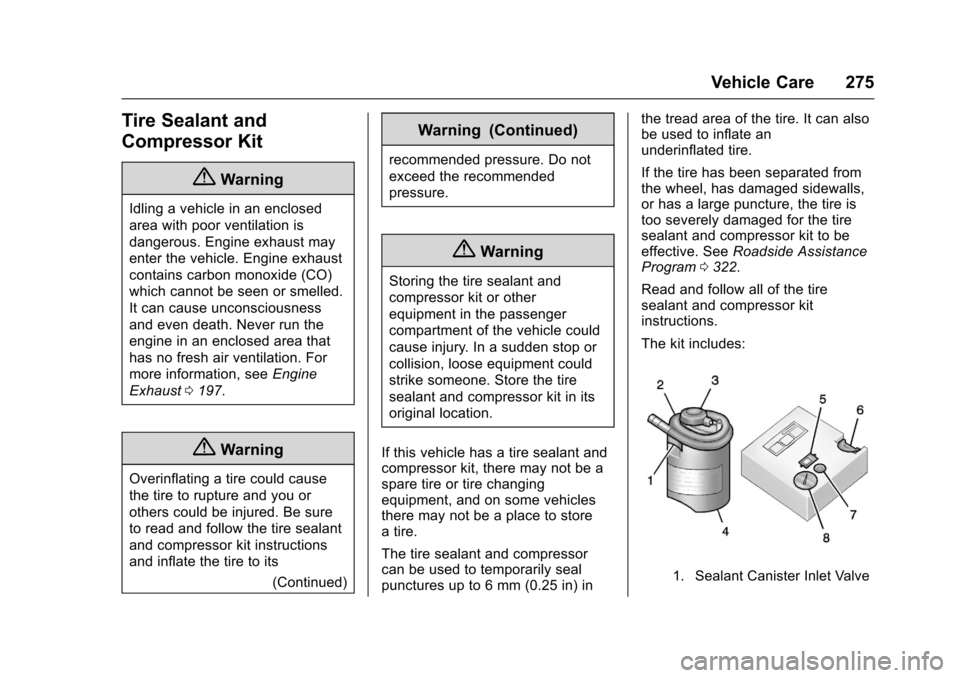
The kit includes:
1. Sealant Canister Inlet Valve
Page 282 of 353
Chevrolet Sonic Owner Manual (GMNA-Localizing-U.S/Canada-9085902) -
2016 - CRC - 5/27/15
Vehicle Care 281
12. Turn the air only hose (10)counterclockwise to remove it
from the tire valve stem.
13. Replace the tire valve stem cap.
14. Return the air only hose (10) and power plug (9) back to
their original storage location.
15. Return the equipment to its original storage location in the
vehicle.
The tire sealant and compressor kit
has accessory adapters located in a
compartment on the bottom of its
housing that can be used to inflate
air mattresses, balls, etc.
Storing the Tire Sealant
and Compressor Kit
The tire sealant and compressor kit
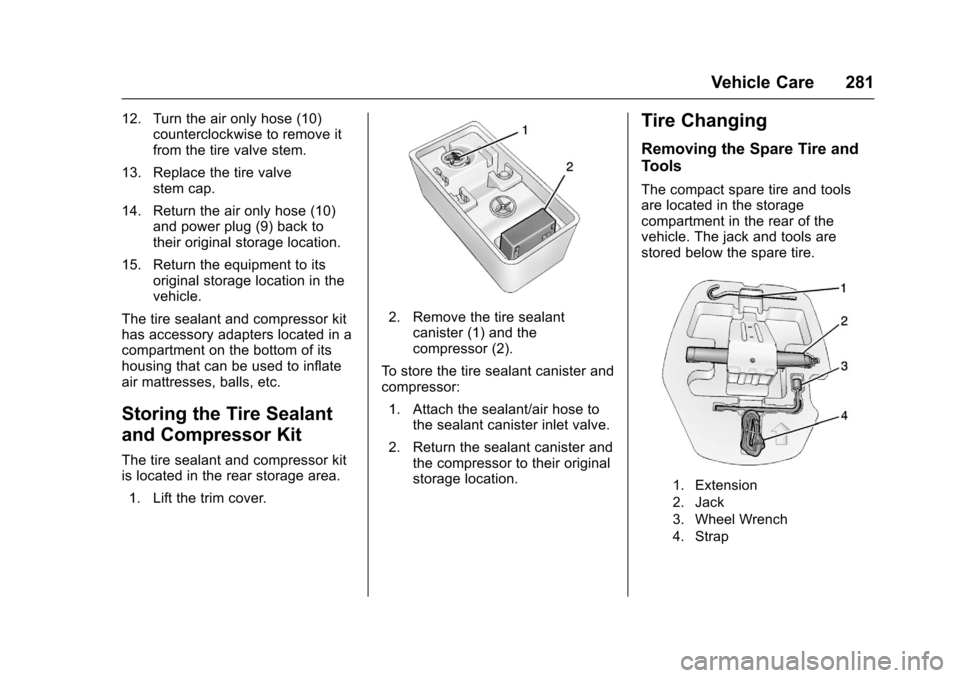
is located in the rear storage area. 1. Lift the trim cover.
2. Remove the tire sealant canister (1) and the
compressor (2).
To store the tire sealant canister and
compressor: 1. Attach the sealant/air hose to the sealant canister inlet valve.
2. Return the sealant canister and the compressor to their original
storage location.
Tire Changing
Removing the Spare Tire and
Tools
The compact spare tire and tools
are located in the storage
compartment in the rear of the
vehicle. The jack and tools are
stored below the spare tire.
1. Extension
2. Jack
3. Wheel Wrench
4. Strap
Page 284 of 353
Chevrolet Sonic Owner Manual (GMNA-Localizing-U.S/Canada-9085902) -
2016 - CRC - 5/27/15
Vehicle Care 283
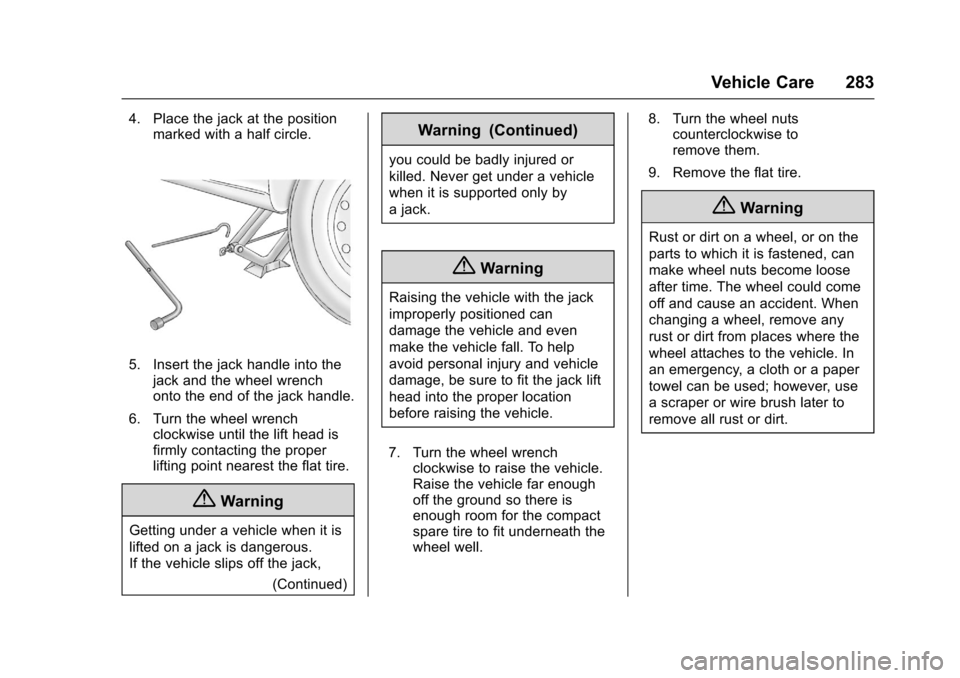
4. Place the jack at the positionmarked with a half circle.
5. Insert the jack handle into thejack and the wheel wrench
onto the end of the jack handle.
6. Turn the wheel wrench clockwise until the lift head is
firmly contacting the proper
lifting point nearest the flat tire.
{Warning
Getting under a vehicle when it is
lifted on a jack is dangerous.
If the vehicle slips off the jack,
(Continued)
Warning (Continued)
you could be badly injured or
killed. Never get under a vehicle
when it is supported only by
a jack.
{Warning
Raising the vehicle with the jack
improperly positioned can
damage the vehicle and even
make the vehicle fall. To help
avoid personal injury and vehicle
damage, be sure to fit the jack lift
head into the proper location
before raising the vehicle.
7. Turn the wheel wrench clockwise to raise the vehicle.
Raise the vehicle far enough
off the ground so there is
enough room for the compact
spare tire to fit underneath the
wheel well. 8. Turn the wheel nuts
counterclockwise to
remove them.
9. Remove the flat tire.
{Warning
Rust or dirt on a wheel, or on the
parts to which it is fastened, can
make wheel nuts become loose
after time. The wheel could come
off and cause an accident. When
changing a wheel, remove any
rust or dirt from places where the
wheel attaches to the vehicle. In
an emergency, a cloth or a paper
towel can be used; however, use
a scraper or wire brush later to
remove all rust or dirt.
Page 286 of 353
Chevrolet Sonic Owner Manual (GMNA-Localizing-U.S/Canada-9085902) -
2016 - CRC - 5/27/15
Vehicle Care 285
Caution
Wheel covers will not fit on the
vehicle's compact spare. If you try
to put a wheel cover on the
compact spare, the cover or the
spare could be damaged.
Storing a Flat or Spare Tire
and Tools
{Warning
Storing a jack, a tire, or other
equipment in the passenger
compartment of the vehicle could
cause injury. In a sudden stop or
collision, loose equipment could
strike someone. Store all these in
the proper place.
Storing the Flat Tire and Tools 1. Return the jack and tools to their original storage location.
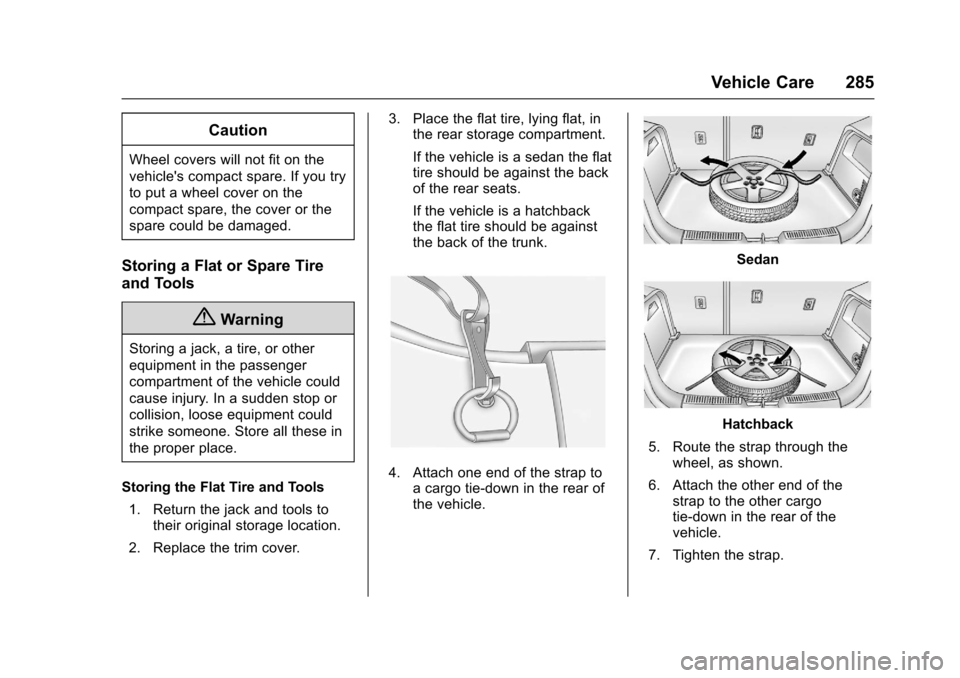
2. Replace the trim cover. 3. Place the flat tire, lying flat, in
the rear storage compartment.
If the vehicle is a sedan the flat
tire should be against the back
of the rear seats.
If the vehicle is a hatchback
the flat tire should be against
the back of the trunk.
4. Attach one end of the strap to
a cargo tie-down in the rear of
the vehicle.
Sedan
Hatchback
5. Route the strap through the wheel, as shown.
6. Attach the other end of the strap to the other cargo
tie-down in the rear of the
vehicle.
7. Tighten the strap.