maintenance schedule CHEVROLET SONIC 2018 Owner's Manual
[x] Cancel search | Manufacturer: CHEVROLET, Model Year: 2018, Model line: SONIC, Model: CHEVROLET SONIC 2018Pages: 349, PDF Size: 5.49 MB
Page 26 of 349
Chevrolet Sonic Owner Manual (GMNA-Localizing-U.S./Canada-11373973) -
2018 - crc - 10/9/17
In Brief 25
Engine Oil Life System
The engine oil life system calculates
engine oil life based on vehicle use
and displays the
:% CHANGE
message on the Driver Information
Center (DIC) when it is necessary to
change the engine oil and filter.
Remember, the oil life display must
be reset after each oil change. It will
not reset itself.
Resetting the Oil Life System
1. Press MENU to show Remaining Oil Life on the
display. This display shows an
estimate of the oil’s remaining
useful life. If 99% is displayed,
that means that 99% of the
current oil life remains.
2. To reset the engine oil life system, press SET/CLR while
the oil life display is active.
Select YES and press and hold
SET/CLR. After a few seconds,
there will be a single chime and
the oil life will be reset
to 100%. Be careful not to reset the oil life
display accidentally at any time
other than when the oil has just
been changed. It cannot be reset
accurately until the next oil change.
See
Engine Oil Life System 0224.
Driving for Better Fuel
Economy
Driving habits can affect fuel
mileage. Here are some driving tips
to get the best fuel economy
possible.
.
Avoid fast starts and accelerate
smoothly.
. Brake gradually and avoid
abrupt stops.
. Avoid idling the engine for long
periods of time.
. When road and weather
conditions are appropriate, use
cruise control.
. Always follow posted speed
limits or drive more slowly when
conditions require. .
Keep vehicle tires properly
inflated.
. Combine several trips into a
single trip.
. Replace the vehicle's tires with
the same TPC Spec number
molded into the tire's sidewall
near the size.
. Follow recommended scheduled
maintenance.
Roadside Assistance
Program
U.S.: 1-800-243-8872
TTY Users (U.S. Only):
1-888-889-2438
Canada: 1-800-268-6800
New Chevrolet owners are
automatically enrolled in the
Roadside Assistance Program.
See Roadside Assistance Program
0 315.
Page 79 of 349
Chevrolet Sonic Owner Manual (GMNA-Localizing-U.S./Canada-11373973) -
2018 - crc - 10/9/17
78 Seats and Restraints
Adding Equipment to the
Airbag-Equipped Vehicle
Adding accessories that change the
vehicle's frame, bumper system,
height, front end, or side sheet
metal may keep the airbag system
from working properly.
The operation of the airbag system
can also be affected by changing
any parts of the front seats, seat
belts, airbag sensing and diagnostic
module, steering wheel, instrument
panel, inner door seals including the
speakers, any of the airbag
modules, ceiling or pillar garnish
trim, front sensors, side impact
sensors, or airbag wiring.
Your dealer and the service manual
have information about the location
of the airbag sensors, sensing and
diagnostic module, and airbag
wiring.
In addition, the vehicle has a
passenger sensing system for the
front outboard passenger position,
which includes sensors that are part
of the passenger seat. The
passenger sensing system may notoperate properly if the original seat
trim is replaced with non-GM
covers, upholstery, or trim; or with
GM covers, upholstery, or trim
designed for a different vehicle. Any
object, such as an aftermarket seat
heater or a comfort-enhancing pad
or device, installed under or on top
of the seat fabric, could also
interfere with the operation of the
passenger sensing system. This
could either prevent proper
deployment of the passenger
airbag(s) or prevent the passenger
sensing system from properly
turning off the passenger airbag(s).
See
Passenger Sensing System
0 73.
If the vehicle has rollover roof-rail
airbags, see Different Size Tires
and Wheels 0267 for additional
important information.
If you have to modify your vehicle
because you have a disability and
have questions about whether the
modifications will affect the vehicle's
airbag system, or if you have
questions about whether the airbag
system will be affected if the vehicle is modified for any other reason, call
Customer Assistance. See
Customer Assistance Offices
0313.
Airbag System Check
The airbag system does not need
regularly scheduled maintenance or
replacement. Make sure the airbag
readiness light is working. See
Airbag Readiness Light 0111.
Caution
If an airbag covering is damaged,
opened, or broken, the airbag
may not work properly. Do not
open or break the airbag
coverings. If there are any
opened or broken airbag
coverings, have the airbag
covering and/or airbag module
replaced. For the location of the
airbags, see Where Are the
Airbags? 069. See your dealer
for service.
Page 121 of 349
Chevrolet Sonic Owner Manual (GMNA-Localizing-U.S./Canada-11373973) -
2018 - crc - 10/9/17
120 Instruments and Controls
For vehicles with the Tire Pressure
Monitor System (TPMS), this light
comes on briefly when the engine is
started. It provides information
about tire pressures and the TPMS.
When the Light Is On Steady
This indicates that one or more of
the tires are significantly
underinflated.
Stop as soon as possible, and
inflate the tires to the pressure value
shown on the Tire and Loading
Information label. SeeTire Pressure
0 258.
When the Light Flashes First and
Then Is On Steady
If the light flashes for about a minute
and then stays on, there may be a
problem with the TPMS. If the
problem is not corrected, the light
will come on at every ignition cycle.
See Tire Pressure Monitor
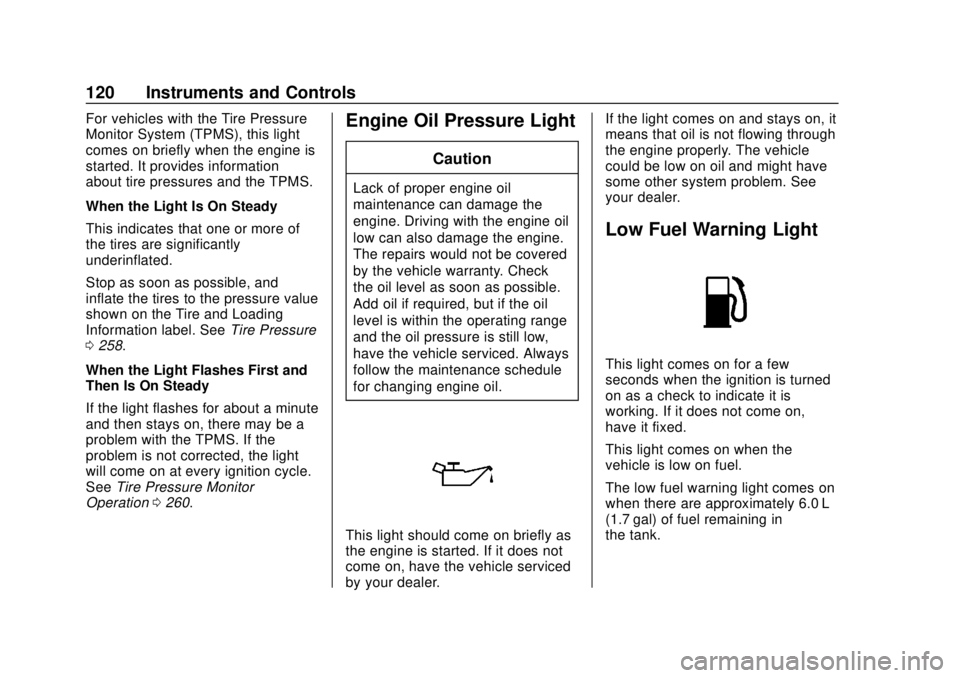
Operation 0260.Engine Oil Pressure Light
Caution
Lack of proper engine oil
maintenance can damage the
engine. Driving with the engine oil
low can also damage the engine.
The repairs would not be covered
by the vehicle warranty. Check
the oil level as soon as possible.
Add oil if required, but if the oil
level is within the operating range
and the oil pressure is still low,
have the vehicle serviced. Always
follow the maintenance schedule
for changing engine oil.
This light should come on briefly as
the engine is started. If it does not
come on, have the vehicle serviced
by your dealer. If the light comes on and stays on, it
means that oil is not flowing through
the engine properly. The vehicle
could be low on oil and might have
some other system problem. See
your dealer.
Low Fuel Warning Light
This light comes on for a few
seconds when the ignition is turned
on as a check to indicate it is
working. If it does not come on,
have it fixed.
This light comes on when the
vehicle is low on fuel.
The low fuel warning light comes on
when there are approximately 6.0 L
(1.7 gal) of fuel remaining in
the tank.
Page 124 of 349
Chevrolet Sonic Owner Manual (GMNA-Localizing-U.S./Canada-11373973) -
2018 - crc - 10/9/17
Instruments and Controls 123
Information Displays
Driver Information
Center (DIC)
The DIC displays information about
the vehicle. It also displays warning
messages if a system problem is
detected. SeeVehicle Messages
0 127. All messages appear in the
DIC display in the instrument panel
cluster.
DIC Operation and Displays
On some models, the trip odometer
reset stem is used to operate the
DIC. On other models, the controls
for the DIC are on the turn signal
lever.
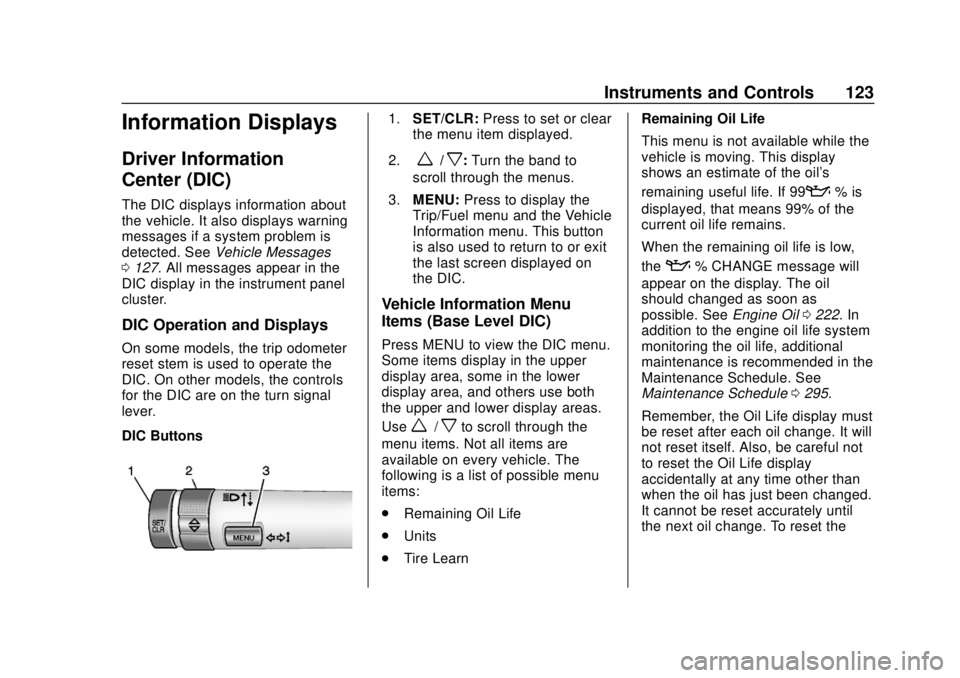
DIC Buttons
1. SET/CLR: Press to set or clear
the menu item displayed.
2.
w/x: Turn the band to
scroll through the menus.
3. MENU: Press to display the
Trip/Fuel menu and the Vehicle
Information menu. This button
is also used to return to or exit
the last screen displayed on
the DIC.
Vehicle Information Menu
Items (Base Level DIC)
Press MENU to view the DIC menu.
Some items display in the upper
display area, some in the lower
display area, and others use both
the upper and lower display areas.
Use
w/xto scroll through the
menu items. Not all items are
available on every vehicle. The
following is a list of possible menu
items:
. Remaining Oil Life
. Units
. Tire Learn Remaining Oil Life
This menu is not available while the
vehicle is moving. This display
shows an estimate of the oil's
remaining useful life. If 99
:% is
displayed, that means 99% of the
current oil life remains.
When the remaining oil life is low,
the
:% CHANGE message will
appear on the display. The oil
should changed as soon as
possible. See Engine Oil0222. In
addition to the engine oil life system
monitoring the oil life, additional
maintenance is recommended in the
Maintenance Schedule. See
Maintenance Schedule 0295.
Remember, the Oil Life display must
be reset after each oil change. It will
not reset itself. Also, be careful not
to reset the Oil Life display
accidentally at any time other than
when the oil has just been changed.
It cannot be reset accurately until
the next oil change. To reset the
Page 127 of 349
Chevrolet Sonic Owner Manual (GMNA-Localizing-U.S./Canada-11373973) -
2018 - crc - 10/9/17
126 Instruments and Controls
last time this menu item was reset.
This number reflects only the
approximate average fuel economy
that the vehicle has right now, and
will change as driving conditions
change. The fuel economy can be
reset by pressing SET/CLR while
the Average Fuel Economy display
is showing.
Average Vehicle Speed
This display shows the average
speed of the vehicle in kilometers
per hour (km/h) or miles per
hour (mph). This average is
calculated based on the various
vehicle speeds recorded since the
last reset of this value. The average
speed can be reset by pressing
SET/CLR while the Average Vehicle
Speed display is showing.
Vehicle Information Menu
Items (Uplevel DIC)
Press MENU on the turn signal
lever until Vehicle Information menu
is displayed. Use
w/xto scroll
through the following possible menu
items: .
Display Units
. Tire Pressure
. Remaining Oil Life
Display Units
Move
w/xto switch between
metric or US when the Unit display
is active. Press SET/CLR to confirm
the setting. This will change the
displays on the cluster and DIC to
either metric or English (US)
measurements.
Tire Pressure
The display will show a vehicle with
the approximate pressures of all
four tires. Tire pressure is displayed
in either kilopascal (kPa) or pounds
per square inch (psi).
See Tire Pressure Monitor System
0 259 andTire Pressure Monitor
Operation 0260.
Remaining Oil Life
This menu is not available while the
vehicle is moving. This display
shows an estimate of the oil's
remaining useful life. If REMAINING OIL LIFE 99 % is displayed, that
means 99% of the current oil life
remains.
When the remaining oil life is low,
the CHANGE ENGINE OIL SOON
message will appear on the display.
The oil should changed as soon as
possible. See
Engine Oil0222. In
addition to the engine oil life system
monitoring the oil life, additional
maintenance is recommended in the
Maintenance Schedule. See
Maintenance Schedule 0295.
Remember, the Oil Life display must
be reset after each oil change. It will
not reset itself. Also, be careful not
to reset the Oil Life display
accidentally at any time other than
when the oil has just been changed.
It cannot be reset accurately until
the next oil change. To reset the
engine oil life system, press SET/
CLR while the Oil Life display is
active. See Engine Oil Life System
0 224.
Page 129 of 349
Chevrolet Sonic Owner Manual (GMNA-Localizing-U.S./Canada-11373973) -
2018 - crc - 10/9/17
128 Instruments and Controls
70 :Service Leveling System
75 : Service AC System
77 : Service Front Camera System
78 : Service Pedestrian Protection
79 : Engine Oil Low –Add Oil
81 : Service Transmission
82 : Change Engine Oil Soon
84 : Engine Power Is Reduced
88 : Use Transmitter Pocket to Start
89 : Service Vehicle Soon
91 : No Remote Detected
92 : No Remote Detected, Press
Brake To Restart
93 : Press Button Again To Turn
Engine Off
94 : Shift to Park
95 : Service Airbag
99 : Pedestrian Protection System
Disabled
120 : Reduce Speed For Hill
Descent Control
136 : Service Parking Assist 145 :
Washer Fluid Low —Add
Fluid
151 : Press Clutch to Start
174 : Low Battery
258 : Park Assist Off
:% CHANGE
This message displays when the
engine oil needs to be changed.
When changing the engine oil, be
sure to reset the Oil Life System.
See Engine Oil Life System 0224,
Engine Oil 0222, and Maintenance
Schedule 0295.
LF XX, RF XX, LR XX,
or RR XX
A message displays when the tire
pressure is low. It shows the
location of the low tire and the
approximate pressure of the low tire.
If a tire pressure message appears,
stop as soon as you can. Inflate the
tires by adding air until the tire
pressure is equal to the values
shown on the Tire and Loading Information label. See
Tires0251,
Vehicle Load Limits 0177, and Tire
Pressure 0258.
Uplevel Cluster
Messages that do not require
immediate action can be
acknowledged and cleared by
pressing SET/CLR.
Messages that require immediate
action cannot be cleared until that
action is performed. Clearing
messages does not correct the
problem.
Engine Power Messages
ENGINE POWER IS REDUCED
This message displays when the
vehicle's propulsion power is
reduced. Reduced propulsion power
can affect the vehicle's ability to
accelerate. If this message is on,
but there is no observed reduction
in performance, proceed to your
destination. The performance may
Page 169 of 349
Chevrolet Sonic Owner Manual (GMNA-Localizing-U.S./Canada-11373973) -
2018 - crc - 10/9/17
168 Climate Controls
Maintenance
Air Intake
Clear away any ice, snow, or leaves
from the air intake at the base of the
windshield that can block the flow of
air into the vehicle.
Passenger Compartment
Air Filter
The filter removes dust, pollen, and
other airborne irritants from outside
air that is pulled into the vehicle.
The filter should be replaced as part
of routine scheduled maintenance.
SeeMaintenance Schedule 0295.
To find out what type of filter to use,
see Maintenance Replacement
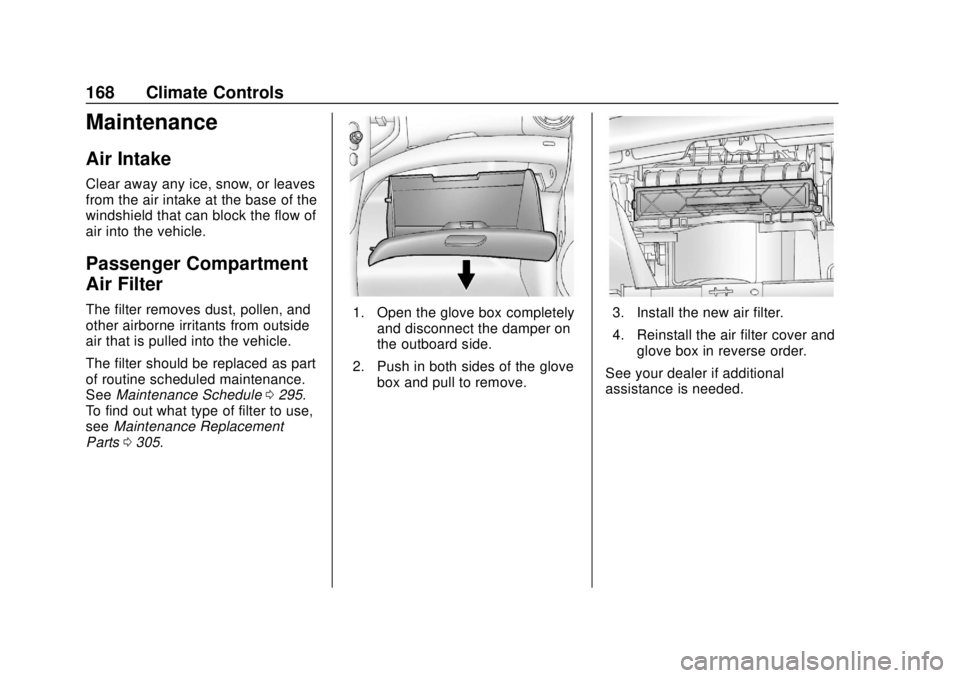
Parts 0305.1. Open the glove box completely
and disconnect the damper on
the outboard side.
2. Push in both sides of the glove box and pull to remove.3. Install the new air filter.
4. Reinstall the air filter cover andglove box in reverse order.
See your dealer if additional
assistance is needed.
Page 227 of 349
Chevrolet Sonic Owner Manual (GMNA-Localizing-U.S./Canada-11373973) -
2018 - crc - 10/9/17
226 Vehicle Care
Change the fluid at the intervals
listed inMaintenance Schedule
0 295, and be sure to use the fluid
listed in Recommended Fluids and
Lubricants 0304.
Manual Transmission
Fluid
It is not necessary to check the
manual transmission fluid level.
A transmission fluid leak is the only
reason for fluid loss. If a leak
occurs, take the vehicle to your
dealer and have it repaired as soon
as possible. See Recommended
Fluids and Lubricants 0304 for the
proper fluid to use.
Hydraulic Clutch
For vehicles with a manual
transmission, it is not necessary to
regularly check brake/clutch fluid
unless there is a leak suspected.
Adding fluid will not correct a leak.
A fluid loss in this system could
indicate a problem. Have the
system inspected and repaired.
When to Check and What
to Use
The common hydraulic clutch and
brake master cylinder fluid reservoir
is filled with DOT 3 brake fluid as
indicated on the reservoir cap. See
Engine Compartment Overview
0 219 for reservoir location.
How to Check and Add Fluid
Visually check the brake/clutch fluid
reservoir to make sure the fluid level
is at the MIN (minimum) line on the
side of the reservoir. The brake/
hydraulic clutch fluid system should
be closed and sealed.
Do not remove the cap to check the
fluid level or to top‐off the fluid level.
Remove the cap only when
necessary to add the proper fluid
until the level reaches the MIN line.
Engine Air Cleaner/Filter
The engine air cleaner/filter is
located in the engine compartment
on the passenger side of the vehicle. See
Engine Compartment
Overview 0219 for more information
on location.
When to Inspect the Engine Air
Cleaner/Filter
For intervals on changing and
inspecting the engine air cleaner/
filter, see Maintenance Schedule
0 295.
How to Inspect the Engine Air
Cleaner/Filter
Do not start the engine or have the
engine running with the engine air
cleaner/filter housing open. Before
removing the engine air cleaner/
filter, make sure that the engine air
cleaner/filter housing and nearby
components are free of dirt and
debris. Remove the engine air
cleaner/filter. Lightly tap and shake
the engine air cleaner/filter (away
from the vehicle), to release loose
dust and dirt. Inspect the engine air
cleaner/filter for damage, and
replace if damaged. Do not clean
the engine air cleaner/filter or
components with water or
compressed air.
Page 236 of 349
Chevrolet Sonic Owner Manual (GMNA-Localizing-U.S./Canada-11373973) -
2018 - crc - 10/9/17
Vehicle Care 235
when new brake linings are
installed. Add or remove fluid, as
necessary, only when work is done
on the brake/clutch hydraulic
system.
{Warning
If too much brake fluid is added, it
can spill on the engine and burn,
if the engine is hot enough. You
or others could be burned, and
the vehicle could be damaged.
Add brake fluid only when work is
done on the brake/clutch
hydraulic system.
When the brake/clutch fluid falls to a
low level, the brake warning light
comes on. See Brake System
Warning Light 0115.
Brake fluid absorbs water over time
which degrades the effectiveness of
the brake fluid. Replace brake fluid
at the specified intervals to prevent
increased stopping distance. See
Maintenance Schedule 0295. What to Add
Use only GM approved DOT 3
brake fluid from a clean, sealed
container. See
Recommended
Fluids and Lubricants 0304.
{Warning
The wrong or contaminated brake
fluid could result in damage to the
brake system. This could result in
the loss of braking leading to a
possible injury. Always use the
proper GM approved brake fluid.
Caution
If brake fluid is spilled on the
vehicle's painted surfaces, the
paint finish can be damaged.
Immediately wash off any painted
surface.
Battery - North America
The original equipment battery is
maintenance free. Do not remove
the cap and do not add fluid.
Refer to the replacement number
shown on the original battery label
when a new battery is needed. See
Engine Compartment Overview
0219 for battery location.
{Warning
WARNING: Battery posts,
terminals, and related
accessories contain lead and lead
compounds, chemicals known to
the State of California to cause
cancer and birth defects or other
reproductive harm. Batteries also
contain other chemicals known to
the State of California to cause
cancer. WASH HANDS AFTER
HANDLING. For more information
go to www.P65Warnings.ca.gov/
passenger-vehicle.
Page 238 of 349
Chevrolet Sonic Owner Manual (GMNA-Localizing-U.S./Canada-11373973) -
2018 - crc - 10/9/17
Vehicle Care 237
2. Apply the parking brake. Beready to apply the regular
brake immediately if the vehicle
begins to move.
3. With the engine off, turn the ignition on, but do not start the
engine. Without applying the
regular brake, try to move the
shift lever out of P (Park) with
normal effort. If the shift lever
moves out of P (Park), contact
your dealer for service.
Ignition Transmission
Lock Check
If equipped with Key Access, while
parked, and with the parking brake
set, try to turn the ignition off in
each shift lever position.
.For automatic transmission
vehicles, the ignition should turn
off only when the shift lever is in
P (Park).
. For manual transmission
vehicles, the ignition should turn
off only when the shift lever is in
Neutral. On all Key Access vehicles, the
ignition key should come out only
when the ignition is off.
Contact your dealer if service is
required.
Park Brake and P (Park)
Mechanism Check
{Warning
When you are doing this check,
the vehicle could begin to move.
You or others could be injured
and property could be damaged.
Make sure there is room in front
of the vehicle in case it begins to
roll. Be ready to apply the regular
brake at once should the vehicle
begin to move.
Park on a fairly steep hill, with the
vehicle facing downhill. Keeping
your foot on the regular brake, set
the parking brake.
. To check the parking brake's
holding ability: With the engine
running and the transmission in N (Neutral), slowly remove foot
pressure from the regular brake
pedal. Do this until the vehicle is
held by the parking brake only.
. To check the P (Park)
mechanism's holding ability:
With the engine running, shift to
P (Park). Then release the
parking brake followed by the
regular brake.
Contact your dealer if service is
required.
Wiper Blade Replacement
Front Wiper Blade
Replacement
Windshield wiper blades should be
inspected for wear or cracking. See
the Maintenance Schedule 0295 for
more information.
Replacement blades come in
different types and are removed in
different ways. For proper
windshield wiper blade length and
type, see Maintenance
Replacement Parts 0305.