instrument cluster CHEVROLET SONIC 2019 User Guide
[x] Cancel search | Manufacturer: CHEVROLET, Model Year: 2019, Model line: SONIC, Model: CHEVROLET SONIC 2019Pages: 351, PDF Size: 5.32 MB
Page 115 of 351
Chevrolet Sonic Owner Manual (GMNA-Localizing-U.S./Canada-12461769) -
2019 - crc - 5/21/18
114 Instruments and Controls
Seat Belt Reminders
Driver Seat Belt Reminder
Light
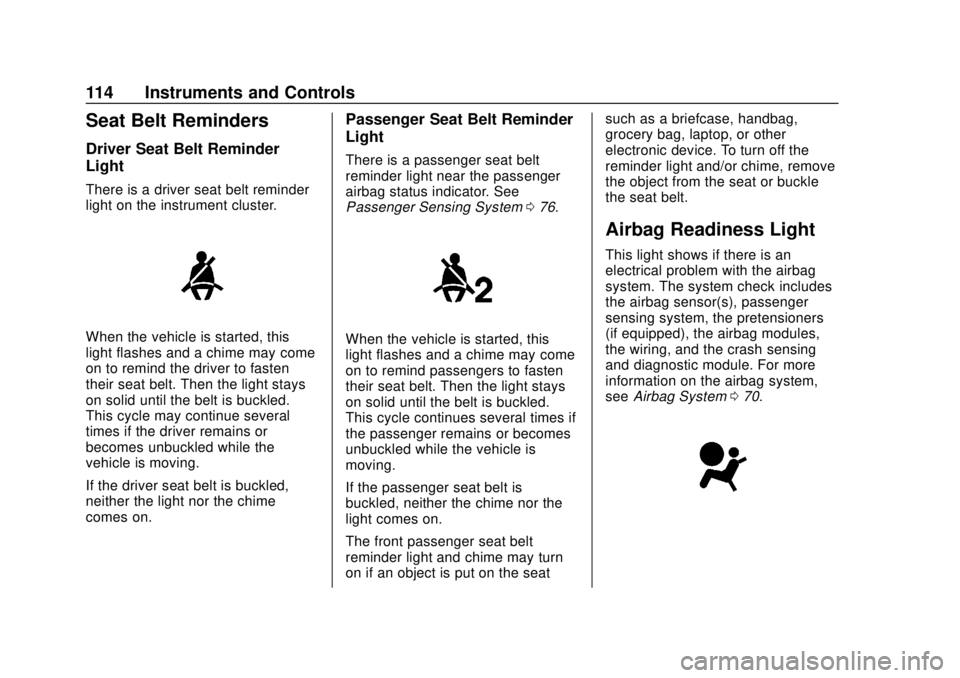
There is a driver seat belt reminder
light on the instrument cluster.
When the vehicle is started, this
light flashes and a chime may come
on to remind the driver to fasten
their seat belt. Then the light stays
on solid until the belt is buckled.
This cycle may continue several
times if the driver remains or
becomes unbuckled while the
vehicle is moving.
If the driver seat belt is buckled,
neither the light nor the chime
comes on.
Passenger Seat Belt Reminder
Light
There is a passenger seat belt
reminder light near the passenger
airbag status indicator. See
Passenger Sensing System076.
When the vehicle is started, this
light flashes and a chime may come
on to remind passengers to fasten
their seat belt. Then the light stays
on solid until the belt is buckled.
This cycle continues several times if
the passenger remains or becomes
unbuckled while the vehicle is
moving.
If the passenger seat belt is
buckled, neither the chime nor the
light comes on.
The front passenger seat belt
reminder light and chime may turn
on if an object is put on the seat such as a briefcase, handbag,
grocery bag, laptop, or other
electronic device. To turn off the
reminder light and/or chime, remove
the object from the seat or buckle
the seat belt.
Airbag Readiness Light
This light shows if there is an
electrical problem with the airbag
system. The system check includes
the airbag sensor(s), passenger
sensing system, the pretensioners
(if equipped), the airbag modules,
the wiring, and the crash sensing
and diagnostic module. For more
information on the airbag system,
see
Airbag System 070.
Page 127 of 351
Chevrolet Sonic Owner Manual (GMNA-Localizing-U.S./Canada-12461769) -
2019 - crc - 5/21/18
126 Instruments and Controls
Information Displays
Driver Information
Center (DIC)
The DIC displays information about
the vehicle. It also displays warning
messages if a system problem is
detected. SeeVehicle Messages
0 130. All messages appear in the
DIC display in the instrument panel
cluster.
DIC Operation and Displays
On some models, the trip odometer
reset stem is used to operate the
DIC. On other models, the controls
for the DIC are on the turn signal
lever.
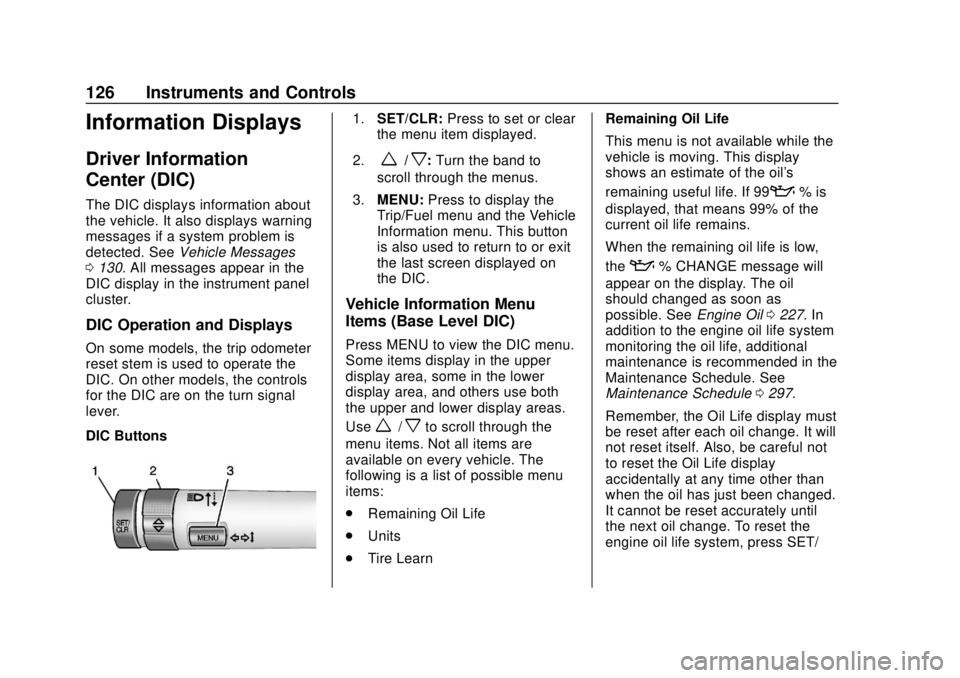
DIC Buttons
1. SET/CLR: Press to set or clear
the menu item displayed.
2.
w/x: Turn the band to
scroll through the menus.
3. MENU: Press to display the
Trip/Fuel menu and the Vehicle
Information menu. This button
is also used to return to or exit
the last screen displayed on
the DIC.
Vehicle Information Menu
Items (Base Level DIC)
Press MENU to view the DIC menu.
Some items display in the upper
display area, some in the lower
display area, and others use both
the upper and lower display areas.
Use
w/xto scroll through the
menu items. Not all items are
available on every vehicle. The
following is a list of possible menu
items:
. Remaining Oil Life
. Units
. Tire Learn Remaining Oil Life
This menu is not available while the
vehicle is moving. This display
shows an estimate of the oil's
remaining useful life. If 99
:% is
displayed, that means 99% of the
current oil life remains.
When the remaining oil life is low,
the
:% CHANGE message will
appear on the display. The oil
should changed as soon as
possible. See Engine Oil0227. In
addition to the engine oil life system
monitoring the oil life, additional
maintenance is recommended in the
Maintenance Schedule. See
Maintenance Schedule 0297.
Remember, the Oil Life display must
be reset after each oil change. It will
not reset itself. Also, be careful not
to reset the Oil Life display
accidentally at any time other than
when the oil has just been changed.
It cannot be reset accurately until
the next oil change. To reset the
engine oil life system, press SET/
Page 128 of 351
Chevrolet Sonic Owner Manual (GMNA-Localizing-U.S./Canada-12461769) -
2019 - crc - 5/21/18
Instruments and Controls 127
CLR while the Oil Life display is
active. SeeEngine Oil Life System
0 229.
Units
This menu is not available while the
vehicle is moving. Press SET/CLR
while the unit display is active and
move
w/xto change units when
UNIT SET is displayed. Press SET/
CLR to confirm the setting. Select 1,
2, or 3 for the unit display. 1 is
metric units, 2 is Imperial units, and
3 is US units. This will change the
displays on the cluster and DIC to
the type of measurements selected.
Tire Learn
This display allows for matching of
the TPMS sensors. The display will
show a vehicle with the approximate
pressures of all four tires. Tire
pressure is displayed in either
kilopascal (kPa) or pounds per
square inch (psi).
See Tire Pressure Monitor System
0 261 andTire Pressure Monitor
Operation 0262.
Trip/Fuel Menu Items (Base
Level DIC)
Press MENU until the Trip/Fuel
menu is displayed. Use
w/xto
scroll through the menu items. On
some models, use the trip odometer
reset stem to scroll through the
menu. Not all items are available on
every vehicle. The following is a list
of possible menu items:
. Trip Odometer
. Fuel Range
. Average Vehicle Speed
. Instantaneous Fuel Economy
. Average Fuel Economy
Trip Odometer
This display shows the current
distance traveled, in either
kilometers (km) or miles (mi), since
the last reset for the trip odometer.
The trip odometer can be reset to
zero by pressing SET/CLR or
pressing and holding the trip
odometer reset stem while the trip
odometer display is showing. Fuel Range
This display shows the approximate
distance the vehicle can be driven
without refueling. The fuel range
estimate is based on an average of
the vehicle's fuel economy over
recent driving history and the
amount of fuel remaining in the fuel
tank. Fuel range cannot be reset.
Average Vehicle Speed
This display shows the average
speed of the vehicle in kilometers
per hour (km/h) or miles per
hour (mph). This average is
calculated based on the various
vehicle speeds recorded since the
last reset of this value. The average
speed can be reset by pressing
SET/CLR or pressing and holding
the trip odometer reset stem while
the Average Vehicle Speed display
is showing.
Instantaneous Fuel Economy
The instantaneous fuel economy
display shows the current fuel
economy in liters per 100 kilometers
(L/100 km) or miles per
gallon (mpg). This number reflects
Page 130 of 351
Chevrolet Sonic Owner Manual (GMNA-Localizing-U.S./Canada-12461769) -
2019 - crc - 5/21/18
Instruments and Controls 129
last time this menu item was reset.
This number reflects only the
approximate average fuel economy
that the vehicle has right now, and
will change as driving conditions
change. The fuel economy can be
reset by pressing SET/CLR while
the Average Fuel Economy display
is showing.
Average Vehicle Speed
This display shows the average
speed of the vehicle in kilometers
per hour (km/h) or miles per
hour (mph). This average is
calculated based on the various
vehicle speeds recorded since the
last reset of this value. The average
speed can be reset by pressing
SET/CLR while the Average Vehicle
Speed display is showing.
Vehicle Information Menu
Items (Uplevel DIC)
Press MENU on the turn signal
lever until Vehicle Information menu
is displayed. Use
w/xto scroll
through the following possible menu
items: .
Display Units
. Tire Pressure
. Remaining Oil Life
Display Units
Move
w/xto switch between
metric or US when the Unit display
is active. Press SET/CLR to confirm
the setting. This will change the
displays on the cluster and DIC to
either metric or English (US)
measurements.
Tire Pressure
The display will show a vehicle with
the approximate pressures of all
four tires. Tire pressure is displayed
in either kilopascal (kPa) or pounds
per square inch (psi).
See Tire Pressure Monitor System
0 261 andTire Pressure Monitor
Operation 0262.
Remaining Oil Life
This menu is not available while the
vehicle is moving. This display
shows an estimate of the oil's
remaining useful life. If REMAINING OIL LIFE 99 % is displayed, that
means 99% of the current oil life
remains.
When the remaining oil life is low,
the CHANGE ENGINE OIL SOON
message will appear on the display.
The oil should changed as soon as
possible. See
Engine Oil0227. In
addition to the engine oil life system
monitoring the oil life, additional
maintenance is recommended in the
Maintenance Schedule. See
Maintenance Schedule 0297.
Remember, the Oil Life display must
be reset after each oil change. It will
not reset itself. Also, be careful not
to reset the Oil Life display
accidentally at any time other than
when the oil has just been changed.
It cannot be reset accurately until
the next oil change. To reset the
engine oil life system, press SET/
CLR while the Oil Life display is
active. See Engine Oil Life System
0 229.
Page 131 of 351
Chevrolet Sonic Owner Manual (GMNA-Localizing-U.S./Canada-12461769) -
2019 - crc - 5/21/18
130 Instruments and Controls
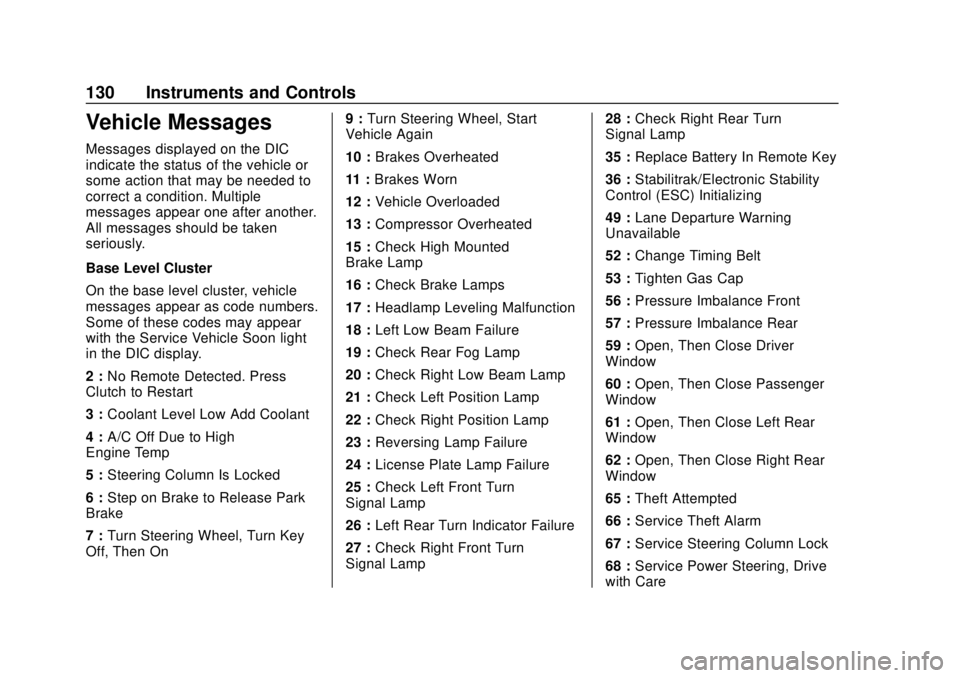
Vehicle Messages
Messages displayed on the DIC
indicate the status of the vehicle or
some action that may be needed to
correct a condition. Multiple
messages appear one after another.
All messages should be taken
seriously.
Base Level Cluster
On the base level cluster, vehicle
messages appear as code numbers.
Some of these codes may appear
with the Service Vehicle Soon light
in the DIC display.
2 :No Remote Detected. Press
Clutch to Restart
3 : Coolant Level Low Add Coolant
4 : A/C Off Due to High
Engine Temp
5 : Steering Column Is Locked
6 : Step on Brake to Release Park
Brake
7 : Turn Steering Wheel, Turn Key
Off, Then On 9 :
Turn Steering Wheel, Start
Vehicle Again
10 : Brakes Overheated
11 : Brakes Worn
12 : Vehicle Overloaded
13 : Compressor Overheated
15 : Check High Mounted
Brake Lamp
16 : Check Brake Lamps
17 : Headlamp Leveling Malfunction
18 : Left Low Beam Failure
19 : Check Rear Fog Lamp
20 : Check Right Low Beam Lamp
21 : Check Left Position Lamp
22 : Check Right Position Lamp
23 : Reversing Lamp Failure
24 : License Plate Lamp Failure
25 : Check Left Front Turn
Signal Lamp
26 : Left Rear Turn Indicator Failure
27 : Check Right Front Turn
Signal Lamp 28 :
Check Right Rear Turn
Signal Lamp
35 : Replace Battery In Remote Key
36 : Stabilitrak/Electronic Stability
Control (ESC) Initializing
49 : Lane Departure Warning
Unavailable
52 : Change Timing Belt
53 : Tighten Gas Cap
56 : Pressure Imbalance Front
57 : Pressure Imbalance Rear
59 : Open, Then Close Driver
Window
60 : Open, Then Close Passenger
Window
61 : Open, Then Close Left Rear
Window
62 : Open, Then Close Right Rear
Window
65 : Theft Attempted
66 : Service Theft Alarm
67 : Service Steering Column Lock
68 : Service Power Steering, Drive
with Care
Page 132 of 351
Chevrolet Sonic Owner Manual (GMNA-Localizing-U.S./Canada-12461769) -
2019 - crc - 5/21/18
Instruments and Controls 131
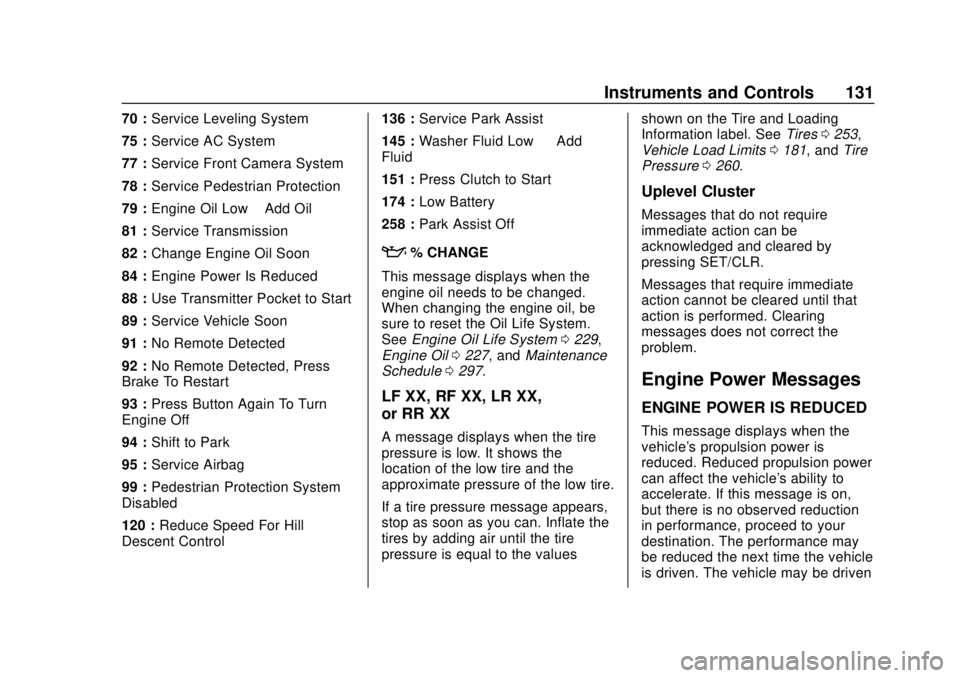
70 :Service Leveling System
75 : Service AC System
77 : Service Front Camera System
78 : Service Pedestrian Protection
79 : Engine Oil Low –Add Oil
81 : Service Transmission
82 : Change Engine Oil Soon
84 : Engine Power Is Reduced
88 : Use Transmitter Pocket to Start
89 : Service Vehicle Soon
91 : No Remote Detected
92 : No Remote Detected, Press
Brake To Restart
93 : Press Button Again To Turn
Engine Off
94 : Shift to Park
95 : Service Airbag
99 : Pedestrian Protection System
Disabled
120 : Reduce Speed For Hill
Descent Control 136 :
Service Park Assist
145 : Washer Fluid Low —Add
Fluid
151 : Press Clutch to Start
174 : Low Battery
258 : Park Assist Off
:% CHANGE
This message displays when the
engine oil needs to be changed.
When changing the engine oil, be
sure to reset the Oil Life System.
See Engine Oil Life System 0229,
Engine Oil 0227, and Maintenance
Schedule 0297.
LF XX, RF XX, LR XX,
or RR XX
A message displays when the tire
pressure is low. It shows the
location of the low tire and the
approximate pressure of the low tire.
If a tire pressure message appears,
stop as soon as you can. Inflate the
tires by adding air until the tire
pressure is equal to the values shown on the Tire and Loading
Information label. See
Tires0253,
Vehicle Load Limits 0181, and Tire
Pressure 0260.
Uplevel Cluster
Messages that do not require
immediate action can be
acknowledged and cleared by
pressing SET/CLR.
Messages that require immediate
action cannot be cleared until that
action is performed. Clearing
messages does not correct the
problem.
Engine Power Messages
ENGINE POWER IS REDUCED
This message displays when the
vehicle's propulsion power is
reduced. Reduced propulsion power
can affect the vehicle's ability to
accelerate. If this message is on,
but there is no observed reduction
in performance, proceed to your
destination. The performance may
be reduced the next time the vehicle
is driven. The vehicle may be driven
Page 137 of 351
Chevrolet Sonic Owner Manual (GMNA-Localizing-U.S./Canada-12461769) -
2019 - crc - 5/21/18
136 Lighting
;:Turns on the parking lamps
including all lamps except the
headlamps.
5: Turns the headlamps on
together with the parking lamps and
instrument panel lights. A warning
chime sounds if the driver door is
opened when the ignition switch is
off and the headlamps are on.
#: If equipped with fog lamps,
press to turn the lamps on or off.
See Fog Lamps 0138.
When the lights are on,
;will be
lit. See Lamps On Reminder 0125.
Headlamp High/
Low-Beam Changer
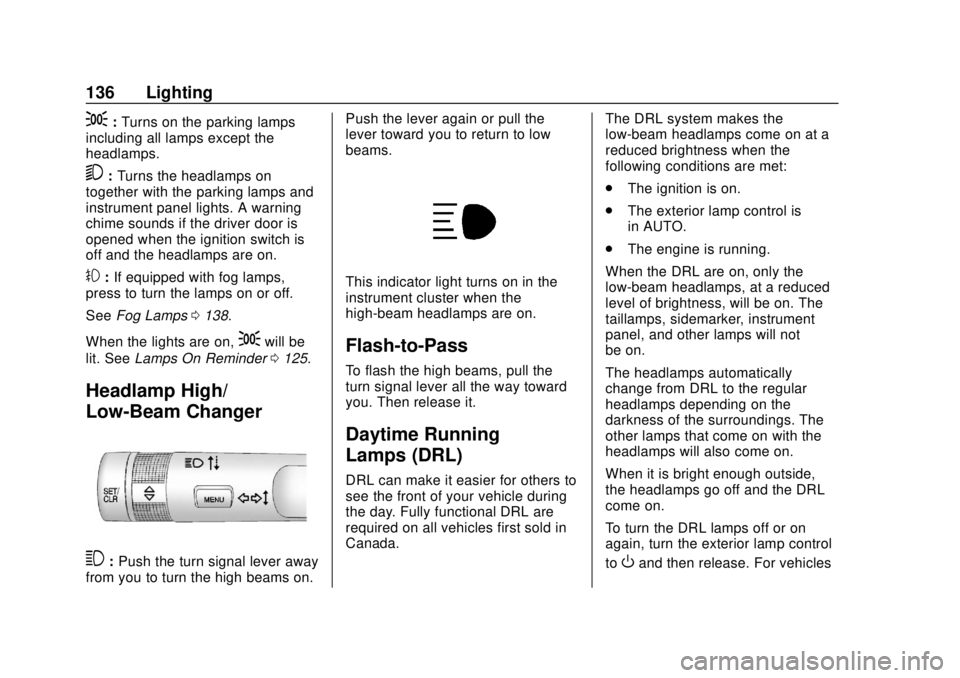
3:Push the turn signal lever away
from you to turn the high beams on. Push the lever again or pull the
lever toward you to return to low
beams.
This indicator light turns on in the
instrument cluster when the
high-beam headlamps are on.
Flash-to-Pass
To flash the high beams, pull the
turn signal lever all the way toward
you. Then release it.
Daytime Running
Lamps (DRL)
DRL can make it easier for others to
see the front of your vehicle during
the day. Fully functional DRL are
required on all vehicles first sold in
Canada.
The DRL system makes the
low-beam headlamps come on at a
reduced brightness when the
following conditions are met:
.
The ignition is on.
. The exterior lamp control is
in AUTO.
. The engine is running.
When the DRL are on, only the
low-beam headlamps, at a reduced
level of brightness, will be on. The
taillamps, sidemarker, instrument
panel, and other lamps will not
be on.
The headlamps automatically
change from DRL to the regular
headlamps depending on the
darkness of the surroundings. The
other lamps that come on with the
headlamps will also come on.
When it is bright enough outside,
the headlamps go off and the DRL
come on.
To turn the DRL lamps off or on
again, turn the exterior lamp control
to
Oand then release. For vehicles
Page 139 of 351
Chevrolet Sonic Owner Manual (GMNA-Localizing-U.S./Canada-12461769) -
2019 - crc - 5/21/18
138 Lighting
Turn and Lane-Change
Signals
Move the lever all the way up or
down to signal a turn.
An arrow on the instrument cluster
will flash in the direction of the turn
or lane change.
Raise or lower the lever until the
arrow starts to flash to signal a lane
change. Hold it there until the lane
change is completed. If the lever is
briefly pressed and released, the
turn signal flashes three times.
The lever returns to its neutral
position when it is released.If after signaling a turn or lane
change the arrow flashes rapidly or
does not come on, a signal bulb
may be burned out. Replace any
burned out bulbs. If a bulb is not
burned out, check the fuse.
See
Fuses and Circuit Breakers
0 248 orBulb Replacement 0245.
Turn Signal On Chime
If the turn signal is left on for more
than 1.2 km (0.75 mi), a chime will
sound at each flash of the turn
signal. To turn the chime off, move
the turn signal lever to the neutral
position.
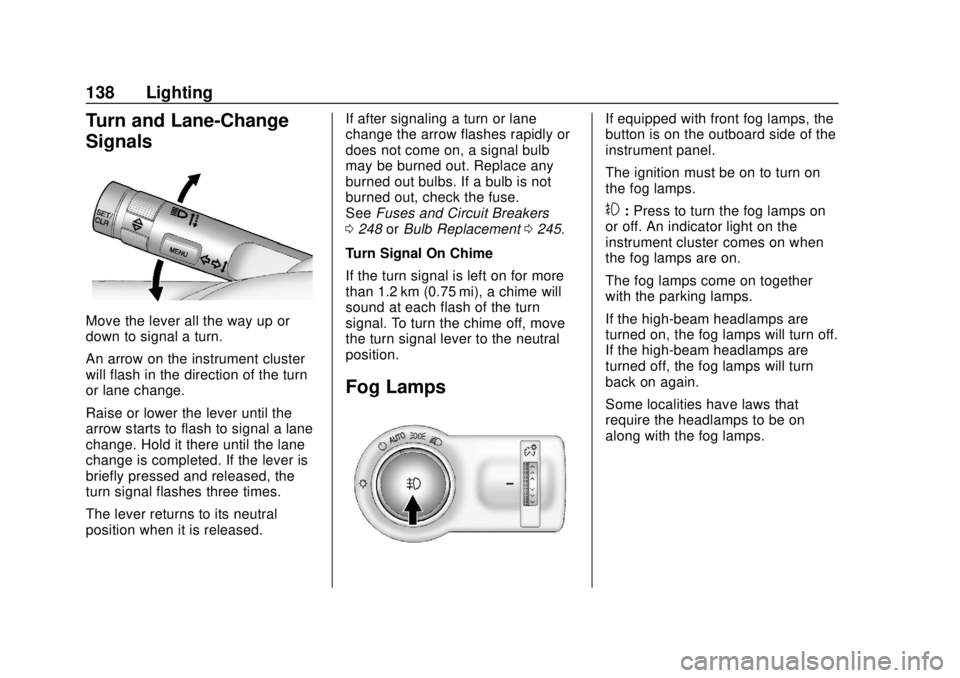
Fog Lamps
If equipped with front fog lamps, the
button is on the outboard side of the
instrument panel.
The ignition must be on to turn on
the fog lamps.
#: Press to turn the fog lamps on
or off. An indicator light on the
instrument cluster comes on when
the fog lamps are on.
The fog lamps come on together
with the parking lamps.
If the high-beam headlamps are
turned on, the fog lamps will turn off.
If the high-beam headlamps are
turned off, the fog lamps will turn
back on again.
Some localities have laws that
require the headlamps to be on
along with the fog lamps.
Page 143 of 351
Chevrolet Sonic Owner Manual (GMNA-Localizing-U.S./Canada-12461769) -
2019 - crc - 5/21/18
142 Infotainment System
Infotainment
System
Introduction
Introduction . . . . . . . . . . . . . . . . . . . 142
Overview . . . . . . . . . . . . . . . . . . . . . 143
Using the System . . . . . . . . . . . . 145
Radio
AM-FM Radio . . . . . . . . . . . . . . . . 147
Satellite Radio . . . . . . . . . . . . . . . . 149
Radio Reception . . . . . . . . . . . . . . 149
Backglass Antenna . . . . . . . . . . . 150
Multi-Band Antenna . . . . . . . . . . 150
Audio Players
Avoiding Untrusted MediaDevices . . . . . . . . . . . . . . . . . . . . . 150
USB Port . . . . . . . . . . . . . . . . . . . . . 150
Auxiliary Jack . . . . . . . . . . . . . . . . 153
Bluetooth Audio . . . . . . . . . . . . . . 154
OnStar System
OnStar System . . . . . . . . . . . . . . . 155
Phone
Bluetooth (Overview) . . . . . . . . . 156
Bluetooth (Pairing and Using a Phone) . . . . . . . . . . . . . . . . . . . . . . 157 Apple CarPlay and
Android Auto . . . . . . . . . . . . . . . . 162
Settings
Settings . . . . . . . . . . . . . . . . . . . . . . 163
Trademarks and License
Agreements
Trademarks and LicenseAgreements . . . . . . . . . . . . . . . . . 167
Introduction
Read the following pages to
become familiar with the features.
{Warning
Taking your eyes off the road for
too long or too often while using
any infotainment feature can
cause a crash. You or others
could be injured or killed. Do not
give extended attention to
infotainment tasks while driving.
Limit your glances at the vehicle
displays and focus your attention
on driving. Use voice commands
whenever possible.
The infotainment system has built-in
features intended to help avoid
distraction by disabling some
functions when driving. These
functions may gray out when they
are unavailable. Many infotainment
features are also available through
the instrument cluster and steering
wheel controls.
Page 188 of 351
Chevrolet Sonic Owner Manual (GMNA-Localizing-U.S./Canada-12461769) -
2019 - crc - 5/23/18
Driving and Operating 187
2. Brake using firm and steadypressure. Do not pump the
brakes repeatedly. This may
deplete power assist, requiring
increased brake pedal force.
3. Shift the vehicle to N (Neutral). This can be done while the
vehicle is moving. Continue
braking and steer the vehicle to
a safe location.
4. Come to a complete stop.
5. Shift to P (Park) with an automatic transmission,
or Neutral with a manual
transmission.
6. Continue to hold the brake pedal, then set the parking
brake. See Parking Brake
0 202.
7. Push the key all the way in toward the steering column,
then turn the ignition to
LOCK/OFF.
8. Remove the key.
9. Release the brake pedal.Caution
Use the correct key, make sure it
is all the way in —or pushed all
the way in toward the steering
column when turning off the
vehicle —and turn it only with
your hand.
1 (ACC/ACCESSORY) : This
position allows features such as the
infotainment system to operate
while the vehicle is off. It also
unlocks the steering column,
if equipped with a locking steering
column. Use this position if the
vehicle must be pushed or towed.
See Retained Accessory Power
(RAP) 0192.
From ON/RUN, push the key all the
way in toward the steering column,
then turn the key to ACC/
ACCESSORY.
If the key is left in ACC/
ACCESSORY with the engine off,
the battery could drain and the
vehicle may not start. A warning chime will sound when
the driver door is opened and the
key is in the ignition.
2 (ON/RUN) :
This position can be
used to operate the electrical
accessories and to display some
instrument cluster warning and
indicator lights. This position can
also be used for service and
diagnostics, and to verify the proper
operation of the malfunction
indicator lamp as may be required
for emission inspection purposes.
The switch stays in this position
when the engine is running. The
transmission is also unlocked in this
position on automatic transmission
vehicles.
If the key is left in ON/RUN with the
engine off, the battery could drain
and the vehicle may not start.
3 (START) : This is the position that
starts the engine. When the engine
starts, release the key. The ignition
returns to ON/RUN for driving.