run flat CHEVROLET SPARK 2013 3.G Owners Manual
[x] Cancel search | Manufacturer: CHEVROLET, Model Year: 2013, Model line: SPARK, Model: CHEVROLET SPARK 2013 3.GPages: 350, PDF Size: 5.89 MB
Page 273 of 350
Black plate (55,1)Chevrolet Spark Owner Manual - 2013 - crc - 9/11/12
Vehicle Care 10-55
6 mm (0.25 in), the tire is too
severely damaged for the tire
sealant and compressor kit to be
effective.
If the tire has a puncture less than a
6 mm (0.25 in) in the tread area of
the tire, seeTire Sealant and
Compressor Kit on page 10‑55.
Tire Sealant and
Compressor Kit
{WARNING
Idling a vehicle in an enclosed
area with poor ventilation is
dangerous. Engine exhaust may
enter the vehicle. Engine exhaust
contains carbon monoxide (CO)
which cannot be seen or smelled.
It can cause unconsciousness
and even death. Never run the
engine in an enclosed area that
has no fresh air ventilation. For
more information, see Engine
Exhaust on page 9‑20.
{WARNING
Overinflating a tire could cause
the tire to rupture and you or
others could be injured. Be sure
to read and follow the tire sealant
and compressor kit instructions
and inflate the tire to its
recommended pressure. Do not
exceed the recommended
pressure.
{WARNING
Storing the tire sealant and
compressor kit or other
equipment in the passenger
compartment of the vehicle could
cause injury. In a sudden stop or
collision, loose equipment could
strike someone. Store the tire
sealant and compressor kit in its
original location. If this vehicle has a tire sealant and
compressor kit, there may not be a
spare tire or tire changing
equipment, and on some vehicles
there may not be a place to store
a tire.
The tire sealant and compressor
can be used to temporarily seal
punctures up to 6 mm (0.25 in) in
the tread area of the tire. It can also
be used to inflate an
underinflated tire.
If the tire has been separated from
the wheel, has damaged sidewalls,
or has a large puncture, the tire is
too severely damaged for the tire
sealant and compressor kit to be
effective. See
Roadside Assistance
Program on page 13‑5.
Read and follow all of the tire
sealant and compressor kit
instructions.
Page 276 of 350
Black plate (58,1)Chevrolet Spark Owner Manual - 2013 - crc - 9/11/12
10-58 Vehicle Care
If the vehicle has an accessory
power outlet, do not use the
cigarette lighter.
If the vehicle only has a cigarette
lighter, use the cigarette lighter.
Do not pinch the power plug
cord in the door or window.
9. Start the vehicle. The vehicle must be running while using the
air compressor.
10. Press the on/off button (5) to turn the tire sealant and
compressor kit on.
The compressor will inject
sealant and air into the tire.
The pressure gauge (7) will
initially show a high pressure
while the compressor pushes
the sealant into the tire. Once
the sealant is completely
dispersed into the tire, the
pressure will quickly drop and
start to rise again as the tire
inflates with air only. 11. Inflate the tire to the
recommended inflation
pressure using the pressure
gauge (7). The recommended
inflation pressure can be found
on the Tire and Loading
Information label. See Tire
Pressure on page 10‑41.
The pressure gauge (7) may
read higher than the actual tire
pressure while the compressor
is on. Turn the compressor off
to get an accurate pressure
reading. The compressor may
be turned on/off until the
correct pressure is reached.
Notice: If the recommended
pressure cannot be reached after
approximately 25 minutes, the
vehicle should not be driven
farther. The tire is too severely
damaged and the tire sealant and
compressor kit cannot inflate the
tire. Remove the power plug from
the accessory power outlet and
unscrew the inflating hose from the tire valve. See
Roadside
Assistance Program on
page 13‑5.
12. Press the on/off button (5) to
turn the tire sealant and
compressor kit off.
The tire is not sealed and will
continue to leak air until the
vehicle is driven and the
sealant is distributed in the tire.
Therefore, Steps 13–21 must
be done immediately after
Step 12.
Be careful while handling the
tire sealant and compressor kit
as it could be warm after
usage.
13. Unplug the power plug (9) from the accessory power outlet in
the vehicle.
14. Turn the sealant/air hose (2) counterclockwise to remove it
from the tire valve stem.
Page 279 of 350
Black plate (61,1)Chevrolet Spark Owner Manual - 2013 - crc - 9/11/12
Vehicle Care 10-61
6. Plug the power plug (9) into theaccessory power outlet in the
vehicle. Unplug all items from
other accessory power outlets.
See Power Outlets on page 5‑5.
If the vehicle has an accessory
power outlet, do not use the
cigarette lighter.
If the vehicle only has a cigarette
lighter, use the cigarette lighter.
Do not pinch the power plug
cord in the door or window.
7. Start the vehicle. The vehicle must be running while using the
air compressor.
8. Press the on/off button (5) to turn the tire sealant and
compressor kit on.
The compressor will inflate the
tire with air only. 9. Inflate the tire to the
recommended inflation pressure
using the pressure gauge (7).
The recommended inflation
pressure can be found on the
Tire and Loading Information
label. See Tire Pressure on
page 10‑41.
The pressure gauge (7) may
read higher than the actual tire
pressure while the compressor is
on. Turn the compressor off to
get an accurate pressure
reading. The compressor may
be turned on/off until the correct
pressure is reached.
If the tire is inflated higher than
the recommended pressure,
adjust the excess pressure by
pressing the pressure deflation
button (8) until the proper
pressure reading is reached.
This option is only functional
when using the air only
hose (10). Notice:
If the recommended
pressure cannot be reached after
approximately 25 minutes, the
vehicle should not be driven
farther. The tire is too severely
damaged and the tire sealant and
compressor kit cannot inflate the
tire. Remove the power plug from
the accessory power outlet and
unscrew the inflating hose from
the tire valve. See Roadside
Assistance Program on
page 13‑5.
10. Press the on/off button (5) to turn the tire sealant and
compressor kit off.
Be careful while handling the
compressor as it could be
warm after usage.
11. Unplug the power plug (9) from the accessory power outlet in
the vehicle.
12. Turn the air only hose (10) counterclockwise to remove it
from the tire valve stem.
Page 280 of 350
Black plate (62,1)Chevrolet Spark Owner Manual - 2013 - crc - 9/11/12
10-62 Vehicle Care
13. Replace the tire valvestem cap.
14. Return the air only hose (10) and power plug (9) back to
their original storage location.
15. Return the equipment to its original storage location in the
vehicle.
The tire sealant and compressor kit
has accessory adapters located in a
compartment on the bottom of its
housing that can be used to inflate
air mattresses, balls, etc.
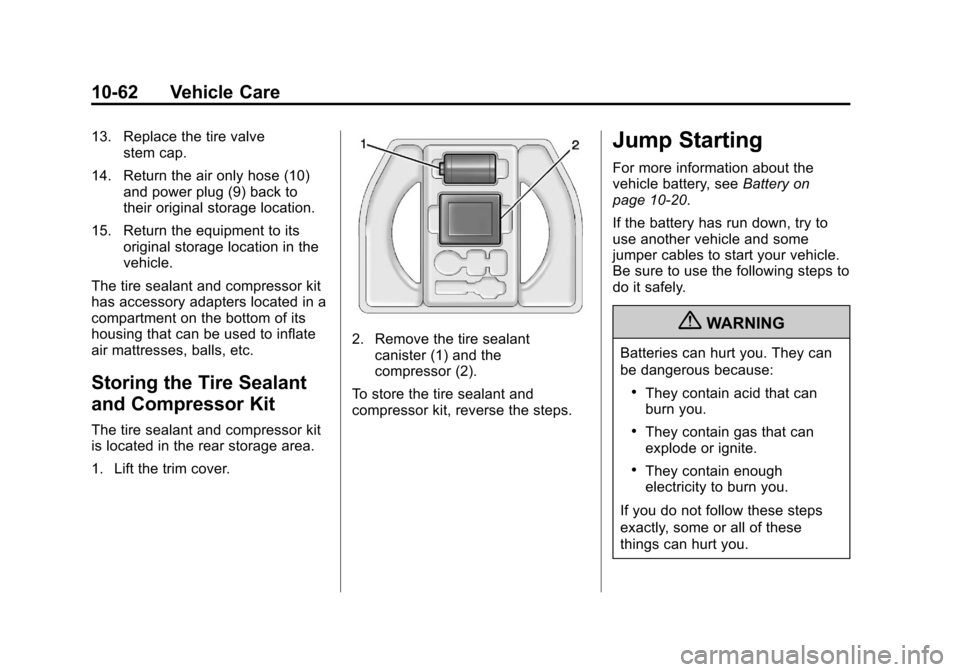
Storing the Tire Sealant
and Compressor Kit
The tire sealant and compressor kit
is located in the rear storage area.
1. Lift the trim cover.
2. Remove the tire sealant canister (1) and the
compressor (2).
To store the tire sealant and
compressor kit, reverse the steps.
Jump Starting
For more information about the
vehicle battery, see Battery on
page 10‑20.
If the battery has run down, try to
use another vehicle and some
jumper cables to start your vehicle.
Be sure to use the following steps to
do it safely.
{WARNING
Batteries can hurt you. They can
be dangerous because:
.They contain acid that can
burn you.
.They contain gas that can
explode or ignite.
.They contain enough
electricity to burn you.
If you do not follow these steps
exactly, some or all of these
things can hurt you.
Page 283 of 350
Black plate (65,1)Chevrolet Spark Owner Manual - 2013 - crc - 9/11/12
Vehicle Care 10-65
9. Start the engine in the vehiclewith the good battery and run
the engine at idle speed for at
least four minutes.
10. Try to start the vehicle that had the dead battery. If it will not
start after a few tries, it
probably needs service.
Notice: If the jumper cables are
connected or removed in the
wrong order, electrical shorting
may occur and damage the
vehicle. The repairs would not be
covered by the vehicle warranty.
Always connect and remove the
jumper cables in the correct
order, making sure that the
cables do not touch each other or
other metal.
Jumper Cable Removal
Reverse the sequence exactly when
removing the jumper cables.Towing
Towing the Vehicle
Notice: Incorrectly towing a
disabled vehicle may cause
damage. The damage would not
be covered by the vehicle
warranty.
Have the vehicle towed on a flatbed
car carrier or a wheel lift tow truck.
If a wheel lift tow truck is used, the
drive wheels cannot contact the
road while the vehicle is being
towed. A wheel dolly must be used
to lift all drive wheels off the ground.
Consult your dealer or a
professional towing service if the
disabled vehicle must be towed.
To tow the vehicle behind another
vehicle for recreational purposes,
such as behind a motor home, see
“Recreational Vehicle Towing” in this
section.
Recreational Vehicle
Towing
Recreational vehicle towing refers to
towing the vehicle behind another
vehicle –such as behind a motor
home. The two most common types
of recreational vehicle towing are
known as dinghy towing and dolly
towing. Dinghy towing is towing the
vehicle with all four wheels on the
ground. Dolly towing is towing the
vehicle with two wheels on the
ground and two wheels up on a
device known as a dolly.
Here are some important things to
consider before recreational vehicle
towing:
.The towing capacity of the
towing vehicle. Be sure to read
the tow vehicle manufacturer's
recommendations.
.How far the vehicle will be
towed. Some vehicles have
restrictions on how far and how
long they can tow.
Page 342 of 350

Black plate (4,1)Chevrolet Spark Owner Manual - 2013 - crc - 9/11/12
i-4 INDEX
Engine (cont'd)Overheating . . . . . . . . . . . . . . . . 10-16
Pressure Light . . . . . . . . . . . . . . . . 5-18
Reduced Power Light . . . . . . . . . 5-19
Running While Parked . . . . . . . . 9-21
Starting . . . . . . . . . . . . . . . . . . . . . . . 9-15
Event Data Recorders . . . . . . . . 13-14
Exit Lighting . . . . . . . . . . . . . . . . . . . . 6-5
Extender, Safety Belt . . . . . . . . . . 3-16
Exterior Lamp Controls . . . . . . . . . 6-1
Exterior Lamps Off Reminder . . . 6-1
F
Filter, Engine Air Cleaner . . . . . . . . . .10-11
Flash-to-Pass . . . . . . . . . . . . . . . . . . . 6-2
Flashers, Hazard Warning . . . . . . 6-2
Flat Tire . . . . . . . . . . . . . . . . . . . . . . 10-53
Floor Mats . . . . . . . . . . . . . . . . . . . . 10-74
Fluid
Automatic Transmission . . . . 10-10
Brakes . . . . . . . . . . . . . . . . . . . . . . 10-19
Washer . . . . . . . . . . . . . . . . . . . . . 10-17
Fog Lamps Bulb Replacement . . . . . . . . . . . . . 6-3
Folding Mirrors . . . . . . . . . . . . . . . . 2-11 Front Fog Lamp
Light . . . . . . . . . . . . . . . . . . . . . . . . . . 5-20
Front Seat Armrest . . . . . . . . . . . . . 3-5
Front Seats Adjustment . . . . . . . . . . . . . . . . . . . . 3-3
Heated . . . . . . . . . . . . . . . . . . . . . . . . 3-6
Fuel . . . . . . . . . . . . . . . . . . . . . . . . . . . 9-32
Additives . . . . . . . . . . . . . . . . . . . . . 9-33
Economy Driving . . . . . . . . . . . . . 1-15
Filling a Portable FuelContainer . . . . . . . . . . . . . . . . . . . 9-36
Filling the Tank . . . . . . . . . . . . . . . 9-34
Foreign Countries . . . . . . . . . . . . 9-33
Gasoline Specifications . . . . . . . 9-33
Gauge . . . . . . . . . . . . . . . . . . . . . . . . . 5-8
Low Fuel Warning Light . . . . . . . 5-18
Recommended . . . . . . . . . . . . . . . 9-32
Requirements, California . . . . . 9-33
Fuses Engine CompartmentFuse Block . . . . . . . . . . . . . . . . 10-28
Fuses and Circuit Breakers . . . . . . . . . . . . . . . . . . 10-27
Instrument Panel Fuse Block . . . . . . . . . . . . . . . . . . . . . . 10-32
G
Gasoline
Specifications . . . . . . . . . . . . . . . . . 9-33
Gauges Fuel . . . . . . . . . . . . . . . . . . . . . . . . . . . 5-8
Odometer . . . . . . . . . . . . . . . . . . . . . . 5-8
Speedometer . . . . . . . . . . . . . . . . . . 5-8
Tachometer . . . . . . . . . . . . . . . . . . . . 5-8
Trip Odometer . . . . . . . . . . . . . . . . . 5-8
Warning Lights andIndicators . . . . . . . . . . . . . . . . . . . . 5-6
General Information Service and Maintenance . . . . . 11-1
Towing . . . . . . . . . . . . . . . . . . . . . . . . 9-36
Vehicle Care . . . . . . . . . . . . . . . . . . 10-2
Glove Box . . . . . . . . . . . . . . . . . . . . . . 4-1
GM Mobility Reimbursement
Program . . . . . . . . . . . . . . . . . . . . . . 13-5
H
Halogen Bulbs . . . . . . . . . . . . . . . . 10-24
Hands-Free Phone . . . . . . . . . . . . 7-28
Hazard Warning Flashers . . . . . . . 6-2
Head Restraints . . . . . . . . . . . . . . . . 3-2