lock CHEVROLET SPARK 2017 4.G Owners Manual
[x] Cancel search | Manufacturer: CHEVROLET, Model Year: 2017, Model line: SPARK, Model: CHEVROLET SPARK 2017 4.GPages: 331, PDF Size: 5.56 MB
Page 234 of 331
Chevrolet Spark Owner Manual (GMNA-Localizing-U.S./Canada-9956101) -
2017 - crc - 4/25/16
Vehicle Care 233
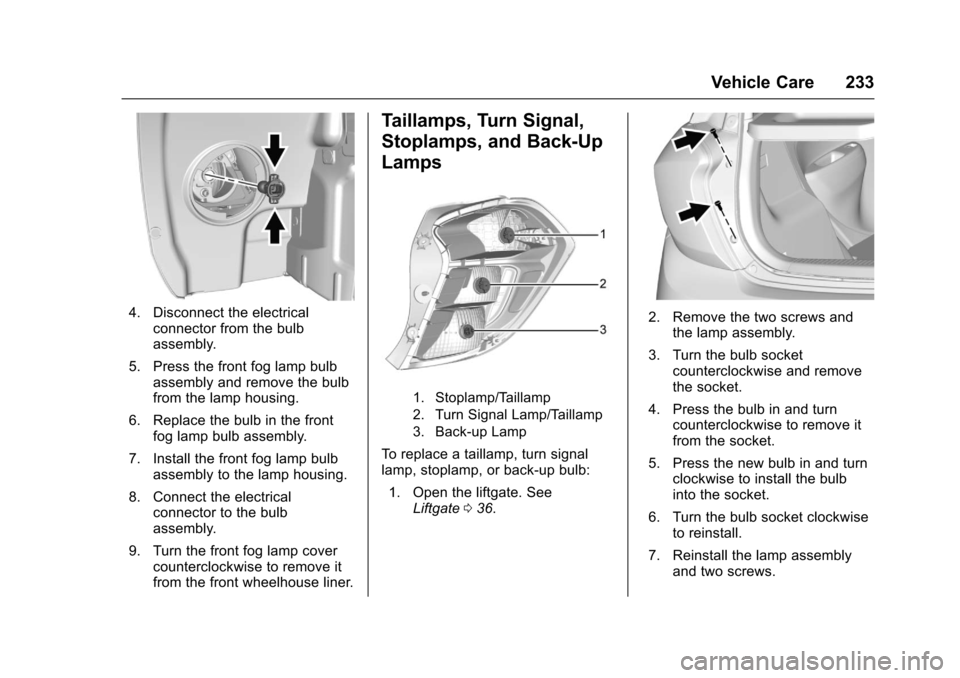
4. Disconnect the electricalconnector from the bulb
assembly.
5. Press the front fog lamp bulb assembly and remove the bulb
from the lamp housing.
6. Replace the bulb in the front fog lamp bulb assembly.
7. Install the front fog lamp bulb assembly to the lamp housing.
8. Connect the electrical connector to the bulb
assembly.
9. Turn the front fog lamp cover counterclockwise to remove it
from the front wheelhouse liner.
Taillamps, Turn Signal,
Stoplamps, and Back-Up
Lamps
1. Stoplamp/Taillamp
2. Turn Signal Lamp/Taillamp
3. Back-up Lamp
To replace a taillamp, turn signal
lamp, stoplamp, or back-up bulb:
1. Open the liftgate. See Liftgate 036.
2. Remove the two screws and
the lamp assembly.
3. Turn the bulb socket counterclockwise and remove
the socket.
4. Press the bulb in and turn counterclockwise to remove it
from the socket.
5. Press the new bulb in and turn clockwise to install the bulb
into the socket.
6. Turn the bulb socket clockwise to reinstall.
7. Reinstall the lamp assembly and two screws.
Page 235 of 331

Chevrolet Spark Owner Manual (GMNA-Localizing-U.S./Canada-9956101) -
2017 - crc - 4/25/16
234 Vehicle Care
License Plate Lamp
1. Attachment Screws
2. License Plate Bulb
3. Bulb Socket
To replace a license plate
lamp bulb:1. Remove the two screws (1) from the license plate lamp
assembly.
2. Turn and pull the license plate lamp assembly down.
3. Turn the bulb socket (3) counterclockwise and pull it out
of the lamp assembly.
4. Pull the bulb (2) straight out of the socket.
5. Push the new bulb into the socket.
6. Install the bulb socket (3) by turning clockwise into the
license plate lamp assembly.
7. Replace the license plate lamp assembly by using the two
screws to secure.Replacement Bulbs
Exterior Lamp Bulb
Number
Back-Up Lamps W16W
Fog Lamps PSX24W
Front Turn Signal/
Parking Lamps 7444NA
Front Sidemarker W5W LL
High/Low-Beam
Headlamp H13
License
Plate Lamp W5W LL
Rear Turn Signal/
Taillamps WY21W
Stoplamp/
Taillamps W21W LL
For replacement bulbs not listed
here, contact your dealer.
Page 237 of 331
Chevrolet Spark Owner Manual (GMNA-Localizing-U.S./Canada-9956101) -
2017 - crc - 4/25/16
236 Vehicle Care
Engine Compartment
Fuse Block
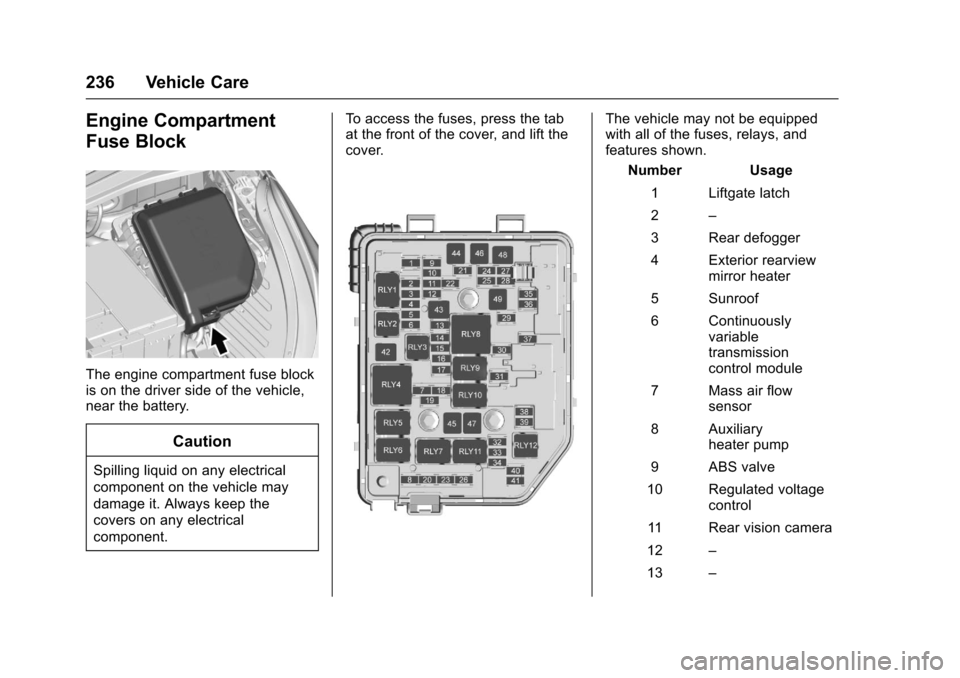
The engine compartment fuse block
is on the driver side of the vehicle,
near the battery.
Caution
Spilling liquid on any electrical
component on the vehicle may
damage it. Always keep the
covers on any electrical
component.To access the fuses, press the tab
at the front of the cover, and lift the
cover.
The vehicle may not be equipped
with all of the fuses, relays, and
features shown.
Number Usage
1 Liftgate latch
2 –
3 Rear defogger
4 Exterior rearview mirror heater
5 Sunroof
6 Continuously variable
transmission
control module
7 Mass air flow sensor
8 Auxiliary heater pump
9 ABS valve
10 Regulated voltage control
11 Rear vision camera
12 –
13 –
Page 238 of 331

Chevrolet Spark Owner Manual (GMNA-Localizing-U.S./Canada-9956101) -
2017 - crc - 4/25/16
Vehicle Care 237
Number Usage14 Engine control module/
Transmission
control module
15 Fuel injection control module/
Starter motor
16 Fuel pump motor
17 Engine control module 1
18 Engine control module 2
19 Injector/Ignition
20 A/C system
21 Intelligent battery sensor
22 Electric steering column lock
23 Cooling fan –low
24 –
25 Exterior rearview mirror motor control Number Usage
26 Engine control module/
Transmission
control module
battery
27 Canister vent solenoid
28 Brake pedal switch
29 Automatic occupant sensing
30 Headlamp leveling motor
31 Horn
32 Front fog lamps
33 Left high-beam headlamp
34 Right high-beam headlamp
35 –
36 Rear wiper
37 Left cornering lamp
38 Washer motor Number Usage
39 Right cornering lamp
40 –
41 –
42 Starter 2
43 In-panel bussed electrical center
44 Automated manual transmission
45 Starter 1
46 ABS pump
47 Cooling fan –high
48 Front wiper motor
49 Accessory/ Retained
accessory power
RLY1 Rear defogger
RLY2 Transmission control module
RLY3 Fuel pump motor
RLY4 Starter 2
RLY5 A/C system
Page 239 of 331

Chevrolet Spark Owner Manual (GMNA-Localizing-U.S./Canada-9956101) -
2017 - crc - 4/25/16
238 Vehicle Care
Number UsageRLY6 Auxiliary heater pump
RLY7 Cooling fan –low
RLY8 Run/Crank
RLY9 WR/TRN
RLY10 Starter 1 RLY11 Cooling fan –high
RLY12 Front fog lamps
Instrument Panel Fuse
Block
The instrument panel fuse block is
on the underside of the driver side
instrument panel.The vehicle may not be equipped
with all of the fuses, relays, and
features shown. Number Usage
ONSTAR OnStar HVAC
CNTR/ECC HVAC control
module/ECC
IPC Instrument panel cluster
TCM Transmission control module
RDO Radio
BCM1
(AT S&S) Body control
module 1 (CVT stop
and start)
SBSA/RPA SBSA/Rear parking assist
DLC Data link connector
ESCL Electric steering column lock
SDM Sensing and diagnostic module
TRANSD DC-DC converter – –
Page 253 of 331
Chevrolet Spark Owner Manual (GMNA-Localizing-U.S./Canada-9956101) -
2017 - crc - 4/25/16
252 Vehicle Care
The horn sounds twice to
signal the receiver is in relearn
mode and the TIRE LEARN or
TIRE LEARNING ACTIVE
message displays on the DIC
screen.
7. Start with the driver side front tire.
8. Place the relearn tool against the tire sidewall, near the valve
stem. Then press the button to
activate the TPMS sensor.
A horn chirp confirms that the
sensor identification code has
been matched to this tire and
wheel position.
9. Proceed to the passenger side front tire, and repeat the
procedure in Step 8.
10. Proceed to the passenger side rear tire, and repeat the
procedure in Step 8.
11. Proceed to the driver side rear tire, and repeat the procedure
in Step 8. The horn sounds two
times to indicate the sensor
identification code has been
matched to the driver side rear tire, and the TPMS sensor
matching process is no longer
active. The TIRE LEARN or
TIRE LEARNING ACTIVE
message on the DIC display
screen goes off.
12. Turn the ignition to LOCK/OFF or press ENGINE START/
STOP to turn the ignition off.
13. Set all four tires to the recommended air pressure
level as indicated on the Tire
and Loading Information label.
Tire Inspection
We recommend that the tires,
including the spare tire, if the
vehicle has one, be inspected
for signs of wear or damage at
least once a month.
Replace the tire if:
.The indicators at three or
more places around the tire
can be seen.
.There is cord or fabric
showing through the tire's
rubber.
.The tread or sidewall is
cracked, cut, or snagged
deep enough to show cord or
fabric.
.The tire has a bump, bulge,
or split.
.The tire has a puncture, cut,
or other damage that cannot
be repaired well because of
the size or location of the
damage.
Tire Rotation
Tires should be rotated every
12 000 km (7,500 mi). See
Maintenance Schedule 0281.
Tires are rotated to achieve a
more uniform wear for all tires.
The first rotation is the most
important.
Anytime unusual wear is
noticed, rotate the tires as soon
as possible, check for proper tire
inflation pressure, and check for
damaged tires or wheels. If the
unusual wear continues after the
Page 256 of 331
Chevrolet Spark Owner Manual (GMNA-Localizing-U.S./Canada-9956101) -
2017 - crc - 4/25/16
Vehicle Care 255
necessary to replace only one
axle set of worn tires, place the
new tires on the rear axle.
Winter tires with the same speed
rating as the original equipment
tires may not be available for H,
V, W, Y, and ZR speed rated
tires. Never exceed the winter
tires’maximum speed capability
when using winter tires with a
lower speed rating.
{Warning
Tires could explode during
improper service. Attempting
to mount or dismount a tire
could cause injury or death.
Only your dealer or authorized
tire service center should
mount or dismount the tires.
{Warning
Mixing tires of different sizes,
brands, or types may cause
loss of control of the vehicle,
resulting in a crash or other
vehicle damage. Use the
correct size, brand, and type
of tire on all wheels.
{Warning
Using bias-ply tires on the
vehicle may cause the wheel
rim flanges to develop cracks
after many miles of driving.
A tire and/or wheel could fail
suddenly and cause a crash.
Use only radial-ply tires with
the wheels on the vehicle.
If the vehicle tires must be
replaced with a tire that does not
have a TPC Spec number, make
sure they are the same size, load range, speed rating, and
construction (radial) as the
original tires.
Vehicles that have a tire
pressure monitoring system
could give an inaccurate
low-pressure warning if non-TPC
Spec rated tires are installed.
See
Tire Pressure Monitor
System 0248.
The Tire and Loading
Information Label indicates the
original equipment tires on the
vehicle. See Vehicle Load
Limits 0172.
Different Size Tires and
Wheels
If wheels or tires are installed that
are a different size than the original
equipment wheels and tires, vehicle
performance, including its braking,
ride and handling characteristics,
stability, and resistance to rollover
may be affected. If the vehicle has
electronic systems such as antilock
brakes, rollover airbags, roll bars,
Page 261 of 331

Chevrolet Spark Owner Manual (GMNA-Localizing-U.S./Canada-9956101) -
2017 - crc - 4/25/16
260 Vehicle Care
Warning (Continued)
causing injury or death. Find a
level place to change the tire. To
help prevent the vehicle from
moving:1. Set the parking brake firmly.
2. Put an automatictransmission in P (Park) or a
manual transmission in
1 (First) or R (Reverse).
3. Turn off the engine and do not restart while the vehicle
is raised.
4. Do not allow passengers to remain in the vehicle.
5. Place wheel blocks, if equipped, on both sides of
the tire at the opposite
corner of the tire being
changed.
When the vehicle has a flat tire (2),
use the following example as a
guide to assist in the placement of
the wheel blocks (1), if equipped.
1. Wheel Block (If Equipped)
2. Flat Tire
The following information explains
how to repair or change a tire.
Tire Changing
Removing the Spare Tire and
Tools
The spare tire and tools are located
in the storage compartment in the
rear of the vehicle.
To access the spare tire and tools: 1. Open the liftgate. See Liftgate 036.
2. Lift the trim cover.
3. Remove the jack, tools, and spare tire.
4. Place them near the tire being changed.
Removing the Flat Tire and
Installing the Spare Tire
1. Do a safety check beforeproceeding. See If a Tire Goes
Flat 0259.
Page 262 of 331

Chevrolet Spark Owner Manual (GMNA-Localizing-U.S./Canada-9956101) -
2017 - crc - 4/25/16
Vehicle Care 261
2. If there is a wheel cover,remove the wheel nut caps to
access the wheel nuts.
3. Turn the wheel wrench
counterclockwise to loosen the
wheel nuts. Do not remove
them yet.
4. Place the jack at the positionmarked with a half circle.
5. Attach the jack handleextension to the jack by sliding
the hook through the end of
the jack.
6. Turn the wheel wrench clockwise until the lift head is
firmly contacting the proper
lifting point nearest the flat tire.
{Warning
Getting under a vehicle when it is
lifted on a jack is dangerous.
If the vehicle slips off the jack,
you could be badly injured or
killed. Never get under a vehicle
when it is supported only by
a jack.
{Warning
Raising the vehicle with the jack
improperly positioned can
damage the vehicle and even
make the vehicle fall. To help
avoid personal injury and vehicle
(Continued)
Page 263 of 331
Chevrolet Spark Owner Manual (GMNA-Localizing-U.S./Canada-9956101) -
2017 - crc - 4/25/16
262 Vehicle Care
Warning (Continued)
damage, be sure to fit the jack lift
head into the proper location
before raising the vehicle.
{Warning
Lifting a vehicle and getting under
it to do maintenance or repairs is
dangerous without the
appropriate safety equipment and
training. If a jack is provided with
the vehicle, it is designed only for
changing a flat tire. If it is used for
anything else, you or others could
be badly injured or killed if the
vehicle slips off the jack. If a jack
is provided with the vehicle, only
use it for changing a flat tire.
7. Turn the wheel wrench clockwise to raise the vehicle
far enough off the ground so
there is enough room for the
spare tire to fit underneath the
wheel well. 8. Turn the wheel nuts
counterclockwise to
remove them.
9. Remove the flat tire.
{Warning
Rust or dirt on a wheel, or on the
parts to which it is fastened, can
make wheel nuts become loose
after time. The wheel could come
off and cause an accident. When
changing a wheel, remove any
rust or dirt from places where the
wheel attaches to the vehicle. In
an emergency, a cloth or a paper
towel can be used; however, use
a scraper or wire brush later to
remove all rust or dirt.
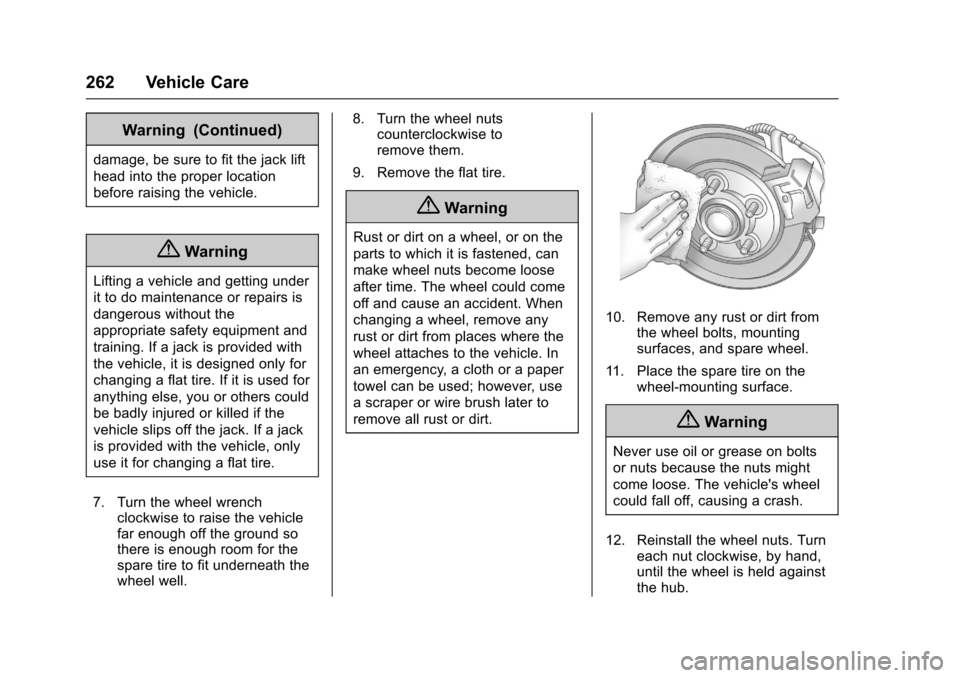
10. Remove any rust or dirt from the wheel bolts, mounting
surfaces, and spare wheel.
11. Place the spare tire on the wheel-mounting surface.
{Warning
Never use oil or grease on bolts
or nuts because the nuts might
come loose. The vehicle's wheel
could fall off, causing a crash.
12. Reinstall the wheel nuts. Turn each nut clockwise, by hand,
until the wheel is held against
the hub.