light CHEVROLET SPARK 2020 Get To Know Guide
[x] Cancel search | Manufacturer: CHEVROLET, Model Year: 2020, Model line: SPARK, Model: CHEVROLET SPARK 2020Pages: 16, PDF Size: 3.29 MB
Page 3 of 16
3
Refer to your Owner’s Manual to learn about the information being relayed by the lights, gauges and indicators on the instrument cluster.
See Introduction in your Owner’s Manual.
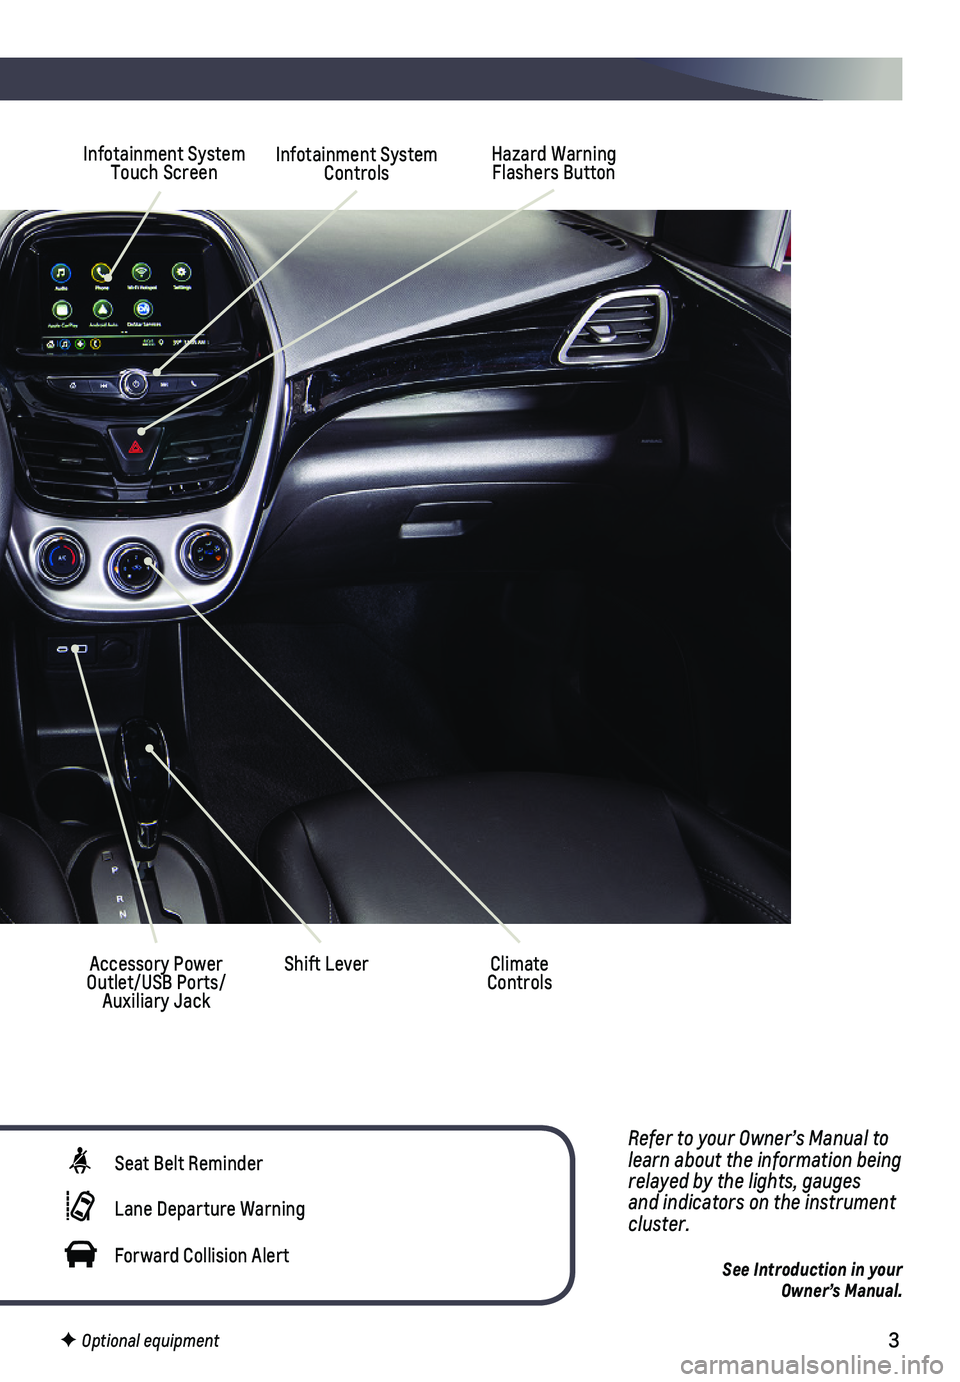
Hazard Warning Flashers Button
Accessory Power Outlet/USB Ports/Auxiliary Jack
Shift Lever
Infotainment System Touch ScreenInfotainment System Controls
Climate Controls
Seat Belt Reminder
Lane Departure Warning
Forward Collision Alert
F Optional equipment
Page 7 of 16
7
LIGHTING
EXTERIOR LAMPS
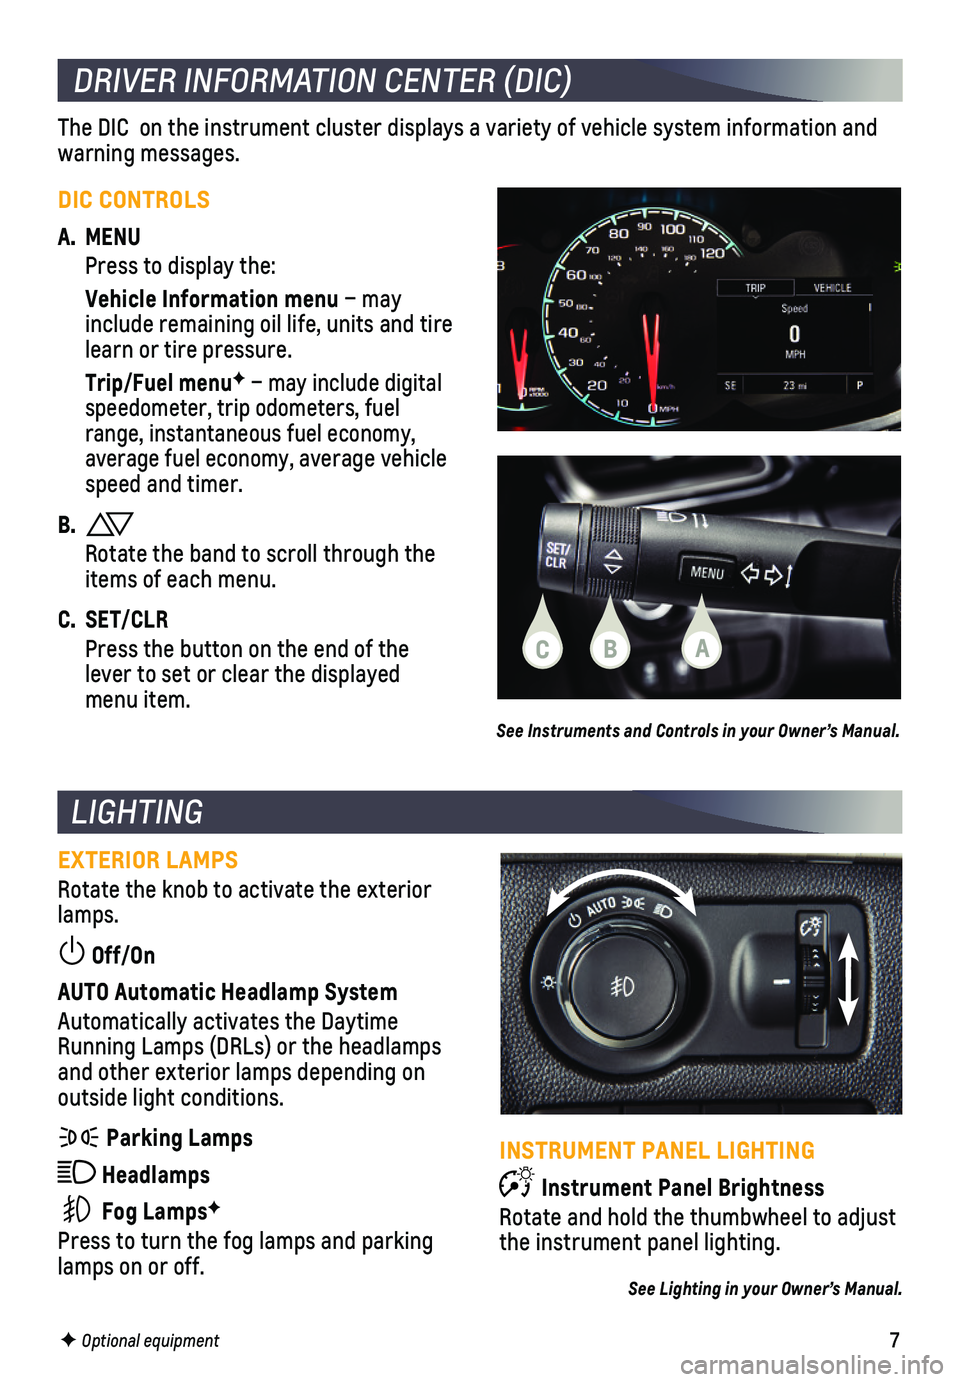
Rotate the knob to activate the exterior lamps.
Off/On
AUTO Automatic Headlamp System
Automatically activates the Daytime Running Lamps (DRLs) or the headlamps and other exterior lamps depending on outside light conditions.
Parking Lamps
Headlamps
Fog LampsF
Press to turn the fog lamps and parking lamps on or off.
F Optional equipment
INSTRUMENT PANEL LIGHTING
Instrument Panel Brightness
Rotate and hold the thumbwheel to adjust the instrument panel lighting.
See Lighting in your Owner’s Manual.
DRIVER INFORMATION CENTER (DIC)
The DIC on the instrument cluster displays a variety of vehicle system \
information and warning messages.
DIC CONTROLS
A. MENU
Press to display the:
Vehicle Information menu – may include remaining oil life, units and tire learn or tire pressure.
Trip/Fuel menuF – may include digital speedometer, trip odometers, fuel range, instantaneous fuel economy, average fuel economy, average vehicle speed and timer.
B.
Rotate the band to scroll through the items of each menu.
C. SET/CLR
Press the button on the end of the lever to set or clear the displayed menu item.
See Instruments and Controls in your Owner’s Manual.
CBA
Page 9 of 16
9
INFOTAINMENT SYSTEM
SETTING THE TIME
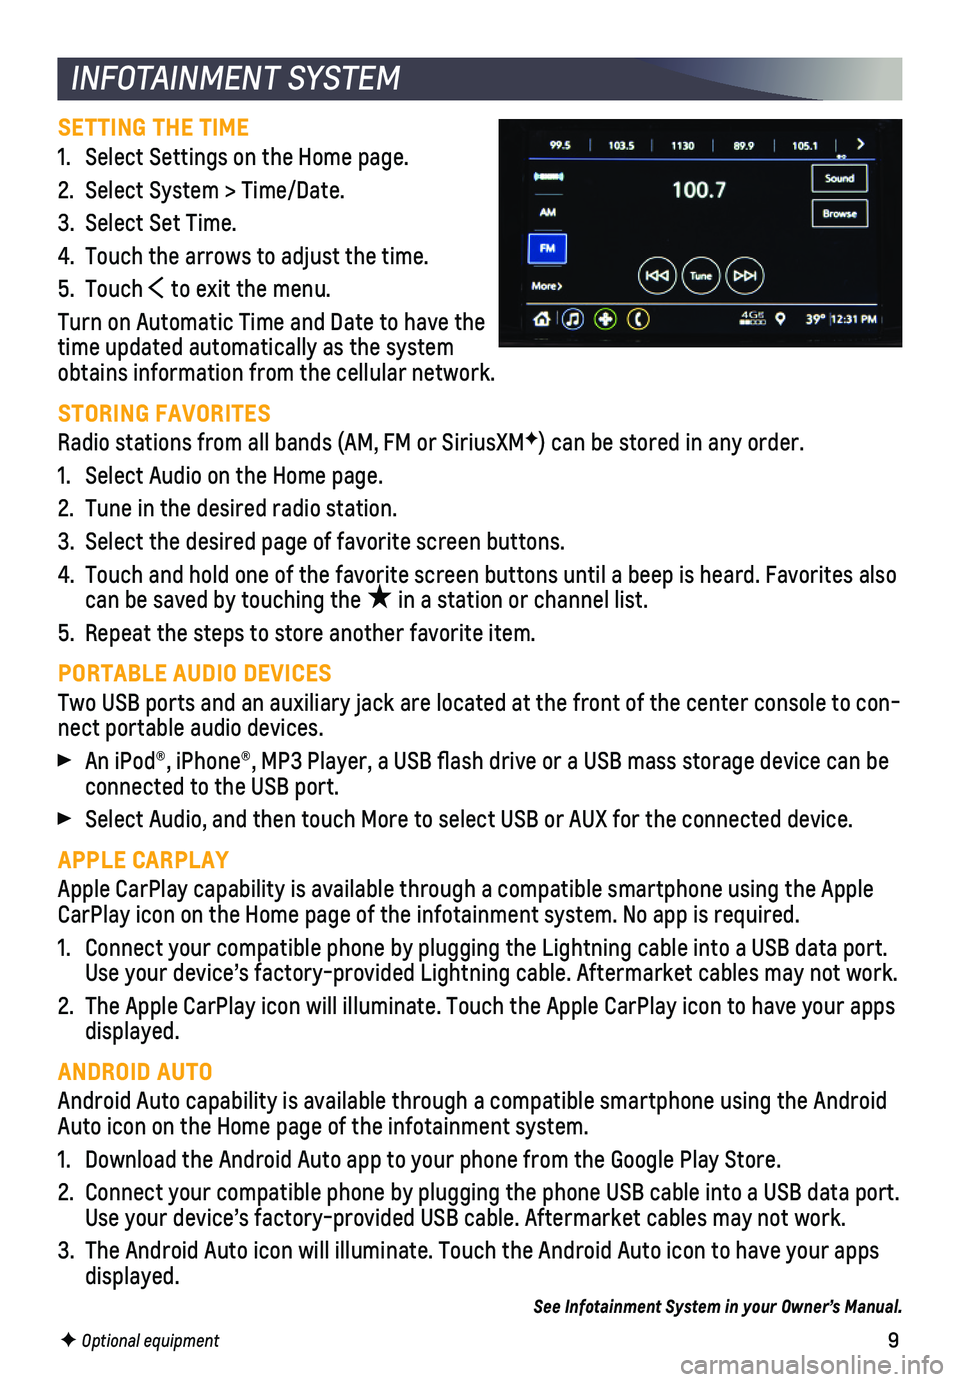
1. Select Settings on the Home page.
2. Select System > Time/Date.
3. Select Set Time.
4. Touch the arrows to adjust the time.
5. Touch to exit the menu.
Turn on Automatic Time and Date to have the time updated automatically as the system obtains information from the cellular network.
STORING FAVORITES
Radio stations from all bands (AM, FM or SiriusXMF) can be stored in any order.
1. Select Audio on the Home page.
2. Tune in the desired radio station.
3. Select the desired page of favorite screen buttons.
4. Touch and hold one of the favorite screen buttons until a beep is heard.\
Favorites also can be saved by touching the ★ in a station or channel list.
5. Repeat the steps to store another favorite item.
PORTABLE AUDIO DEVICES
Two USB ports and an auxiliary jack are located at the front of the cent\
er console to con-nect portable audio devices.
An iPod®, iPhone®, MP3 Player, a USB flash drive or a USB mass s\
torage device can be connected to the USB port.
Select Audio, and then touch More to select USB or AUX for the connected\
device.
APPLE CARPLAY
Apple CarPlay capability is available through a compatible smartphone us\
ing the Apple CarPlay icon on the Home page of the infotainment system. No app is requ\
ired.
1. Connect your compatible phone by plugging the Lightning cable into a USB\
data port. Use your device’s factory-provided Lightning cable. Aftermarket cable\
s may not work.
2. The Apple CarPlay icon will illuminate. Touch the Apple CarPlay icon to \
have your apps displayed.
ANDROID AUTO
Android Auto capability is available through a compatible smartphone usi\
ng the Android Auto icon on the Home page of the infotainment system.
1. Download the Android Auto app to your phone from the Google Play Store.
2. Connect your compatible phone by plugging the phone USB cable into a USB\
data port. Use your device’s factory-provided USB cable. Aftermarket cables may \
not work.
3. The Android Auto icon will illuminate. Touch the Android Auto icon to ha\
ve your apps displayed.
See Infotainment System in your Owner’s Manual.
F Optional equipment
Page 13 of 16
13
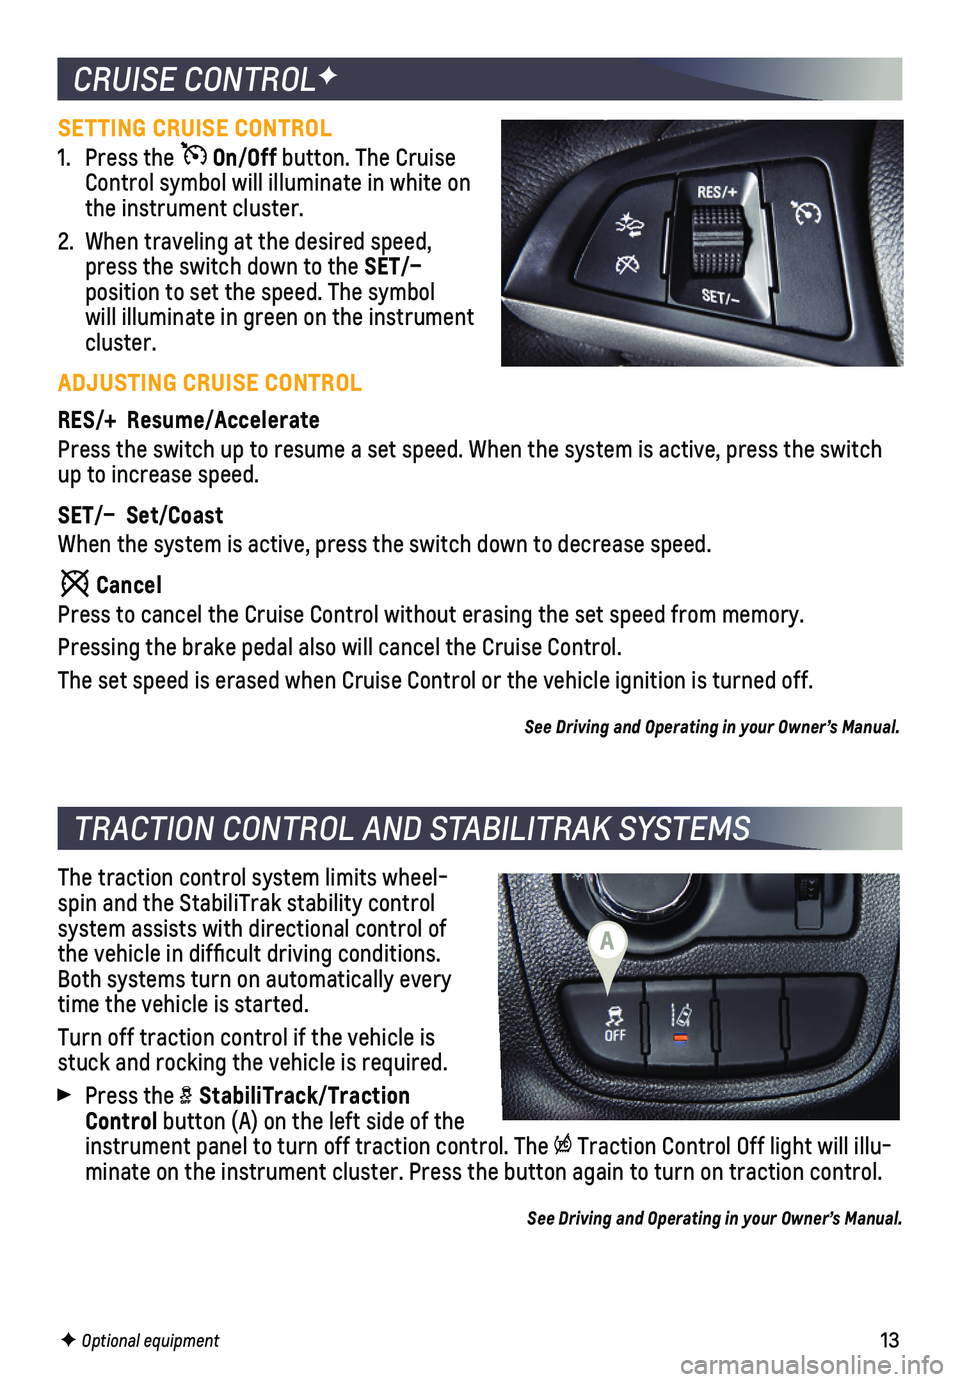
SETTING CRUISE CONTROL
1. Press the On/Off button. The Cruise Control symbol will illuminate in white on the instrument cluster.
2. When traveling at the desired speed, press the switch down to the SET/–
position to set the speed. The symbol will illuminate in green on the instrument cluster.
ADJUSTING CRUISE CONTROL
RES/+ Resume/Accelerate
Press the switch up to resume a set speed. When the system is active, pr\
ess the switch up to increase speed.
SET/– Set/Coast
When the system is active, press the switch down to decrease speed.
Cancel
Press to cancel the Cruise Control without erasing the set speed from me\
mory.
Pressing the brake pedal also will cancel the Cruise Control.
The set speed is erased when Cruise Control or the vehicle ignition is t\
urned off.
See Driving and Operating in your Owner’s Manual.
CRUISE CONTROLF
TRACTION CONTROL AND STABILITRAK SYSTEMS
The traction control system limits wheel-spin and the StabiliTrak stability control
system assists with directional control of the vehicle in difficult driving conditions. Both systems turn on automatically every time the vehicle is started.
Turn off traction control if the vehicle is stuck and rocking the vehicle is required.
Press the StabiliTrack/Traction Control button (A) on the left side of the instrument panel to turn off traction control. The Traction Control Off light will illu-minate on the instrument cluster. Press the button again to turn on trac\
tion control.
See Driving and Operating in your Owner’s Manual.
F Optional equipment
A
Page 15 of 16
15
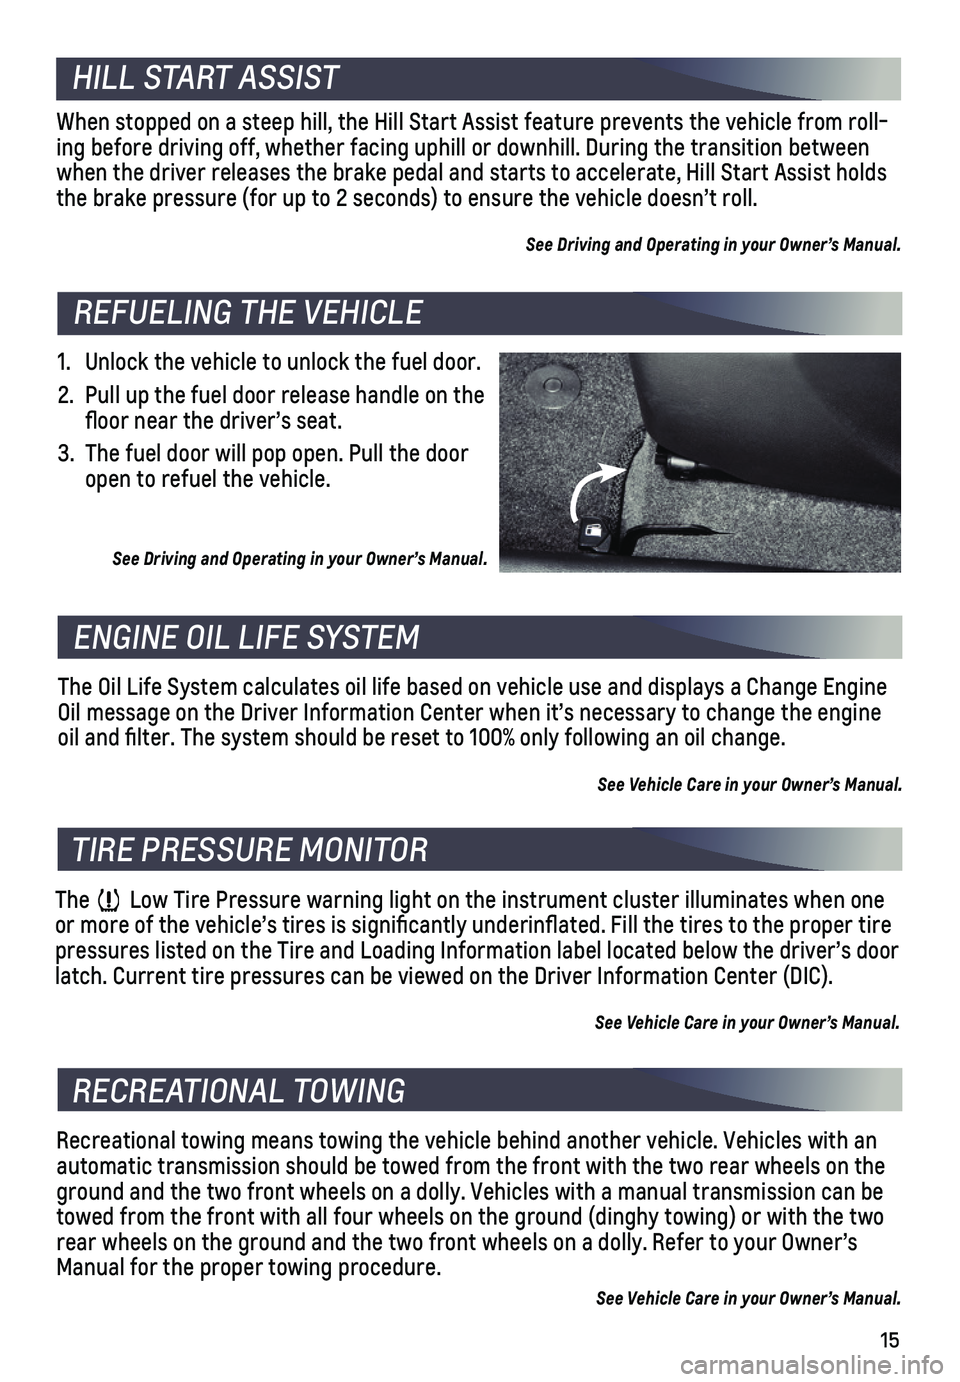
1. Unlock the vehicle to unlock the fuel door.
2. Pull up the fuel door release handle on the floor near the driver’s seat.
3. The fuel door will pop open. Pull the door open to refuel the vehicle.
See Driving and Operating in your Owner’s Manual.
The Oil Life System calculates oil life based on vehicle use and display\
s a Change Engine Oil message on the Driver Information Center when it’s necessary to c\
hange the engine oil and filter. The system should be reset to 100% only following an o\
il change.
See Vehicle Care in your Owner’s Manual.
The Low Tire Pressure warning light on the instrument cluster illuminates wh\
en one or more of the vehicle’s tires is significantly underinflated. Fi\
ll the tires to the proper tire pressures listed on the Tire and Loading Information label located below\
the driver’s door latch. Current tire pressures can be viewed on the Driver Information Ce\
nter (DIC).
See Vehicle Care in your Owner’s Manual.
Recreational towing means towing the vehicle behind another vehicle. Veh\
icles with an automatic transmission should be towed from the front with the two rear \
wheels on the ground and the two front wheels on a dolly. Vehicles with a manual trans\
mission can be towed from the front with all four wheels on the ground (dinghy towing)\
or with the two rear wheels on the ground and the two front wheels on a dolly. Refer to \
your Owner’s Manual for the proper towing procedure.
See Vehicle Care in your Owner’s Manual.
REFUELING THE VEHICLE
ENGINE OIL LIFE SYSTEM
TIRE PRESSURE MONITOR
RECREATIONAL TOWING
When stopped on a steep hill, the Hill Start Assist feature prevents the\
vehicle from roll-ing before driving off, whether facing uphill or downhill. During the tr\
ansition between when the driver releases the brake pedal and starts to accelerate, Hill \
Start Assist holds the brake pressure (for up to 2 seconds) to ensure the vehicle doesn’\
t roll.
See Driving and Operating in your Owner’s Manual.
HILL START ASSIST
Page 16 of 16
16
ROADSIDE ASSISTANCE
1-800-CHEV-USA (1-800-243-8872) TTY Users: 1-888-889-2438
As the owner of a new Chevrolet, you are automatically enrolled in the C\
hevrolet Roadside Assistance program for up to 5 years/60,000 miles, whichever oc\
curs first, at no expense to you. Chevrolet’s Roadside Assistance toll-free numbe\
r is staffed by a team of trained advisors who are available 24 hours a day, 365 days a year, t\
o contact a service provider for light services (fuel delivery, jump-starts, flat\
tire and lock-outs) or make arrangements to tow your vehicle to the nearest Chevrolet dealer fo\
r any repairs.
OnStar Roadside Assistance
If you have a current OnStar Safety & Security plan, push the blue OnStar button or red Emergency button to get the help you need. An OnStar advisor will use GPS technol\
ogy to pinpoint your vehicle location and contact the nearest service provid\
er.
To learn more about OnStar services, press the blue OnStar button, call 1-888-466-7827, visit onstar.com or refer to your Owner’s Manual.
CHEVROLET OWNER CENTER
MYCHEVROLET MOBILE APP
Get to know your vehicle inside and out with the Chevrolet Owner Center.\
Check out
personalized information, including an online Owner’s Manual and help\
ful how-to videos, track your service history and warranty status, manage your OnStar and C\
onnected Services vehicle plans, review your current Vehicle Diagnostics report (\
active service required) and more. Create an account today at my.chevrolet.com.
!84321090=A!
Download the myChevrolet app to your compatible smartphone (or device)\
and, if your vehicle is properly equipped, you can start or turn off your engine, loc\
k or unlock your doors, view key diagnostic information, set parking information and more\
.
The app is available on select Apple and Android devices. Service availa\
bility, features and functionality vary by vehicle, device and data plan. Device data con\
nection required. Visit onstar.com for more details. Download the mobile app from your compatible mobile device’s app store.
84321090 A
Certain restrictions, precautions and safety procedures apply to your ve\
hicle. Please read your Owner’s Manual for complete instructions. All information contained in this guide is ba\
sed on the latest information available at the time of printing and is subject to change without notice. Copyright \
2019 General Motors. All rights reserved.
We recommend always using ACDelco or genuine GM service parts.