CHEVROLET SS 2014 Owners Manual
Manufacturer: CHEVROLET, Model Year: 2014, Model line: SS, Model: CHEVROLET SS 2014Pages: 422, PDF Size: 6.18 MB
Page 301 of 422
Black plate (19,1)Chevrolet SS Sedan Owner Manual (GMNA-Localizing-U.S.-6014851) - 2014 -
1st Edition - 8/22/13
Vehicle Care 10-19
installing disc brake pads that are
wrong for the vehicle, can change
the balance between the front and
rear brakes—for the worse. The
braking performance expected can
change in many other ways if the
wrong replacement brake parts are
installed.
Brake Fluid
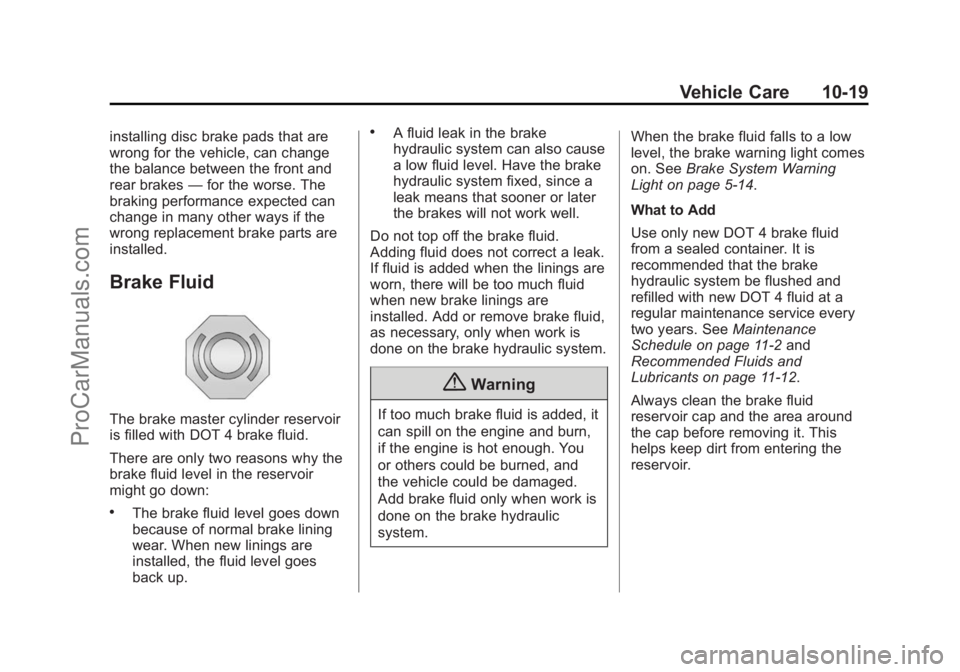
The brake master cylinder reservoir
is filled with DOT 4 brake fluid.
There are only two reasons why the
brake fluid level in the reservoir
might go down:
.The brake fluid level goes down
because of normal brake lining
wear. When new linings are
installed, the fluid level goes
back up.
.A fluid leak in the brake
hydraulic system can also cause
a low fluid level. Have the brake
hydraulic system fixed, since a
leak means that sooner or later
the brakes will not work well.
Do not top off the brake fluid.
Adding fluid does not correct a leak.
If fluid is added when the linings are
worn, there will be too much fluid
when new brake linings are
installed. Add or remove brake fluid,
as necessary, only when work is
done on the brake hydraulic system.
{Warning
If too much brake fluid is added, it
can spill on the engine and burn,
if the engine is hot enough. You
or others could be burned, and
the vehicle could be damaged.
Add brake fluid only when work is
done on the brake hydraulic
system. When the brake fluid falls to a low
level, the brake warning light comes
on. See
Brake System Warning
Light on page 5-14.
What to Add
Use only new DOT 4 brake fluid
from a sealed container. It is
recommended that the brake
hydraulic system be flushed and
refilled with new DOT 4 fluid at a
regular maintenance service every
two years. See Maintenance
Schedule on page 11-2 and
Recommended Fluids and
Lubricants on page 11-12.
Always clean the brake fluid
reservoir cap and the area around
the cap before removing it. This
helps keep dirt from entering the
reservoir.
ProCarManuals.com
Page 302 of 422
Black plate (20,1)Chevrolet SS Sedan Owner Manual (GMNA-Localizing-U.S.-6014851) - 2014 -
1st Edition - 8/22/13
10-20 Vehicle Care
{Warning
With the wrong kind of fluid in the
brake hydraulic system, the
brakes might not work well. This
could cause a crash. Always use
the proper brake fluid.
{Caution
.Using the wrong fluid can
badly damage brake
hydraulic system parts. For
example, just a few drops of
mineral-based oil, such as
engine oil, in the brake
hydraulic system can damage
brake hydraulic system parts
so badly that they will have to
be replaced. Do not let
someone put in the wrong
kind of fluid.(Continued)
Caution (Continued)
.If brake fluid is spilled on the
vehicle's painted surfaces,
the paint finish can be
damaged. Be careful not to
spill brake fluid on the
vehicle. If you do, wash it off
immediately.
Battery
The battery is in the trunk, behind a
trim panel, on the driver side of the
vehicle. Refer to the replacement
number shown on the original
battery label when a new battery is
needed.
{Warning
A specifically developed battery
with a ventilation system is
required for this vehicle. Any
(Continued)
Warning (Continued)
other standard battery may cause
explosive gases to enter the trunk
or passenger compartment.
Do not remove the caps on the
top of the battery. The battery
supplied in the vehicle is
maintenance free and does not
require checking or filling.
The battery vent tube must be
installed correctly to ensure the
explosive gases are vented
outside the vehicle.
Only use a manufacturer
recommended battery as a
replacement.
{Warning
Battery posts, terminals, and
related accessories contain lead
and lead compounds, chemicals(Continued)
ProCarManuals.com
Page 303 of 422
Black plate (21,1)Chevrolet SS Sedan Owner Manual (GMNA-Localizing-U.S.-6014851) - 2014 -
1st Edition - 8/22/13
Vehicle Care 10-21
Warning (Continued)
known to the State of California to
cause cancer and reproductive
harm. Wash hands after handling.
Vehicle Storage
{Warning
Batteries have acid that can burn
you and gas that can explode.
You can be badly hurt if you are
not careful. SeeJump Starting on
page 10-69 for tips on working
around a battery without
getting hurt.
Infrequent Usage: Remove the
black, negative (−) cable from the
battery to keep the battery from
running down.
Extended Storage: Remove the
black, negative (−) cable from the
battery or use a battery trickle
charger.
Rear Axle
When to Check Lubricant
It is not necessary to regularly
check rear axle fluid unless you
suspect there is a leak or you hear
an unusual noise. A fluid loss could
indicate a problem. Have it
inspected and repaired.
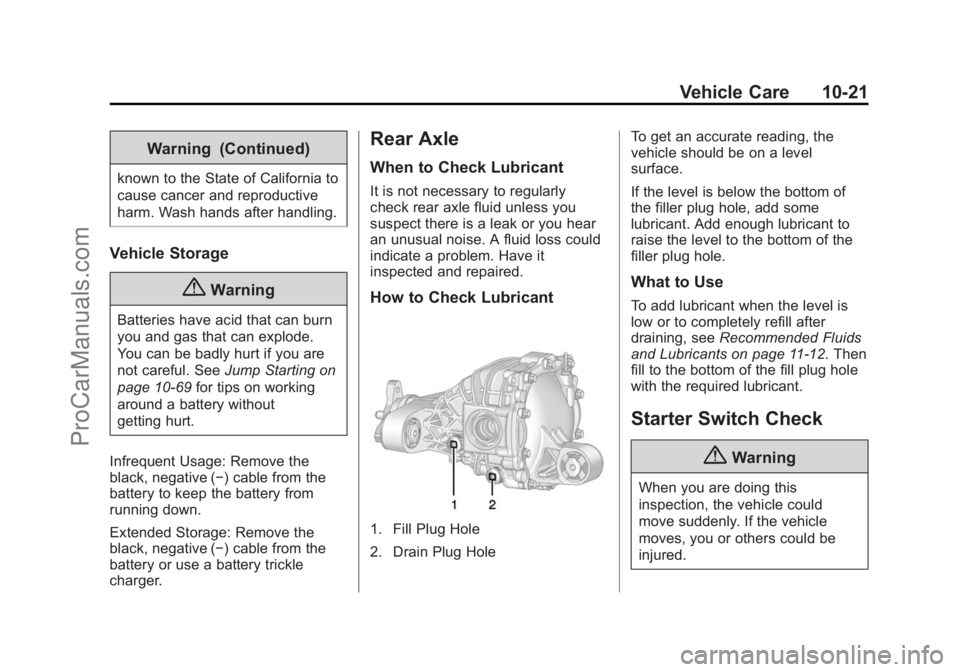
How to Check Lubricant
1. Fill Plug Hole
2. Drain Plug Hole To get an accurate reading, the
vehicle should be on a level
surface.
If the level is below the bottom of
the filler plug hole, add some
lubricant. Add enough lubricant to
raise the level to the bottom of the
filler plug hole.
What to Use
To add lubricant when the level is
low or to completely refill after
draining, see
Recommended Fluids
and Lubricants on page 11-12. Then
fill to the bottom of the fill plug hole
with the required lubricant.
Starter Switch Check
{Warning
When you are doing this
inspection, the vehicle could
move suddenly. If the vehicle
moves, you or others could be
injured.
ProCarManuals.com
Page 304 of 422
Black plate (22,1)Chevrolet SS Sedan Owner Manual (GMNA-Localizing-U.S.-6014851) - 2014 -
1st Edition - 8/22/13
10-22 Vehicle Care
1. Before starting this check, besure there is enough room
around the vehicle.
2. Apply both the parking brake and the regular brake.
Do not use the accelerator
pedal, and be ready to turn off
the engine immediately if it
starts.
3. Try to start the engine in each gear. The vehicle should start
only in P (Park) or N (Neutral).
If the vehicle starts in any other
position, contact your dealer for
service.Automatic Transmission
Shift Lock Control
Function Check
{Warning
When you are doing this
inspection, the vehicle could
move suddenly. If the vehicle
moves, you or others could be
injured.
1. Before starting this check, be sure there is enough room
around the vehicle. It should be
parked on a level surface.
2. Apply the parking brake. Be ready to apply the regular brake
immediately if the vehicle begins
to move.
3. With the engine off, turn the ignition on, but do not start the
engine. Without applying the
regular brake, try to move the
shift lever out of P (Park) with normal effort. If the shift lever
moves out of P (Park), contact
your dealer for service.
Ignition Transmission
Lock Check
If equipped with a key type ignition,
while parked and with the parking
brake set, try to turn the ignition to
LOCK/OFF in each shift lever
position.
.The ignition should turn to
LOCK/OFF only when the shift
lever is in P (Park).
.The ignition key should come
out only in LOCK/OFF.
Contact your dealer if service is
required.
ProCarManuals.com
Page 305 of 422
Black plate (23,1)Chevrolet SS Sedan Owner Manual (GMNA-Localizing-U.S.-6014851) - 2014 -
1st Edition - 8/22/13
Vehicle Care 10-23
Park Brake and P (Park)
Mechanism Check
{Warning
When you are doing this check,
the vehicle could begin to move.
You or others could be injured
and property could be damaged.
Make sure there is room in front
of the vehicle in case it begins to
roll. Be ready to apply the regular
brake at once should the vehicle
begin to move.
Park on a fairly steep hill, with the
vehicle facing downhill. Keeping
your foot on the regular brake, set
the parking brake.
.To check the parking brake's
holding ability: With the engine
running and the transmission in
N (Neutral), slowly remove foot
pressure from the regular brake
pedal. Do this until the vehicle is
held by the parking brake only.
.To check the P (Park)
mechanism's holding ability:
With the engine running, shift to
P (Park). Then release the
parking brake followed by the
regular brake.
Contact your dealer if service is
required.
Wiper Blade Replacement
Front Wiper Blade
Windshield wiper blades should be
inspected for wear or cracking. See
Maintenance Schedule on
page 11-2.
Replacement blades come in
different types and are removed in
different ways. For the proper type
and size, see Maintenance
Replacement Parts on page 11-13.
To replace the wiper blade
assembly:
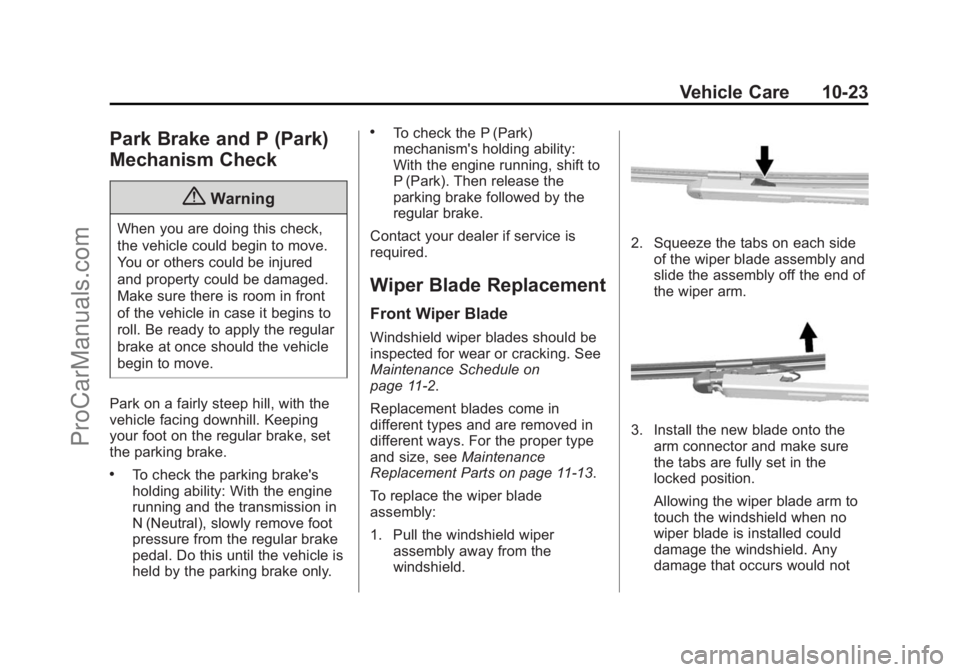
1. Pull the windshield wiper assembly away from the
windshield.
2. Squeeze the tabs on each side
of the wiper blade assembly and
slide the assembly off the end of
the wiper arm.
3. Install the new blade onto thearm connector and make sure
the tabs are fully set in the
locked position.
Allowing the wiper blade arm to
touch the windshield when no
wiper blade is installed could
damage the windshield. Any
damage that occurs would not
ProCarManuals.com
Page 306 of 422
Black plate (24,1)Chevrolet SS Sedan Owner Manual (GMNA-Localizing-U.S.-6014851) - 2014 -
1st Edition - 8/22/13
10-24 Vehicle Care
be covered by your warranty. Do
not allow the wiper blade arm to
touch the windshield.
4. Repeat the steps for the other blade.
Windshield Replacement
The windshield is part of the HUD
system. If the vehicle has to have
the windshield replaced, get one
that is designed for HUD or the
HUD image may look out of focus.
Headlamp Aiming
Headlamp aim has been preset and
should need no further adjustment.
If the vehicle is damaged in a crash,
the headlamp aim may be affected.
If adjustment to the headlamps is
necessary, see your dealer.
Bulb Replacement
For the proper type of replacement
bulbs, see Replacement Bulbs on
page 10-25.
For any bulb changing procedure
not listed in this section, contact
your dealer.
High Intensity Discharge
(HID) Lighting
{Warning
The high intensity discharge
lighting system operates at a very
high voltage. If you try to service
any of the system components,
you could be seriously injured.
Have your dealer or a qualified
technician service them.
After an HID headlamp bulb has
been replaced, the beam might be a
slightly different shade than it was
originally. This is normal.
ProCarManuals.com
Page 307 of 422
Black plate (25,1)Chevrolet SS Sedan Owner Manual (GMNA-Localizing-U.S.-6014851) - 2014 -
1st Edition - 8/22/13
Vehicle Care 10-25
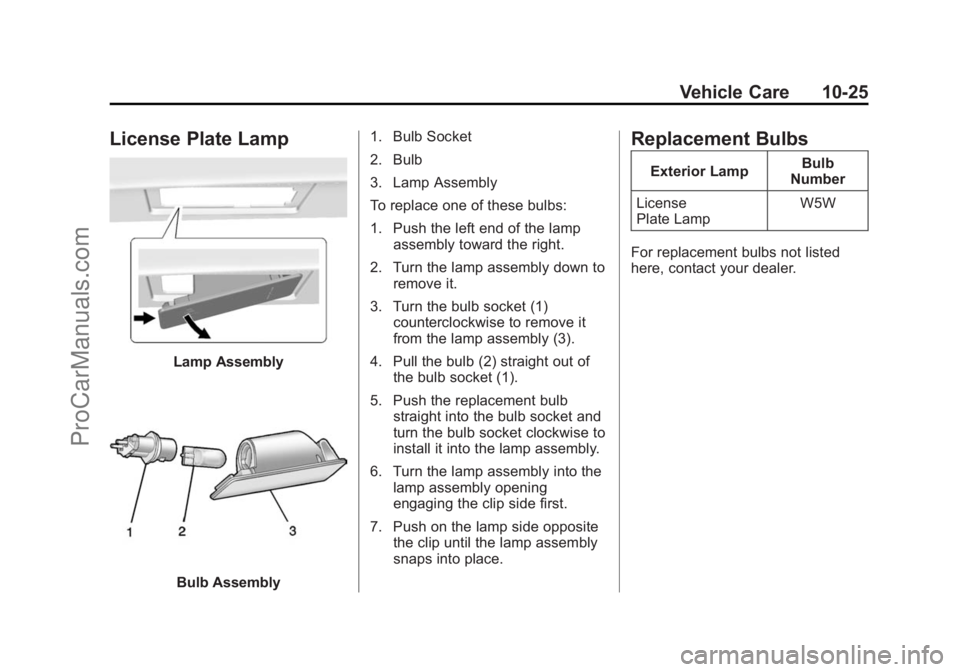
License Plate Lamp
Lamp Assembly
Bulb Assembly1. Bulb Socket
2. Bulb
3. Lamp Assembly
To replace one of these bulbs:
1. Push the left end of the lamp
assembly toward the right.
2. Turn the lamp assembly down to remove it.
3. Turn the bulb socket (1) counterclockwise to remove it
from the lamp assembly (3).
4. Pull the bulb (2) straight out of the bulb socket (1).
5. Push the replacement bulb straight into the bulb socket and
turn the bulb socket clockwise to
install it into the lamp assembly.
6. Turn the lamp assembly into the lamp assembly opening
engaging the clip side first.
7. Push on the lamp side opposite the clip until the lamp assembly
snaps into place.
Replacement Bulbs
Exterior Lamp Bulb
Number
License
Plate Lamp W5W
For replacement bulbs not listed
here, contact your dealer.
ProCarManuals.com
Page 308 of 422
Black plate (26,1)Chevrolet SS Sedan Owner Manual (GMNA-Localizing-U.S.-6014851) - 2014 -
1st Edition - 8/22/13
10-26 Vehicle Care
Electrical System
Electrical System
Overload
The vehicle has fuses and circuit
breakers to protect against an
electrical system overload.
When the current electrical load is
too heavy, the circuit breaker opens
and closes, protecting the circuit
until the current load returns to
normal or the problem is fixed. This
greatly reduces the chance of circuit
overload and fire caused by
electrical problems.
Fuses and circuit breakers protect
power devices in the vehicle.
Replace a bad fuse with a new one
of the identical size and rating.
If there is a problem on the road and
a fuse needs to be replaced, the
same amperage fuse can be
borrowed. Choose some feature of
the vehicle that is not needed to use
and replace it as soon as possible.
Headlamp Wiring
An electrical overload may cause
the lamps to go on and off, or in
some cases to remain off. Have the
headlamp wiring checked right away
if the lamps go on and off or
remain off.
Windshield Wipers
If the wiper motor overheats due to
heavy snow or ice, the windshield
wipers will stop until the motor cools
and will then restart.
Although the circuit is protected
from electrical overload, overload
due to heavy snow or ice may
cause wiper linkage damage.
Always clear ice and heavy snow
from the windshield before using the
windshield wipers.
If the overload is caused by an
electrical problem and not snow or
ice, be sure to get it fixed.
Fuses
The wiring circuits in the vehicle are
protected from short circuits by
fuses. This greatly reduces the
chance of fires caused by electrical
problems.
Look at the silver-colored band
inside the fuse. If the band is broken
or melted, replace the fuse. Be sure
you replace a bad fuse with a new
one of the identical size and rating.
Fuses of the same amperage can
be temporarily borrowed from
another fuse location, if a fuse goes
out. Replace the fuse as soon as
you can.
Spare fuses of various ratings are
provided in the Engine
Compartment Fuse Block and Rear
Compartment Fuse Block.
ProCarManuals.com
Page 309 of 422
Black plate (27,1)Chevrolet SS Sedan Owner Manual (GMNA-Localizing-U.S.-6014851) - 2014 -
1st Edition - 8/22/13
Vehicle Care 10-27
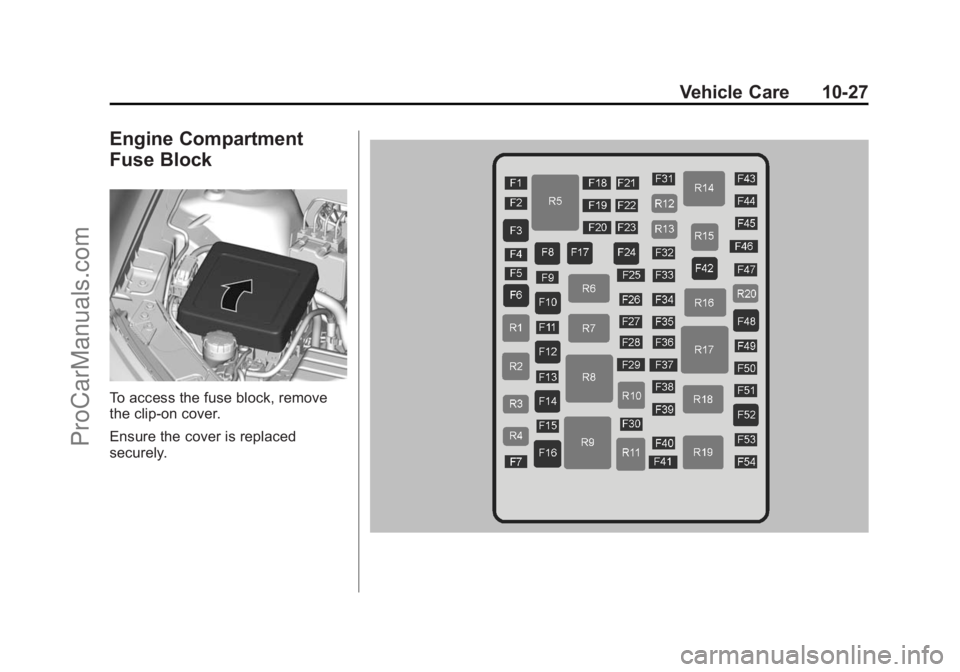
Engine Compartment
Fuse Block
To access the fuse block, remove
the clip-on cover.
Ensure the cover is replaced
securely.
ProCarManuals.com
Page 310 of 422
Black plate (28,1)Chevrolet SS Sedan Owner Manual (GMNA-Localizing-U.S.-6014851) - 2014 -
1st Edition - 8/22/13
10-28 Vehicle Care
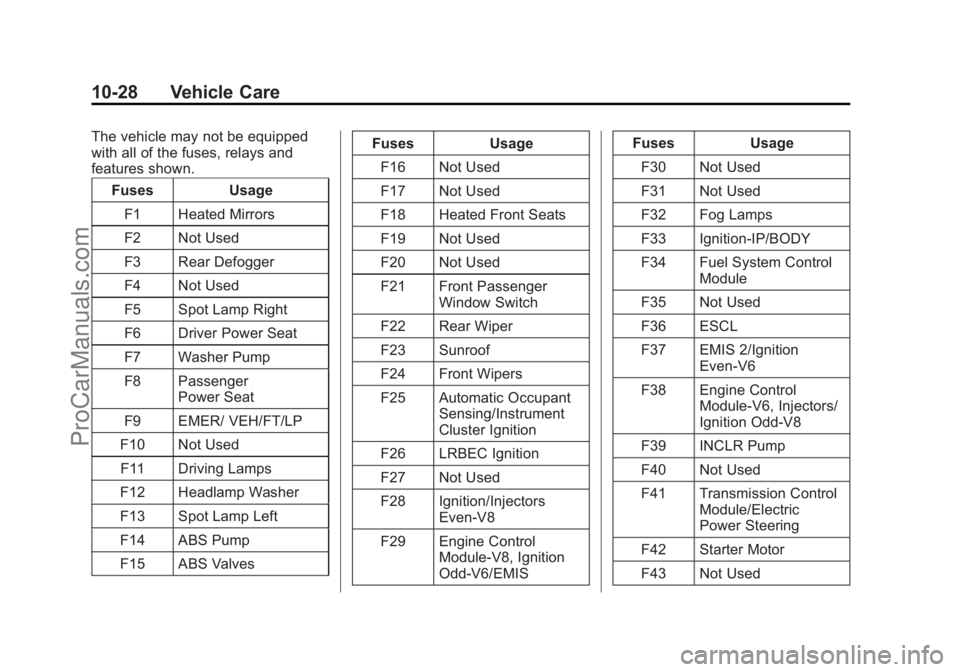
The vehicle may not be equipped
with all of the fuses, relays and
features shown.Fuses Usage
F1 Heated Mirrors
F2 Not Used
F3 Rear Defogger
F4 Not Used
F5 Spot Lamp Right
F6 Driver Power Seat
F7 Washer Pump
F8 Passenger Power Seat
F9 EMER/ VEH/FT/LP
F10 Not Used F11 Driving Lamps
F12 Headlamp Washer
F13 Spot Lamp Left
F14 ABS Pump
F15 ABS Valves Fuses Usage
F16 Not Used
F17 Not Used
F18 Heated Front Seats
F19 Not Used
F20 Not Used
F21 Front Passenger Window Switch
F22 Rear Wiper
F23 Sunroof
F24 Front Wipers
F25 Automatic Occupant Sensing/Instrument
Cluster Ignition
F26 LRBEC Ignition
F27 Not Used
F28 Ignition/Injectors Even-V8
F29 Engine Control Module-V8, Ignition
Odd-V6/EMIS Fuses Usage
F30 Not Used
F31 Not Used
F32 Fog Lamps
F33 Ignition-IP/BODY
F34 Fuel System Control Module
F35 Not Used
F36 ESCL
F37 EMIS 2/Ignition Even-V6
F38 Engine Control Module-V6, Injectors/
Ignition Odd-V8
F39 INCLR Pump
F40 Not Used
F41 Transmission Control Module/Electric
Power Steering
F42 Starter Motor
F43 Not Used
ProCarManuals.com