engine CHEVROLET SSR 2004 1.G Manual Online
[x] Cancel search | Manufacturer: CHEVROLET, Model Year: 2004, Model line: SSR, Model: CHEVROLET SSR 2004 1.GPages: 398, PDF Size: 2.49 MB
Page 294 of 398
Notice:Ignoring these steps could result in costly
damage to your vehicle that would not be covered
by your warranty.
Trying to start your vehicle by pushing or pulling it
will not work, and it could damage your vehicle.
1. Check the other vehicle. It must have a 12-volt
battery with a negative ground system.
Notice:If the other vehicle’s system is not a 12-volt
system with a negative ground, both vehicles can
be damaged. Only use vehicles with 12-volt systems
with negative grounds to jump start your vehicle.
2. Get the vehicles close enough so the jumper cables
can reach, but be sure the vehicles aren’t touching
each other. If they are, it could cause a ground
connection you don’t want. You wouldn’t be able to
start your vehicle and the bad grounding could
damage the electrical systems.
To avoid the possibility of the vehicles rolling, set
the parking brake �rmly on both vehicles involved in
the jump start procedure. Put your transmission
in PARK (P) before setting the parking brake.
Notice:If you leave your radio or other accessories
on during the jump starting procedure, they could
be damaged. The repairs would not be covered
by your warranty. Always turn off your radio and
other accessories when jump starting your vehicle.3. Turn off the ignition on both vehicles. Unplug
unnecessary accessories plugged into the cigarette
lighter or in the accessory power outlets. Turn off
the radio and all lamps that aren’t needed. This will
avoid sparks and help save both batteries. And it
could save your radio.
4. Open the hoods and locate the positive (+) and
negative (−) terminal locations on the other
vehicle. Your vehicle has a remote positive (+) jump
starting terminal and a remote negative (−) jump
starting terminal. You should always use these
remote terminals instead of the terminals on the
battery.
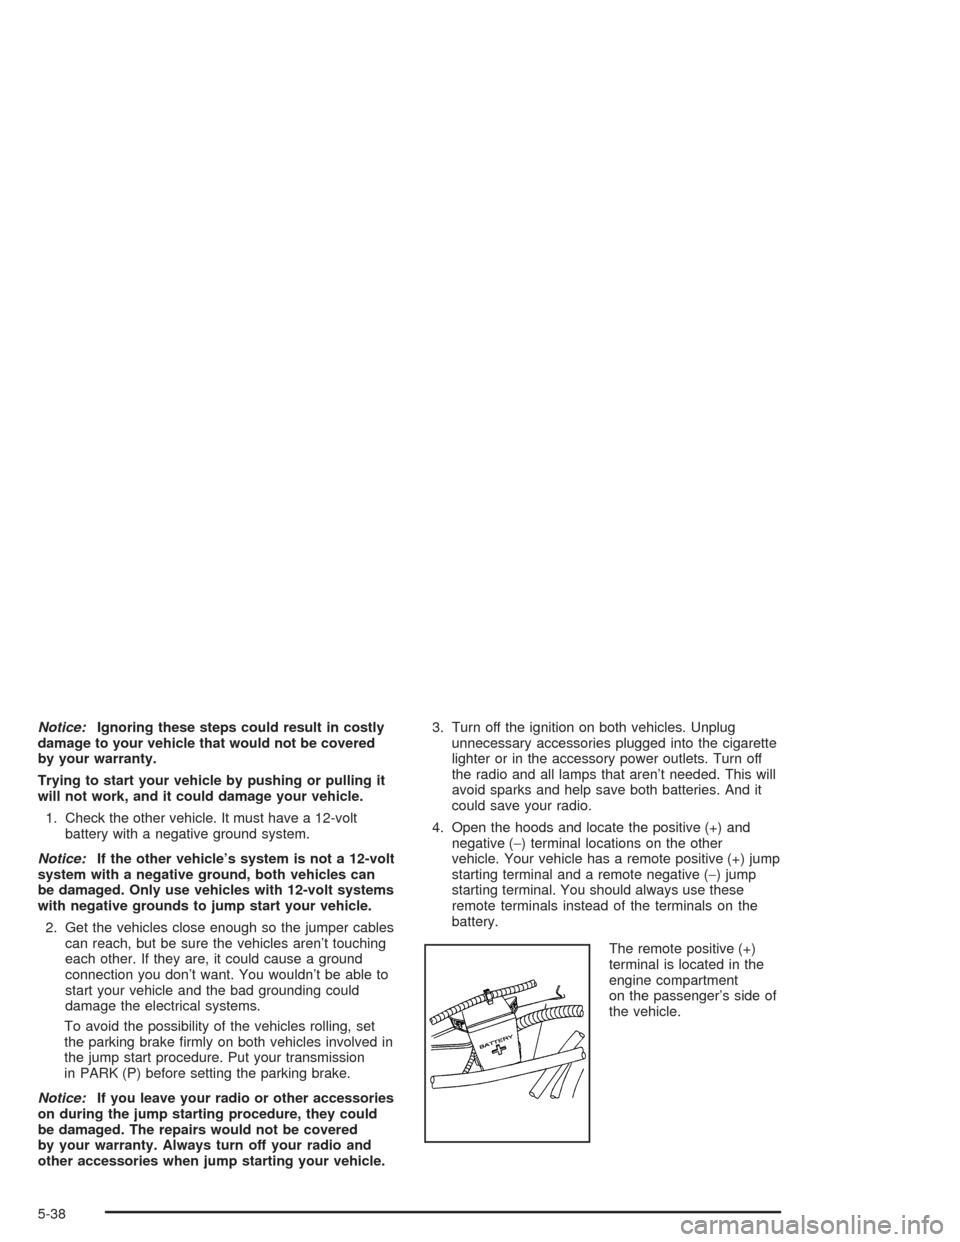
The remote positive (+)
terminal is located in the
engine compartment
on the passenger’s side of
the vehicle.
5-38
Page 295 of 398

Press inward on the tabs located on the outboard
sides of the remote positive (+) terminal cover
and pull outward to access the terminal.
The remote negative (−) terminal is located near the
power steering �uid reservoir. It is marked
“GND (−).” SeeEngine Compartment Overview on
page 5-12for more information on location.
You will not see the battery of your vehicle under
the hood. It is located on the rear underside of
the vehicle. You will not need to access the battery
for jump starting. The remote positive (+) terminal
is for that purpose.
{CAUTION:
An electric fan can start up even when the
engine is not running and can injure you.
Keep hands, clothing and tools away from any
underhood electric fan.
{CAUTION:
Using a match near a battery can cause battery
gas to explode. People have been hurt doing
this, and some have been blinded. Use a
�ashlight if you need more light.
Be sure the battery has enough water. You do
not need to add water to the ACDelco
®battery
installed in your new vehicle. But if a battery
has �ller caps, be sure the right amount of
�uid is there. If it is low, add water to take care
of that �rst. If you do not, explosive gas could
be present.
Battery �uid contains acid that can burn you.
Do not get it on you. If you accidentally get it
in your eyes or on your skin, �ush the place
with water and get medical help immediately.
5-39
Page 296 of 398
{CAUTION:
Fans or other moving engine parts can injure
you badly. Keep your hands away from moving
parts once the engine is running.
5. Check that the jumper cables don’t have loose or
missing insulation. If they do, you could get a
shock. The vehicles could also be damaged, too.
Before you connect the cables, here are some basic
things you should know. Positive (+) will go to
positive (+) or to a remote positive (+) terminal if the
vehicle has one. Negative (−) will go to a heavy,
unpainted metal engine part or to a remote
negative (−) terminal if the vehicle has one.
Don’t connect positive (+) to the negative (−)oryou
will get a short that would damage the battery
and maybe other parts, too. And don’t connect the
negative (−) cable to negative (−) terminal on
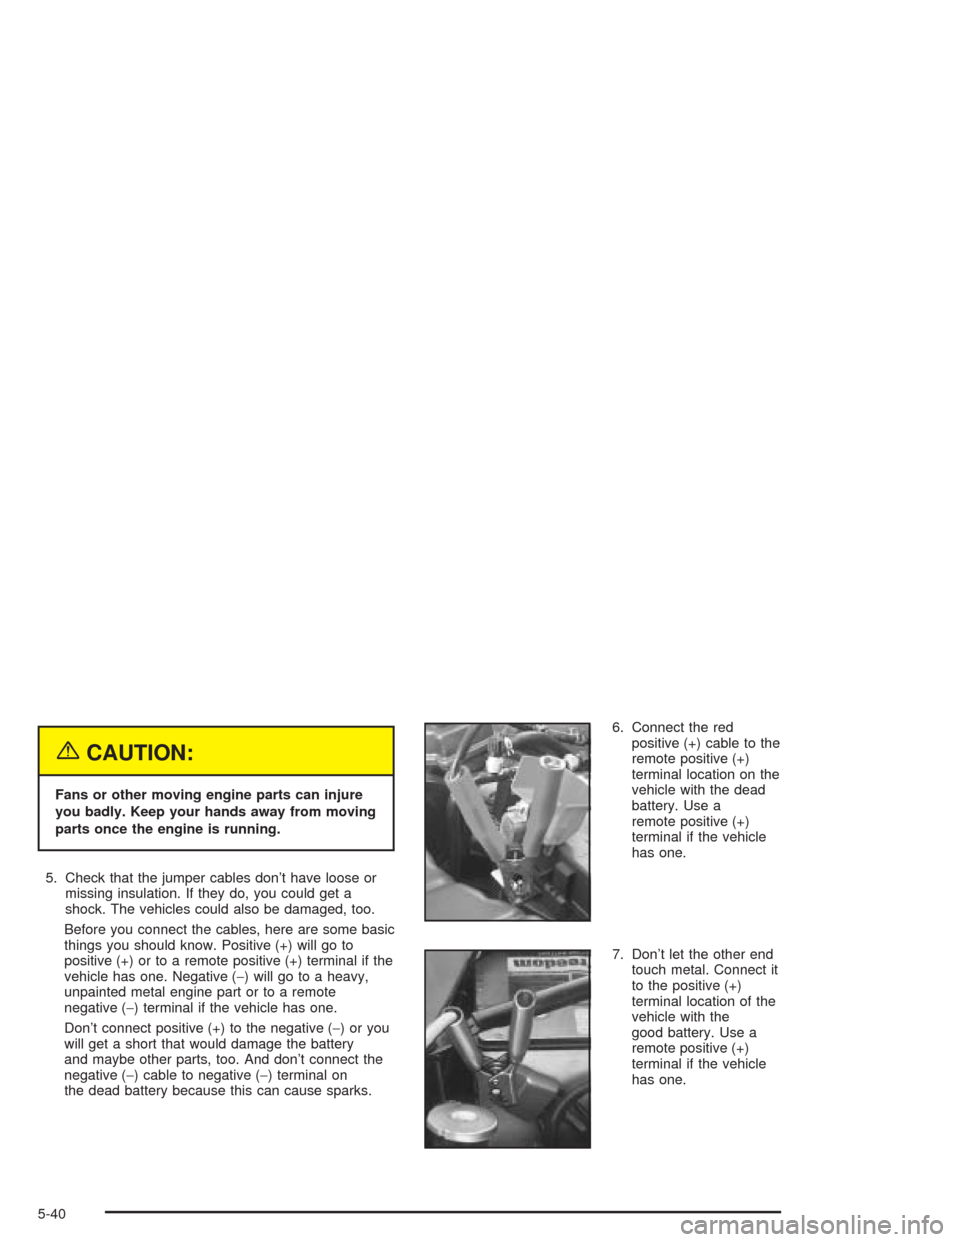
the dead battery because this can cause sparks.6. Connect the red
positive (+) cable to the
remote positive (+)
terminal location on the
vehicle with the dead
battery. Use a
remote positive (+)
terminal if the vehicle
has one.
7. Don’t let the other end
touch metal. Connect it
to the positive (+)
terminal location of the
vehicle with the
good battery. Use a
remote positive (+)
terminal if the vehicle
has one.
5-40
Page 297 of 398
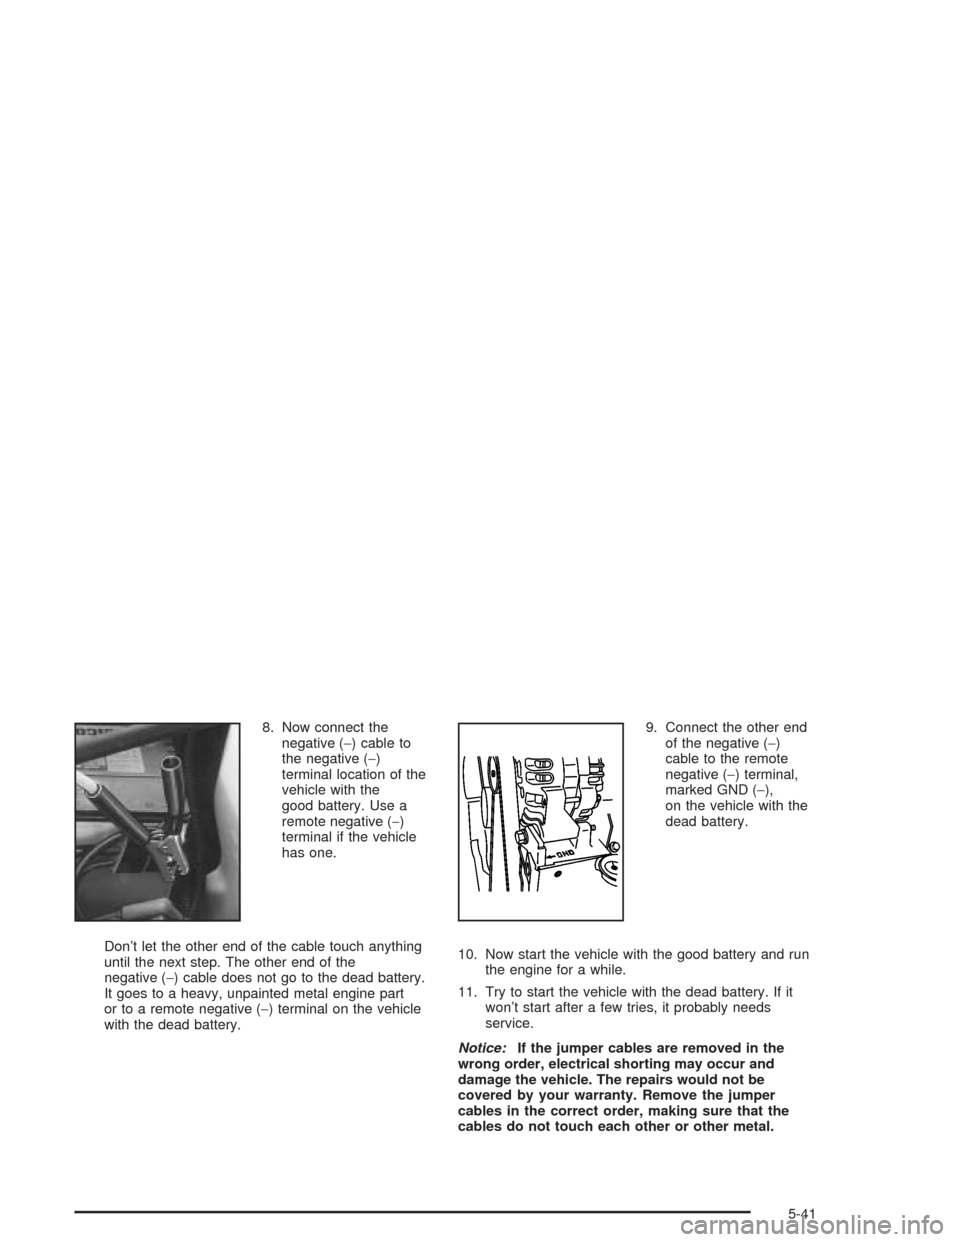
8. Now connect the
negative (−) cable to
the negative (−)
terminal location of the
vehicle with the
good battery. Use a
remote negative (−)
terminal if the vehicle
has one.
Don’t let the other end of the cable touch anything
until the next step. The other end of the
negative (−) cable does not go to the dead battery.
It goes to a heavy, unpainted metal engine part
or to a remote negative (−) terminal on the vehicle
with the dead battery.9. Connect the other end
of the negative (−)
cable to the remote
negative (−) terminal,
marked GND (−),
on the vehicle with the
dead battery.
10. Now start the vehicle with the good battery and run
the engine for a while.
11. Try to start the vehicle with the dead battery. If it
won’t start after a few tries, it probably needs
service.
Notice:If the jumper cables are removed in the
wrong order, electrical shorting may occur and
damage the vehicle. The repairs would not be
covered by your warranty. Remove the jumper
cables in the correct order, making sure that the
cables do not touch each other or other metal.
5-41
Page 298 of 398
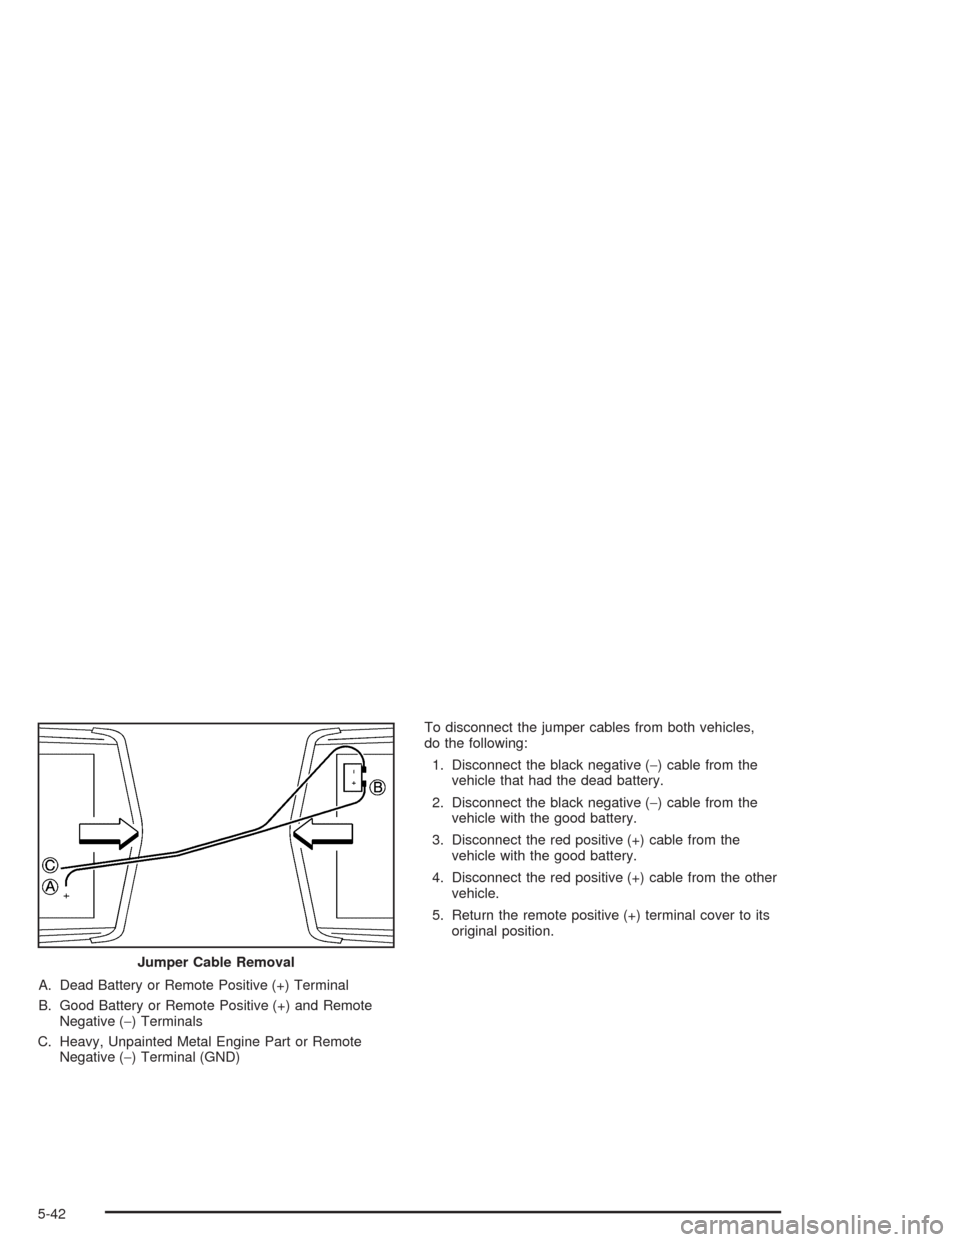
A. Dead Battery or Remote Positive (+) Terminal
B. Good Battery or Remote Positive (+) and Remote
Negative (−) Terminals
C. Heavy, Unpainted Metal Engine Part or Remote
Negative (−) Terminal (GND)To disconnect the jumper cables from both vehicles,
do the following:
1. Disconnect the black negative (−) cable from the
vehicle that had the dead battery.
2. Disconnect the black negative (−) cable from the
vehicle with the good battery.
3. Disconnect the red positive (+) cable from the
vehicle with the good battery.
4. Disconnect the red positive (+) cable from the other
vehicle.
5. Return the remote positive (+) terminal cover to its
original position.
Jumper Cable Removal
5-42
Page 310 of 398

(E) Tire Ply Material:The type of cord and number
of plies in the sidewall and under the tread.
(F) Uniform Tire Quality Grading (UTQG):Tire
manufacturers are required to grade tires based on
three performance factors: treadwear, traction,
and temperature resistance. For more information, see
Uniform Tire Quality Grading on page 5-61.
(G) Maximum Cold In�ation Load Limit:Maximum
load that can be carried and the maximum pressure
needed to support that load. For information on
recommended tire pressure seeIn�ation - Tire Pressure
on page 5-58andLoading Your Vehicle on page 4-32.Tire Size
The following illustration shows, an example of, a typical
passenger car tire size.
(A) Passenger (P-Metric) Tire:The United States
version of a metric tire sizing system. The letter “P” as
the �rst character in the tire size means a passenger
vehicle tire engineered to standards set by the U.S. Tire
and Rim Association.
(B) Tire Width:The three-digit number indicates the
tire section width in millimeters from sidewall to sidewall.
5-54
Page 322 of 398
If a Tire Goes Flat
Your vehicle has no spare tire, no tire changing
equipment and no place to store a tire.
It’s unusual for a tire to “blow out” while you’re driving,
especially if you maintain your tires properly. See
Tires on page 5-51. If air goes out of a tire, it’s much
more likely to leak out slowly. But if you should
ever have a “blow out” here are a few tips about what to
expect and what to do:
If a front tire fails, the �at tire will create a drag that
pulls the vehicle toward that side. Take your foot off the
accelerator pedal and grip the steering wheel �rmly.
Steer to maintain lane position, and then gently brake to
a stop well out of the traffic lane.
A rear blow out, particularly on a curve, acts much like
a skid and may require the same correction you’d
use in a skid. In any rear blow out, remove your foot
from the accelerator pedal. Get the vehicle under control
by steering the way you want the vehicle to go. It may
be very bumpy and noisy, but you can still steer. Gently
brake to a stop, well off the road if possible.If a tire goes �at, avoid further tire and wheel damage by
driving slowly to a level place and stopping. Then do this:
1. Turn on the hazard warning �ashers.
2. Set the parking brake �rmly.
3. Put the shift lever in PARK (P).
4. Turn off the engine.
5. Inspect the �at tire.
If the tire has been separated from the wheel or has
damaged sidewalls or large tears that allow rapid
air loss, call a tire repair facility. SeeRoadside
Assistance Program on page 7-6.
If the �at tire is due to a slow leak caused by a nail or
other similar road hazard, the tire in�ator kit may
be used to repair the damaged tire temporarily. The kit
uses a liquid tire sealant to seal small punctures in
the tread area of the tire. The �at tire is then in�ated to
at least 26 psi (179 kPa) and driven to evenly distribute
the tire sealant. The tire pressure is checked after
driving for a maximum of 10 minutes to see if the
slow leak has been stopped. If the tire pressure is
19 psi (131 kPa) or more, in�ate the tire up to the
standard operating pressure as shown on the tire and
loading information label found on center pillar near the
door latch or on the rear edge of the driver’s door.
SeeIn�ation - Tire Pressure on page 5-58.
5-66
Page 327 of 398

{CAUTION:
Idling the engine in a closed-in place or with
the climate control system off can cause
deadly carbon monoxide (CO). See “Engine
Exhaust” in the Index.
Notice:The car engine must be running to avoid
draining the battery while running the air
compressor.
3. Start your vehicle.
4. Turn the compressor on to in�ate the tire.
{CAUTION:
In�ating something too much can make it
explode, and you or others could be injured.
Be sure to read the in�ator instructions, and
in�ate the tire to its recommended pressure.
Do not exceed 36 psi (248 kPa).
5. In�ate the tire to at
least 26 psi (179 kPa),
but not more than
36 psi (248 kPa).
5-71
Page 338 of 398

Vehicle Identi�cation
Vehicle Identi�cation Number (VIN)
This is the legal identi�er for your vehicle. It appears on
a plate in the front corner of the instrument panel, on
the driver’s side. You can see it if you look through the
windshield from outside your vehicle. The VIN also
appears on the Vehicle Certi�cation and Service Parts
labels and the certi�cates of title and registration.
Engine Identi�cation
The 8th character in your VIN is the engine code. This
code will help you identify your engine, speci�cations
and replacement parts.
Service Parts Identi�cation Label
You’ll �nd this label on the inside of the glove box.
It’s very helpful if you ever need to order parts. On this
label is:
your VIN,
the model designation,
paint information and
a list of all production options and special
equipment.
Be sure that this label is not removed from the vehicle.
5-82
Page 343 of 398

Engine Compartment Fuse Block
The fuse block is located
under the hood in the
engine compartment on
the driver’s side of
the vehicle. SeeEngine
Compartment Overview on
page 5-12for more
information on location.
To remove the fuse block cover and access the fuses,
do the following:
1. To remove the primary fuse block cover, press in
on the two locking tabs and then lift the cover off.
2. Lift up on the secondary cover to remove it.
3. Reverse the steps to reinstall the covers.
Fuses Usage
1 Air Conditioning
2Automatic Transmission Shift Lock
Control System
3 Canister, Fuel System
4 Ignition
5-87