start stop button CHEVROLET SSR 2005 1.G Owners Manual
[x] Cancel search | Manufacturer: CHEVROLET, Model Year: 2005, Model line: SSR, Model: CHEVROLET SSR 2005 1.GPages: 388, PDF Size: 2.5 MB
Page 75 of 388
Key Release Button
(Manual Transmission)
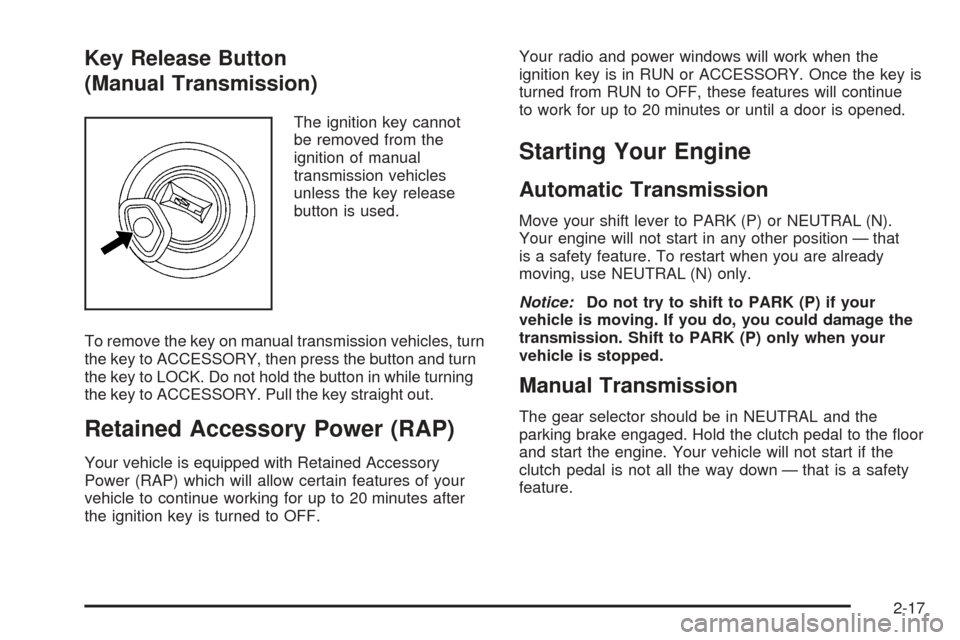
The ignition key cannot
be removed from the
ignition of manual
transmission vehicles
unless the key release
button is used.
To remove the key on manual transmission vehicles, turn
the key to ACCESSORY, then press the button and turn
the key to LOCK. Do not hold the button in while turning
the key to ACCESSORY. Pull the key straight out.
Retained Accessory Power (RAP)
Your vehicle is equipped with Retained Accessory
Power (RAP) which will allow certain features of your
vehicle to continue working for up to 20 minutes after
the ignition key is turned to OFF.Your radio and power windows will work when the
ignition key is in RUN or ACCESSORY. Once the key is
turned from RUN to OFF, these features will continue
to work for up to 20 minutes or until a door is opened.
Starting Your Engine
Automatic Transmission
Move your shift lever to PARK (P) or NEUTRAL (N).
Your engine will not start in any other position — that
is a safety feature. To restart when you are already
moving, use NEUTRAL (N) only.
Notice:Do not try to shift to PARK (P) if your
vehicle is moving. If you do, you could damage the
transmission. Shift to PARK (P) only when your
vehicle is stopped.
Manual Transmission
The gear selector should be in NEUTRAL and the
parking brake engaged. Hold the clutch pedal to the �oor
and start the engine. Your vehicle will not start if the
clutch pedal is not all the way down — that is a safety
feature.
2-17
Page 78 of 388
If you cannot shift out of PARK (P), ease pressure on
the shift lever, and push the shift lever all the way
into PARK (P) (press the button in on the console shift
lever) as you maintain brake application. Then move
the shift lever into the gear you wish. SeeShifting Out of
Park (P) (Automatic Transmission) on page 2-25.
REVERSE (R):Use this gear to back up.
Notice:Shifting to REVERSE (R) while your vehicle
is moving forward could damage the transmission.
The repairs would not be covered by your warranty.
Shift to REVERSE (R) only after your vehicle is
stopped.
To rock your vehicle back and forth to get out of
snow, ice or sand without damaging your transmission,
seeIf You Are Stuck: In Sand, Mud, Ice or Snow
on page 4-28.
NEUTRAL (N):In this position, your engine does
not connect with the wheels. To restart when you
are already moving, use NEUTRAL (N) only.
{CAUTION:
Shifting into a drive gear while your engine is
running at high speed is dangerous. Unless
your foot is �rmly on the brake pedal, your
vehicle could move very rapidly. You could
lose control and hit people or objects. Do not
shift into a drive gear while your engine is
running at high speed.
Notice:Shifting out of PARK (P) or NEUTRAL (N)
with the engine running at high speed may damage
the transmission. The repairs would not be covered
by your warranty. Be sure the engine is not running
at high speed when shifting your vehicle.
DRIVE (D):This position is for normal driving.
If you need more power for passing, and you are:
Going less than about 35 mph (55 km/h), push
your accelerator pedal about halfway down.
Going about 35 mph (55 km/h) or more, push
the accelerator all the way down.
You will shift down to the next gear and have
more power.
2-20
Page 127 of 388
Windshield Washer
{CAUTION:
In freezing weather, do not use your washer
until the windshield is warmed. Otherwise the
washer ¯uid can form ice on the windshield,
blocking your vision.
LQ(Windshield Washer): To spray washer ¯uid on
the windshield, press the paddle. The wipers will clear
the window and then either stop or return to your preset
speed.
Cruise Control
With cruise control, you can maintain a speed of about
25 mph (40 km/h) or more without keeping your foot
on the accelerator. This can really help on long
trips. Cruise control does not work at speeds below
about 25 mph (40 km/h).
If you apply your brakes, the cruise control will shut off.
{CAUTION:
Cruise control can be dangerous where you
cannot drive safely at a steady speed. So, do
not use your cruise control on winding roads
or in heavy traffic.
Cruise control can be dangerous on slippery
roads. On such roads, fast changes in tire
traction can cause needless wheel spinning,
and you could lose control. Do not use cruise
control on slippery roads.
{CAUTION:
If you leave your cruise control on when you
are not using cruise, you might hit a button
and go into cruise when you do not want to.
You could be startled and even lose control.
Keep the cruise control switch off until you
want to use cruise control.
3-9
Page 161 of 388
C.q(Personalization): Press this button to access
the vehicle personalization menu and customize
the personalization settings on your vehicle.
D.
r(Select) : Press this button to reset certain DIC
functions, acknowledge DIC warning messages
and clear them from the DIC, and set your
personalization settings.
Trip Information
3
(Trip Information): Press this button to scroll
through the odometer, TRIP A, TRIP B, and TIMER.
Odometer
Press the trip information button until the odometer
appears on the display. This shows the total distance
the vehicle has been driven in either miles or kilometers.
Trip Odometer
Press the trip information button until TRIP A or TRIP B
is displayed. This shows the current distance traveled
since the last reset for each trip odometer in either miles
or kilometers. Both odometers can be used at the
same time. Each trip odometer can be reset to zero separately by
pressing and holding the select button while the desired
trip odometer is displayed.
Timer
The DIC can be used as a stopwatch. Press the trip
information button until TIMER is displayed. Press the
select button to start the timer. The display will show
the amount of time that has passed since the timer was
last reset (not including time the ignition is off). Time
will continue to be counted as long as the ignition is on,
even if another display is being shown on the DIC.
The timer will record up to 99 hours, 59 minutes and
59 seconds (99:59:59) after which the display will
roll back to zero.
To stop the counting of time, press the select button
brie¯y while TIMER is displayed.
To reset the timer to zero, press and hold the select
button while TIMER is displayed until the timer returns
to zero.
Fuel Information
r
(Fuel Information):
Press this button to scroll
through the range, average fuel economy, instant fuel
economy and engine oil life.
3-43
Page 168 of 388
When operating the top in low temperatures, such as
below 32ÉF (0ÉC), the time needed to cycle the top will
increase. This may cause the top movement to stop
and the Roof Cycle Timeout message to appear on
the DIC display. If this occurs, you may release
the convertible top switch and press it again to continue
the cycle. Make sure nothing is blocking the path of
the top before pressing the switch again. It may
be necessary to do this several times to complete the
cycle, depending on the outside temperature. See
Convertible Top on page 2-51for more information.
Notice:If you operate the convertible top switch
continuously while the ignition is in ACCESSORY,
the battery will drain and you might not be able
to start your vehicle. Do not use the convertible
top switch for extended periods of time when
the ignition is in ACCESSORY.
Roof Hall Switch Fault
This message will be displayed on the DIC when trying
to raise or lower the convertible top and there is a
fault with this switch. If the message persists, see your
GM dealer for service.
Service Air Bag
If there is a problem with the airbag system, this
message will be displayed on the DIC. The airbag
readiness light may also be displayed on the instrument
panel cluster. See your GM dealer for service. Press
the select button to acknowledge this message and clear
it from the display. See
Servicing Your Airbag-Equipped
Vehicle on page 1-51andAirbag Readiness Light on
page 3-27for more information.
Service Brake System
If a problem occurs with the brake system, this message
will appear on the DIC. The brake system warning
light and the anti-lock brake system warning light may
also be displayed on the instrument panel cluster.
See
Brake System Warning Light on page 3-30andAnti-Lock Brake System Warning Light on page 3-31for
more information. If this message appears, stop as
soon as possible and turn off the vehicle. Restart the
vehicle and check for the message on the DIC display.
If the message is still displayed, or appears again
when you begin driving, the brake system needs service.
See your GM dealer. See
Brakes on page 5-35for
more information. Press the select button to
acknowledge this message and clear it from the display.
3-50
Page 182 of 388
If TRAF is on the display, press the TRAF button to turn
of the traffic announcements.
The radio will play the traffic announcement if the
volume is low. The radio will interrupt the play of a CD if
the last tuned station broadcasts traffic announcements.
Radio Messages
CAL ERR (Calibration Error):The audio system
has been calibrated for your vehicle from the factory.
If CAL ERR appears on the display it means that
the radio has not been con®gured properly for your
vehicle and it must be returned to your GM dealer for
service.
LOCKED: This message is displayed when the
THEFTLOCK
žsystem has locked up. Take your
vehicle to your GM dealer for service.
If any error occurs repeatedly or if an error cannot
be corrected, contact your GM dealer.
Playing a CD
Insert a CD partway into the slot, label side up. The
player will pull it in, and READING will appear on
the display. The CD should begin playing. If you want
to insert a CD with the ignition off, ®rst press the
EJT button or the DISPL knob. If the ignition or radio is turned off with a CD in the
player it will stay in the player. When the ignition or radio
is turned on, the CD will start to play where it stopped,
if it was the last selected audio source.
When the CD is inserted, the CD symbol will appear on
the display. As each new track starts to play, the
track number will appear on the display.
The CD player can play the smaller 3 inch (8 cm) single
CDs with an adapter ring. Full-size CDs and the
smaller CDs are loaded in the same manner.
If playing a CD-R the sound quality may be reduced
due to CD-R quality, the method of recording, the quality
of the music that has been recorded, and the way the
CD-R has been handled. There may be an increase
in skipping, difficulty in ®nding tracks, and/or difficulty in
loading and ejecting. If these problems occur try a
known good CD.
Do not add paper labels to CDs, they could get caught
in the CD player.
If an error appears on the display, see ªCD Messagesº
later in this section.
1 FLDx(Previous):
Press this pushbutton to go to
the start of the current track if more than eight seconds
have played. TRACK and the track number will
appear on the display. If this pushbutton is held or
pressed more than once, the player will continue moving
backward through the CD.
3-64
Page 183 of 388
2 FLDw(Next):Press this pushbutton to go to the
next track. TRACK and the track number will appear
on the display. If this pushbutton is held or pressed more
than once, the player will continue moving forward
through the CD.
3 REV (Reverse): Press and hold this pushbutton
to reverse quickly within a track. Press and hold this
pushbutton for less than two seconds to reverse
at 10 times the normal playing speed. Press and hold
it for more than two seconds to reverse at 20 times
the normal playing speed. Release this pushbutton to
play the passage. REV and the elapsed time of the track
will appear on the display.
4 FWD (Forward): Press and hold this pushbutton to
advance quickly within a track. Press and hold this
pushbutton for less than two seconds to advance at
six times the normal playing speed. Press and hold it for
more than two seconds to advance at 17 times the
normal playing speed. Release this pushbutton to play
the passage. ET and the elapsed time of the track
will appear on the display.
6 RDM (Random): Press this pushbutton to hear
the tracks in random, rather than sequential, order.
RDM ON will appear on the display. RDM T and
the track number will appear on the display when
each track starts to play. Press RDM again to turn off
random play. RDM OFF will appear on the display.oSEEKp: Press the left arrow to go to the start
of the current or the previous track. Press the right
arrow to go to the start of the next track. Pressing
either arrow for more than two seconds will search
the previous or next tracks at two tracks per second.
Release the button to stop searching and to play
the track.
oTUNEp: Turning the TUNE knob will fast track
reverse or advance through tracks. The track number
will appear on the display for each track.
DISPL (Display): Press this knob to see how long the
current track has been playing. ET and the elapsed
time of the track will appear on the display. To change
the default on the display, track or elapsed time,
press this knob until you see the display you want, then
hold the knob for two seconds. The radio will produce
one beep and the selected display will now be the
default.
BAND: Press this button to listen to the radio when
a CD is playing. The inactive CD will remain safely
inside the radio for future listening.
CD AUX (Auxiliary): Press this button to play a CD
when listening to the radio. The CD symbol will appear
on the display when a CD is loaded.
3-65
Page 186 of 388
If the ignition or radio is turned off with a CD in the
player it will stay in the player. When the ignition or radio
is turned on, the CD will start to play where it stopped,
if it was the last selected audio source.
As each new track starts to play, the track number will
appear on the display.
The CD player can play the smaller 3 inch (8 cm) single
CDs with an adapter ring. Full-size CDs and the
smaller CDs are loaded in the same manner.
If playing a CD-R the sound quality may be reduced
due to CD-R quality, the method of recording, the quality
of the music that has been recorded, and the way the
CD-R has been handled. There may be an increase
in skipping, difficulty in ®nding tracks, and/or difficulty in
loading and ejecting. If these problems occur try a
known good CD.
Do not add paper labels to CDs, they could get caught
in the CD player.
If an error appears on the display, see ªCD Messagesº
later in this section.
1 FLD
x(Previous Folder):Press this pushbutton
to go to the ®rst track in the previous folder. Pressing
this button while in folder random mode will take you
to the previous folder and random the tracks in that
folder. 2 FLD
w(Next Folder):
Press this pushbutton to go to
the ®rst track in the next folder. Pressing this button
while in folder random mode will take you to the
next folder and random the tracks in that folder.
3 REV (Reverse): Press and hold this pushbutton
to reverse quickly within a track. Press and hold this
pushbutton for less than two seconds to reverse
at 10 times the normal playing speed. Press and hold it
for more than two seconds to reverse at 20 times the
normal playing speed. Release this pushbutton to
play the passage. REV and the elapsed time of the track
will appear on the display.
4 FWD (Forward): Press and hold this pushbutton
to advance quickly within a track. Press and hold this
pushbutton for less than two seconds to advance at
10 times the normal playing speed. Press and hold it
for more than two seconds to advance at 20 times
the normal playing speed. Release this pushbutton to
play the passage. FWD and the elapsed time of
the track will appear on the display.
6 RDM (Random): To random the tracks in the current
folder or playlist, press and release this pushbutton.
FLDR RDM will appear on the display. Once all of the
tracks in the current folder or playlist have been played,
the system will move on to the next folder or playlist
and play all of the tracks in random order.
3-68
Page 187 of 388
To random all the tracks on the CD, press and hold this
pushbutton for two seconds. You will hear a beep
and CD RDM will appear on the display. This feature
will not work with playlists.
When in random, pressing and releasing either SEEK
arrow will take you to the next or previous random track.
Press and release this pushbutton again to turn off
random play. NO RDM will appear on the display.
oSEEKp:Press the left arrow to go to the start of
the previous track. Press the right arrow to go to the
start of the next track. Pressing either arrow for
more than two seconds will search the previous or next
tracks at two tracks per second. Release the button
to stop searching and to play the track.
TUNE: Turning the TUNE knob will fast track reverse or
advance through the tracks in all folders or playlists.
The track number and ®le name will appear on the
display for each track. Turning this knob while in random
will fast track reverse or advance the tracks in
sequential order. DISPL (Display):
Press this knob to switch between
track mode, folder/playlist mode, and time of day mode.
The display will show only eight characters, but there
can be up to four pages of text. If there are more
than eight characters in the song, folder, or playlist
name, pressing this knob within two seconds will take
you to the next page of text. If there are no other pages
to be shown, pressing this knob within two seconds
will take you to the next display mode.·Track mode will display the current track number
and the ID3 tag song name.
·Folder/playlist mode will display the current folder or
playlist number and the folder/playlist name.
·Time of day mode will display the time of day and
the ID3 tag song name.
To change the default on the display, press the DISPL
knob until you see the display you want, then hold
this knob for two seconds. The radio will produce one
beep and the selected display will now be the default.
INFO (Information): INFO will appear on the display
whenever a current track has ID3 tag information.
Press this button to display the artist name and album
contained in the tag. INFO will disappear from the
display when the information in the ID3 tag has ®nished.
3-69
Page 195 of 388
Playing a CD
If the ignition or radio is turned off, with a CD in the
player, it will stay in the player. When the ignition
or radio is turned on, the CD will start playing where it
stopped, if it was the last selected audio source.
When a CD is inserted, the CD symbol will appear on
the CD. As each new track starts to play, the track
number will appear on the display.
The CD player can play the smaller 3 inch (8 cm) single
CDs with an adapter ring. Full-size CDs and the
smaller CDs are loaded in the same manner.
If playing a CD-R the sound quality may be reduced
due to CD-R quality, the method of recording, the quality
of the music that has been recorded, and the way the
CD-R has been handled. There may be an increase
in skipping, difficulty in ®nding tracks, and/or difficulty in
loading and ejecting. If these problems occur try a
known good CD.
Do not add paper labels to CDs, they could get caught
in the CD player.
If an error appears on the display, see ªCD Messagesº
later in this section.
LOAD:Press this button to load CDs into the CD
player. This CD player will hold up to six CDs. To insert one CD, do the following:
1. Turn the ignition on.
2. Press and release the LOAD button.
3. Wait for the indicator light, located to the right of the slot, to turn green.
4. Load a CD. Insert the CD partway into the slot, label side up. The player will pull the CD in.
To insert multiple CDs, do the following: 1. Turn the ignition on.
2. Press and hold the LOAD button for two seconds. You will hear a beep and the indicator light, located
to the right of the slot, will begin to ¯ash and
MULTI LOAD # will appear on the display.
3. Once the light stops ¯ashing and turns green, INSERT CD # will appear on the display, load
a CD. Insert the CD partway into the slot, label side
up. The player will pull the CD in.
Once the CD is loaded, the indicator light will begin
¯ashing again. Once the light stops ¯ashing and
turns green, you can load another CD. The
CD player takes up to six CDs. Do not try to load
more than six.
3-77