Dome CHEVROLET SUBURBAN 1994 Owners Manual
[x] Cancel search | Manufacturer: CHEVROLET, Model Year: 1994, Model line: SUBURBAN, Model: CHEVROLET SUBURBAN 1994Pages: 385, PDF Size: 19.88 MB
Page 31 of 385
1. Close and lock the door.
2. Adjust the seat (to see how, see “Seats” in the Index) so you can sit up
straight.
L 1
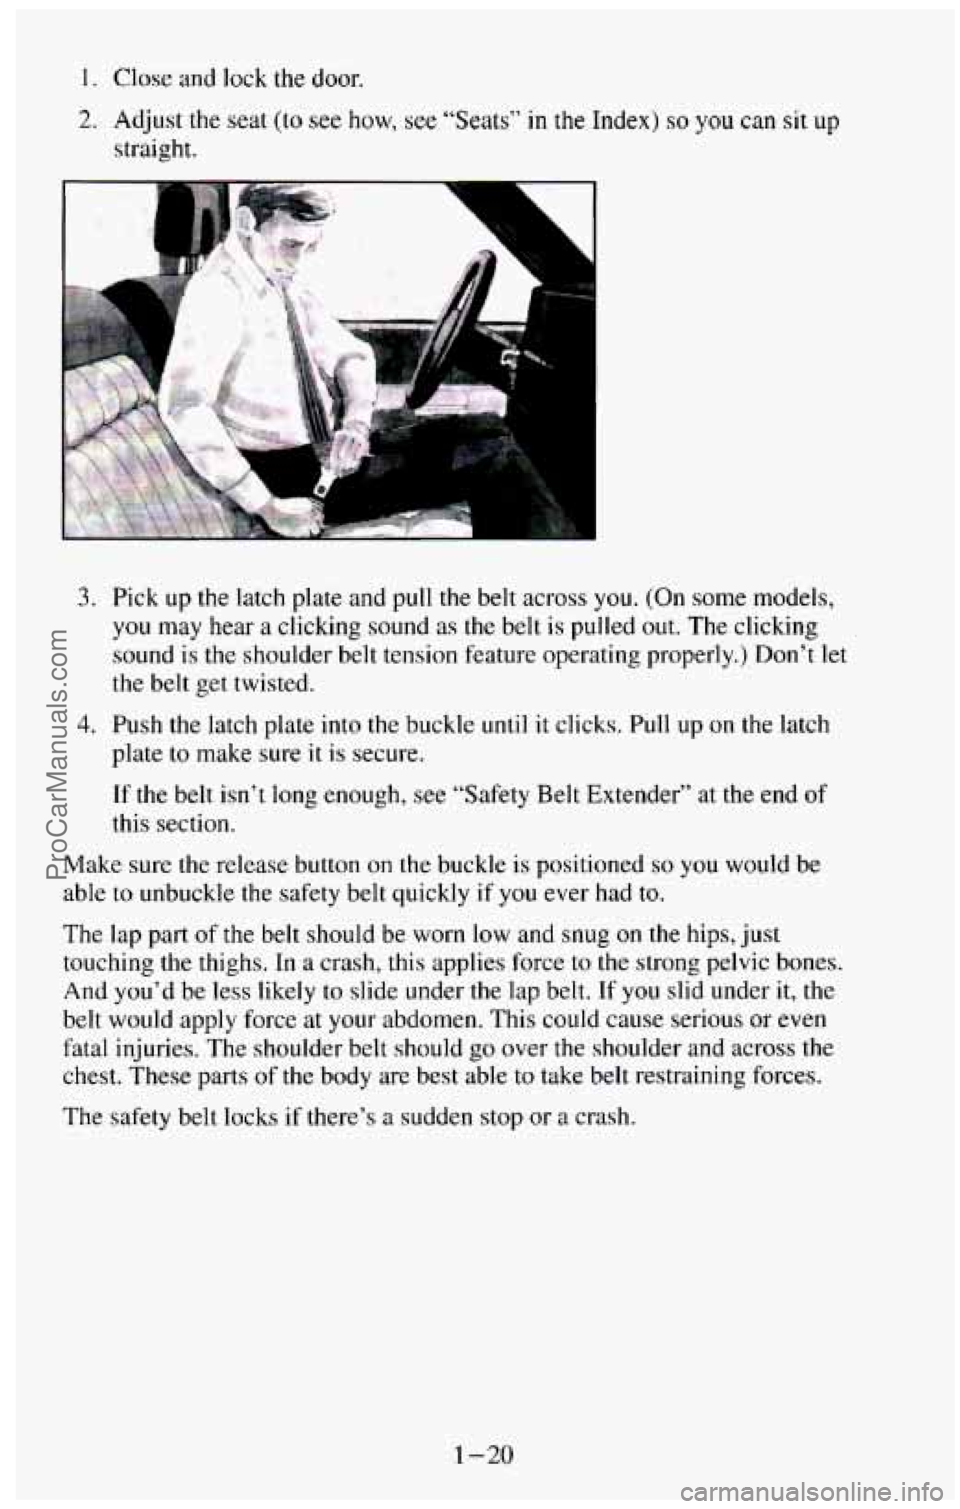
3. Pick up the latch plate and pull the belt across you. (On some models,
you may hear a clicking sound as the belt is pulled out. The clicking
sound is the shoulder belt tension feature operating properly.) Don’t
let
the belt get twisted.
4. Push the latch plate into the buckle until it clicks. Pull up on the latch
plate
to make sure it is secure.
If the belt isn’t long enough, see “Safety Belt Extender’’ at the end of
this section.
Make sure the release button on the buckle
is positioned so you would be
able
to unbuckle the safety belt quickly if you ever had to.
The lap part of the belt should be worn low and snug on the hips, just
touching the thighs.
In a crash, this applies force to the strong pelvic bones.
And you’d be less likely to slide under the lap belt. If
you slid under it, the
belt would apply force
at your abdomen. This could cause serious or even
fatal injuries. The shoulder belt should go over the shoulder and across the
chest.
These parts of the body are best able to take belt restraining forces.
The safety belt locks
if there’s a sudden stop or a crash.
1-20
ProCarManuals.com
Page 41 of 385
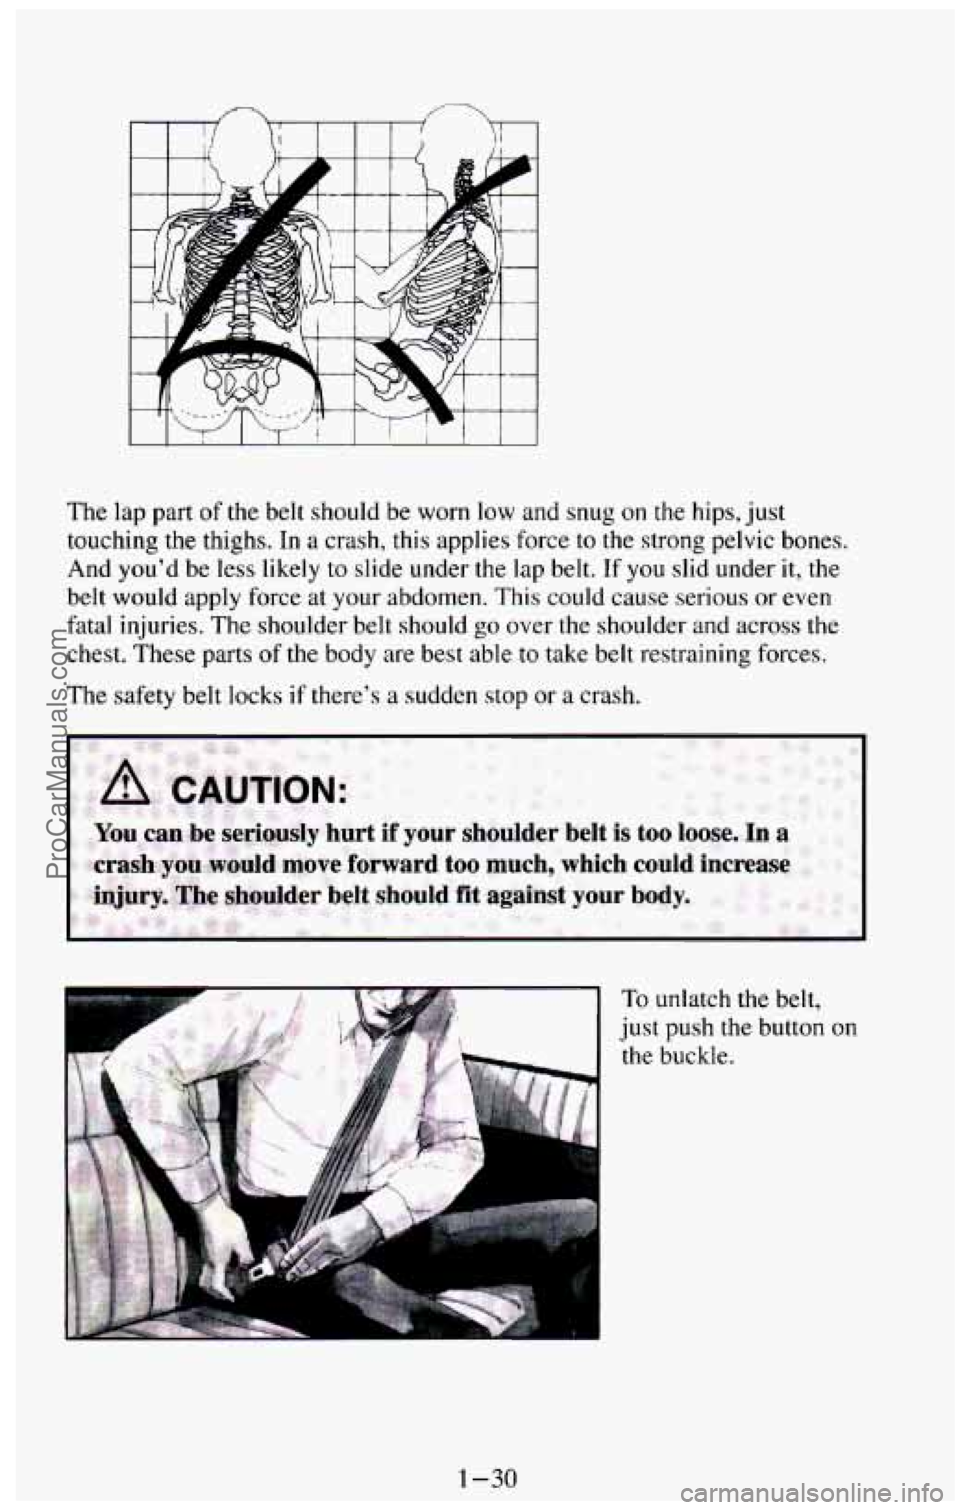
The lap part of the belt should be worn low and snug on the hips, just
touching the thighs. In
a crash, this applies force to the strong pelvic bones.
And you’d be less likely
to slide under the lap belt. If you slid under it, the
belt would apply force at your abdomen. This could cause serious or
even
fatal injuries. The shoulder belt should go over the shoulder and across the
chest.
These parts of the body are best able to take belt restraining forces.
The safety belt locks if there’s
a sudden stop or a crash.
To unlatch the belt,
just push the button on
the buckle.
1-30
ProCarManuals.com
Page 104 of 385
Dome Lights
The dome lights will come on when you open the doors or tailgate. You can
also turn the dome lights
on by turning the interior light dimmer dial all they
way up
until it clicks.
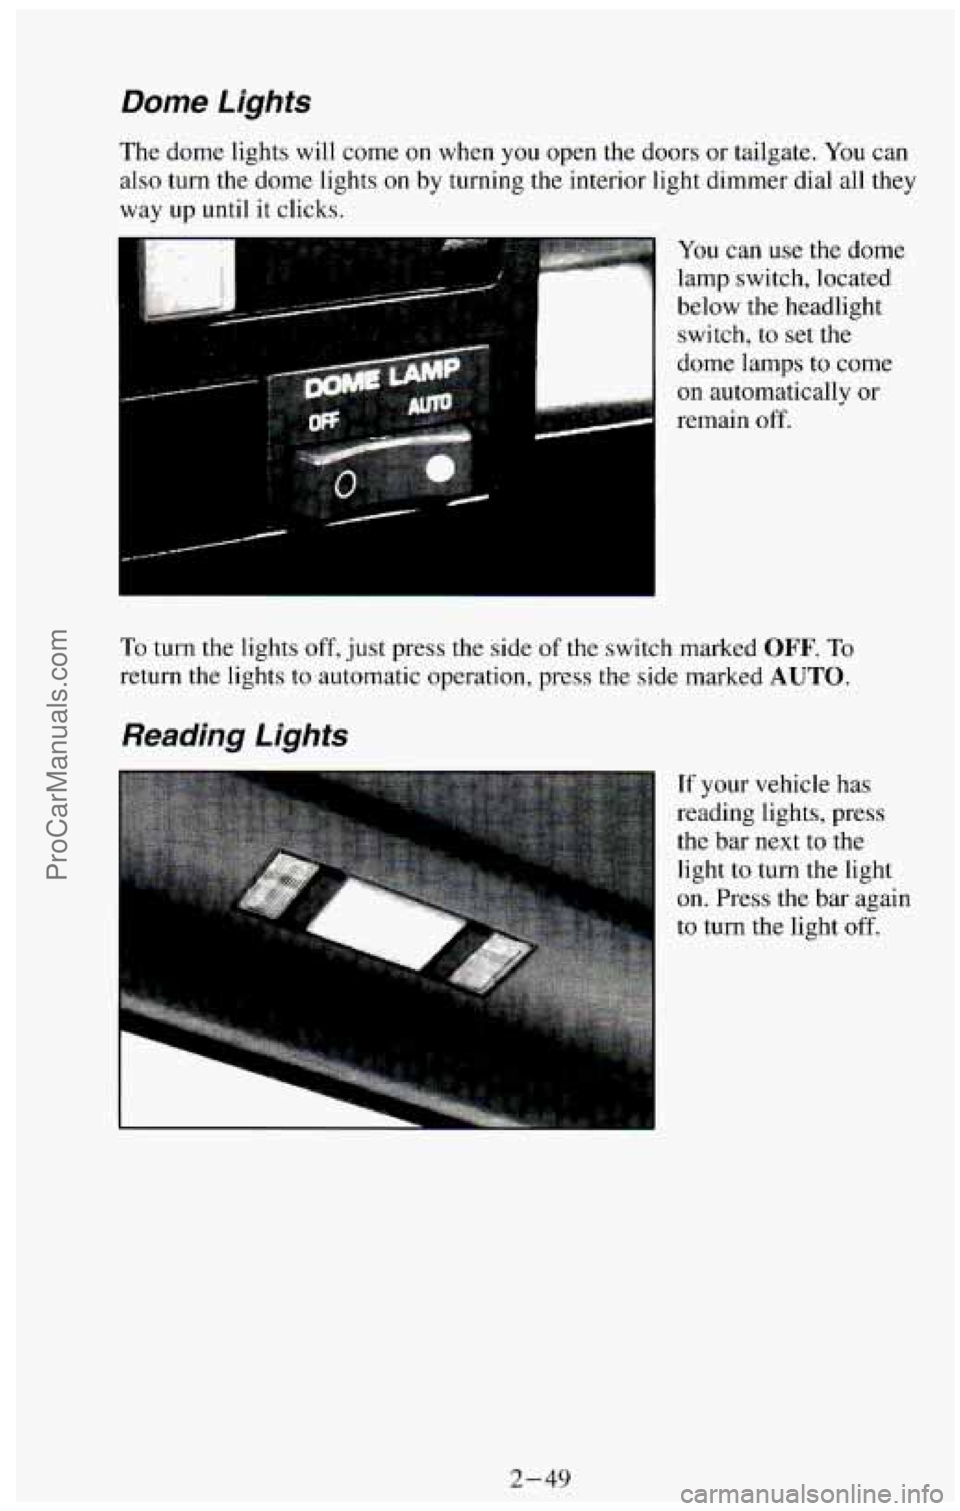
You can use the dome
lamp switch, located
below
the headlight
switch, to set the
dome lamps to come
on automatically or
remain off.
To turn the lights off, just press the side of the switch marked OFF. To
return the lights to automatic operation, press the side marked AUTO.
Reading Lighfs
If your vehicle has
reading lights, press
the bar next to the
light to turn the light
on. Press the bar again
to turn the light off.
2-49
ProCarManuals.com
Page 119 of 385
Instrument Panel
13 1’2
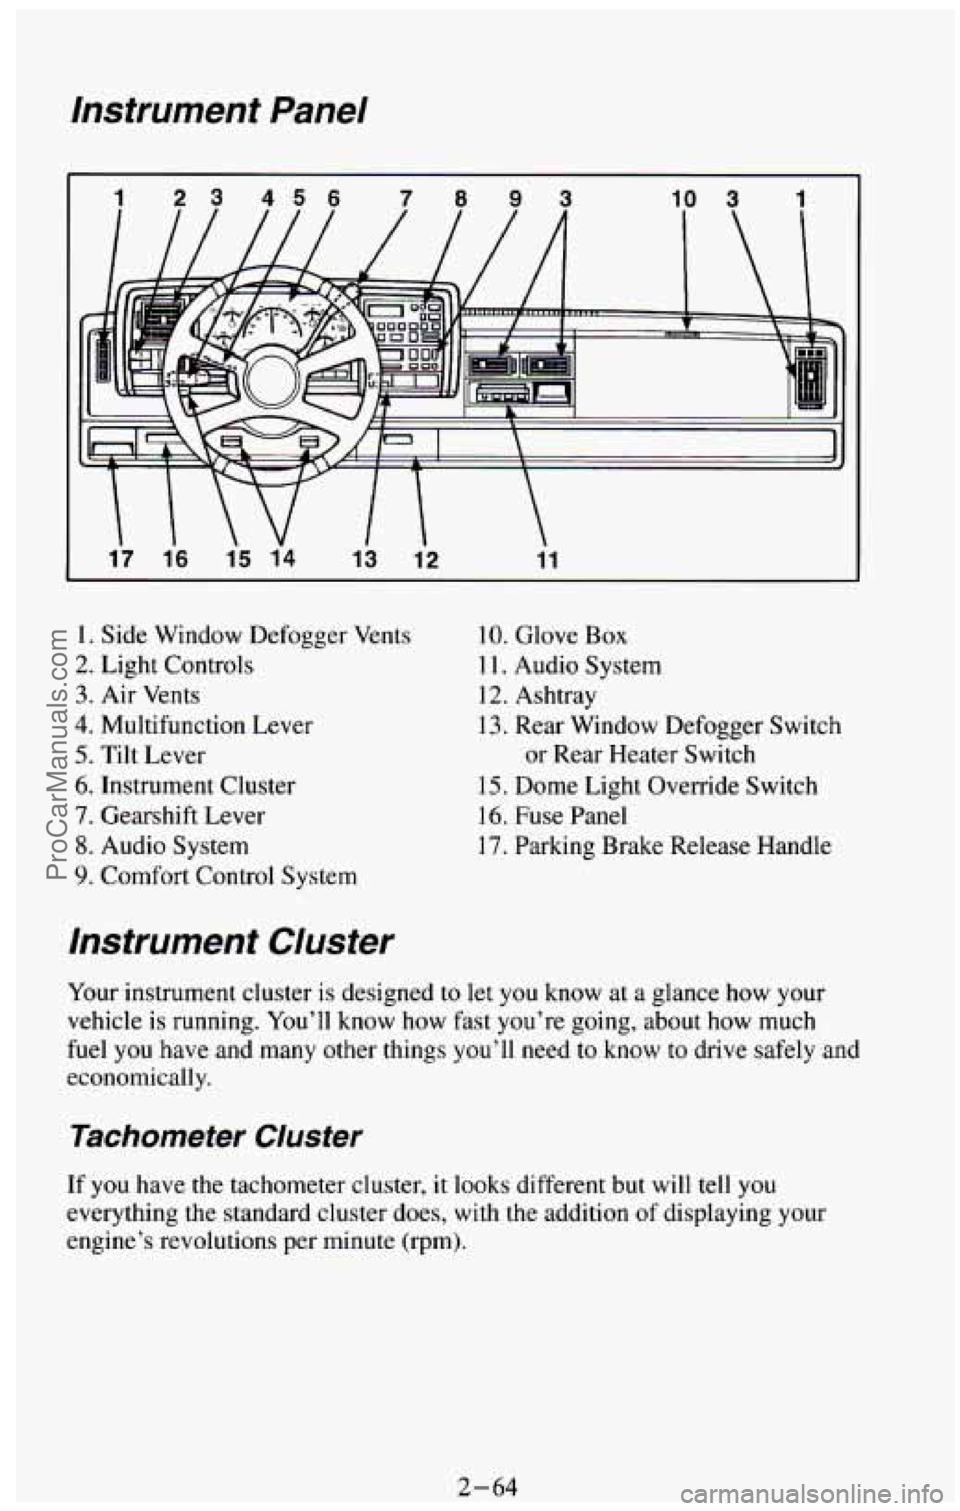
1. Side Window Defogger Vents
2. Light Controls
3. Air Vents
4. Multifunction Lever
5. Tilt Lever
6. Instrument Cluster
7. Gearshift Lever
8. Audio System
9. Comfort Control System
10. Glove Box
1 1. Audio System
12. Ashtray
13. Rear Window Defogger Switch
or Rear Heater Switch
15. Dome Light Override Switch
16. Fuse Panel
17. Parking Brake Release Handle
Instrument Cluster
Your instrument cluster is designed to let you know at a glance how your
vehicle is running.
You’ll know how fast you’re going, about how much
fuel you have
and many other things you’ll need to know to drive safely and
economically.
Tachometer Cluster
If you have the tachometer cluster, it looks different but will tell you
everything the standard cluster does, with the addition of displaying your
engine’s revolutions per minute (rpm).
2-64 ProCarManuals.com
Page 120 of 385
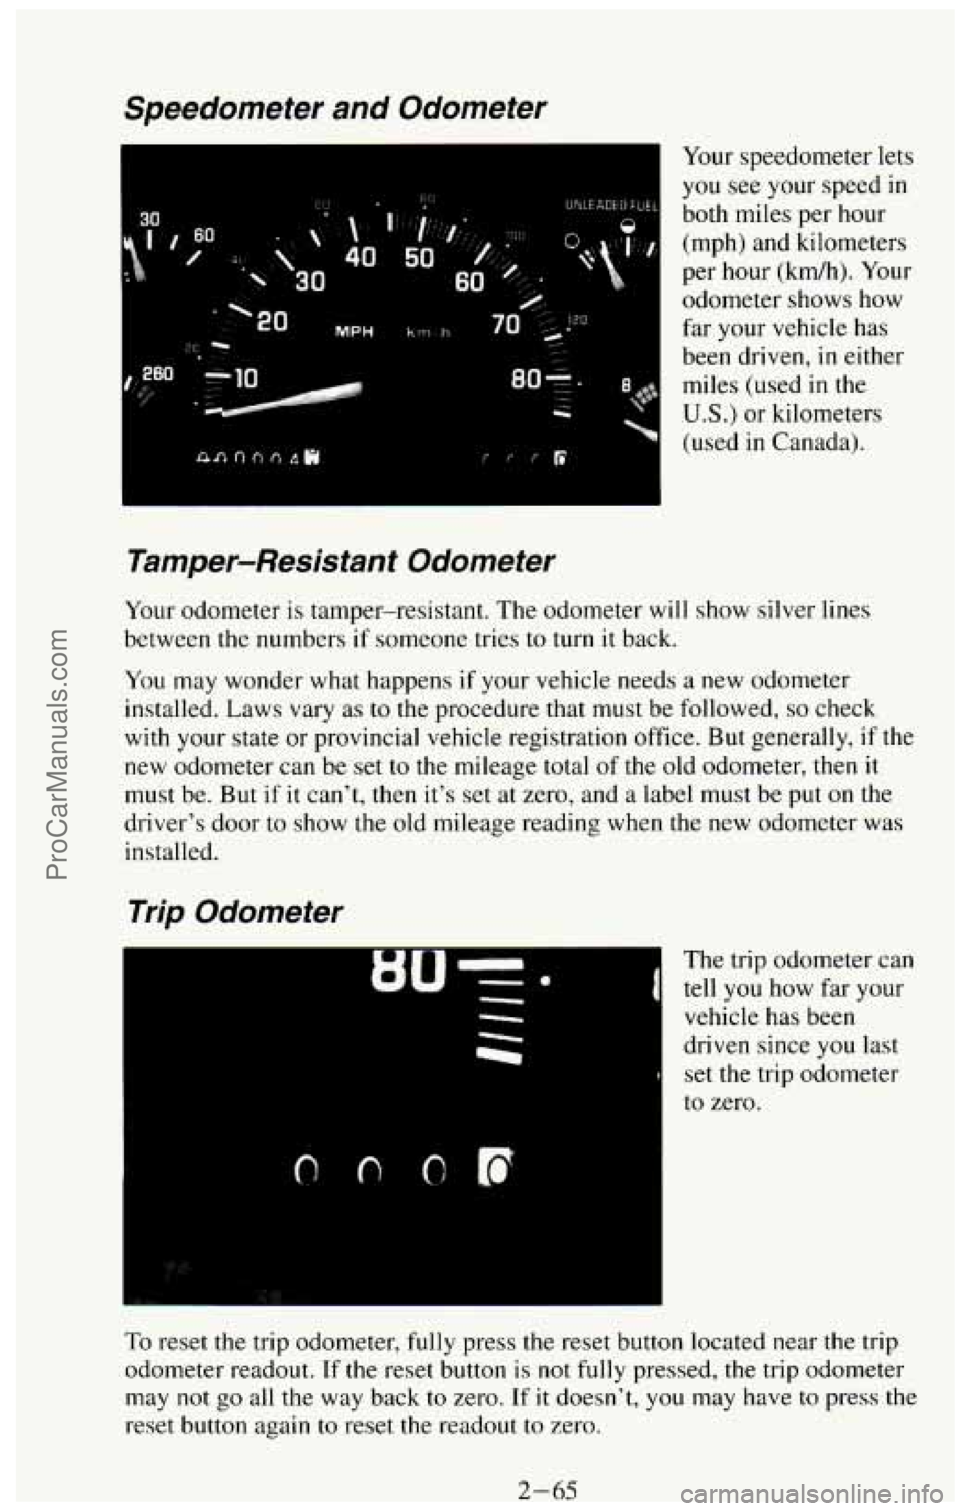
Speedometer and Odometer
. ..
' -20
MPH
Your speedometer lets
you see your speed in
both miles per hour
(mph) and kilometers
per hour (kdh). Your
odometer shows how
far your vehicle has
been driven, in either
miles (used
in the
US.) or kilometers
(used
in Canada).
Tamper-Resistant Odometer
Your odometer is tamper-resistant. The odometer will show silver lines
between
the numbers if someone tries to turn it back.
You may wonder what happens if your vehicle needs a new odometer
installed. Laws vary
as to the procedure that must be followed, so check
with your state or provincial
vehicle registration office. But generally, if the
new odometer can be set to the mileage total
of the old odometer, then it
must be. But if it can't, then it's set at zero, and a label must be put on the
driver's door to show the old mileage reading when the new odometer was
installed.
Trip Odometer
The trip odometer can
tell you how far your
vehicle has been
driven since
you last
set the trip odometer
to zero.
To reset the trip odometer, fully press the reset button located near the trip
odometer readout.
If the reset button is not fully pressed, the trip odometer
may
not go all the way back to zero. If it doesn't, you may have to press the
reset button again
to reset the readout to zero.
2-65 ProCarManuals.com
Page 187 of 385
Once you are moving on the freeway, make certain you allow a reasonable
following distance. Expect to move slightly slower
at night.
When you want to leave the freeway, move to the proper lane well
in
advance. If you miss your exit do not, under any circumstances, stop and
back up. Drive on to the next exit.
The exit ramp can be curved, sometimes quite sharply.
The exit speed is usually posted.
Reduce your speed according to your speedometer, not to your sense of
motion. After driving for
any distance at higher speeds, you may tend to
think you
are going slower than you actually are.
Before Leaving on a Long Trip
Make sure you’re ready. Try to be well rested. If you must start when you’re
not fresh
- such as after a day’s work - don’t plan to make too many
miles that first part of the journey. Wear comfortable clothing and shoes you
can easily drive
in.
Is your vehicle ready for a long trip? If you keep it serviced and maintained,
it’s ready
to go. If it needs service, have it done before starting out. Of
course, you’ll find experienced and able service experts in vehicle
dealerships all across North America. They’ll be ready and willing
to help if
you need
it.
Here are some things you can check before a trip:
0
0
0
0
0
0
Windshield Washer Fluid: Is the reservoir full? Are all windows clean
inside and outside?
Wiper Blades: Are they in good shape?
Fuel, Engine OiZ, Other Fluids: Have you checked all levels?
Lights: Are they all working? Are the lenses clean?
Tires: They are vitally important to a safe, trouble-free trip. Is the tread
good enough for long-distance driving? Are the tires all inflated to the
recommended pressure?
Weather Forecasts: What’s the weather outlook along your route?
Should you delay your trip a short time to avoid a major storm system?
Maps: Do you have up-to-date maps?
4-28
ProCarManuals.com
Page 313 of 385
Wheel Replacement
Replace any wheel that is bent, cracked or badly rusted. If wheel nuts keep
coming loose, the wheel, wheel bolts, and wheel nuts should be replaced.
If
the wheel leaks air, replace it (except some aluminum wheels, which can
sometimes be repaired). See your GM dealer if any
of these conditions exist.
Your dealer will know the kind
of wheel you need.
Each new wheel should have the same load carrying capacity, diameter,
width, offset, and be mounted the same way as the one it replaces.
If you need to replace any of your wheels, wheel bolts, or wheel nuts,
replace them only with new GM original equipment parts. This way, you
will be sure to have the right wheel, wheel bolts, and wheel nuts
for your
GM model.
NOTICE:
The wrong wheel can also cause problems with bearing life,
brake cooling, speedometer/odometer calibration, headlight aim, bumper height, vehicle ground clearance, and tire or tire chain\
clearance to the body and chassis.
Used Replacement Wheels
ProCarManuals.com
Page 330 of 385
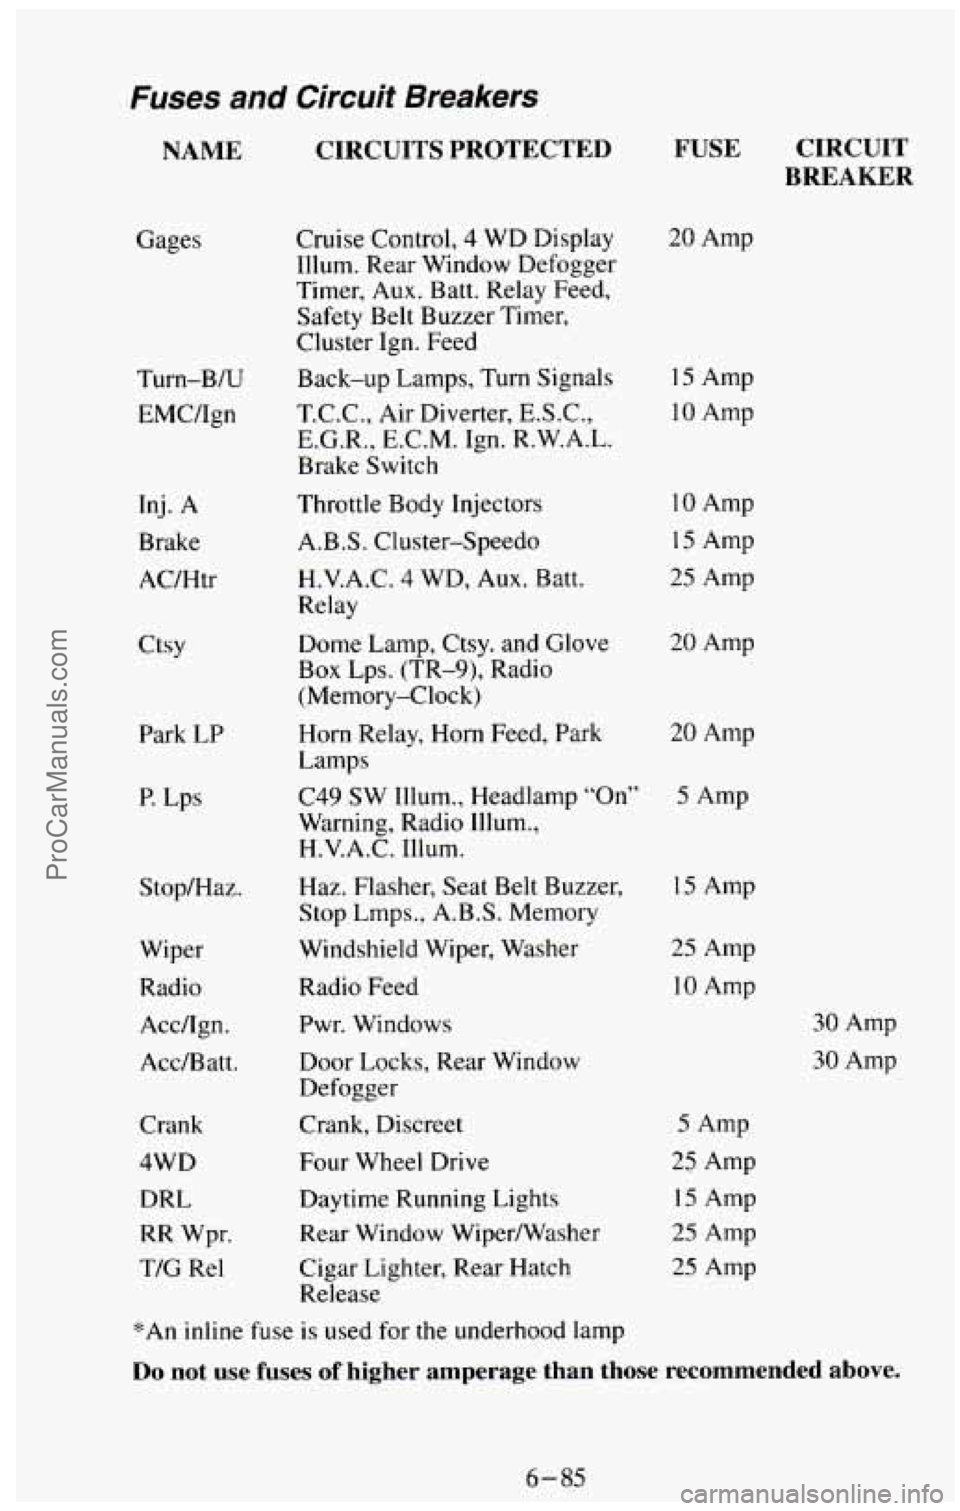
Fuses and Circuit Breakers
NAME CIRCUITS PROTECTED
Gages Turn-B/U
EMC/Ign
Inj. A
Brake
AC/Htr
Ctsy Park
LP
P. Lps
Stop/Haz.
Wiper
Radio Acc/Ign.
Acc/Batt.
Crank
4WD DRL
RR Wpr.
TIC Re1 Cruise Control,
4 WD Display
Illum. Rear Window Defogger
Timer, Aux. Batt. Relay Feed,
Safety Belt Buzzer Timer,
Cluster Ign. Feed
Back-up Lamps, Turn Signals
T.C.C., Air Diverter, E.S.C.,
E.G.R., E.C.M. Ign. R.W.A.L.
Brake Switch
Throttle Body Injectors
A.B.S. Cluster-Speed0
H.V.A.C.
4 WD, Aux. Batt.
Relay
Dome Lamp, Ctsy. and Glove
Box Lps. (TR-9), Radio
(Memory-Clock)
FUSE CIRCUIT
BREAKER
20 Amp
15 Amp
10 Amp
10 Amp
15 Amp
25 Amp
20 Amp
Horn Relay,
Horn Feed, Park 20 Amp
Lamps
C49 SW Illum., Headlamp
“On” 5 Amp
Warning, Radio Illum.,
H.V.A.C.
Illum.
Haz. Flasher, Seat Belt Buzzer,
Stop
Lmps., A.B.S. Memory
Windshield Wiper, Washer
Radio Feed Pwr. Windows
Door Locks, Rear Window
Defogger
Crank, Discreet
Four Wheel Drive
Daytime Running Lights
Rear Window Wipermasher
Cigar Lighter, Rear Hatch
Release
15 Amp
25 Amp
10 Amp
5 Amp
25 Amp
15 Amp
25 Amp
25 Amp
30 Amp
30 Amp
*An inline fuse is used for the underhood lamp
Do not use fuses of higher amperage than those recommended above.
6-85
ProCarManuals.com
Page 331 of 385
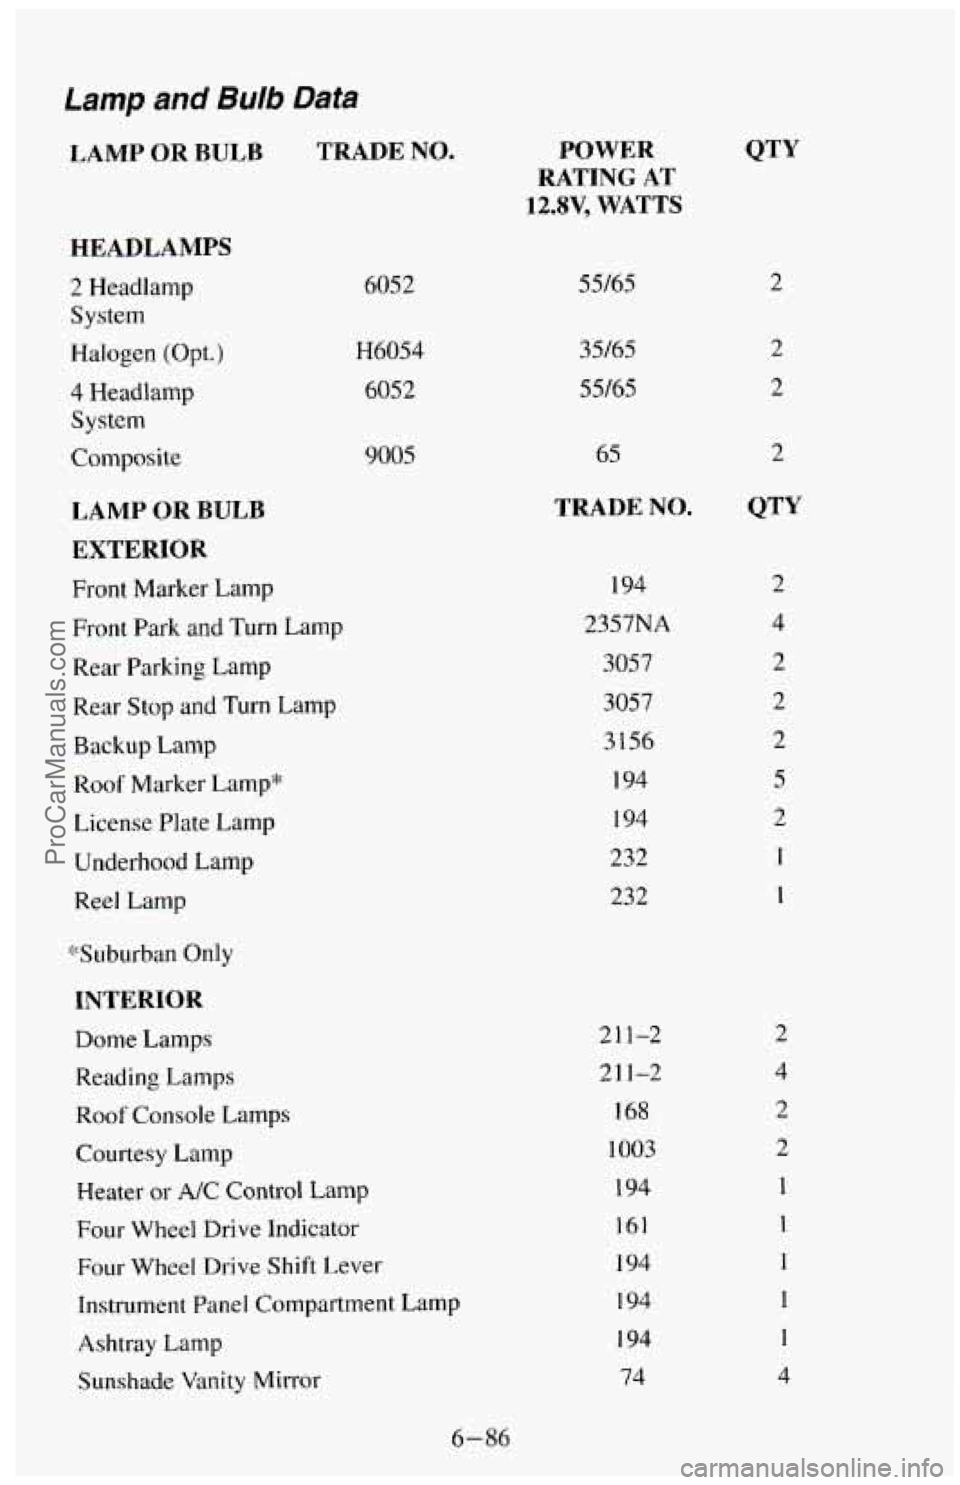
Lamp and Bulb Data
LAMP OR BULB TRADE NO.
HEADLAMPS
2 Headlamp
System
Halogen
(Opt.)
4 Headlamp
System
Composite
LAMP OR BULB
EXTERIOR
Front Marker Lamp
Front Park
and Turn Lamp
Rear Parking Lamp
Rear Stop and Turn Lamp
Backup Lamp
Roof Marker Lamp"
License Plate Lamp
Underhood Lamp
Reel Lamp
*Suburban Only 6052
H6054 6052
9005
INTERIOR
Dome Lamps
Reading Lamps
Roof Console Lamps
Courtesy Lamp
Heater
or A/C Control Lamp
Four Wheel Drive Indicator
Four Wheel Drive Shift Lever
Instrument Panel Compartment Lamp
Ashtray Lamp
Sunshade
Vanity Mirror
POWER
RATING AT
12.8V, WATTS
55/65
35/65 55/65
65
TRADE NO.
194
2357NA
3057 3057
3156
194 194
232 232
211-2
21 1-2
I68
1003
194
161
194
194
194
74
i
2
2
2
2
4
2
2
2
5
2
1
1
2
4 2
2
1
1
1
1
1
4
6-86
ProCarManuals.com
Page 361 of 385
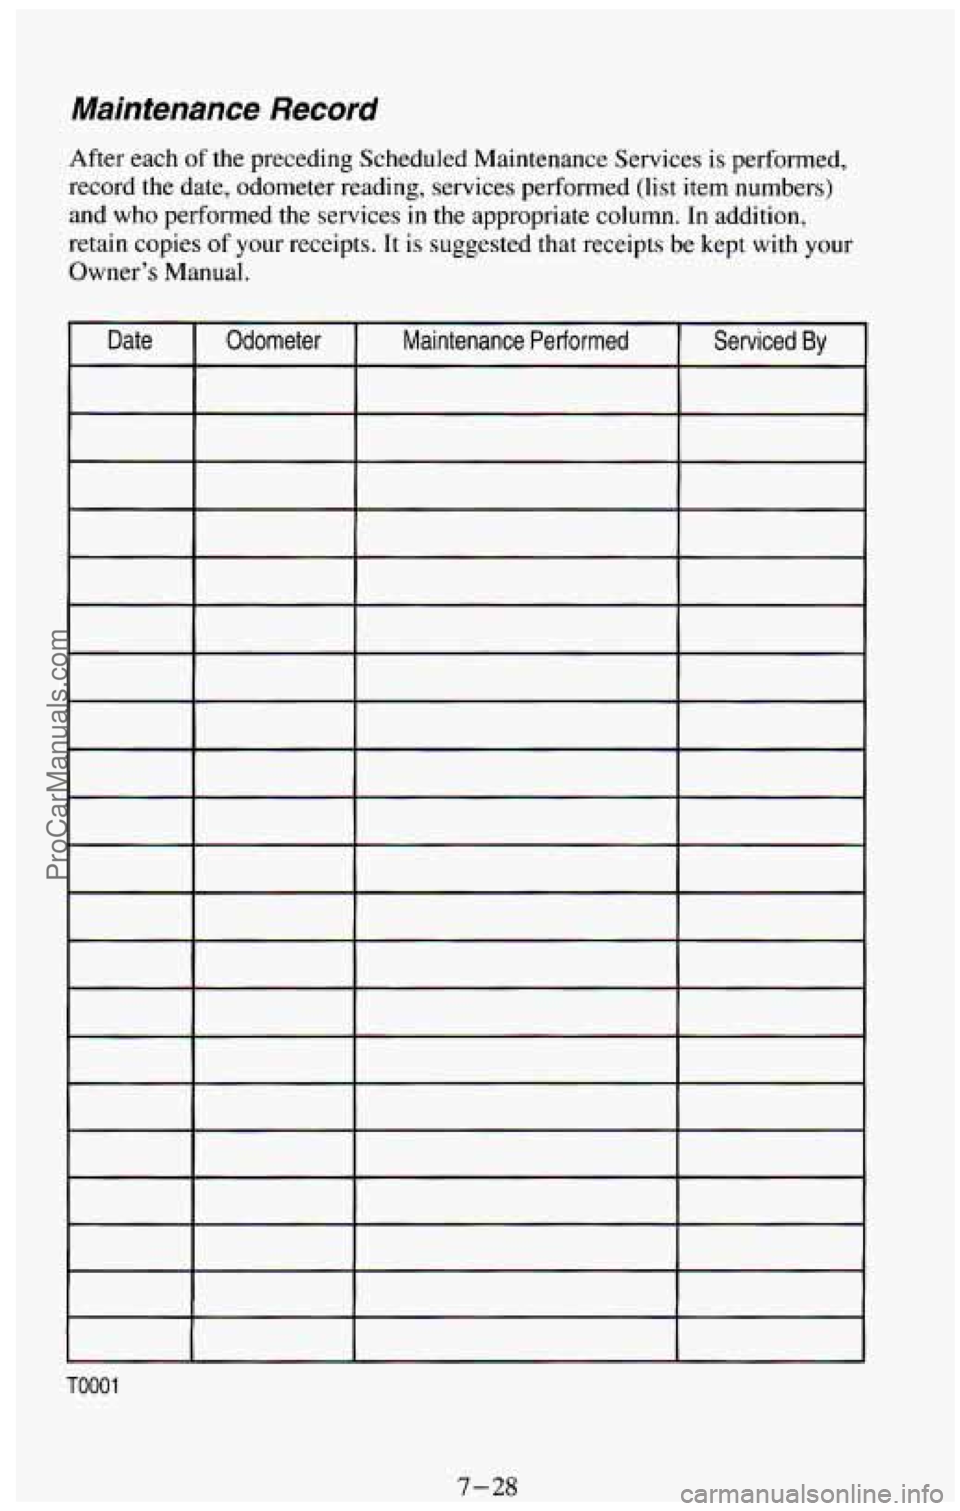
Maintenance Record
After each of the preceding Scheduled Maintenance Services is performed,
record the date, odometer reading, services performed (list
item numbers)
and who performed the services in
the appropriate column. In addition,
retain copies of your receipts. It
is suggested that receipts be kept with your
Owner's Manual.
7-28 ProCarManuals.com