ECO mode CHEVROLET SUBURBAN 2005 9.G Owners Manual
[x] Cancel search | Manufacturer: CHEVROLET, Model Year: 2005, Model line: SUBURBAN, Model: CHEVROLET SUBURBAN 2005 9.GPages: 536, PDF Size: 3.07 MB
Page 14 of 536
Head Restraints
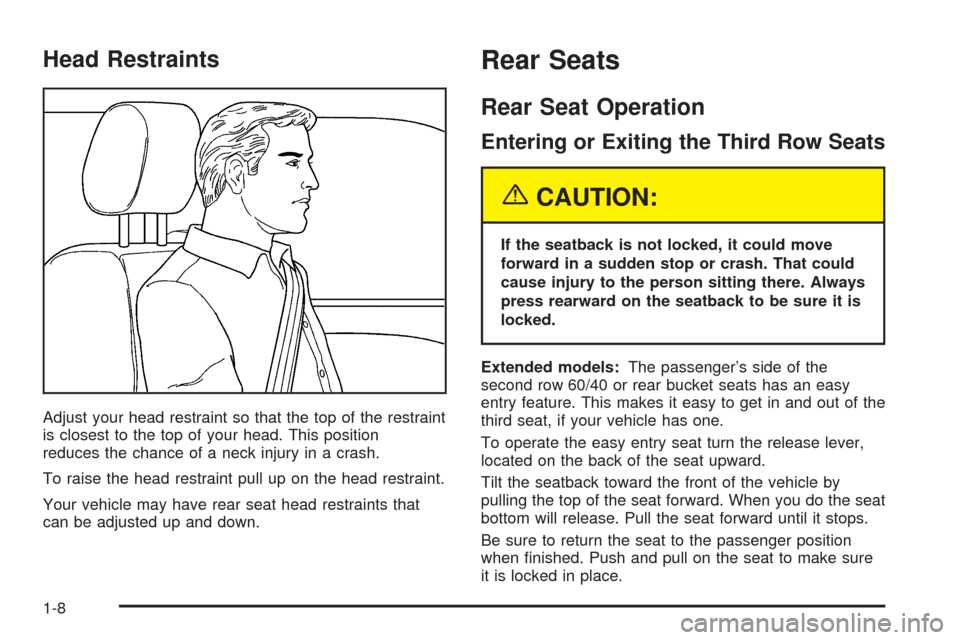
Adjust your head restraint so that the top of the restraint
is closest to the top of your head. This position
reduces the chance of a neck injury in a crash.
To raise the head restraint pull up on the head restraint.
Your vehicle may have rear seat head restraints that
can be adjusted up and down.
Rear Seats
Rear Seat Operation
Entering or Exiting the Third Row Seats
{CAUTION:
If the seatback is not locked, it could move
forward in a sudden stop or crash. That could
cause injury to the person sitting there. Always
press rearward on the seatback to be sure it is
locked.
Extended models:The passenger’s side of the
second row 60/40 or rear bucket seats has an easy
entry feature. This makes it easy to get in and out of the
third seat, if your vehicle has one.
To operate the easy entry seat turn the release lever,
located on the back of the seat upward.
Tilt the seatback toward the front of the vehicle by
pulling the top of the seat forward. When you do the seat
bottom will release. Pull the seat forward until it stops.
Be sure to return the seat to the passenger position
when �nished. Push and pull on the seat to make sure
it is locked in place.
1-8
Page 15 of 536
60/40 Split Bench Seat
Tahoe models:The rear seat may have a 60/40 split
seat which may be folded down to give you more
cargo space.
Extended models:The second row rear seat of
extended models may have a 60/40 split seat. Either
side of the rear seat my be folded down to provide
more cargo space.
Folding the Seatbacks
{CAUTION:
If the seatback is not locked, it could move
forward in a sudden stop or crash. That could
cause injury to the person sitting there. Always
press rearward on the seatback to be sure it is
locked.Make sure that nothing is under or in front of the seat
and that the head restraints are completely lowered.
On Tahoe models the rear seatbacks may be equipped
with rearward folding head restraints. When the
seatback is being folded down, the head restraint will
automatically fold rearward to allow a �at load �oor
for cargo or entry to the third row seat (if equipped).
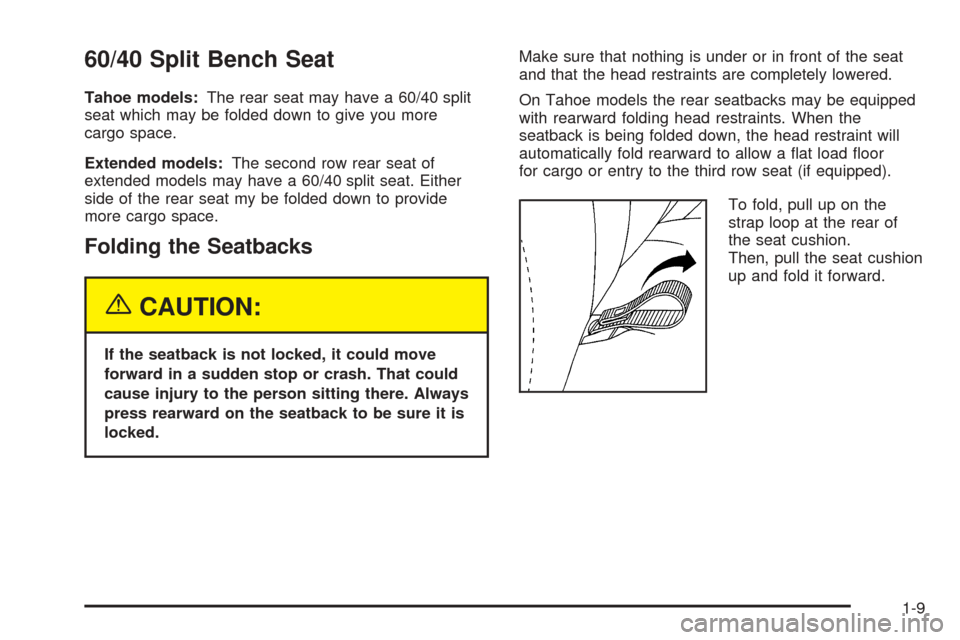
To fold, pull up on the
strap loop at the rear of
the seat cushion.
Then, pull the seat cushion
up and fold it forward.
1-9
Page 101 of 536
Programmable Automatic
Door Locks
Your vehicle is equipped with an automatic lock/unlock
feature which enables you to program your vehicle’s
power door locks. You can program this feature through
the Driver Information Center (DIC), or by the following
method.
Programmable Locking Feature
Following are the two available programming options:
Mode 1:All doors lock when the transmission is shifted
into gear.
Mode 2:All doors lock when the vehicle speed is
greater than 8 mph (13 km/h).
The automatic door locks were pre-programmed at the
factory to lock all the doors when the transmission
is shifted into gear. The following instructions detail how
to program your door locks differently than the factory
setting. Choose one of the two programming options
listed above before entering the program mode.To enter the program mode, do the following:
1. Begin with the ignition off. Then pull the turn
signal/multifunction lever toward you and hold
it there while you perform the next step.
2. Turn the key to RUN and LOCK twice. Then, with the
key in LOCK, release the turn signal/multifunction
lever. Once you do this, you will hear the lock switch
lock and unlock, the horn will chirp twice, and a
30 second program timer will begin. You are now
ready to program the automatic door locks.
3. Select one of the two programming options listed
previously, and press the lock side of the power
door lock switch to cycle through the lock options.
You will have 30 seconds to begin programming.
If you exceed the 30 second limit, the locks will
automatically lock and unlock and the horn will chirp
twice to indicate that you have left the program
mode. If this occurs, repeat the procedure beginning
with Step 1 to re-enter the programming mode.
You can exit the program mode any time by turning the
ignition to RUN (the locks will automatically lock and
unlock and the horn will chirp twice to indicate that you
are leaving the program mode). If the lock/unlock
switches are not pressed while in the programming
mode, the current auto lock/unlock setting will not
be modi�ed.
See your dealer for more information.
2-11
Page 102 of 536
Programmable Unlocking Feature
The following is the list of available programming
options:
Mode 1:Driver’s door unlocks when the transmission is
shifted into PARK (P).
Mode 2:All doors unlock when the transmission is
shifted into PARK (P).
Mode 3:All doors unlock when the key is removed
from the ignition.
Mode 4:No automatic door unlock.
The automatic door locks were pre-programmed
at the factory to unlock the driver’s door once the
transmission is shifted to PARK (P). The following
instructions detail how to program your door locks
differently than the factory setting. Choose one of the
four programming options listed above before entering
the program mode.
To enter the program mode, do the following:
1. Begin with the ignition off. Then pull the turn
signal/multifunction lever toward you and hold
it there while you perform the next step.2. Turn the key to RUN and LOCK twice. Then, with the
key in LOCK, release the turn signal/multifunction
lever. Once you do this, you will hear the lock switch
lock and unlock, the horn will chirp twice, and a
30-second program timer will begin.
3. You are now ready to program the automatic door
locks. Select one of the four programming options
listed previously, and press the unlock side of
the power door lock switch to cycle through the
unlocking options. You will have 30 seconds
to begin programming. If you exceed the 30-second
limit, the locks will automatically lock and unlock
and the horn will chirp twice to indicate that
you have left the program mode. If this occurs,
repeat the procedure beginning with Step 1
to re-enter the programming mode.
You can exit the program mode any time by turning the
ignition to RUN. The locks will automatically lock and
unlock and the horn will chirp twice to indicate that you
are leaving the program mode. If the lock/unlock
switches are not pressed while in the programming
mode, the current auto lock/unlock setting will not be
modi�ed.
See your dealer for more information.
2-12
Page 118 of 536
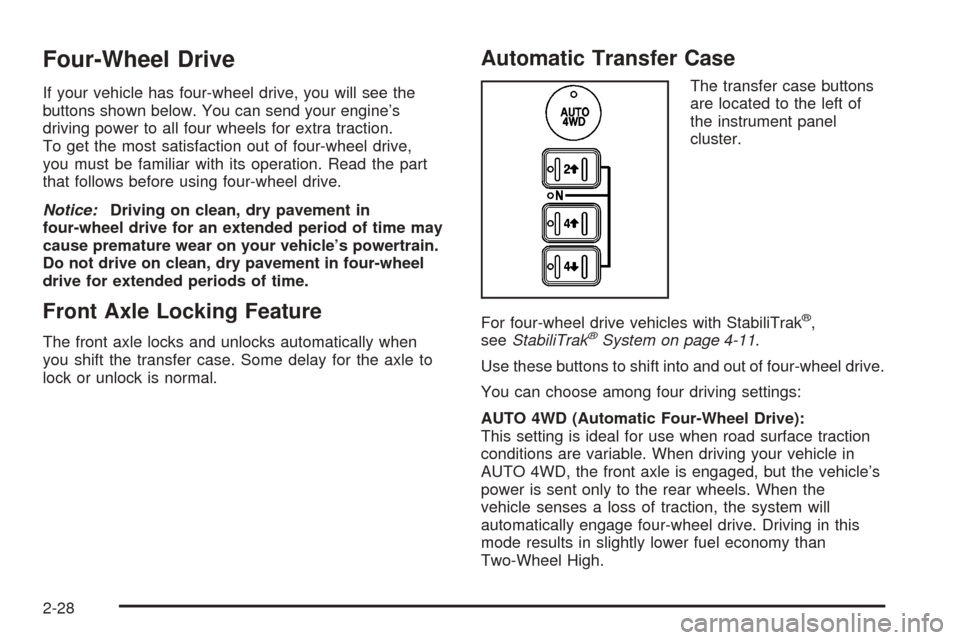
Four-Wheel Drive
If your vehicle has four-wheel drive, you will see the
buttons shown below. You can send your engine’s
driving power to all four wheels for extra traction.
To get the most satisfaction out of four-wheel drive,
you must be familiar with its operation. Read the part
that follows before using four-wheel drive.
Notice:Driving on clean, dry pavement in
four-wheel drive for an extended period of time may
cause premature wear on your vehicle’s powertrain.
Do not drive on clean, dry pavement in four-wheel
drive for extended periods of time.
Front Axle Locking Feature
The front axle locks and unlocks automatically when
you shift the transfer case. Some delay for the axle to
lock or unlock is normal.
Automatic Transfer Case
The transfer case buttons
are located to the left of
the instrument panel
cluster.
For four-wheel drive vehicles with StabiliTrak
®,
seeStabiliTrak®System on page 4-11.
Use these buttons to shift into and out of four-wheel drive.
You can choose among four driving settings:
AUTO 4WD (Automatic Four-Wheel Drive):
This setting is ideal for use when road surface traction
conditions are variable. When driving your vehicle in
AUTO 4WD, the front axle is engaged, but the vehicle’s
power is sent only to the rear wheels. When the
vehicle senses a loss of traction, the system will
automatically engage four-wheel drive. Driving in this
mode results in slightly lower fuel economy than
Two-Wheel High.
2-28
Page 119 of 536
2m(Two Wheel-High):This setting is used for driving
in most street and highway situations. Your front axle
is not engaged in two-wheel drive. This setting also
provides the best fuel economy.
4
m(Four Wheel-High):Use the four-wheel high
position when you need extra traction, such as on snowy
or icy roads or in most off-road situations. This setting
also engages your front axle to help drive your vehicle.
This is the best setting to use when plowing snow.
4
n(Four Wheel-Low):This setting also engages your
front axle and delivers extra torque. You may never need
this setting. It sends maximum power to all four wheels.
You might choose Four Wheel-Low if you are driving
off-road in deep sand, deep mud, deep snow, and while
climbing or descending steep hills. StabiliTrak
®will not
engage in this mode. SeeStabiliTrak®System on
page 4-11for more information.
{CAUTION:
Shifting the transfer case to NEUTRAL can cause
your vehicle to roll even if the transmission is
in PARK (P). You or someone else could be
seriously injured. Be sure to set the parking
brake before placing the transfer case in
NEUTRAL. SeeParking Brake on page 2-35.
NEUTRAL (N):Shift the vehicle’s transfer case
to NEUTRAL only when towing your vehicle.
SeeRecreational Vehicle Towing on page 4-62or
Towing Your Vehicle on page 4-62for more information.
Indicator lights in the button show which setting you
are in. The indicator lights will come on brie�y when you
turn on the ignition and one will stay on. If the lights
do not come on, you should take your vehicle to your
dealer for service. An indicator light will �ash while
shifting the transfer case. It will remain illuminated when
the shift is complete. If for some reason the transfer
case cannot make a requested shift, it will return to the
last chosen setting.
If the SERVICE 4WD message stays on, you should
take your vehicle to your dealer for service. See “Service
4WD message” underDriver Information Center (DIC)
on page 3-56.
Shifting Into Four-Wheel High or
AUTO 4WD (Automatic Four Wheel Drive)
Press and release the Four-Wheel High or AUTO
4WD button. This can be done at any speed, except
when shifting from Four Wheel-Low, and the indicator
light will �ash while shifting. It will remain on when
the shift is completed.
Shifting Into Two-Wheel High
Press and release the Two-Wheel High button.
This can be done at any speed, except when shifting
from Four-Wheel Low.
2-29
Page 120 of 536
Shifting Into Four-Wheel Low
To shift to the Four-Wheel Low position, the ignition
must be in RUN and the vehicle must be stopped
or moving less than 3 mph (5 km/h) with the
transmission in NEUTRAL (N). The preferred method
for shifting into four-wheel low is to have your vehicle
moving 1 to 2 mph (1.6 to 3.2 km/h). Press and release
the Four-Wheel Low button. You must wait for the
four-wheel low indicator light to stop �ashing and remain
on before shifting your transmission in gear.
Notice:Shifting the transmission into gear before
the Four-Wheel Low indicator light has stopped
�ashing could damage the transfer case. To
help avoid damaging your vehicle, always wait for
the Four-Wheel Low indicator light to stop �ashing
before shifting the transmission into gear.
It is typical for your vehicle to exhibit signi�cant
engagement noise and bump when shifting between
Four-Wheel Low and Four-Wheel High ranges or from
NEUTRAL with the engine running.
If the Four-Wheel Low button is pressed when your
vehicle is in gear and/or moving, the Four-Wheel Low
indicator light will �ash for 30 seconds and not complete
the shift unless your vehicle is moving less than
3 mph (5 km/h) and the transmission is in NEUTRAL (N).
After 30 seconds the transfer case will shift to
Four-Wheel High mode.
Shifting Out of Four-Wheel Low
To shift from Four-Wheel Low to Four-Wheel High,
AUTO 4WD or Two-Wheel High, your vehicle must be
stopped or moving less than 3 mph (5 km/h) with
the transmission in NEUTRAL (N) and the ignition in
RUN. The preferred method for shifting out of
Four-Wheel Low is to have your vehicle moving
1 to 2 mph (1.6 to 3.2 km/h). Press and release the
Four-Wheel High, AUTO 4WD or Two-Wheel High
button. You must wait for the Four-Wheel High,
AUTO 4WD or Two-Wheel High indicator light to stop
�ashing and remain on before shifting your transmission
into gear.
Notice:Shifting the transmission into gear before
the Four-Wheel Low indicator light has stopped
�ashing could damage the transfer case. To
help avoid damaging your vehicle, always wait for
the Four-Wheel Low indicator light to stop �ashing
before shifting the transmission into gear.
It is typical for your vehicle to exhibit signi�cant
engagement noise and bump when shifting between
Four-Wheel Low and Four-Wheel High ranges or from
NEUTRAL with the engine running.
If the Four-Wheel High, AUTO 4WD or Two Wheel High
switch is pressed when your vehicle is in gear and/or
moving, the Four-Wheel High, AUTO 4WD or Two-Wheel
High indicator light will �ash for 30 seconds but will not
complete the shift unless your vehicle is moving less than
3 mph (5 km/h) and the transmission is in NEUTRAL (N).
2-30
Page 121 of 536
Shifting into NEUTRAL
To shift the transfer case to NEUTRAL do the following:
1. Make sure the vehicle is parked so that it will
not roll.
2. Set the parking brake.
3. Start the vehicle or turn the ignition to RUN.
4. Put the transmission in NEUTRAL (N).
5. Shift the transfer case to Two-Wheel High.
6. Simultaneously press and hold the Two-Wheel High
and Four-Wheel Low buttons for 10 seconds. The
NEUTRAL light will come on when the transfer case
shift to NEUTRAL is complete.
7. If the engine is running, verify that the transmission
is in NEUTRAL (N) by shifting the transmission to
REVERSE (R) for one second, then shift the
transmission to DRIVE (D) for one second.
8. Turn the ignition to ACCESSORY, which will turn
the engine off.
9. Place the transmission shift lever in PARK (P).
10. Turn the ignition to LOCK.
Shifting Out of NEUTRAL
To shift out of NEUTRAL do the following:
1. Set the parking brake and apply the regular
brake pedal.
2. Shift the transmission to NEUTRAL (N) and turn
the ignition to RUN with the engine off.
3. Press the button for the desired transfer case
shift position (Two-Wheel High, Four-Wheel
High, AUTO 4WD, or Four-Wheel Low).
4. After the transfer case has shifted out of NEUTRAL
the NEUTRAL light will go out.
5. Release the parking brake.
6. Start the engine and shift the transmission to the
desired position.
Excessively shifting the transfer case into or out of
the different modes may cause the transfer case to
enter the shift protection mode. This will protect
the transfer case from possible damage and will
only allow the transfer case to respond to one shift
per 10 seconds. The transfer case may stay in this
mode for up to three minutes.
2-31
Page 123 of 536
{CAUTION:
Shifting the transfer case to NEUTRAL can
cause your vehicle to roll even if the
transmission is in PARK (P). You or someone
else could be seriously injured. Be sure to set
the parking brake before placing the transfer
case in NEUTRAL. SeeParking Brake on
page 2-35.
N (Neutral):Shift the vehicle’s transfer case to
NEUTRAL only when towing your vehicle. See
Recreational Vehicle Towing on page 4-62orTowing
Your Vehicle on page 4-62for more information.
Indicator lights in the buttons show which mode you are
in. The indicator lights will come on brie�y when you turn
on the ignition and one will stay on. If the lights do not
come on, you should take your vehicle to your dealer for
service. An indicator light will �ash while the transfer case
is shifting. It will remain on when the shift is complete.
If for some reason the transfer case cannot make a
requested shift, it will return to the last chosen setting.
If the SERVICE 4WD message stays on, you should
take your vehicle to your dealer for service. See
SERVICE 4WD underDriver Information Center (DIC)
on page 3-56.
Shifting Into Four Wheel Low
To shift to the Four-Wheel Low position, the ignition
must be in RUN and the vehicle must be stopped
or moving less than 3 mph (5 km/h) with the
transmission in NEUTRAL (N). Press and release the
Four-Wheel Low switch. You must wait for the
Four-Wheel Low indicator light to stop �ashing and
remain on before shifting your transmission in gear.
Notice:Shifting the transmission into gear before
the Four-Wheel Low indicator light has stopped
�ashing could damage the transfer case. To
help avoid damaging your vehicle, always wait for
the Four-Wheel Low indicator light to stop �ashing
before shifting the transmission into gear.
If the Four-Wheel Low button is pressed when your
vehicle is in gear and/or moving, the Four-Wheel Low
indicator light will �ash for 30 seconds and not complete
the shift unless your vehicle is moving less than
3 mph (5 km/h) and the transmission is in NEUTRAL (N).
After 30 seconds, the transfer case will return to the
setting last chosen.
When in Four-Wheel Low, StabiliTrak
®is automatically
disabled. For more information seeStabiliTrak®
System on page 4-11.
2-33
Page 132 of 536
Automatic Dimming Mirror Operation
The automatic dimming mirror function is turned
on automatically each time the ignition is started.
To operate the automatic dimming mirror, do the
following:
1. Make sure the green indicator light, located to the
left of the on/off button, is lit. If it is not, press and
hold the on/off button for approximately six seconds
until the green light comes on, indicating that the
mirror is in automatic dimming mode.
2. Turn off the automatic dimming mirror function
by pressing and holding the on/off button for
approximately six seconds, until the green indicator
light turns off.
Compass Variance
The mirror is set in zone eight upon leaving the
factory. It will be necessary to adjust the compass to
compensate for compass variance if the vehicle is
outside of zone eight. Under certain circumstances, as
during a long distance cross-country trip, it will be
necessary to adjust for compass variance. Compass
variance is the difference between earth’s magnetic
north and true geographic north. If not adjusted
to account for compass variance, the compass could
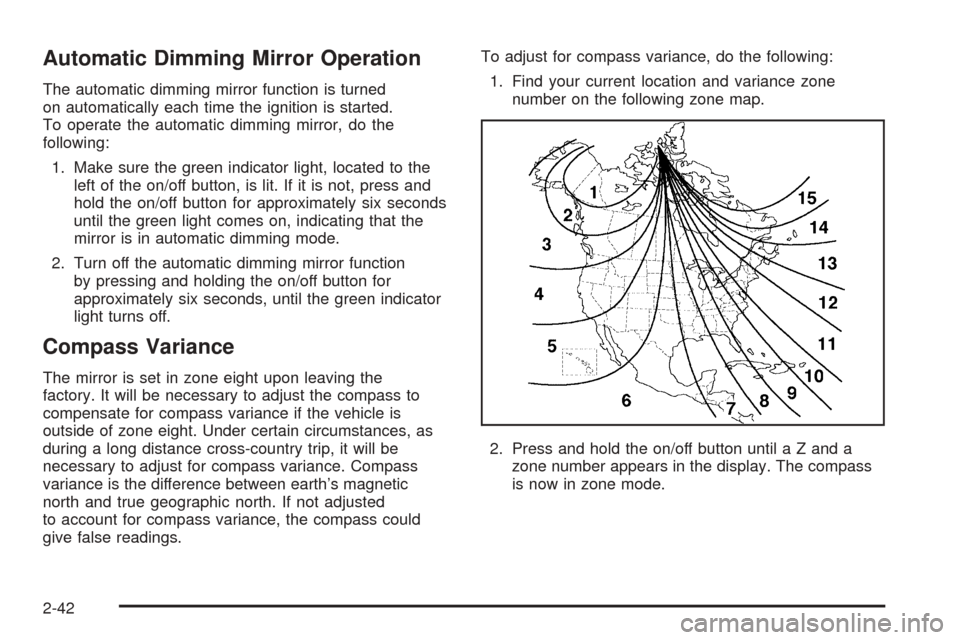
give false readings.To adjust for compass variance, do the following:
1. Find your current location and variance zone
number on the following zone map.
2. Press and hold the on/off button until a Z and a
zone number appears in the display. The compass
is now in zone mode.
2-42