belt CHEVROLET SUBURBAN 2016 11.G Service Manual
[x] Cancel search | Manufacturer: CHEVROLET, Model Year: 2016, Model line: SUBURBAN, Model: CHEVROLET SUBURBAN 2016 11.GPages: 453, PDF Size: 6.23 MB
Page 115 of 453
Chevrolet Tahoe/Suburban Owner Manual (GMNA-Localizing-U.S./Canada/
Mexico-9159366) - 2016 - crc - 5/19/15
114 Seats and Restraints
1. Attach and tighten the lowerattachments to the lower
anchors. If the child restraint
does not have lower
attachments or the desired
seating position does not have
lower anchors, secure the child
restraint with the the safety
belts and top tether when
recommended by the child
restraint manufacturer. Refer to
your child restraint
manufacturer instructions and
the instructions in this manual.
For the third row outboard
seating positions, if the head
restraint interferes with the
proper installation of the child
restraint, then the head
restraint may be removed. See
“Head Restraint Removal and
Reinstallation under Lower
Anchors and Tethers for
Children (LATCH System)
0 109.
1.1. Find the lower anchors for the desired seating
position.
1.2. Put the child restraint on the seat. 1.3. Attach and tighten the
lower attachments on the
child restraint to the lower
anchors.
2. If the child restraint manufacturer recommends that
the top tether be attached,
attach and tighten the top
tether to the top tether anchor.
Refer to the child restraint
instructions and the following
steps:
2.1. Find the top tether anchor.
For models with a third
row seat, move the flipper
panel rearward to access
the top tether anchors.
2.2. Route, attach, and tighten the top tether according to
your child restraint
instructions and the
following instructions:
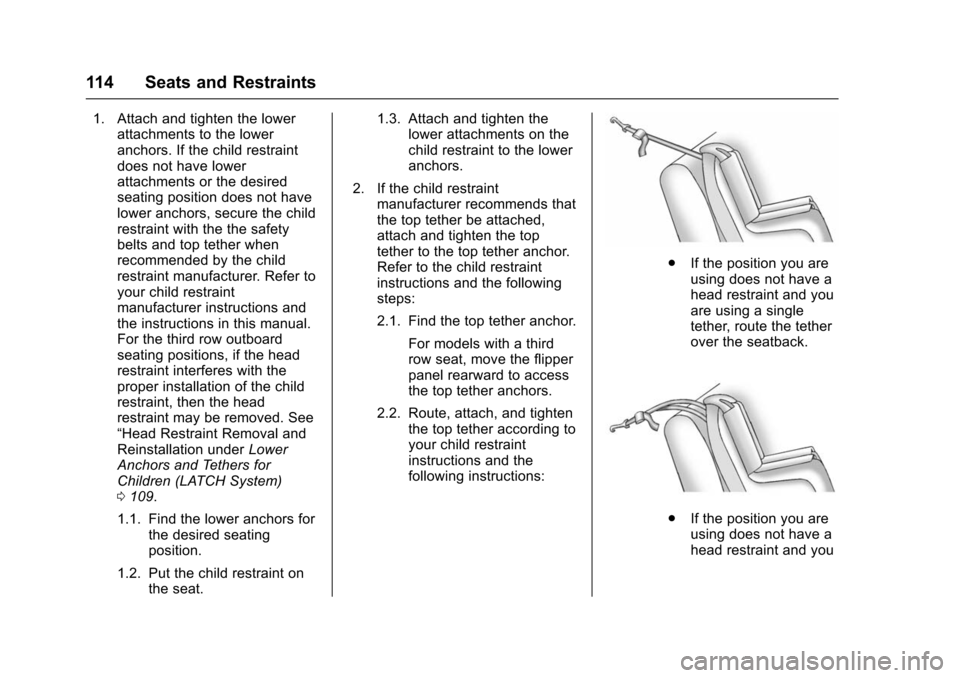
.If the position you are
using does not have a
head restraint and you
are using a single
tether, route the tether
over the seatback.
.If the position you are
using does not have a
head restraint and you
Page 118 of 453
Chevrolet Tahoe/Suburban Owner Manual (GMNA-Localizing-U.S./Canada/
Mexico-9159366) - 2016 - crc - 5/19/15
Seats and Restraints 117
Warning (Continued)
system inspected and any
necessary replacements made as
soon as possible.
If the vehicle has the LATCH system
and it was being used during a
crash, new LATCH system parts
may be needed.
New parts and repairs may be
necessary even if the LATCH
system was not being used at the
time of the crash.
Securing Child Restraints
(Center Front Seat)
{Warning
A child in a child restraint in the
center front seat can be badly
injured or killed by the frontal
airbags if they inflate. Never
secure a child restraint in the (Continued)
Warning (Continued)
center front seat. It is always
better to secure a child restraint in
a rear seat.
Do not use child restraints in the
center front seat position.
Securing Child Restraints
(Rear Seat)
When securing a child restraint in a
rear seating position, study the
instructions that came with the child
restraint to make sure it is
compatible with this vehicle.
If the child restraint has the LATCH
system, see Lower Anchors and
Tethers for Children (LATCH
System) 0109 for how and where to
install the child restraint using
LATCH. If a child restraint is
secured in the vehicle using a
safety belt and it uses a top tether,
see Lower Anchors and Tethers for
Children (LATCH System) 0109 for
top tether anchor locations. Do not secure a child seat in a
position without a top tether anchor
if a national or local law requires
that the top tether be anchored, or if
the instructions that come with the
child restraint say that the top strap
must be anchored.
In Canada, the law requires that
forward-facing child restraints have
a top tether, and that the tether be
attached.
If the child restraint or vehicle seat
position does not have the LATCH
system, you will be using the safety
belt to secure the child restraint in
this position. Be sure to follow the
instructions that came with the child
restraint. Secure the child in the
child restraint when and as the
instructions say.
If more than one child restraint
needs to be installed in the rear
seat, be sure to read
Where to Put
the Restraint 0107.
1. Put the child restraint on the seat.
Page 119 of 453
Chevrolet Tahoe/Suburban Owner Manual (GMNA-Localizing-U.S./Canada/
Mexico-9159366) - 2016 - crc - 5/19/15
118 Seats and Restraints
For the third row outboard
seating positions, if the head
restraint interferes with the
proper installation of the child
restraint, the head restraint
may be removed. See“Head
Restraint Removal and
Reinstallation” underLower
Anchors and Tethers for
Children (LATCH System)
0 109.
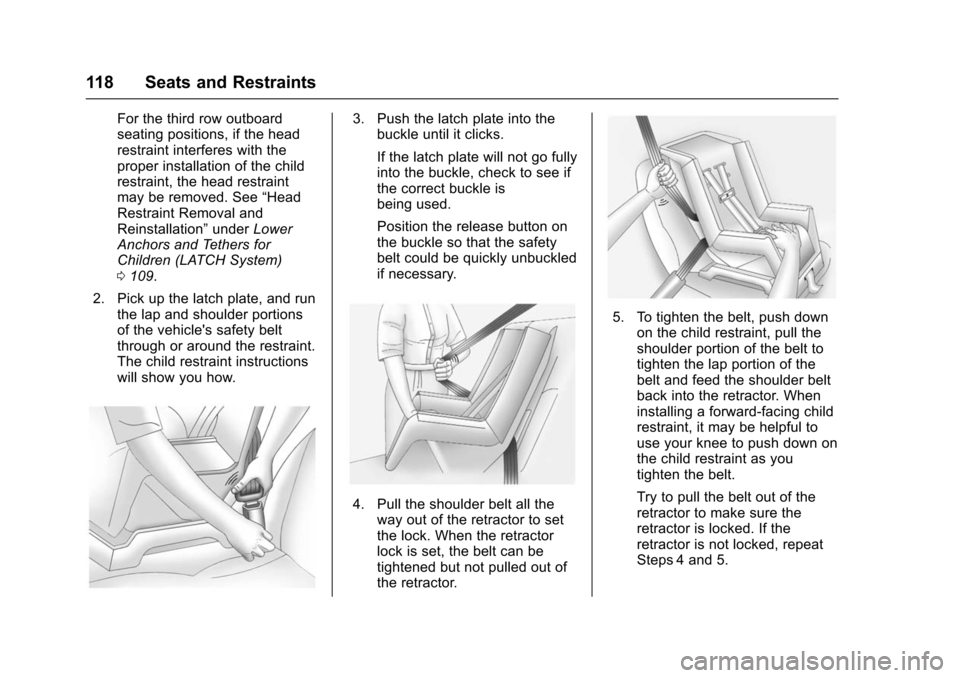
2. Pick up the latch plate, and run the lap and shoulder portions
of the vehicle's safety belt
through or around the restraint.
The child restraint instructions
will show you how.3. Push the latch plate into thebuckle until it clicks.
If the latch plate will not go fully
into the buckle, check to see if
the correct buckle is
being used.
Position the release button on
the buckle so that the safety
belt could be quickly unbuckled
if necessary.
4. Pull the shoulder belt all theway out of the retractor to set
the lock. When the retractor
lock is set, the belt can be
tightened but not pulled out of
the retractor.
5. To tighten the belt, push down
on the child restraint, pull the
shoulder portion of the belt to
tighten the lap portion of the
belt and feed the shoulder belt
back into the retractor. When
installing a forward-facing child
restraint, it may be helpful to
use your knee to push down on
the child restraint as you
tighten the belt.
Try to pull the belt out of the
retractor to make sure the
retractor is locked. If the
retractor is not locked, repeat
Steps 4 and 5.
Page 120 of 453
Chevrolet Tahoe/Suburban Owner Manual (GMNA-Localizing-U.S./Canada/
Mexico-9159366) - 2016 - crc - 5/19/15
Seats and Restraints 119
6. If the child restraint has a toptether, follow the child restraint
manufacturer ’s instructions
regarding the use of the top
tether. Refer to the instructions
that came with the child
restraint and see Lower
Anchors and Tethers for
Children (LATCH System)
0 109.
7. Before placing a child in the child restraint, make sure it is
securely held in place. To
check, grasp the child restraint
at the safety belt path and
attempt to move it side to side
and back and forth. When the
child restraint is properly
installed, there should be no
more than 2.5 cm (1 in) of
movement.
To remove the child restraint,
unbuckle the vehicle safety belt and
let it return to the stowed position.
If the top tether is attached to a top
tether anchor, disconnect it.
If the head restraint was removed
for a third row outboard seating
position, reinstall it before the seating position is used. See
“Head
Restraint Removal and
Reinstallation” underLower Anchors
and Tethers for Children (LATCH
System) 0109 for additional
information on reinstalling the head
restraint properly.
Securing Child Restraints
(Front Passenger Seat)
This vehicle has airbags. A rear
seat is a safer place to secure a
forward-facing child restraint. See
Where to Put the Restraint 0107.
In addition, the vehicle has a
passenger sensing system which is
designed to turn off the front
outboard passenger frontal airbag
under certain conditions. See
Passenger Sensing System 096
and Passenger Airbag Status
Indicator 0145 for more information,
including important safety
information.
Never put a rear-facing child seat in
the front. This is because the risk to
the rear-facing child is so great if the
airbag deploys.
{Warning
A child in a rear-facing child
restraint can be seriously injured
or killed if the front outboard
passenger frontal airbag inflates.
This is because the back of the
rear-facing child restraint would
be very close to the inflating
airbag. A child in a forward-facing
child restraint can be seriously
injured or killed if the front
outboard passenger frontal airbag
inflates and the passenger seat is
in a forward position.
Even if the passenger sensing
system has turned off the front
outboard passenger frontal
airbag, no system is fail-safe. No
one can guarantee that an airbag
will not deploy under some
unusual circumstance, even
though it is turned off.
Secure rear-facing child restraints
in a rear seat, even if the airbag
is off. If you secure a
(Continued)
Page 121 of 453
Chevrolet Tahoe/Suburban Owner Manual (GMNA-Localizing-U.S./Canada/
Mexico-9159366) - 2016 - crc - 5/19/15
120 Seats and Restraints
Warning (Continued)
forward-facing child restraint in
the front seat, always move the
front passenger seat as far back
as it will go. It is better to secure
the child restraint in a rear seat.
SeePassenger Sensing System
0 96 for additional information.
If the child restraint uses a top
tether, see Lower Anchors and
Tethers for Children (LATCH
System) 0109 for top tether anchor
locations.
Do not secure a child seat in a
position without a top tether anchor
if a national or local law requires
that the top tether be anchored, or if
the instructions that come with the
child restraint say that the top strap
must be anchored.
In Canada, the law requires that
forward-facing child restraints have
a top tether, and that the tether be
attached. When using the lap-shoulder belt to
secure the child restraint in this
position, follow the instructions that
came with the child restraint and the
following instructions:
1. Move the seat as far back as it will go before securing the
forward-facing child restraint.
When the passenger sensing
system has turned off the front
outboard passenger frontal
airbag, the off indicator on the
passenger airbag status
indicator should light and stay
lit when you start the vehicle.
See Passenger Airbag Status
Indicator 0145.
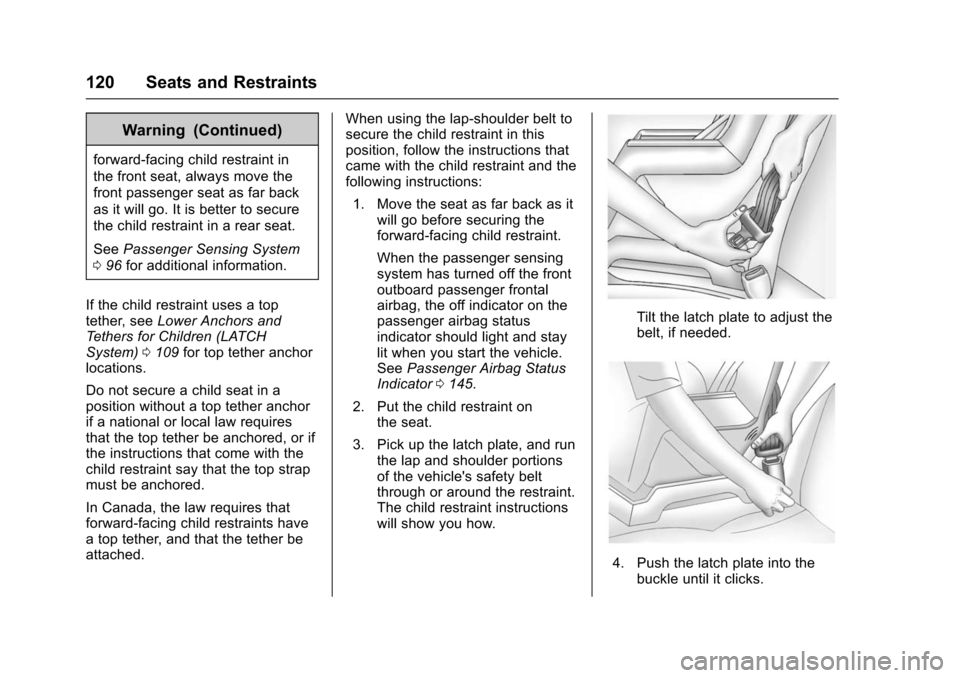
2. Put the child restraint on the seat.
3. Pick up the latch plate, and run the lap and shoulder portions
of the vehicle's safety belt
through or around the restraint.
The child restraint instructions
will show you how.
Tilt the latch plate to adjust the
belt, if needed.
4. Push the latch plate into thebuckle until it clicks.
Page 122 of 453
Chevrolet Tahoe/Suburban Owner Manual (GMNA-Localizing-U.S./Canada/
Mexico-9159366) - 2016 - crc - 5/19/15
Seats and Restraints 121
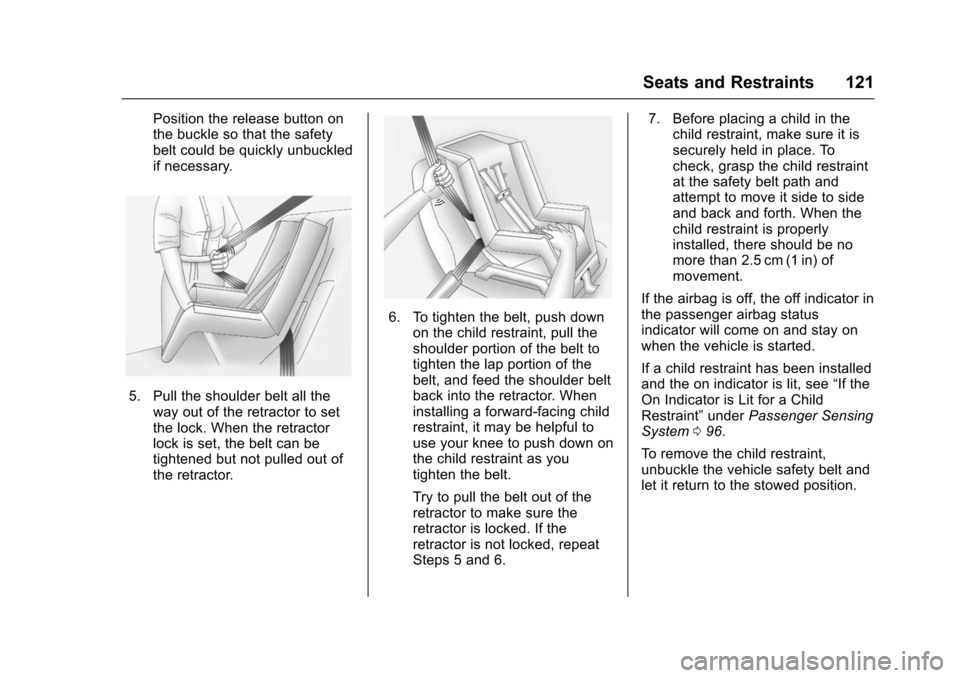
Position the release button on
the buckle so that the safety
belt could be quickly unbuckled
if necessary.
5. Pull the shoulder belt all theway out of the retractor to set
the lock. When the retractor
lock is set, the belt can be
tightened but not pulled out of
the retractor.
6. To tighten the belt, push downon the child restraint, pull the
shoulder portion of the belt to
tighten the lap portion of the
belt, and feed the shoulder belt
back into the retractor. When
installing a forward-facing child
restraint, it may be helpful to
use your knee to push down on
the child restraint as you
tighten the belt.
Try to pull the belt out of the
retractor to make sure the
retractor is locked. If the
retractor is not locked, repeat
Steps 5 and 6. 7. Before placing a child in the
child restraint, make sure it is
securely held in place. To
check, grasp the child restraint
at the safety belt path and
attempt to move it side to side
and back and forth. When the
child restraint is properly
installed, there should be no
more than 2.5 cm (1 in) of
movement.
If the airbag is off, the off indicator in
the passenger airbag status
indicator will come on and stay on
when the vehicle is started.
If a child restraint has been installed
and the on indicator is lit, see “If the
On Indicator is Lit for a Child
Restraint” underPassenger Sensing
System 096.
To remove the child restraint,
unbuckle the vehicle safety belt and
let it return to the stowed position.
Page 127 of 453
Chevrolet Tahoe/Suburban Owner Manual (GMNA-Localizing-U.S./Canada/
Mexico-9159366) - 2016 - crc - 5/20/15
126 Instruments and Controls
Instruments and
Controls
Controls
Steering Wheel Adjustment . . . 127
Steering Wheel Controls . . . . . . 128
Heated Steering Wheel . . . . . . . 129
Horn . . . . . . . . . . . . . . . . . . . . . . . . . . 129
Windshield Wiper/Washer . . . . 129
Rear Window Wiper/Washer . . . . . . . . . . . . . . . . . . . . . 131
Compass . . . . . . . . . . . . . . . . . . . . . 132
Clock . . . . . . . . . . . . . . . . . . . . . . . . . 132
Power Outlets . . . . . . . . . . . . . . . . 133
Wireless Charging . . . . . . . . . . . . 135
Warning Lights, Gauges, and
Indicators
Warning Lights, Gauges, and Indicators . . . . . . . . . . . . . . . . . . . 136
Instrument Cluster . . . . . . . . . . . . 137
Speedometer . . . . . . . . . . . . . . . . . 140
Odometer . . . . . . . . . . . . . . . . . . . . . 140
Trip Odometer . . . . . . . . . . . . . . . . 140
Tachometer . . . . . . . . . . . . . . . . . . . 140
Fuel Gauge . . . . . . . . . . . . . . . . . . . 140
Engine Oil Pressure
Gauge . . . . . . . . . . . . . . . . . . . . . . 141 Engine Coolant Temperature
Gauge . . . . . . . . . . . . . . . . . . . . . . 142
Voltmeter Gauge . . . . . . . . . . . . . 143
Safety Belt Reminders . . . . . . . . 144
Airbag Readiness Light . . . . . . . 144
Passenger Airbag Status Indicator . . . . . . . . . . . . . . . . . . . . 145
Charging System Light . . . . . . . 146
Malfunction Indicator Lamp (Check Engine Light) . . . . . . . . 146
Brake System Warning Light . . . . . . . . . . . . . . . . . . . . . . . . 148
Antilock Brake System (ABS) Warning Light . . . . . . . . . . . . . . . 149
Tow/Haul Mode Light . . . . . . . . . 149
Lane Keep Assist (LKA) Light . . . . . . . . . . . . . . . . . . . . . . . . 149
Vehicle Ahead Indicator . . . . . . 150
Traction Off Light . . . . . . . . . . . . . 150
StabiliTrak
®OFF Light . . . . . . . . 150
Traction Control System (TCS)/ StabiliTrak
®Light . . . . . . . . . . . 150
Tire Pressure Light . . . . . . . . . . . 151
Low Fuel Warning Light . . . . . . 151
Security Light . . . . . . . . . . . . . . . . . 151
High-Beam On Light . . . . . . . . . . 152
Front Fog Lamp Light . . . . . . . . . 152
Lamps On Reminder . . . . . . . . . 152
Cruise Control Light . . . . . . . . . . 152
Information Displays
Driver Information Center (DIC) (Base Level) . . . . . . . . . . . . . . . . 153
Driver Information Center (DIC) (Uplevel) . . . . . . . . . . . . . . . . . . . . 155
Head-Up Display (HUD) . . . . . . 157
Vehicle Messages
Vehicle Messages . . . . . . . . . . . . 161
Battery Voltage and Charging
Messages . . . . . . . . . . . . . . . . . . . 161
Brake System Messages . . . . . 162
Compass Messages . . . . . . . . . . 162
Cruise Control Messages . . . . . 162
Door Ajar Messages . . . . . . . . . . 163
Engine Cooling System Messages . . . . . . . . . . . . . . . . . . . 163
Engine Oil Messages . . . . . . . . . 164
Engine Power Messages . . . . . 164
Fuel System Messages . . . . . . . 165
Key and Lock Messages . . . . . 165
Lamp Messages . . . . . . . . . . . . . . 165
Object Detection System
Messages . . . . . . . . . . . . . . . . . . . 166
Ride Control System Messages . . . . . . . . . . . . . . . . . . . 167
Airbag System Messages . . . . 169
Security Messages . . . . . . . . . . . 169
Steering System Messages . . . . . . . . . . . . . . . . . . . 169
Page 145 of 453
Chevrolet Tahoe/Suburban Owner Manual (GMNA-Localizing-U.S./Canada/
Mexico-9159366) - 2016 - crc - 5/20/15
144 Instruments and Controls
Safety Belt Reminders
Driver Safety Belt Reminder
Light
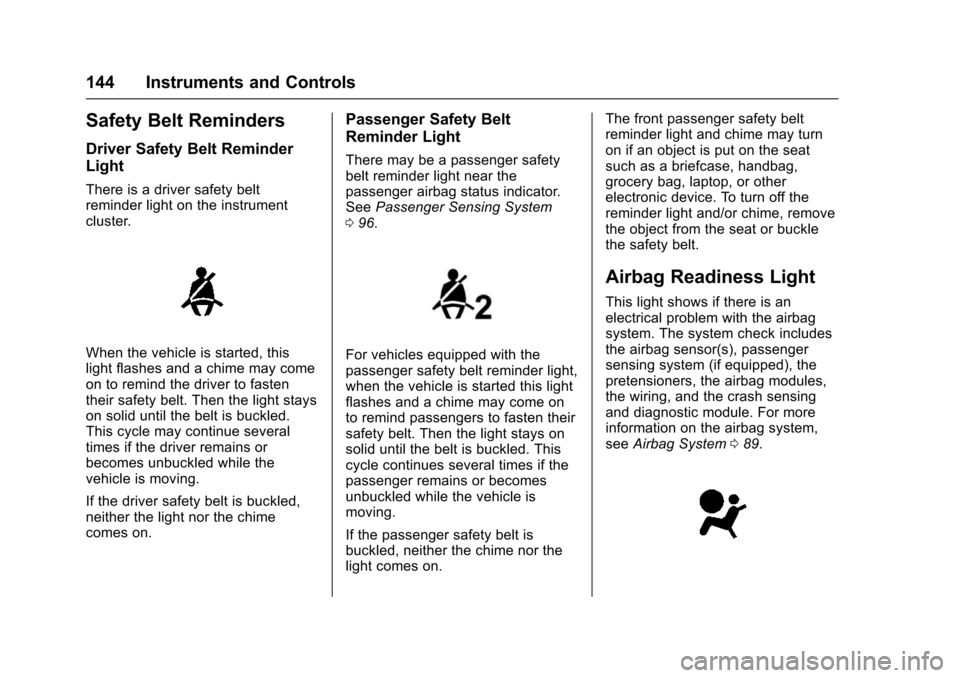
There is a driver safety belt
reminder light on the instrument
cluster.
When the vehicle is started, this
light flashes and a chime may come
on to remind the driver to fasten
their safety belt. Then the light stays
on solid until the belt is buckled.
This cycle may continue several
times if the driver remains or
becomes unbuckled while the
vehicle is moving.
If the driver safety belt is buckled,
neither the light nor the chime
comes on.
Passenger Safety Belt
Reminder Light
There may be a passenger safety
belt reminder light near the
passenger airbag status indicator.
SeePassenger Sensing System
0 96.
For vehicles equipped with the
passenger safety belt reminder light,
when the vehicle is started this light
flashes and a chime may come on
to remind passengers to fasten their
safety belt. Then the light stays on
solid until the belt is buckled. This
cycle continues several times if the
passenger remains or becomes
unbuckled while the vehicle is
moving.
If the passenger safety belt is
buckled, neither the chime nor the
light comes on. The front passenger safety belt
reminder light and chime may turn
on if an object is put on the seat
such as a briefcase, handbag,
grocery bag, laptop, or other
electronic device. To turn off the
reminder light and/or chime, remove
the object from the seat or buckle
the safety belt.
Airbag Readiness Light
This light shows if there is an
electrical problem with the airbag
system. The system check includes
the airbag sensor(s), passenger
sensing system (if equipped), the
pretensioners, the airbag modules,
the wiring, and the crash sensing
and diagnostic module. For more
information on the airbag system,
see
Airbag System 089.
Page 230 of 453
Chevrolet Tahoe/Suburban Owner Manual (GMNA-Localizing-U.S./Canada/
Mexico-9159366) - 2016 - crc - 5/20/15
Driving and Operating 229
Refer to the infotainment section for
more information on using that
system and the navigation system,
if equipped, including pairing and
using a cell phone.
Defensive Driving
Defensive driving means“always
expect the unexpected.” The first
step in driving defensively is to wear
the safety belt. See Safety Belts
0 80.
. Assume that other road users
(pedestrians, bicyclists, and
other drivers) are going to be
careless and make mistakes.
Anticipate what they might do
and be ready.
. Allow enough following distance
between you and the driver in
front of you.
. Focus on the task of driving.
Drunk Driving
Death and injury associated with
drinking and driving is a global
tragedy.
{Warning
Drinking and then driving is very
dangerous. Your reflexes,
perceptions, attentiveness, and
judgment can be affected by even
a small amount of alcohol. You
can have a serious —or even
fatal —collision if you drive after
drinking.
Do not drink and drive or ride with
a driver who has been drinking.
Ride home in a cab; or if you are
with a group, designate a driver
who will not drink.
Control of a Vehicle
Braking, steering, and accelerating
are important factors in helping to
control a vehicle while driving.
Braking
Braking action involves perception
time and reaction time. Deciding to
push the brake pedal is perception
time. Actually doing it is
reaction time. Average driver reaction time is
about three-quarters of a second. In
that time, a vehicle moving at
100 km/h (60 mph) travels 20 m
(66 ft), which could be a lot of
distance in an emergency.
Helpful braking tips to keep in mind
include:
.
Keep enough distance between
you and the vehicle in front
of you.
. Avoid needless heavy braking.
. Keep pace with traffic.
If the engine ever stops while the
vehicle is being driven, brake
normally but do not pump the
brakes. Doing so could make the
pedal harder to push down. If the
engine stops, there will be some
power brake assist but it will be
used when the brake is applied.
Once the power assist is used up, it
can take longer to stop and the
brake pedal will be harder to push.
Page 232 of 453
Chevrolet Tahoe/Suburban Owner Manual (GMNA-Localizing-U.S./Canada/
Mexico-9159366) - 2016 - crc - 5/20/15
Driving and Operating 231
3. Turn the steering wheel to gostraight down the roadway.
Loss of Control
Skidding
There are three types of skids that
correspond to the vehicle's three
control systems:
.Braking Skid —wheels are not
rolling.
. Steering or Cornering Skid —
too much speed or steering in a
curve causes tires to slip and
lose cornering force.
. Acceleration Skid —too much
throttle causes the driving
wheels to spin.
Defensive drivers avoid most skids
by taking reasonable care suited to
existing conditions, and by not
overdriving those conditions. But
skids are always possible.
If the vehicle starts to slide, follow
these suggestions:
. Ease your foot off the
accelerator pedal and steer the
way you want the vehicle to go. The vehicle may straighten out.
Be ready for a second skid if it
occurs.
. Slow down and adjust your
driving according to weather
conditions. Stopping distance
can be longer and vehicle
control can be affected when
traction is reduced by water,
snow, ice, gravel, or other
material on the road. Learn to
recognize warning clues —such
as enough water, ice, or packed
snow on the road to make a
mirrored surface —and slow
down when you have any doubt.
. Try to avoid sudden steering,
acceleration, or braking,
including reducing vehicle speed
by shifting to a lower gear. Any
sudden changes could cause
the tires to slide.
Remember: Antilock brakes help
avoid only the braking skid.
Off-Road Driving
Four-wheel-drive vehicles can be
used for off-road driving. Vehicles
without four-wheel drive and vehicles not equipped with All
Terrain (AT) or On-Off Road (OOR)
tires must not be driven off-road
except on a level, solid surface. For
more contact information about the
original equipment tires, see the
Limited Warranty and Owner
Assistance Information manual.
One of the best ways for successful
off-road driving is to control the
speed.
{Warning
When driving off-road, bouncing
and quick changes in direction
can easily throw you out of
position. This could cause you to
lose control and crash. You and
your passengers should always
wear safety belts.
Before Driving Off-Road
.
Have all necessary maintenance
and service work completed.