Tire tool CHEVROLET SUBURBAN 2021 Owner's Manual
[x] Cancel search | Manufacturer: CHEVROLET, Model Year: 2021, Model line: SUBURBAN, Model: CHEVROLET SUBURBAN 2021Pages: 433, PDF Size: 7.36 MB
Page 299 of 433
Chevrolet Tahoe/Suburban Owner Manual (GMNA-Localizing-U.S./Canada/
Mexico-13690484) - 2021 - crc - 8/17/20
298 Driving and Operating
The Trailering App Preview will appear when
the Trailering App is opened for the first
time from the Home Page. Touch GET
STARTED in the Trailering App to go into
the app.
When a trailer is electrically connected and
a trailer profile has not been created, there
will be an option to create a profile, use a
guest profile, or select Accessory/No trailer.
After the pop-up is displayed three times,
Don’t Remind Me will display and touching
that will turn off the trailer detection
pop-up. To turn the Trailer Detection Alert
on, select ON in the Settings tab.
When a trailer is electrically connected and
after a Trailer Profile has been created, the
trailer detection pop-up will appear with a
list of all of the custom Trailer Profiles made
on the vehicle. To load an existing Trailer
Profile, select one of the Trailer Profiles
listed, or load the Guest Trailer Profile by
selecting GUEST TRAILER. Touching
Accessory/No trailer will select Accessory/No
trailer as the active Trailer Profile and will
dismiss the pop- up. Shifting the vehicle
from P (Park) will select Guest Trailer as the
active Trailer Profile and will dismiss the
pop-up.Create a Trailer Profile
1. Touch Create Profile on the trailer detection pop-up or touch + Add Trailer
Profile in the Trailering App.
2. Create a name for the trailer.
3. Select the trailer type.
4. Select Save Profile.
A pop-up will indicate the setup is complete.
Touch DONE to complete the process or
touch TRAILER FEATURE SETUP to set up the
Tow/Haul Mode reminder, Trailer Tire
Pressure Monitoring System, if equipped,
maintenance reminders, or towing
assistance, if equipped.
Import a Trailer Profile
A trailer profile saved to an OnStar account
can be imported to the vehicle. 1. Touch + Add Trailer Profile in the Trailering App
2. Touch Import Profile on the pop-up.
3. Select a trailer profile from the list.
4. Touch IMPORT.
A pop-up will indicate the import was
successful. Touch OK to return to the trailer
list and select the trailer profile. The Tow/ Haul Mode reminder, Brake Gain Setting and
Trailer Tire Pressure sensor learning,
if equipped, do not import.
Trailer Feature Setup
Tow/Haul Mode Reminder
To turn the Tow/Haul Mode Reminder
setting on, touch Yes. To turn it off,
touch No.
Trailer Tire Pressure Setup
If the Trailer Tire Pressure Monitoring
System (TTPMS) is detected, touch the Tire
Pressure Monitoring icon to set up tire
pressure monitoring. Touch Yes to set up
the sensors or touch No to return to the
previous screen.
The trailer tire pressure sensors can transmit
up to 7 m (23 feet) from the hitch receiver of
the vehicle.
A trailer must be electrically connected to
the vehicle before starting the
sensor-to-vehicle learn process.
After selecting Start from the Learn Sensors
screen, use the Tool Method or the Manual
Method (described below) to learn each tire
sensor, during which the current tire number
will be highlighted.
Page 300 of 433
Chevrolet Tahoe/Suburban Owner Manual (GMNA-Localizing-U.S./Canada/
Mexico-13690484) - 2021 - crc - 8/17/20
Driving and Operating 299
Each sensor has a minimum of two minutes
to learn, shown by a timer. After a sensor is
learned, a checkmark appears next to the
tire, the vehicle horn will sound, the
vehicle’s brake lamps will flash, and all
working trailer lamps will flash. It then
moves to the next sensor.
To cancel the process touch Stop.
The recommended tire pressure must be
entered for the trailer tires. This allows the
vehicle to alert when the tire pressure is
high or low.
TTPMS must learn the location of the
installed tire sensors to show correct air
pressure and temperature for each tire. To
set up, use one of the following options or
see a tire or trailer dealer for service. The
learning process must be repeated when the
trailer tires are rotated or replaced. See
“Editing a Trailer Profile”later in this section
for tire pressure sensor relearn information.
Tool Method: A TTPMS activation tool can
be purchased separately to learn the sensor
locations.
Manual Method: Without the tool, the air
pressure can be increased or decreased in
each tire for 10 seconds. Do not exceed the
maximum inflation pressure found on the tire sidewalls. Make sure to re-adjust tire
pressure to the recommended level when
the process is complete.
Sensor Learning Steps
To complete the sensor-to-vehicle learn
process:
1. Touch Start on the Learn Sensors screen. The horn chirps twice and the Learning
Active screen appears on the
infotainment display.
2. Start with the driver side front trailer tire.
3. Activate the tool near the valve stem or adjust the air pressure of this tire until
the horn chirps and all working vehicle
and trailer lights flash.
The process stops without saving the
sensor locations if this step takes more
than two minutes.
4. Move to the next tire and repeat Step 3 for each sensor. The horn chirps twice
when all sensors are completed.
5. Return to the vehicle to complete the setup.Maintenance Reminders
To set up maintenance reminders, touch the
Trailer Maintenance icon. Select Yes to set
up the maintenance reminders for the
Trailer Profile. Follow the on-screen prompts.
The maximum number of reminders is 50.
Select No to return to the previous screen.
Trailer Side Blind Zone Alert Setup
Trailer dimensions must be in range to
enable this feature.
.Trailer Length: 300 cm (118.1 in) –1200 cm
(472.4 in). Measure from center of coupler
to furthest rear point on the trailer.
If trailer dimensions are out of range, this
feature will be unavailable.
Status View
The Status view shows:
.Vehicle
.Connections
.Tires
.Maintenance
Upon entry, the most recent items will be
shown. Select MORE to view all options.
Page 359 of 433

Chevrolet Tahoe/Suburban Owner Manual (GMNA-Localizing-U.S./Canada/
Mexico-13690484) - 2021 - crc - 8/17/20
358 Vehicle Care
Warning (Continued)
may cause a blowout and a serious crash.
Never attempt to re-inflate a tire that has
been driven on while severely
underinflated or flat. Have your dealer or
an authorized tire service center repair or
replace the flat tire as soon as possible.
{Warning
Lifting a vehicle and getting under it to
do maintenance or repairs is dangerous
without the appropriate safety equipment
and training. If a jack is provided with
the vehicle, it is designed only for
changing a flat tire. If it is used for
anything else, you or others could be
badly injured or killed if the vehicle slips
off the jack. If a jack is provided with the
vehicle, only use it for changing a
flat tire.
If a tire goes flat, avoid further tire and
wheel damage by driving slowly to a level
place, well off the road, if possible. Turn on
the hazard warning flashers. See Hazard
Warning Flashers 0136.
{Warning
Changing a tire can be dangerous. The
vehicle can slip off the jack and roll over
or fall causing injury or death. Find a
level place to change the tire. To help
prevent the vehicle from moving:
1. Set the parking brake firmly.
2. Shift the vehicle to P (Park).
3. For vehicles with four-wheel drive with an N (Neutral) transfer case
position, be sure the transfer case is
in a drive gear —not in N (Neutral).
4. Turn off the engine and do not restart while the vehicle is raised.
5. Do not allow passengers to remain in the vehicle.
6. Place wheel blocks, if equipped, on both sides of the tire at the opposite
corner of the tire being changed.
When the vehicle has a flat tire (2), use the
following example as a guide to assist in the
placement of the wheel blocks (1),
if equipped.
1. Wheel Block (If Equipped)
2. Flat Tire
The following information explains how to
use the jack and change a tire.
Tire Changing
Before changing a flat tire, see “Hands-Free
Operation” underLiftgate 018.
Removing the Spare Tire and Tools
The equipment needed to change a flat tire
is stored in the rear of the vehicle. The
jacking tools are under the load floor,
secured with velcro straps. The jack is
behind a door in the trim panel on the
driver side.
Page 360 of 433

Chevrolet Tahoe/Suburban Owner Manual (GMNA-Localizing-U.S./Canada/
Mexico-13690484) - 2021 - crc - 8/17/20
Vehicle Care 359
1. Pull to open the trim panel door.
The third row driver side seat may
need to be folded to access the trim
panel door.
2. Turn the jack knob counterclockwise torelease the jack and wheel blocks from
the bracket. If equipped, remove the
wheel blocks from the jack and place
the wheel blocks on both sides of the
tire at the opposite corner of the tire
being changed. See If a Tire Goes Flat
0 357 for more information on the
placement of the wheel blocks. Place
the jack and wheel blocks near the tire
being changed.Short Wheel Base Shown, Extended Wheel
Base Similar
3. Lift the load floor. Remove the jackingtools and place them near the tire
being changed.
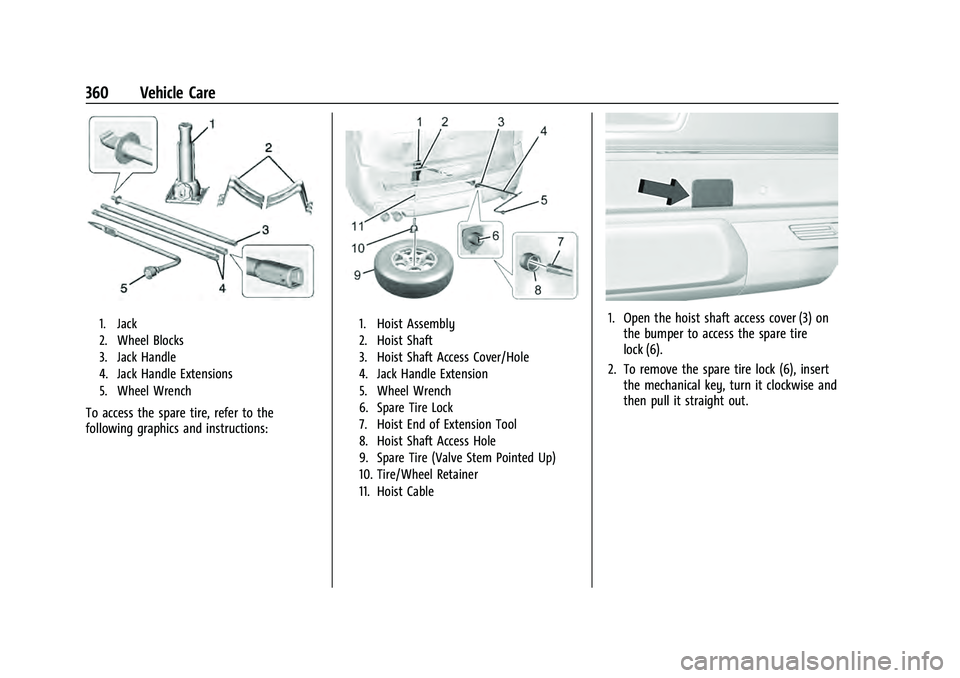
Use the following tools:
Page 361 of 433
Chevrolet Tahoe/Suburban Owner Manual (GMNA-Localizing-U.S./Canada/
Mexico-13690484) - 2021 - crc - 8/17/20
360 Vehicle Care
1. Jack
2. Wheel Blocks
3. Jack Handle
4. Jack Handle Extensions
5. Wheel Wrench
To access the spare tire, refer to the
following graphics and instructions:
1. Hoist Assembly
2. Hoist Shaft
3. Hoist Shaft Access Cover/Hole
4. Jack Handle Extension
5. Wheel Wrench
6. Spare Tire Lock
7. Hoist End of Extension Tool
8. Hoist Shaft Access Hole
9. Spare Tire (Valve Stem Pointed Up)
10. Tire/Wheel Retainer
11. Hoist Cable1. Open the hoist shaft access cover (3) onthe bumper to access the spare tire
lock (6).
2. To remove the spare tire lock (6), insert the mechanical key, turn it clockwise and
then pull it straight out.
Page 366 of 433
Chevrolet Tahoe/Suburban Owner Manual (GMNA-Localizing-U.S./Canada/
Mexico-13690484) - 2021 - crc - 8/17/20
Vehicle Care 365
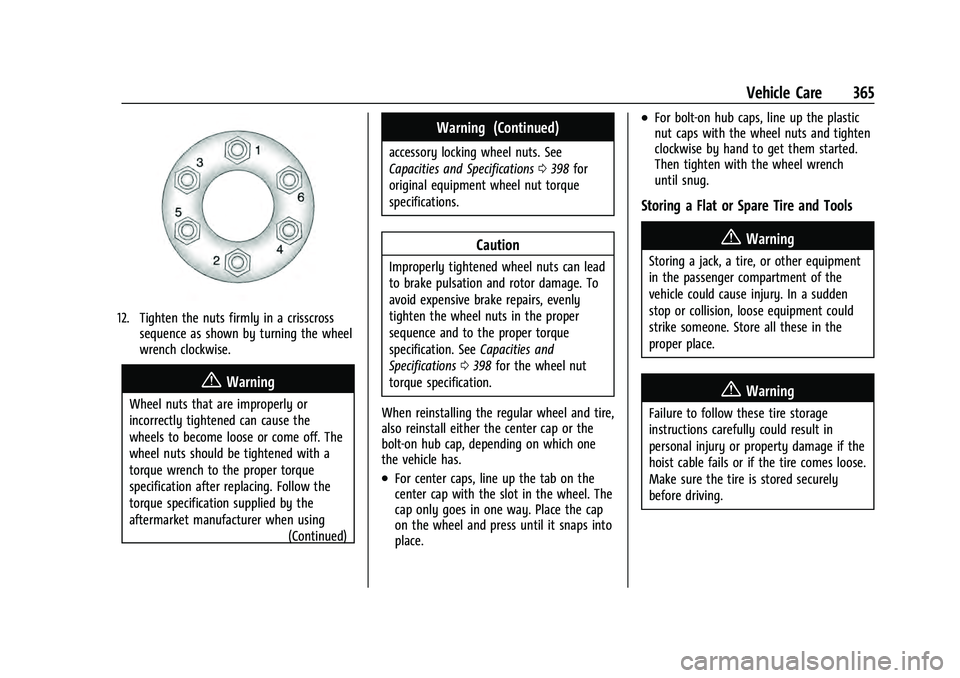
12. Tighten the nuts firmly in a crisscrosssequence as shown by turning the wheel
wrench clockwise.
{Warning
Wheel nuts that are improperly or
incorrectly tightened can cause the
wheels to become loose or come off. The
wheel nuts should be tightened with a
torque wrench to the proper torque
specification after replacing. Follow the
torque specification supplied by the
aftermarket manufacturer when using
(Continued)
Warning (Continued)
accessory locking wheel nuts. See
Capacities and Specifications0398 for
original equipment wheel nut torque
specifications.
Caution
Improperly tightened wheel nuts can lead
to brake pulsation and rotor damage. To
avoid expensive brake repairs, evenly
tighten the wheel nuts in the proper
sequence and to the proper torque
specification. See Capacities and
Specifications 0398 for the wheel nut
torque specification.
When reinstalling the regular wheel and tire,
also reinstall either the center cap or the
bolt-on hub cap, depending on which one
the vehicle has.
.For center caps, line up the tab on the
center cap with the slot in the wheel. The
cap only goes in one way. Place the cap
on the wheel and press until it snaps into
place.
.For bolt-on hub caps, line up the plastic
nut caps with the wheel nuts and tighten
clockwise by hand to get them started.
Then tighten with the wheel wrench
until snug.
Storing a Flat or Spare Tire and Tools
{Warning
Storing a jack, a tire, or other equipment
in the passenger compartment of the
vehicle could cause injury. In a sudden
stop or collision, loose equipment could
strike someone. Store all these in the
proper place.
{Warning
Failure to follow these tire storage
instructions carefully could result in
personal injury or property damage if the
hoist cable fails or if the tire comes loose.
Make sure the tire is stored securely
before driving.
Page 367 of 433
Chevrolet Tahoe/Suburban Owner Manual (GMNA-Localizing-U.S./Canada/
Mexico-13690484) - 2021 - crc - 8/17/20
366 Vehicle Care
Caution
Always store the spare tire or flat tire
with the valve stem pointed up. Stowing
a tire with the valve stem pointed down
could result in damage to the wheel.
Caution
The tire hoist is designed to be raised
and lowered with tension on the cable.
If the hoist must be raised or lowered
without a tire attached, do so only by
hand, and at a slow pace, to avoid
damaging the mechanism. Do not use
power tools.
{Warning
An improperly stored spare tire could
come loose and cause a crash. To avoid
personal injury or property damage,
always store the spare tire when the
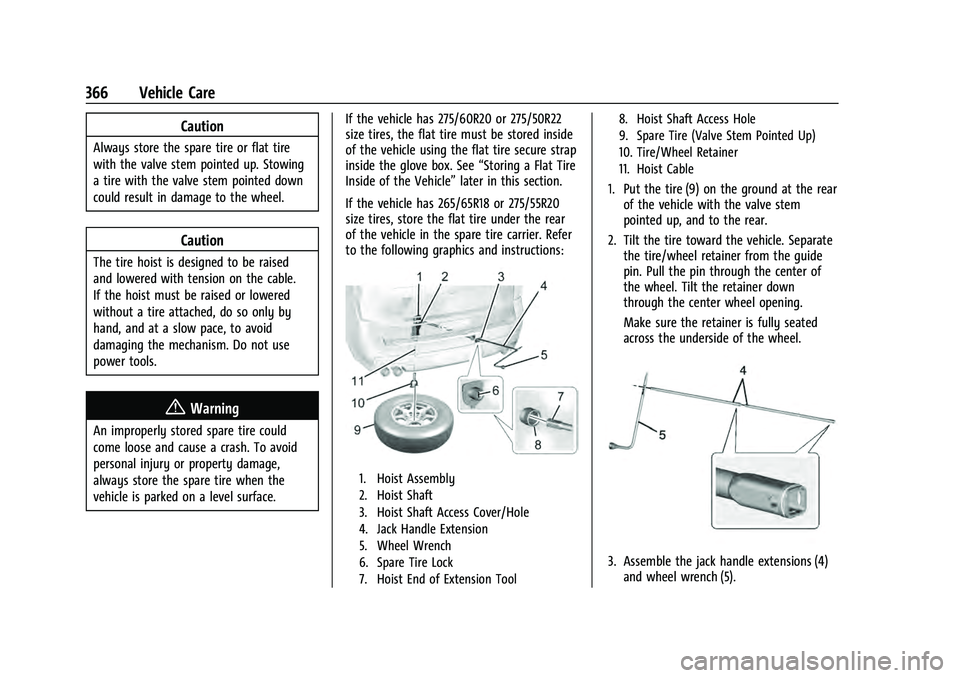
vehicle is parked on a level surface.If the vehicle has 275/60R20 or 275/50R22
size tires, the flat tire must be stored inside
of the vehicle using the flat tire secure strap
inside the glove box. See
“Storing a Flat Tire
Inside of the Vehicle” later in this section.
If the vehicle has 265/65R18 or 275/55R20
size tires, store the flat tire under the rear
of the vehicle in the spare tire carrier. Refer
to the following graphics and instructions:
1. Hoist Assembly
2. Hoist Shaft
3. Hoist Shaft Access Cover/Hole
4. Jack Handle Extension
5. Wheel Wrench
6. Spare Tire Lock
7. Hoist End of Extension Tool 8. Hoist Shaft Access Hole
9. Spare Tire (Valve Stem Pointed Up)
10. Tire/Wheel Retainer
11. Hoist Cable
1. Put the tire (9) on the ground at the rear
of the vehicle with the valve stem
pointed up, and to the rear.
2. Tilt the tire toward the vehicle. Separate the tire/wheel retainer from the guide
pin. Pull the pin through the center of
the wheel. Tilt the retainer down
through the center wheel opening.
Make sure the retainer is fully seated
across the underside of the wheel.
3. Assemble the jack handle extensions (4)and wheel wrench (5).
Page 368 of 433
Chevrolet Tahoe/Suburban Owner Manual (GMNA-Localizing-U.S./Canada/
Mexico-13690484) - 2021 - crc - 8/17/20
Vehicle Care 367
Caution
Use of an air wrench or other power
tools with the hoist mechanism is not
recommended and could damage the
system. Use only the tools supplied with
the hoist mechanism.
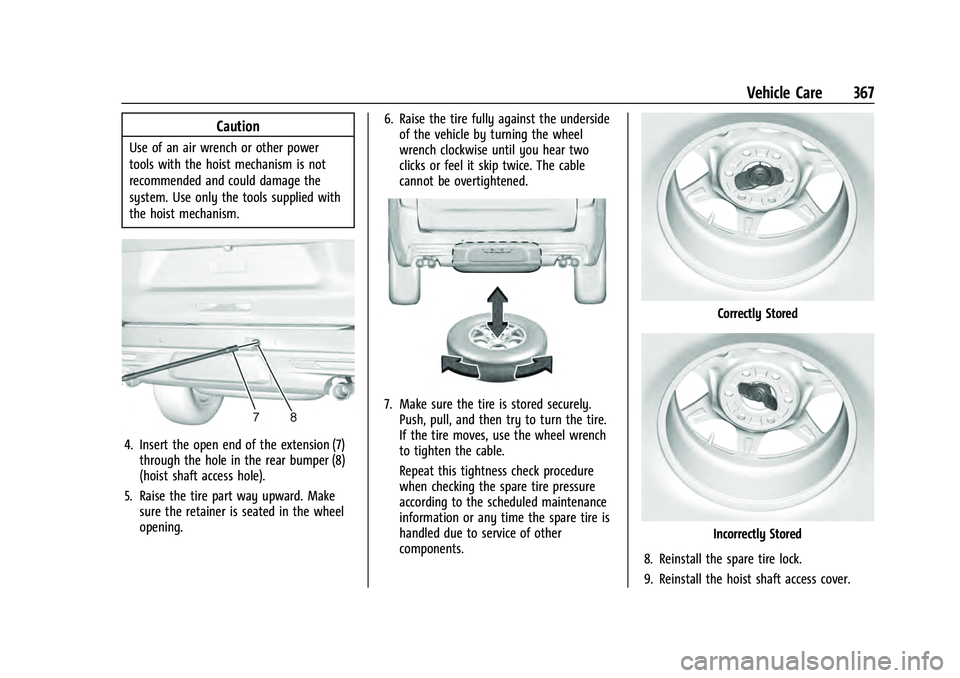
4. Insert the open end of the extension (7)through the hole in the rear bumper (8)
(hoist shaft access hole).
5. Raise the tire part way upward. Make sure the retainer is seated in the wheel
opening. 6. Raise the tire fully against the underside
of the vehicle by turning the wheel
wrench clockwise until you hear two
clicks or feel it skip twice. The cable
cannot be overtightened.
7. Make sure the tire is stored securely.Push, pull, and then try to turn the tire.
If the tire moves, use the wheel wrench
to tighten the cable.
Repeat this tightness check procedure
when checking the spare tire pressure
according to the scheduled maintenance
information or any time the spare tire is
handled due to service of other
components.
Correctly Stored
Incorrectly Stored
8. Reinstall the spare tire lock.
9. Reinstall the hoist shaft access cover.
Page 369 of 433
Chevrolet Tahoe/Suburban Owner Manual (GMNA-Localizing-U.S./Canada/
Mexico-13690484) - 2021 - crc - 8/17/20
368 Vehicle Care
Storing the Tools
To store the tools:1. Return the tools (wheel wrench, jack handle, and jack handle extensions) to
the tool bag. Use the velcro straps to
secure the tool bag under the load floor
in the cargo area.
2. Position the jack and wheel blocks in the driver side trim panel over the
wheelhouse.
3. Turn the jack knob clockwise until the jack is secured tight in the mounting
bracket. Be sure to position the holes in
the base of the jack onto the pin in the
mounting bracket.
4. Close the trim panel door.
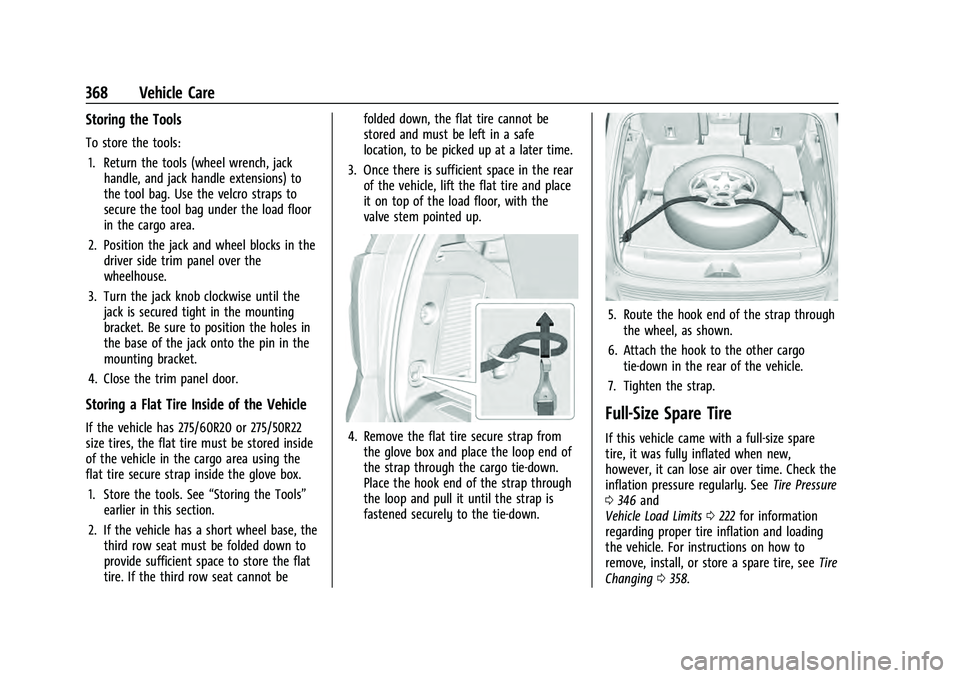
Storing a Flat Tire Inside of the Vehicle
If the vehicle has 275/60R20 or 275/50R22
size tires, the flat tire must be stored inside
of the vehicle in the cargo area using the
flat tire secure strap inside the glove box. 1. Store the tools. See “Storing the Tools”
earlier in this section.
2. If the vehicle has a short wheel base, the third row seat must be folded down to
provide sufficient space to store the flat
tire. If the third row seat cannot be folded down, the flat tire cannot be
stored and must be left in a safe
location, to be picked up at a later time.
3. Once there is sufficient space in the rear of the vehicle, lift the flat tire and place
it on top of the load floor, with the
valve stem pointed up.4. Remove the flat tire secure strap from
the glove box and place the loop end of
the strap through the cargo tie-down.
Place the hook end of the strap through
the loop and pull it until the strap is
fastened securely to the tie-down.
5. Route the hook end of the strap throughthe wheel, as shown.
6. Attach the hook to the other cargo tie-down in the rear of the vehicle.
7. Tighten the strap.
Full-Size Spare Tire
If this vehicle came with a full-size spare
tire, it was fully inflated when new,
however, it can lose air over time. Check the
inflation pressure regularly. See Tire Pressure
0 346 and
Vehicle Load Limits 0222 for information
regarding proper tire inflation and loading
the vehicle. For instructions on how to
remove, install, or store a spare tire, see Tire
Changing 0358.
Page 386 of 433
Chevrolet Tahoe/Suburban Owner Manual (GMNA-Localizing-U.S./Canada/
Mexico-13690484) - 2021 - crc - 8/17/20
Service and Maintenance 385
Service and Maintenance
General Information
General Information . . . . . . . . . . . . . . . . . . . 385
Maintenance Schedule
Maintenance Schedule . . . . . . . . . . . . . . . . 386
Special Application Services
Special Application Services . . . . . . . . . . . . 392
Additional Maintenance and Care
Additional Maintenance and Care . . . . . 392
Recommended Fluids, Lubricants, and
Parts
Recommended Fluids andLubricants . . . . . . . . . . . . . . . . . . . . . . . . . . . 395
Maintenance Replacement Parts . . . . . . 396
Maintenance Records
Maintenance Records . . . . . . . . . . . . . . . . . . 397
General Information
This maintenance section applies to vehicles
with a gasoline engine. For diesel engine
vehicles, see "Maintenance Schedule" in the
Duramax diesel supplement.
Your vehicle is an important investment.
This section describes the required
maintenance for the vehicle. Follow this
schedule to help protect against major repair
expenses resulting from neglect or
inadequate maintenance. It may also help to
maintain the value of the vehicle if it is
sold. It is the responsibility of the owner to
have all required maintenance performed.
Your dealer has trained technicians who can
perform required maintenance using genuine
replacement parts. They have up-to-date
tools and equipment for fast and accurate
diagnostics. Many dealers have extended
evening and Saturday hours, courtesy
transportation, and online scheduling to
assist with service needs.
Your dealer recognizes the importance of
providing competitively priced maintenance
and repair services. With trained technicians,
the dealer is the place for routine maintenance such as oil changes and tire
rotations and additional maintenance items
like tires, brakes, batteries, and wiper blades.
Caution
Damage caused by improper maintenance
can lead to costly repairs and may not be
covered by the vehicle warranty.
Maintenance intervals, checks,
inspections, recommended fluids, and
lubricants are important to keep the
vehicle in good working condition.
Do not have chemical flushes that are not
approved by GM performed on the
vehicle. The use of flushes, solvents,
cleaners, or lubricants that are not
approved by GM could damage the
vehicle, requiring expensive repairs that
are not covered by the vehicle warranty.
The Tire Rotation and Required Services are
the responsibility of the vehicle owner. It is
recommended to have your dealer perform
these services every 12 000 km/7,500 mi.
Proper vehicle maintenance helps to keep
the vehicle in good working condition,
improves fuel economy, and reduces vehicle
emissions.