engine CHEVROLET SUBURBAN 2023 Owners Manual
[x] Cancel search | Manufacturer: CHEVROLET, Model Year: 2023, Model line: SUBURBAN, Model: CHEVROLET SUBURBAN 2023Pages: 443, PDF Size: 18.73 MB
Page 351 of 443
Chevrolet Tahoe/Suburban Owner Manual (GMNA-Localizing-U.S./Canada/
Mexico-16416971) - 2023 - CRC - 4/26/22
350 Vehicle Care
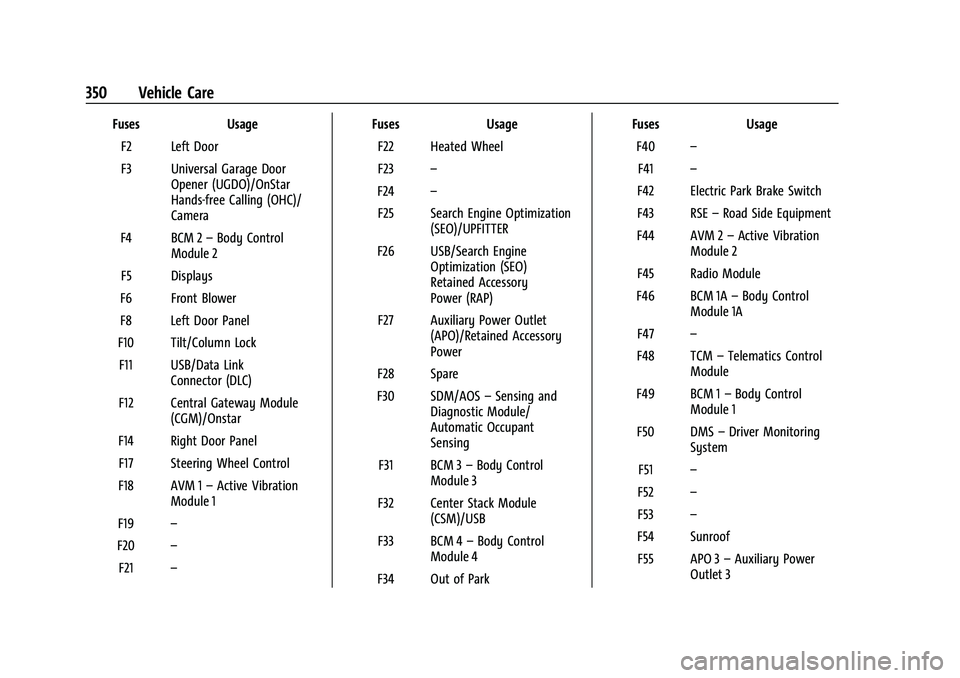
FusesUsage
F2 Left Door
F3 Universal Garage Door Opener (UGDO)/OnStar
Hands-free Calling (OHC)/
Camera
F4 BCM 2 –Body Control
Module 2
F5 Displays
F6 Front Blower
F8 Left Door Panel
F10 Tilt/Column Lock F11 USB/Data Link Connector (DLC)
F12 Central Gateway Module (CGM)/Onstar
F14 Right Door Panel F17 Steering Wheel Control
F18 AVM 1 –Active Vibration
Module 1
F19 –
F20 –
F21 – Fuses
Usage
F22 Heated Wheel
F23 –
F24 –
F25 Search Engine Optimization (SEO)/UPFITTER
F26 USB/Search Engine Optimization (SEO)
Retained Accessory
Power (RAP)
F27 Auxiliary Power Outlet (APO)/Retained Accessory
Power
F28 Spare
F30 SDM/AOS –Sensing and
Diagnostic Module/
Automatic Occupant
Sensing
F31 BCM 3 –Body Control
Module 3
F32 Center Stack Module (CSM)/USB
F33 BCM 4 –Body Control
Module 4
F34 Out of Park Fuses
Usage
F40 –
F41 –
F42 Electric Park Brake Switch
F43 RSE –Road Side Equipment
F44 AVM 2 –Active Vibration
Module 2
F45 Radio Module
F46 BCM 1A –Body Control
Module 1A
F47 –
F48 TCM –Telematics Control
Module
F49 BCM 1 –Body Control
Module 1
F50 DMS –Driver Monitoring
System
F51 –
F52 –
F53 –
F54 Sunroof F55 APO 3 –Auxiliary Power
Outlet 3
Page 353 of 443
Chevrolet Tahoe/Suburban Owner Manual (GMNA-Localizing-U.S./Canada/
Mexico-16416971) - 2023 - CRC - 4/26/22
352 Vehicle Care
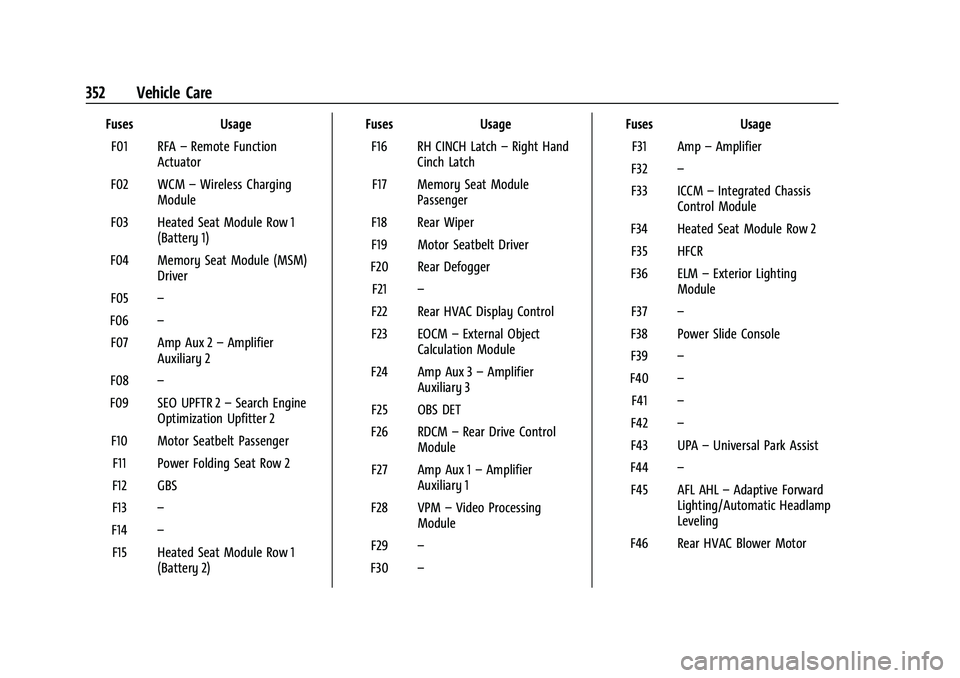
FusesUsage
F01 RFA –Remote Function
Actuator
F02 WCM –Wireless Charging
Module
F03 Heated Seat Module Row 1 (Battery 1)
F04 Memory Seat Module (MSM) Driver
F05 –
F06 –
F07 Amp Aux 2 –Amplifier
Auxiliary 2
F08 –
F09 SEO UPFTR 2 –Search Engine
Optimization Upfitter 2
F10 Motor Seatbelt Passenger F11 Power Folding Seat Row 2
F12 GBS
F13 –
F14 –
F15 Heated Seat Module Row 1 (Battery 2) Fuses
Usage
F16 RH CINCH Latch –Right Hand
Cinch Latch
F17 Memory Seat Module Passenger
F18 Rear Wiper
F19 Motor Seatbelt Driver
F20 Rear Defogger F21 –
F22 Rear HVAC Display Control
F23 EOCM –External Object
Calculation Module
F24 Amp Aux 3 –Amplifier
Auxiliary 3
F25 OBS DET
F26 RDCM –Rear Drive Control
Module
F27 Amp Aux 1 –Amplifier
Auxiliary 1
F28 VPM –Video Processing
Module
F29 –
F30 – Fuses
Usage
F31 Amp –Amplifier
F32 –
F33 ICCM –Integrated Chassis
Control Module
F34 Heated Seat Module Row 2 F35 HFCR
F36 ELM –Exterior Lighting
Module
F37 –
F38 Power Slide Console
F39 –
F40 –
F41 –
F42 –
F43 UPA –Universal Park Assist
F44 –
F45 AFL AHL –Adaptive Forward
Lighting/Automatic Headlamp
Leveling
F46 Rear HVAC Blower Motor
Page 357 of 443
Chevrolet Tahoe/Suburban Owner Manual (GMNA-Localizing-U.S./Canada/
Mexico-16416971) - 2023 - CRC - 4/26/22
356 Vehicle Care
Tire Designations
Tire Size
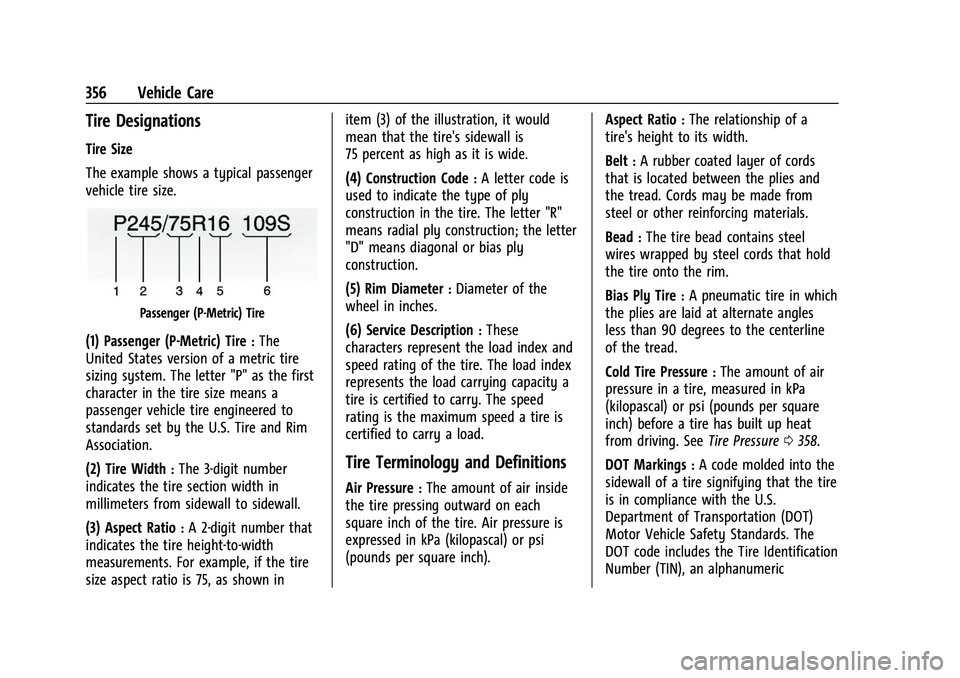
The example shows a typical passenger
vehicle tire size.
Passenger (P-Metric) Tire
(1) Passenger (P-Metric) Tire:The
United States version of a metric tire
sizing system. The letter "P" as the first
character in the tire size means a
passenger vehicle tire engineered to
standards set by the U.S. Tire and Rim
Association.
(2) Tire Width
:The 3-digit number
indicates the tire section width in
millimeters from sidewall to sidewall.
(3) Aspect Ratio
:A 2-digit number that
indicates the tire height-to-width
measurements. For example, if the tire
size aspect ratio is 75, as shown in item (3) of the illustration, it would
mean that the tire's sidewall is
75 percent as high as it is wide.
(4) Construction Code
:A letter code is
used to indicate the type of ply
construction in the tire. The letter "R"
means radial ply construction; the letter
"D" means diagonal or bias ply
construction.
(5) Rim Diameter
:Diameter of the
wheel in inches.
(6) Service Description
:These
characters represent the load index and
speed rating of the tire. The load index
represents the load carrying capacity a
tire is certified to carry. The speed
rating is the maximum speed a tire is
certified to carry a load.
Tire Terminology and Definitions
Air Pressure:The amount of air inside
the tire pressing outward on each
square inch of the tire. Air pressure is
expressed in kPa (kilopascal) or psi
(pounds per square inch). Aspect Ratio
:The relationship of a
tire's height to its width.
Belt
:A rubber coated layer of cords
that is located between the plies and
the tread. Cords may be made from
steel or other reinforcing materials.
Bead
:The tire bead contains steel
wires wrapped by steel cords that hold
the tire onto the rim.
Bias Ply Tire
:A pneumatic tire in which
the plies are laid at alternate angles
less than 90 degrees to the centerline
of the tread.
Cold Tire Pressure
:The amount of air
pressure in a tire, measured in kPa
(kilopascal) or psi (pounds per square
inch) before a tire has built up heat
from driving. See Tire Pressure0358.
DOT Markings
:A code molded into the
sidewall of a tire signifying that the tire
is in compliance with the U.S.
Department of Transportation (DOT)
Motor Vehicle Safety Standards. The
DOT code includes the Tire Identification
Number (TIN), an alphanumeric
Page 359 of 443
Chevrolet Tahoe/Suburban Owner Manual (GMNA-Localizing-U.S./Canada/
Mexico-16416971) - 2023 - CRC - 4/26/22
358 Vehicle Care
Treadwear Indicators:Narrow bands,
sometimes called wear bars, that show
across the tread of a tire when only
1.6 mm (1/16 in) of tread remains. See
When It Is Time for New Tires 0366.
UTQGS (Uniform Tire Quality Grading
Standards)
:A tire information system
that provides consumers with ratings
for a tire's traction, temperature, and
treadwear. Ratings are determined by
tire manufacturers using government
testing procedures. The ratings are
molded into the sidewall of the tire.
See Uniform Tire Quality Grading 0368.
Vehicle Capacity Weight
:The number
of designated seating positions
multiplied by 68 kg (150 lbs) plus the
rated cargo load. See Vehicle Load
Limits 0205.
Vehicle Maximum Load on the Tire
:
Load on an individual tire due to curb
weight, accessory weight, occupant
weight, and cargo weight.
Vehicle Placard
:A label permanently
attached to a vehicle showing the
vehicle's capacity weight and the original equipment tire size and
recommended inflation pressure. See
“Tire and Loading Information Label”
under
Vehicle Load Limits 0205.
Tire Pressure
Tires need the correct amount of air
pressure to operate effectively.
{Warning
Neither tire underinflation nor
overinflation is good. Underinflated
tires, or tires that do not have
enough air, can result in:
.Tire overloading and overheating,
which could lead to a blowout
.Premature or irregular wear
.Poor handling
.Reduced fuel economy for
internal combustion engine
vehicles
.Reduced range for electric vehicles
Overinflated tires, or tires that have
too much air, can result in:
(Continued)
Warning (Continued)
.Unusual wear
.Poor handling
.Rough ride
.Needless damage from road
hazards
The Tire and Loading Information label
on the vehicle indicates the original
equipment tires and the correct cold
tire inflation pressures. The
recommended pressure is the minimum
air pressure needed to support the
vehicle's maximum load carrying
capacity.
For additional information regarding
how much weight the vehicle can carry,
and an example of the Tire and Loading
Information label, see Vehicle Load
Limits 0205. How the vehicle is loaded
affects vehicle handling and ride
comfort. Never load the vehicle with
more weight than it was designed to
carry.
Page 373 of 443
Chevrolet Tahoe/Suburban Owner Manual (GMNA-Localizing-U.S./Canada/
Mexico-16416971) - 2023 - CRC - 4/26/22
372 Vehicle Care
{Warning
Changing a tire can be dangerous. The
vehicle can slip off the jack and roll over
or fall causing injury or death. Find a
level place to change the tire. To help
prevent the vehicle from moving:1. Set the parking brake firmly.
2. Shift the vehicle to P (Park).
3. For vehicles with four-wheel drive with an N (Neutral) transfer case
position, be sure the transfer case is
in a drive gear —not in N (Neutral).
4. Turn off the engine and do not restart while the vehicle is raised.
5. Do not allow passengers to remain in the vehicle.
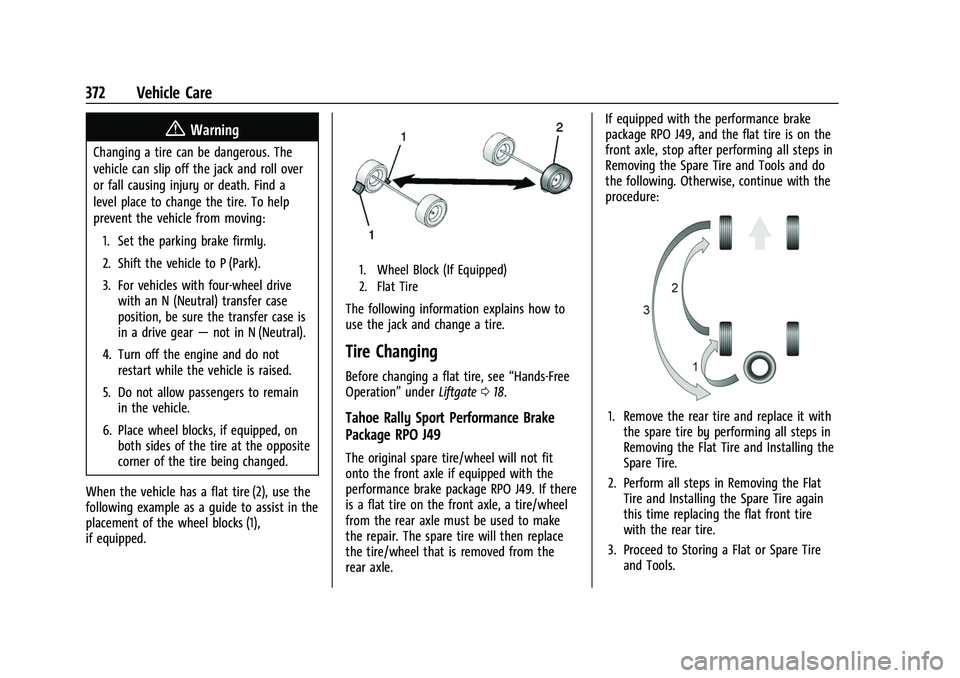
6. Place wheel blocks, if equipped, on both sides of the tire at the opposite
corner of the tire being changed.
When the vehicle has a flat tire (2), use the
following example as a guide to assist in the
placement of the wheel blocks (1),
if equipped.
1. Wheel Block (If Equipped)
2. Flat Tire
The following information explains how to
use the jack and change a tire.
Tire Changing
Before changing a flat tire, see “Hands-Free
Operation” underLiftgate 018.
Tahoe Rally Sport Performance Brake
Package RPO J49
The original spare tire/wheel will not fit
onto the front axle if equipped with the
performance brake package RPO J49. If there
is a flat tire on the front axle, a tire/wheel
from the rear axle must be used to make
the repair. The spare tire will then replace
the tire/wheel that is removed from the
rear axle. If equipped with the performance brake
package RPO J49, and the flat tire is on the
front axle, stop after performing all steps in
Removing the Spare Tire and Tools and do
the following. Otherwise, continue with the
procedure:
1. Remove the rear tire and replace it with
the spare tire by performing all steps in
Removing the Flat Tire and Installing the
Spare Tire.
2. Perform all steps in Removing the Flat Tire and Installing the Spare Tire again
this time replacing the flat front tire
with the rear tire.
3. Proceed to Storing a Flat or Spare Tire and Tools.
Page 385 of 443
Chevrolet Tahoe/Suburban Owner Manual (GMNA-Localizing-U.S./Canada/
Mexico-16416971) - 2023 - CRC - 4/26/22
384 Vehicle Care
Caution
Ignoring these steps could result in costly
damage to the vehicle that would not be
covered by the vehicle warranty. Trying
to start the vehicle by pushing or pulling
it will not work, and it could damage the
vehicle.
Caution
If the jumper cables are connected or
removed in the wrong order, electrical
shorting may occur and damage the
vehicle. The repairs would not be covered
by the vehicle warranty. Always connect
and remove the jumper cables in the
correct order, making sure that the cables
do not touch each other or other metal.
5.3L V8 Shown, 6.2L V8 Similar
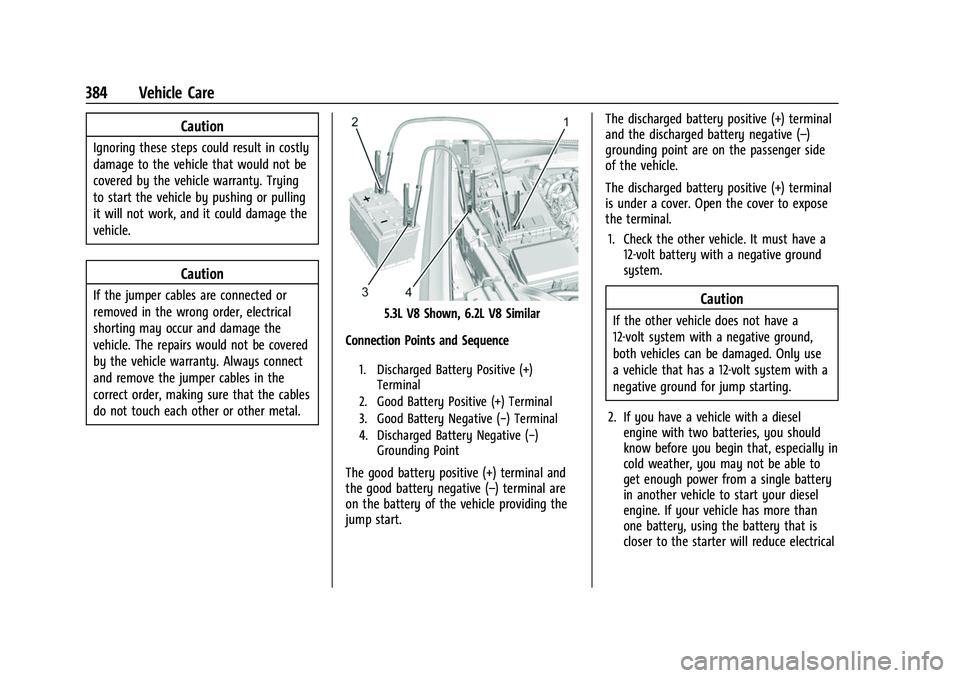
Connection Points and Sequence
1. Discharged Battery Positive (+) Terminal
2. Good Battery Positive (+) Terminal
3. Good Battery Negative (−) Terminal
4. Discharged Battery Negative (−) Grounding Point
The good battery positive (+) terminal and
the good battery negative (–) terminal are
on the battery of the vehicle providing the
jump start. The discharged battery positive (+) terminal
and the discharged battery negative (–)
grounding point are on the passenger side
of the vehicle.
The discharged battery positive (+) terminal
is under a cover. Open the cover to expose
the terminal.
1. Check the other vehicle. It must have a 12-volt battery with a negative ground
system.
Caution
If the other vehicle does not have a
12-volt system with a negative ground,
both vehicles can be damaged. Only use
a vehicle that has a 12-volt system with a
negative ground for jump starting.
2. If you have a vehicle with a diesel engine with two batteries, you should
know before you begin that, especially in
cold weather, you may not be able to
get enough power from a single battery
in another vehicle to start your diesel
engine. If your vehicle has more than
one battery, using the battery that is
closer to the starter will reduce electrical
Page 386 of 443
Chevrolet Tahoe/Suburban Owner Manual (GMNA-Localizing-U.S./Canada/
Mexico-16416971) - 2023 - CRC - 4/26/22
Vehicle Care 385
resistance. This is located on the
passenger side, in the rear of the engine
compartment.
3. Get the vehicles close enough so the jumper cables can reach, but be sure the
vehicles are not touching each other.
If they are, it could cause an unwanted
ground connection. You would not be
able to start your vehicle, and the bad
grounding could damage the electrical
systems.
To avoid the possibility of the vehicles
rolling, set the parking brake firmly on
both vehicles involved in the jump start
procedure. Put an automatic transmission
in P (Park) or a manual transmission in
Neutral before setting the parking brake.
If you have a four-wheel-drive vehicle, be
sure the transfer case is in a drive gear,
not in N (Neutral).
Caution
If any accessories are left on or plugged
in during the jump starting procedure,
they could be damaged. The repairs
would not be covered by the vehicle
warranty. Whenever possible, turn off or
unplug all accessories on either vehicle
when jump starting. 4. Turn the ignition off on both vehicles.
Unplug unnecessary accessories plugged
into the accessory power outlets. Turn
off the radio and all the lamps that are
not needed. This will avoid sparks and
help save both batteries. And it could
save the radio!
5. Open the hood on the other vehicle and locate the positive (+) and negative (−)
terminal locations on that vehicle.
{Warning
An electric fan can start up even when
the engine is not running and can injure
you. Keep hands, clothing, and tools
away from any underhood electric fan.
{Warning
Using a match near a battery can cause
battery gas to explode. People have been
hurt doing this, and some have been
blinded. Use a flashlight if you need
more light.
(Continued)
Warning (Continued)
Battery fluid contains acid that can burn
you. Do not get it on you. If you
accidentally get it in your eyes or on
your skin, flush the place with water and
get medical help immediately.
{Warning
Fans or other moving engine parts can
injure you badly. Keep your hands away
from moving parts once the engine is
running.
6. Check that the jumper cables do not have loose or missing insulation. If they
do, you could get a shock. The vehicles
could be damaged too.
Before you connect the cables, here are
some basic things you should know.
Positive (+) will go to positive (+) or to a
remote positive (+) terminal if the
vehicle has one. Negative (−) will go to a
heavy, unpainted metal engine part or to
a remote negative (−) terminal if the
vehicle has one.
Page 387 of 443
Chevrolet Tahoe/Suburban Owner Manual (GMNA-Localizing-U.S./Canada/
Mexico-16416971) - 2023 - CRC - 4/26/22
386 Vehicle Care
Do not connect positive (+) to negative
(−) or you will get a short that would
damage the battery and maybe other
parts too. And do not connect the
negative (−) cable to the negative (−)
terminal on the dead battery because
this can cause sparks.
7. Connect one end of the red positive (+) cable to the discharged battery
positive (+) terminal.
8. Do not let the other end touch metal. Connect it to the good battery
positive (+) terminal. Use a remote
positive (+) terminal if the vehicle
has one.
9. Connect one end of the black negative (−) cable to the good battery negative
(−) terminal. Use a remote negative (−)
terminal if the vehicle has one.
Do not let the other end touch anything
until the next step.
10. Connect the other end of the negative (−) cable to the discharged battery
negative (−) grounding point.
11. Start the vehicle with the good battery and run the engine for a while. 12. Try to start the vehicle that had the
dead battery. If it will not start after a
few tries, it probably needs service.
Jumper Cable Removal
Reverse the sequence exactly when
removing the jumper cables.
After starting the disabled vehicle and
removing the jumper cables, allow it to idle
for several minutes.
Towing the Vehicle
Transporting a Disabled Vehicle
Caution
Incorrectly transporting a disabled vehicle
may cause damage to the vehicle. Use
proper tire straps to secure the vehicle to
the flatbed tow truck. Do not strap or
hook to any frame, underbody,
or suspension component not specified
below. Do not move vehicles with drive
axle tires on the ground. Damage is not
covered by the vehicle warranty.
Caution
The vehicle may be equipped with an
electric parking brake and/or an
electronic shifter. In the event of a loss of
12-volt battery power, the electric parking
brake cannot be released, and the vehicle
cannot be shifted to N (Neutral). Tire
skates or dollies must be used under the
non-rolling tires to prevent damage while
loading/unloading the vehicle. Dragging
the vehicle will cause damage not
covered by the vehicle warranty.
Caution
The vehicle may be equipped with a tow
eye. Improper use of the tow eye may
cause damage to the vehicle and is not
covered by the vehicle warranty.
If equipped, use the tow eye to load the
vehicle onto a flatbed tow truck from a
flat road surface, or to move the vehicle
a very short distance at a walking pace.
The tow eye is not designed for off-road
recovery. The vehicle must be in
N (Neutral) with the electric parking
brake released when using the tow eye.
Page 388 of 443
Chevrolet Tahoe/Suburban Owner Manual (GMNA-Localizing-U.S./Canada/
Mexico-16416971) - 2023 - CRC - 4/26/22
Vehicle Care 387
Contact a professional towing service if the
disabled vehicle must be transported. GM
recommends a flatbed tow truck to
transport a disabled vehicle. Use ramps to
help reduce approach angles, if necessary.
If equipped, a tow eye may be located near
the spare tire or emergency jack. Do not use
the tow eye to pull the vehicle from the
snow, mud, sand, or ditch. Tow eye threads
may have right or left-hand threads. Use
caution when installing or removing the
tow eye.
The vehicle must be in N (Neutral) and the
electric parking brake must be released
when loading the vehicle onto a flatbed tow
truck.
.If the vehicle is equipped with car wash
mode and has 12-volt battery power, refer
to“Car Wash Mode” underAutomatic
Transmission 0215 to place the vehicle in
N (Neutral).
.If the 12-volt battery is dead and/or the
engine will not start, the vehicle will not
move. Try to jump start the vehicle. Refer
to Jump Starting - North America 0383
and if the jump start is successful, retry
the “Car Wash Mode” procedure.
.If jump starting is unsuccessful, the
vehicle will not move. Tire skates or
dollies must be used under the non-rolling
tires to prevent vehicle damage.
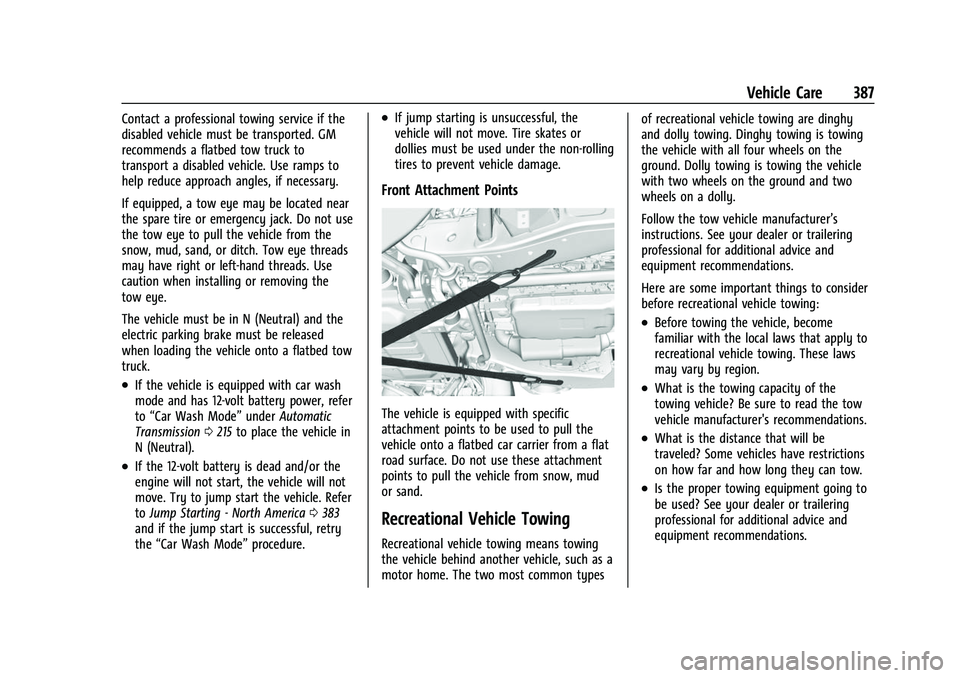
Front Attachment Points
The vehicle is equipped with specific
attachment points to be used to pull the
vehicle onto a flatbed car carrier from a flat
road surface. Do not use these attachment
points to pull the vehicle from snow, mud
or sand.
Recreational Vehicle Towing
Recreational vehicle towing means towing
the vehicle behind another vehicle, such as a
motor home. The two most common types of recreational vehicle towing are dinghy
and dolly towing. Dinghy towing is towing
the vehicle with all four wheels on the
ground. Dolly towing is towing the vehicle
with two wheels on the ground and two
wheels on a dolly.
Follow the tow vehicle manufacturer’s
instructions. See your dealer or trailering
professional for additional advice and
equipment recommendations.
Here are some important things to consider
before recreational vehicle towing:
.Before towing the vehicle, become
familiar with the local laws that apply to
recreational vehicle towing. These laws
may vary by region.
.What is the towing capacity of the
towing vehicle? Be sure to read the tow
vehicle manufacturer's recommendations.
.What is the distance that will be
traveled? Some vehicles have restrictions
on how far and how long they can tow.
.Is the proper towing equipment going to
be used? See your dealer or trailering
professional for additional advice and
equipment recommendations.
Page 389 of 443
Chevrolet Tahoe/Suburban Owner Manual (GMNA-Localizing-U.S./Canada/
Mexico-16416971) - 2023 - CRC - 4/26/22
388 Vehicle Care
.Is the vehicle ready to be towed? Just as
preparing the vehicle for a long trip,
make sure the vehicle is prepared to be
towed.
Caution
Use of a shield mounted in front of the
vehicle grille could restrict airflow and
cause damage to the transmission. The
repairs would not be covered by the
vehicle warranty. If using a shield, only
use one that attaches to the towing
vehicle.
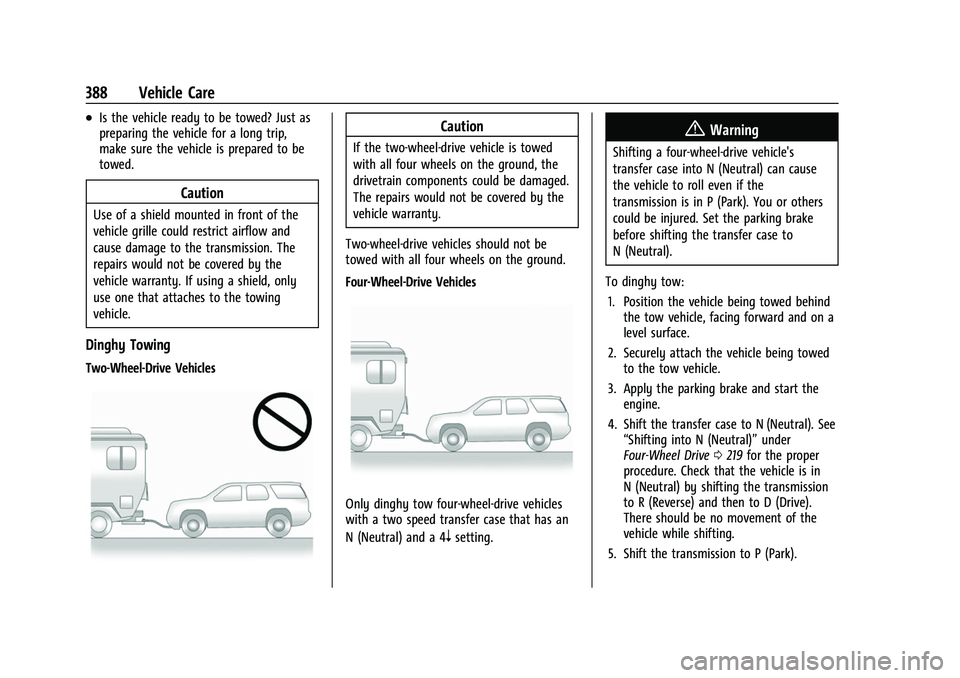
Dinghy Towing
Two-Wheel-Drive Vehicles
Caution
If the two-wheel-drive vehicle is towed
with all four wheels on the ground, the
drivetrain components could be damaged.
The repairs would not be covered by the
vehicle warranty.
Two-wheel-drive vehicles should not be
towed with all four wheels on the ground.
Four-Wheel-Drive Vehicles
Only dinghy tow four-wheel-drive vehicles
with a two speed transfer case that has an
N (Neutral) and a 4
nsetting.
{Warning
Shifting a four-wheel-drive vehicle's
transfer case into N (Neutral) can cause
the vehicle to roll even if the
transmission is in P (Park). You or others
could be injured. Set the parking brake
before shifting the transfer case to
N (Neutral).
To dinghy tow: 1. Position the vehicle being towed behind the tow vehicle, facing forward and on a
level surface.
2. Securely attach the vehicle being towed to the tow vehicle.
3. Apply the parking brake and start the engine.
4. Shift the transfer case to N (Neutral). See “Shifting into N (Neutral)” under
Four-Wheel Drive 0219 for the proper
procedure. Check that the vehicle is in
N (Neutral) by shifting the transmission
to R (Reverse) and then to D (Drive).
There should be no movement of the
vehicle while shifting.
5. Shift the transmission to P (Park).