maintenance CHEVROLET TAHOE 2003 2.G User Guide
[x] Cancel search | Manufacturer: CHEVROLET, Model Year: 2003, Model line: TAHOE, Model: CHEVROLET TAHOE 2003 2.GPages: 552, PDF Size: 3.44 MB
Page 371 of 552

When You Are Ready to Leave After
Parking on a Hill
1. Apply your regular brakes and hold the pedal down
while you:
·start your engine,
·shift into a gear, and
·release the parking brake.
2. Let up on the brake pedal.
3. Drive slowly until the trailer is clear of the chocks.
4. Stop and have someone pick up and store the
chocks.
Maintenance When Trailer Towing
Your vehicle will need service more often when you're
pulling a trailer. See the Maintenance Schedule for more
on this. Things that are especially important in trailer
operation are automatic transmission ¯uid (don't over®ll),
engine oil, axle lubricant, belts, cooling system and brake
system. Each of these is covered in this manual, and the
Index will help you ®nd them quickly. If you're trailering,
it's a good idea to review these sections before you start
your trip.
Check periodically to see that all hitch nuts and bolts
are tight.
Trailer Wiring Harness
Your vehicle is equipped with the following wiring
harnesses for towing a trailer.
4-77
Page 378 of 552

Tires..............................................................5-67
In¯ation Ð Tire Pressure...............................5-68
Tire Inspection and Rotation...........................5-69
When It Is Time for New Tires.......................5-70
Buying New Tires.........................................5-71
Uniform Tire Quality Grading..........................5-72
Wheel Alignment and Tire Balance..................5-74
Wheel Replacement......................................5-74
Tire Chains..................................................5-76
If a Tire Goes Flat........................................5-76
Changing a Flat Tire.....................................5-77
Spare Tire...................................................5-98
Appearance Care............................................5-99
Cleaning the Inside of Your Vehicle.................5-99
Care of Safety Belts....................................5-102
Weatherstrips.............................................5-102
Cleaning the Outside of Your Vehicle.............5-102
Sheet Metal Damage...................................5-104Finish Damage...........................................5-104
Underbody Maintenance...............................5-105
Chemical Paint Spotting...............................5-105
Vehicle Care/Appearance Materials................5-105
Vehicle Identi®cation.....................................5-107
Vehicle Identi®cation Number (VIN)................5-107
Service Parts Identi®cation Label...................5-107
Electrical System..........................................5-108
Add-On Electrical Equipment.........................5-108
Windshield Wiper Fuses...............................5-108
Power Windows and Other Power Options......5-108
Fuses and Circuit Breakers..........................5-109
Capacities and Speci®cations........................5-118
Capacities and Speci®cations........................5-118
Normal Maintenance Replacement Parts.........5-121
Normal Maintenance Replacement Parts.........5-121
Section 5 Service and Appearance Care
5-2
Page 379 of 552
Service
Your dealer knows your vehicle best and wants you to
be happy with it. We hope you will go to your dealer
for all your service needs. You will get genuine GM parts
and GM-trained and supported service people.
We hope you will want to keep your GM vehicle all GM.
Genuine GM parts have one of these marks:
Doing Your Own Service Work
If you want to do some of your own service work, you'll
want to use the proper service manual. It tells you
much more about how to service your vehicle than this
manual can. To order the proper service manual,
see
Service Publications Ordering Information on
page 7-11.
Your vehicle has an air bag system. Before attempting
to do your own service work, see
Servicing Your Air
Bag-Equipped Vehicle on page 1-87.
You should keep a record with all parts receipts and list
the mileage and the date of any service work you
perform. See
Part E: Maintenance Record on page 6-20.
{CAUTION:
You can be injured and your vehicle could be
damaged if you try to do service work on a
vehicle without knowing enough about it.
·Be sure you have sufficient knowledge,
experience, the proper replacement parts
and tools before you attempt any vehicle
maintenance task.
CAUTION: (Continued)
5-3
Page 402 of 552

Automatic Transmission Fluid
When to Check and Change
A good time to check your automatic transmission ¯uid
level is when the engine oil is changed.
Change both the ¯uid and ®lter every 50,000 miles
(83 000 km) if the vehicle's GVWR is over 8,600 or if
the vehicle is mainly driven under one or more of these
conditions:
·In heavy city traffic where the outside temperature
regularly reaches 90ÉF (32ÉC) or higher.
·In hilly or mountainous terrain.
·When doing frequent trailer towing.
·Uses such as found in taxi, police or delivery
service.
If your vehicle's GVWR is not over 8,600 and you do
not use your vehicle under any of these conditions,
change the ¯uid and ®lter every 100,000 miles
(166 000 km).
See
Part A: Scheduled Maintenance Services on
page 6-4.
How to Check
Because this operation can be a little difficult, you may
choose to have this done at the dealership service
department.
If you do it yourself, be sure to follow all the instructions
here, or you could get a false reading on the dipstick.
Notice:Too much or too little ¯uid can damage
your transmission. Too much can mean that some
of the ¯uid could come out and fall on hot engine
part or exhaust system parts, starting a ®re.
Too little ¯uid could cause the transmission to
overheat. Be sure to get an accurate reading if you
check your transmission ¯uid.
Wait at least 30 minutes before checking the
transmission ¯uid level if you have been driving:
·When outside temperatures are above 90ÉF (32ÉC).
·At high speed for quite a while.
·In heavy traffic ± especially in hot weather.
·While pulling a trailer.
To get the right reading, the ¯uid should be at normal
operating temperature, which is 180ÉF to 200ÉF
(82ÉC to 93ÉC).
5-26
Page 405 of 552

How to Add Fluid
Refer to the Maintenance Schedule to determine what
kind of transmission ¯uid to use. SeePart D:
Recommended Fluids and Lubricants on page 6-18.
Add ¯uid only after checking the transmission ¯uid while
it is hot. (A cold check is used only as a reference.) If
the ¯uid level is low, add only enough of the proper ¯uid
to bring the level up to the HOT area for a hot check.
It doesn't take much ¯uid, generally less than one
pint (0.5 L).
Don't over®ll.
Notice:
We recommend you use only ¯uid labeled
DEXRONž-III, because ¯uid with that label is
made especially for your automatic transmission.
Damage caused by ¯uid other than DEXRON
ž-III is
not covered by your new vehicle warranty.
·After adding ¯uid, recheck the ¯uid level as
described under
How to Check.
·When the correct ¯uid level is obtained, push the
dipstick back in all the way; then ¯ip the handle
down to lock the dipstick in place.
Engine Coolant
The cooling system in your vehicle is ®lled with
DEX-COOLžengine coolant. This coolant is designed
to remain in your vehicle for 5 years or 150,000 miles
(240 000 km), whichever occurs ®rst, if you add only
DEX-COOL
žextended life coolant.
The following explains your cooling system and how to
add coolant when it is low. If you have a problem
with engine overheating, see
Engine Overheating on
page 5-33.
5-29
Page 421 of 552

Brakes
Brake Fluid
Your brake master cylinder reservoir is ®lled with DOT-3
brake ¯uid. SeeEngine Compartment Overview on
page 5-14for the location of the reservoir.
There are only two reasons why the brake ¯uid level in
the reservoir might go down. The ®rst is that the
brake ¯uid goes down to an acceptable level during
normal brake lining wear. When new linings are put in,
the ¯uid level goes back up. The other reason is
that ¯uid is leaking out of the brake system. If it is, you
should have your brake system ®xed, since a leak
means that sooner or later your brakes will not work
well, or will not work at all.
So, it is not a good idea to ªtop offº your brake ¯uid.
Adding brake ¯uid will not correct a leak. If you add ¯uid
when your linings are worn, then you will have too
much ¯uid when you get new brake linings. You should
add (or remove) brake ¯uid, as necessary, only when
work is done on the brake hydraulic system.
{CAUTION:
If you have too much brake ¯uid, it can spill on
the engine. The ¯uid will burn if the engine is
hot enough. You or others could be burned,
and your vehicle could be damaged. Add brake
¯uid only when work is done on the brake
hydraulic system. See ªChecking Brake Fluidº
in this section.
Refer to the Maintenance Schedule to determine when
to check your brake ¯uid. See
Part C: Periodic
MaintenanceInspections on page 6-16.
5-45
Page 424 of 552

Brake Pedal Travel
See your dealer if the brake pedal does not return to
normal height, or if there is a rapid increase in
pedal travel. This could be a sign of brake trouble.
Brake Adjustment
Every time you make a brake stop, your disc brakes
adjust for wear.
Replacing Brake System Parts
The braking system on a vehicle is complex. Its many
parts have to be of top quality and work well together if
the vehicle is to have really good braking. Your
vehicle was designed and tested with top-quality GM
brake parts. When you replace parts of your braking
system Ð for example, when your brake linings
wear down and you need new ones put in Ð be sure
you get new approved GM replacement parts. If you do
not, your brakes may no longer work properly. For
example, if someone puts in brake linings that are wrong
for your vehicle, the balance between your front and
rear brakes can change Ð for the worse. The braking
performance you have come to expect can change
in many other ways if someone puts in the wrong
replacement brake parts.
Battery
Your new vehicle comes with a maintenance free
ACDelcožbattery. When it's time for a new battery, get
one that has the replacement number shown on the
original battery's label. We recommend an ACDelco
ž
battery. SeeEngine Compartment Overview on
page 5-14for battery location.
Warning:Battery posts, terminals and related
accessories contain lead and lead compounds,
chemicals known to the State of California to cause
cancer and reproductive harm. Wash hands after
handling.
5-48
Page 431 of 552
All-Wheel Drive
Lubricant checks in this section also apply to these
vehicles. However, there are two additional systems that
need lubrication.
Transfer Case
When to Check Lubricant
Refer to the Maintenance Schedule to determine how
often to check the lubricant. SeePart C: Periodic
MaintenanceInspections on page 6-16.
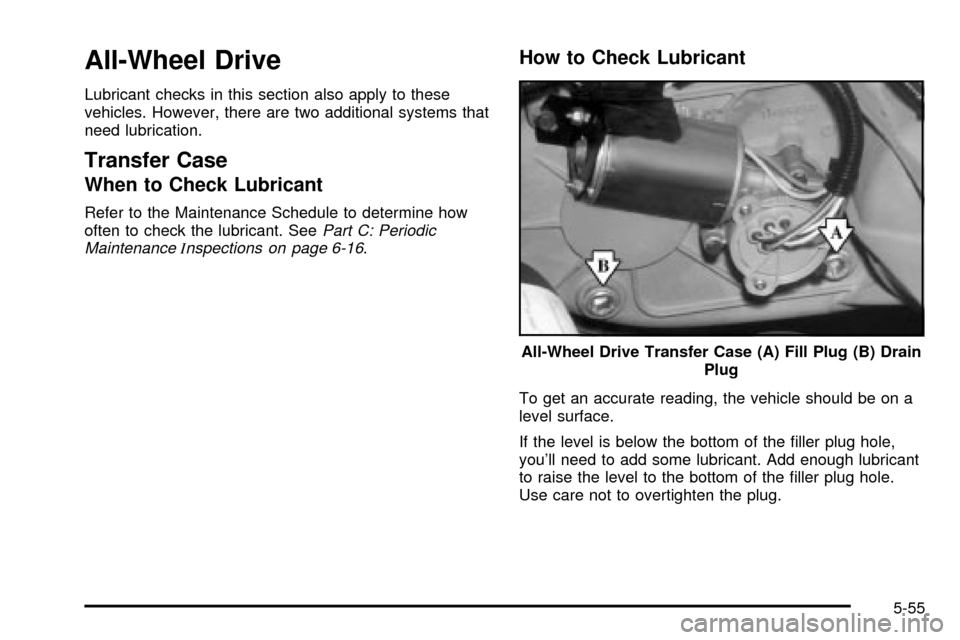
How to Check Lubricant
To get an accurate reading, the vehicle should be on a
level surface.
If the level is below the bottom of the ®ller plug hole,
you'll need to add some lubricant. Add enough lubricant
to raise the level to the bottom of the ®ller plug hole.
Use care not to overtighten the plug.All-Wheel Drive Transfer Case (A) Fill Plug (B) Drain
Plug
5-55
Page 432 of 552

What to Use
Refer to the Maintenance Schedule to determine what
kind of lubricant to use. SeePart D: Recommended
Fluids and Lubricants on page 6-18.
Rear Axle
When to Check Lubricant
Refer to the Maintenance Schedule to determine how
often to check the lubricant. SeePart A: Scheduled
Maintenance Services on page 6-4.
How to Check Lubricant
To get an accurate reading, the vehicle should be on a
level surface.
The proper level for the 1500 Series is from 5/8 inch to
1 5/8 inch (15 mm to 40 mm) below the bottom of
the ®ller plug hole. The proper level for the 2500 Series
is from 0 to 1/2 inch (0 to 13 mm) below the bottom
of the ®ller plug hole. The proper level for the 1500 and
2500 series vehicles with QUADRASTEERŸ (4
Wheel Steer) is from 0 to 1/4 inch (0 to 6 mm) below
the ®ller plug hole. Add only enough ¯uid to reach
the proper level.1500 Series shown, 2500 similar
5-56
Page 433 of 552

What to Use
Refer to the Maintenance Schedule to determine what
kind of lubricant to use. SeePart D: Recommended
Fluids and Lubricants on page 6-18.
Four-Wheel Drive
Lubricant checks in this section also apply to these
vehicles. However, there are two additional systems that
need lubrication.
Transfer Case
When to Check Lubricant
Refer to the Maintenance Schedule to determine how
often to check the lubricant. SeePart C: Periodic
MaintenanceInspections on page 6-16.
How to Check Lubricant
To get an accurate reading, the vehicle should be on a
level surface.
If the level is below the bottom of the ®ller plug hole,
you'll need to add some lubricant. Add enough lubricant
to raise the level to the bottom of the ®ller plug hole.
Use care not to overtighten the plug.
What to Use
Refer to the Maintenance Schedule to determine what
kind of lubricant to use. SeePart D: Recommended
Fluids and Lubricants on page 6-18. Automatic Transfer Case
5-57