change time CHEVROLET TAHOE 2007 3.G Owner's Manual
[x] Cancel search | Manufacturer: CHEVROLET, Model Year: 2007, Model line: TAHOE, Model: CHEVROLET TAHOE 2007 3.GPages: 634, PDF Size: 3.18 MB
Page 293 of 634
Changing the Time and Date Default
Settings
You can change the time default setting from
12 hours to 24 hours or change the date default
setting from month/day/year to day/month/year.
To change the time or date default settings, follow
these instructions:
1. Press the clock button and then the
pushbutton located under the forward arrow
that is currently displayed on the radio screen
until the time 12H (hour) and 24H (hour),
and the date MM/DD (month and day)
and DD/MM (day and month) displays.
2. Press the pushbutton located under the
desired option.
3. Press the clock button again to apply the
selected default, or let the screen time out.
Setting the Time (MP3 Radio with a
Six-Disc CD Player)
If your vehicle has a radio with a six-disc CD
player, the radio has a MENU button instead of
the clock button to set the time and date.
To set the time and date, follow these instructions:
1. Press the MENU button. Once the clock
option displays, press the pushbutton
located under that label. The HR, MIN, MM,
DD, YYYY (hour, minute, month, day,
and year) displays.
2. Press the pushbutton located under any one
of the time or date setting labels that you
want to change. Every time the pushbutton is
pressed again, the time or the date if
selected, increases by one.
Another way to increase the time or date, is
to press the right SEEK arrow or the FWD
(forward) button.
3. To decrease the time or date, press the left
SEEK arrow or the REV (reverse) button.
You can also turn the tune knob, located on
the upper right side of the radio, to adjust
the selected setting.
293
Page 294 of 634
Changing the Time and Date Default
Settings
You can change the time default setting from
12 hours to 24 hours or change the date default
setting from month/day/year to day/month/year.
To change the time or date default settings, follow
these instructions:
1. Press the MENU button. Once the clock
option displays, press the pushbutton
located under the forward arrow that is
currently displayed on the radio screen until
the 12H (hour) and 24H (hour), and the
date MM/DD (month and day) and DD/MM
(day and month) displays.
2. Press the pushbutton located under the
desired option.
3. Press the MENU button again to apply the
selected default, or let the screen time out.
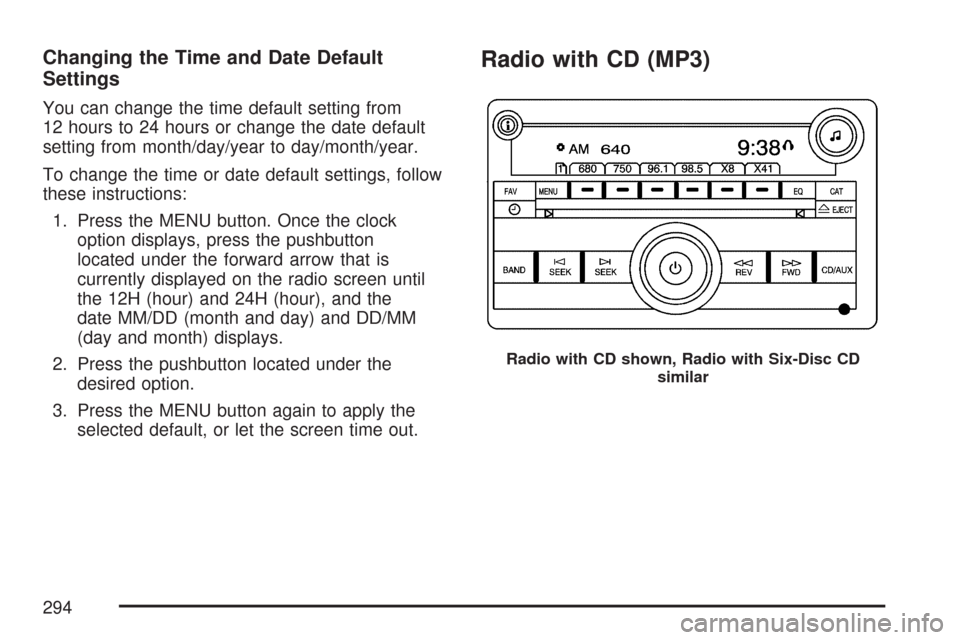
Radio with CD (MP3)
Radio with CD shown, Radio with Six-Disc CD
similar
294
Page 295 of 634
Radio Data System (RDS)
The audio system has a Radio Data System (RDS).
The RDS feature is available for use only on FM
stations that broadcast RDS information. This
system relies upon receiving speci�c information
from these stations and only works when the
information is available. While the radio is tuned to
an FM-RDS station, the station name or call letters
display. In rare cases, a radio station could
broadcast incorrect information that causes the
radio features to work improperly. If this happens,
contact the radio station.
XM™ Satellite Radio Service
XM™ is a satellite radio service that is based in the
48 contiguous United States and Canada. XM™
offers a large variety of coast-to-coast channels
including music, news, sports, talk, traffic/weather
(U.S. subscribers), and children’s programming.
XM™ provides digital quality audio and text
information that includes song title and artist name.
A service fee is required in order to receive the
XM™ service. For more information, contact XM™;
In the U.S. at www.xmradio.com or call
1-800-852-XMXM (9696) or in Canada at
www.xmradio.ca or call 1-877-GET-XMSR
(438-9677).
Playing the Radio
O
(Power/Volume):Press this knob to turn the
system on and off.
Turn this knob clockwise or counterclockwise to
increase or decrease the volume.
Speed Compensated Volume (SCV):The radio
has Speed Compensated Volume (SCV). While
SCV is on, the radio volume automatically adjusts
to compensate for road and wind noise as driving
speed changes. That way, the volume level should
sound about the same as you drive.
To activate SCV:
1. Set the radio volume to the desired level.
2. Press the MENU button to display the radio
setup menu.
3. Press the pushbutton under the AUTO
VOLUM (volume) label on the radio display.
4. Press the pushbutton under the desired Speed
Compensated Volume setting (OFF, Low, Med
(medium), or High) to select the level of radio
volume compensation. The display times out
after approximately 10 seconds. Each higher
setting allows for more radio volume
compensation at faster vehicle speeds.
295
Page 301 of 634
If the ignition or radio is turned off, with a CD in the
player, it stays in the player. While the ignition or
radio is turned on, the CD starts playing where it
stopped, if it was the last selected audio source.
When a CD is inserted, the CD symbol appears on
the CD. As each new track starts to play, the
track number displays. When more than one CD is
in the radio, the desired CD to be played can be
changed by pressing the pushbuttons located
under the displayed Disc label.
The CD player can play the smaller 3 inch (8 cm)
single CDs with an adapter ring. Full-size CDs
and the smaller CDs are loaded in the same
manner.
If playing a CD-R, the sound quality can be
reduced due to CD-R quality, the method of
recording, the quality of the music that has been
recorded, and the way the CD-R has been
handled. There can be an increase in skipping,
difficulty in �nding tracks, and/or difficulty in loading
and ejecting. If these problems occur, check the
bottom surface of the CD. If the surface of the CD
is damaged, such as cracked, broken, or
scratched, the CD will not play properly. If the
surface of the CD is soiled, seeCare of Your CDs
and DVDs on page 353for more information.If there is no apparent damage, try a known
good CD.
Notice:If a label is added to a CD, or more
than one CD is inserted into the slot at a time,
or an attempt is made to play scratched or
damaged CDs, the CD player could be
damaged. While using the CD player, use only
CDs in good condition without any label,
load one CD at a time, and keep the CD player
and the loading slot free of foreign materials,
liquids, and debris.
Do not add any label to a CD, it could get caught
in the CD player. If a CD is recorded on a
personal computer and a description label is
needed, try labeling the top of the recorded CD
with a marking pen.
If an error displays, see “CD Messages” later in
this section.
301
Page 306 of 634
XM™ Satellite Radio Service
XM™ is a satellite radio service that is based in
the 48 contiguous United States and Canada.
XM™ offers a large variety of coast-to-coast
channels including music, news, sports, talk,
traffic/weather (U.S. subscribers), and children’s
programming. XM™ provides digital quality
audio and text information that includes song title
and artist name. A service fee is required in
order to receive the XM™ service. For more
information, contact XM™; In the U.S. at
www.xmradio.com or call 1-800-852-XMXM (9696)
or in Canada at www.xmradio.ca or call
1-877-GET-XMSR (438-9677).
Playing the Radio
O
(Power/Volume):Press this knob to turn the
system on and off.
Turn this knob clockwise or counterclockwise to
increase or decrease the volume.Speed Compensated Volume (SCV):The radio
has Speed Compensated Volume (SCV). While
SCV is on, the radio volume automatically adjusts
to compensate for road and wind noise as
driving speed changes. That way, the volume level
should sound about the same as you drive. To
activate SCV:
1. Set the radio volume to the desired level.
2. Press the MENU button to display the radio
setup menu.
3. Press the pushbutton under the AUTO
VOLUM (volume) label on the radio display.
4. Press the pushbutton under the desired SCV
setting (OFF, Low, Med (medium), or High) to
select the level of radio volume compensation.
The display times out after approximately
10 seconds. Each higher setting allows
for more radio volume compensation at faster
vehicle speeds.
306
Page 316 of 634
See “Using the Auxiliary Input Jack(s)” later in this
section, or “Audio/Video (A/V) Jacks” under,Rear
Seat Entertainment System on page 337for more
information.
O(Power):Press this knob to turn the radio on or
off. Turn this knob clockwise or counterclockwise to
increase or decrease the volume. Press and hold
the knob for more than two seconds to turn off the
entire radio and Rear Seat Entertainment (RSE)
system and to start the parental control feature.
Parental control prevents the rear seat occupant
from operating the Rear Seat Audio (RSA) system
or remote control.
A lock symbol appears next to the clock display.
The parental control feature remains on until this
button is pressed and held for more than
two seconds again, or until the driver turns the
ignition off and exits the vehicle.
f(Tune):Turn this knob to change tracks on a CD
or DVD, to manually tune a radio station, or to
change clock or date settings, while in the clock or
date setting mode. See the information given earlier
in this section speci�c to the radio, CD, and the
DVD. Also, see “Setting the Time” in the index, for
setting the clock and date.
©SEEK (Previous Track/Chapter):Press this
button to return to the start of the current track
or chapter. Press this button again to go to
the previous track or chapter. This button might
not work when the DVD is playing the copyright
information or the previews.
SEEK
¨(Next Track/Chapter):Press this
button to go to the next track or chapter. This
button might not work when the DVD is playing the
copyright information or the previews.
sREV (Reverse):Press this button to quickly
reverse the CD or DVD at �ve times the normal
speed. The radio displays the elapsed time while in
fast reverse. To stop fast reversing, press this
button again. This button might not work when the
DVD is playing the copyright information or the
previews.
\FWD (Fast Forward):Press this button to
fast forward the CD or DVD. The radio displays the
elapsed time and fast forwards �ve times the
normal speed. To stop fast forwarding, press this
button again. This button might not work when
the DVD is playing the copyright information or the
previews.
316
Page 340 of 634
Battery Replacement
To change the batteries on the headphones, do
the following:
1. Turn the screw with a coin or screw driver
to loosen the battery door located on the left
side of the headphones. Slide the battery
door open.
2. Replace the two batteries in the compartment.
Make sure that they are installed correctly,
using the diagram on the inside of the battery
compartment.
3. Replace the battery door and tighten the door
screw.
If the headphones are to be stored for a long
period of time, remove the batteries and keep them
in a cool, dry place.
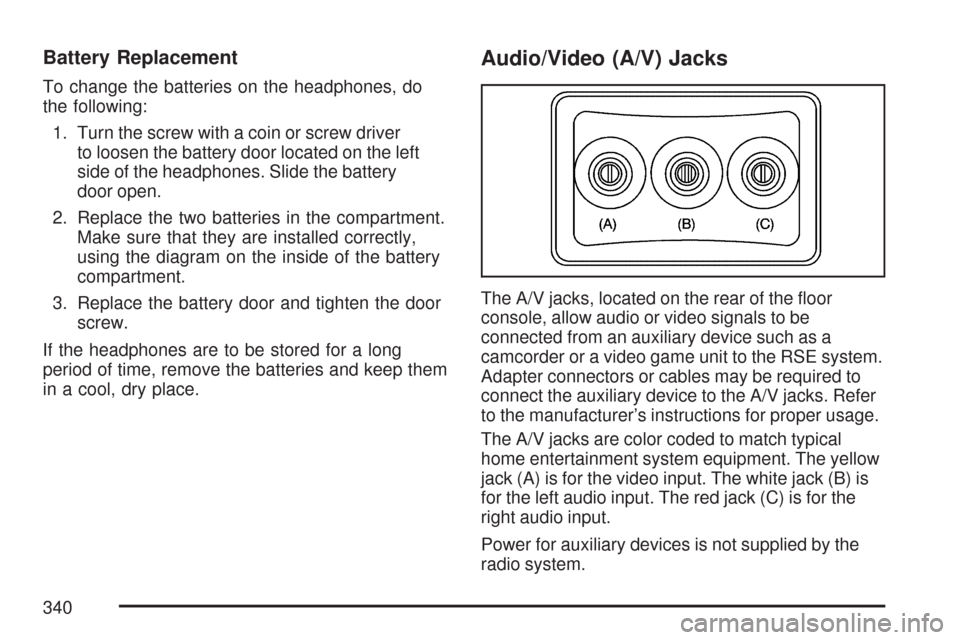
Audio/Video (A/V) Jacks
The A/V jacks, located on the rear of the �oor
console, allow audio or video signals to be
connected from an auxiliary device such as a
camcorder or a video game unit to the RSE system.
Adapter connectors or cables may be required to
connect the auxiliary device to the A/V jacks. Refer
to the manufacturer’s instructions for proper usage.
The A/V jacks are color coded to match typical
home entertainment system equipment. The yellow
jack (A) is for the video input. The white jack (B) is
for the left audio input. The red jack (C) is for the
right audio input.
Power for auxiliary devices is not supplied by the
radio system.
340
Page 346 of 634
Battery Replacement
To change the remote control batteries, do the
following:
1. Remove the battery compartment door
located on the bottom of the remote control.
2. Replace the two batteries in the compartment.
Make sure that they are installed correctly,
using the diagram on the inside of the battery
compartment.
3. Close the battery door securely.
If the remote control is to be stored for a long
period of time, remove the batteries and keep them
in a cool, dry place.
Problem Recommended Action
No power. The ignition might not be
turned on or in accessory.
The picture does not �ll the
screen. There are black
borders on the top and
bottom or on both sides or
it looks stretched out.Check the display mode
settings in the setup menu
by pressing the display
menu button on the remote
control.
In auxiliary mode, the
picture moves or scrolls.Check the auxiliary input
connections at both
devices.
The remote control does
not work.Check to make sure there
is no obstruction between
the remote control and the
transmitter window.
Check the batteries to
make sure they are not
dead or installed
incorrectly.
After stopping the player,
I push Play but sometimes
the DVD starts where I left
off and sometimes at the
beginning.If the stop button was
pressed one time, the DVD
player resumes playing
where the DVD was
stopped. If the stop button
was pressed two times
the DVD player begins to
play from the beginning of
the DVD.
346
Page 363 of 634
Remember: ABS does not change the time you
need to get your foot up to the brake pedal or
always decrease stopping distance. If you get too
close to the vehicle in front of you, you will not have
time to apply your brakes if that vehicle suddenly
slows or stops. Always leave enough room up
ahead to stop, even though you have ABS.
Using ABS
Do not pump the brakes. Just hold the brake
pedal down �rmly and let anti-lock work for you.
You may feel the brakes vibrate, or you may notice
some noise, but this is normal.
Braking in Emergencies
With ABS, you can steer and brake at the same
time. In many emergencies, steering can help you
more than even the very best braking.
Locking Rear Axle
If your vehicle has this feature, your locking rear
axle can give you additional traction on snow, mud,
ice, sand or gravel. It works like a standard axle
most of the time, but when one of the rear wheels
has no traction and the other does, this feature will
allow the wheel with traction to move the vehicle.
StabiliTrak®System
Your vehicle may be equipped with the
StabiliTrak®system which combines antilock
brake, traction and stability control systems and
helps the driver maintain directional control of the
vehicle in most driving conditions.
When you �rst start your vehicle and begin to drive
away, the system performs several diagnostic
checks to ensure there are no problems. You may
hear or feel the system working. This is normal and
does not mean there is a problem with your vehicle.
The system should initialize before the vehicle
reaches 20 mph (32 km/h). In some cases, it may
take approximately two miles of driving before the
system initializes.
363
Page 371 of 634
Check your vehicle’s mirrors, glance over your
shoulder, and start your left lane change signal
before moving out of the right lane to pass.
When you are far enough ahead of the passed
vehicle to see its front in your vehicle’s inside
mirror, activate the right lane change signal and
move back into the right lane. Remember that,
if your vehicle’s passenger side outside mirror
is convex, the vehicle you just passed may
seem to be farther away from you than it
really is.
Try not to pass more than one vehicle at a time
on two-lane roads. Reconsider before passing
the next vehicle.
Do not overtake a slowly moving vehicle
too rapidly. Even though the brake lamps are
not �ashing, it may be slowing down or starting
to turn.
If you are being passed, make it easy for the
following driver to get ahead of you. Perhaps
you can ease a little to the right.
Loss of Control
Let us review what driving experts say about what
happens when the three control systems — brakes,
steering, and acceleration — do not have enough
friction where the tires meet the road to do what the
driver has asked.
In any emergency, do not give up. Keep trying to
steer and constantly seek an escape route or
area of less danger.
Skidding
In a skid, a driver can lose control of the vehicle.
Defensive drivers avoid most skids by taking
reasonable care suited to existing conditions, and
by not overdriving those conditions. But skids
are always possible.
The three types of skids correspond to your
vehicle’s three control systems. In the braking skid,
your wheels are not rolling. In the steering or
cornering skid, too much speed or steering in a
curve causes tires to slip and lose cornering force.
And in the acceleration skid, too much throttle
causes the driving wheels to spin.
371