clock CHEVROLET TAHOE 2016 4.G Owners Manual
[x] Cancel search | Manufacturer: CHEVROLET, Model Year: 2016, Model line: TAHOE, Model: CHEVROLET TAHOE 2016 4.GPages: 453, PDF Size: 6.23 MB
Page 23 of 453
Chevrolet Tahoe/Suburban Owner Manual (GMNA-Localizing-U.S./Canada/
Mexico-9159366) - 2016 - crc - 5/19/15
22 In Brief
Vehicle Features
Infotainment System
The base radio information is
included in this manual. See the
infotainment manual for information
on the uplevel radios, audio players,
phone, navigation system, Rear
Seat Entertainment (RSE), and
voice or speech recognition,
if equipped.
Radio(s)
O
:Press to turn the system on.
Press and hold to turn it off. When
on, press to mute; press again to
unmute. Turn to increase or
decrease the volume.
RADIO : Press to choose between
FM, AM, and SiriusXM
®,
if equipped.
MEDIA : Press to change the audio
source between CD, USB,
and AUX.
{: Press to go to the Home Page.
MENU : Press to select a menu.
g:Press to seek the previous
station or track.
l: Press to seek the next station
or track.
See Overview 0193 about these
and other radio features.
Storing Radio Station Presets
Up to 25 preset stations from all
bands can be stored in the favorite
lists in any order. Up to five stations
can be stored in each favorite page
and the number of favorite pages
can be set.
To store the station to a position in
the list, while on the active source
main page, such as AM, FM,
or SiriusXM (if equipped), press and
hold a favorites/soft key button on
the faceplate.
See “Storing Radio Station Presets”
under AM-FM Radio 0198.
Setting the Clock
See Clock 0132.
Satellite Radio
Vehicles with a SiriusXM®satellite
radio tuner and a valid SiriusXM
satellite radio subscription can
receive SiriusXM programming.
SiriusXM Satellite Radio
Service
SiriusXM is a satellite radio service
based in the 48 contiguous United
States and 10 Canadian provinces.
SiriusXM satellite radio has a wide
variety of programming and
commercial-free music, coast to
coast, and in digital-quality sound.
A fee is required to receive the
SiriusXM service.
For more information refer to:
. www.siriusxm.com or call
1-866-635-2349 (U.S.).
. www.xmradio.ca or call
1-877-209-0079 (Canada).
See Satellite Radio 0200.
Page 41 of 453

Chevrolet Tahoe/Suburban Owner Manual (GMNA-Localizing-U.S./Canada/
Mexico-9159366) - 2016 - crc - 5/19/15
40 Keys, Doors, and Windows
Keyless Liftgate Opening
Press the touch pad on the
underside of the liftgate handle to
open the liftgate when all doors are
unlocked, or when the transmitter is
within 1 m (3 ft).
Keyless Liftglass Opening
Press the exterior liftglass button to
open the liftglass when all doors are
unlocked, or when the transmitter is
within 1 m (3 ft).
SeeLiftgate 047.
Keyed Access
To access a vehicle with a dead
transmitter battery, see Door Locks
0 44.
Programming Transmitters to
the Vehicle
Only RKE transmitters programmed
to the vehicle will work. If a
transmitter is lost or stolen, a
replacement can be purchased and
programmed through your dealer.
The vehicle can be reprogrammed
so that lost or stolen transmitters no longer work. Each vehicle can have
up to eight transmitters matched
to it.
Programming with a Recognized
Transmitter (Keyless Access
Vehicles Only)
A new transmitter can be
programmed to the vehicle when
there is one recognized transmitter.
To program, the vehicle must be off
and all transmitters, both currently
recognized and new, must be
with you.
1. Remove the key from the recognized transmitter.
2. Place the recognized transmitter(s) in the cupholder
or on the passenger seat.
3. Insert the vehicle key into the key lock cylinder on the driver
door handle. Then turn the key
counterclockwise, to the unlock
position, five times within
10 seconds.
The Driver Information Center
(DIC) displays READY FOR
REMOTE#2, 3, 4, ETC.
4. Place the new transmitter inthe transmitter pocket/insert.
Open the center console
storage area and the storage
tray. The transmitter pocket/
insert is in front of the storage
area next to the center console
storage area between the
driver and front passenger
seats.
5. Press the ENGINE START/ STOP button. When the
transmitter is learned, the DIC
display will show that it is ready
to program the next transmitter.
Page 42 of 453
Chevrolet Tahoe/Suburban Owner Manual (GMNA-Localizing-U.S./Canada/
Mexico-9159366) - 2016 - crc - 5/19/15
Keys, Doors, and Windows 41
6. Remove the transmitter fromthe transmitter pocket and
press
KorQon the
transmitter.
To program additional
transmitters, repeat Steps 4–6.
When all additional transmitters
are programmed, press and
hold the ENGINE START/
STOP button for approximately
12 seconds to exit
programming mode.
7. Return the key back into the transmitter.
Programming without a
Recognized Transmitter (Keyless
Access Vehicles Only)
If there are no currently recognized
transmitters available, follow this
procedure to program up to eight
transmitters. This feature is not
available in Canada. This procedure
will take approximately 30 minutes
to complete. The vehicle must be off
and all transmitters to be
programmed must be with you. 1. Remove the vehicle key from the transmitter. 2. Insert the vehicle key into the
key lock cylinder on the driver
door handle; then turn the key
counterclockwise, to the unlock
position, five times within
10 seconds.
The Driver Information Center
(DIC) displays REMOTE
LEARN PENDING,
PLEASE WAIT.
3. Wait for 10 minutes until the DIC displays PRESS ENGINE
START BUTTON TO LEARN,
then press the ENGINE
START/STOP button.
The DIC display will again
show REMOTE LEARN
PENDING, PLEASE WAIT.
4. Repeat Step 3 two additional times. After the third time all
previously known transmitters
will no longer work with the
vehicle. Remaining transmitters
can be relearned during the
next steps.
The DIC display should now
show READY FOR REMOTE
# 1.
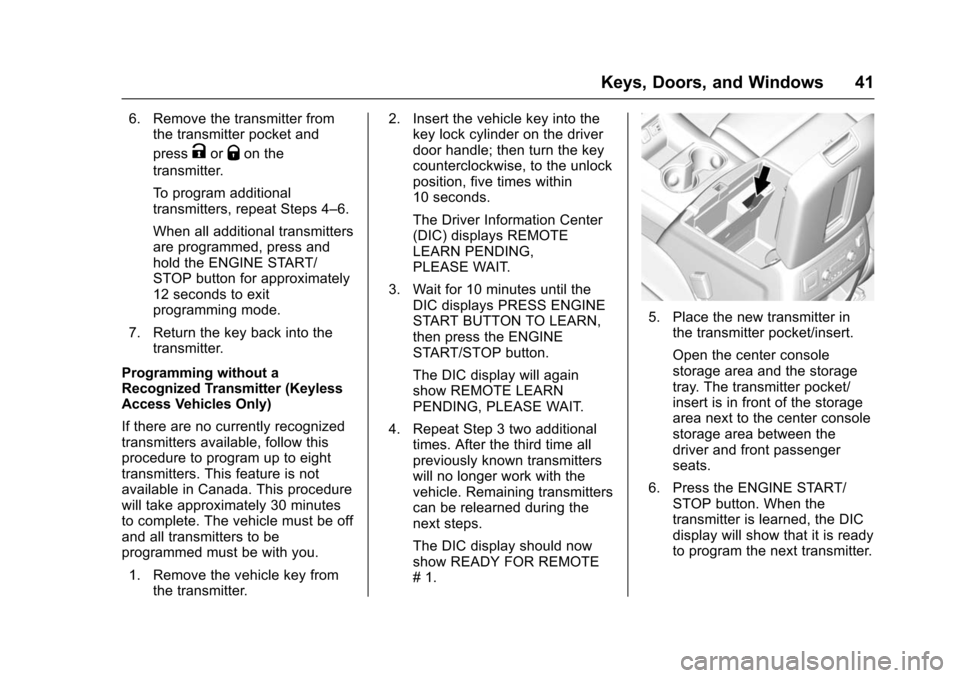
5. Place the new transmitter in
the transmitter pocket/insert.
Open the center console
storage area and the storage
tray. The transmitter pocket/
insert is in front of the storage
area next to the center console
storage area between the
driver and front passenger
seats.
6. Press the ENGINE START/ STOP button. When the
transmitter is learned, the DIC
display will show that it is ready
to program the next transmitter.
Page 127 of 453
Chevrolet Tahoe/Suburban Owner Manual (GMNA-Localizing-U.S./Canada/
Mexico-9159366) - 2016 - crc - 5/20/15
126 Instruments and Controls
Instruments and
Controls
Controls
Steering Wheel Adjustment . . . 127
Steering Wheel Controls . . . . . . 128
Heated Steering Wheel . . . . . . . 129
Horn . . . . . . . . . . . . . . . . . . . . . . . . . . 129
Windshield Wiper/Washer . . . . 129
Rear Window Wiper/Washer . . . . . . . . . . . . . . . . . . . . . 131
Compass . . . . . . . . . . . . . . . . . . . . . 132
Clock . . . . . . . . . . . . . . . . . . . . . . . . . 132
Power Outlets . . . . . . . . . . . . . . . . 133
Wireless Charging . . . . . . . . . . . . 135
Warning Lights, Gauges, and
Indicators
Warning Lights, Gauges, and Indicators . . . . . . . . . . . . . . . . . . . 136
Instrument Cluster . . . . . . . . . . . . 137
Speedometer . . . . . . . . . . . . . . . . . 140
Odometer . . . . . . . . . . . . . . . . . . . . . 140
Trip Odometer . . . . . . . . . . . . . . . . 140
Tachometer . . . . . . . . . . . . . . . . . . . 140
Fuel Gauge . . . . . . . . . . . . . . . . . . . 140
Engine Oil Pressure
Gauge . . . . . . . . . . . . . . . . . . . . . . 141 Engine Coolant Temperature
Gauge . . . . . . . . . . . . . . . . . . . . . . 142
Voltmeter Gauge . . . . . . . . . . . . . 143
Safety Belt Reminders . . . . . . . . 144
Airbag Readiness Light . . . . . . . 144
Passenger Airbag Status Indicator . . . . . . . . . . . . . . . . . . . . 145
Charging System Light . . . . . . . 146
Malfunction Indicator Lamp (Check Engine Light) . . . . . . . . 146
Brake System Warning Light . . . . . . . . . . . . . . . . . . . . . . . . 148
Antilock Brake System (ABS) Warning Light . . . . . . . . . . . . . . . 149
Tow/Haul Mode Light . . . . . . . . . 149
Lane Keep Assist (LKA) Light . . . . . . . . . . . . . . . . . . . . . . . . 149
Vehicle Ahead Indicator . . . . . . 150
Traction Off Light . . . . . . . . . . . . . 150
StabiliTrak
®OFF Light . . . . . . . . 150
Traction Control System (TCS)/ StabiliTrak
®Light . . . . . . . . . . . 150
Tire Pressure Light . . . . . . . . . . . 151
Low Fuel Warning Light . . . . . . 151
Security Light . . . . . . . . . . . . . . . . . 151
High-Beam On Light . . . . . . . . . . 152
Front Fog Lamp Light . . . . . . . . . 152
Lamps On Reminder . . . . . . . . . 152
Cruise Control Light . . . . . . . . . . 152
Information Displays
Driver Information Center (DIC) (Base Level) . . . . . . . . . . . . . . . . 153
Driver Information Center (DIC) (Uplevel) . . . . . . . . . . . . . . . . . . . . 155
Head-Up Display (HUD) . . . . . . 157
Vehicle Messages
Vehicle Messages . . . . . . . . . . . . 161
Battery Voltage and Charging
Messages . . . . . . . . . . . . . . . . . . . 161
Brake System Messages . . . . . 162
Compass Messages . . . . . . . . . . 162
Cruise Control Messages . . . . . 162
Door Ajar Messages . . . . . . . . . . 163
Engine Cooling System Messages . . . . . . . . . . . . . . . . . . . 163
Engine Oil Messages . . . . . . . . . 164
Engine Power Messages . . . . . 164
Fuel System Messages . . . . . . . 165
Key and Lock Messages . . . . . 165
Lamp Messages . . . . . . . . . . . . . . 165
Object Detection System
Messages . . . . . . . . . . . . . . . . . . . 166
Ride Control System Messages . . . . . . . . . . . . . . . . . . . 167
Airbag System Messages . . . . 169
Security Messages . . . . . . . . . . . 169
Steering System Messages . . . . . . . . . . . . . . . . . . . 169
Page 133 of 453
Chevrolet Tahoe/Suburban Owner Manual (GMNA-Localizing-U.S./Canada/
Mexico-9159366) - 2016 - crc - 5/20/15
132 Instruments and Controls
in R (Reverse), and the front
windshield wiper is performing
interval wipes, then the rear wiper
automatically performs interval
wipes.
This feature can be turned on or off.
SeeVehicle Personalization 0173.
The windshield washer reservoir is
used for the windshield and the rear
window. Check the fluid level in the
reservoir if either washer is not
working. See Washer Fluid 0328.
Compass
The vehicle may have a compass
display on the Driver Information
Center (DIC). The compass receives
its heading and other information
from the Global Positioning
System (GPS) antenna,
StabiliTrak
®, and vehicle speed
information.
The compass system is designed to
operate for a certain number of
miles or degrees of turn before
needing a signal from the GPS
satellites. When the compass
display shows CAL, drive the
vehicle for a short distance in an open area where it can receive a
GPS signal. The compass system
will automatically determine when a
GPS signal is restored and provide
a heading again. See
Compass
Messages 0162 for the messages
that may be displayed for the
compass.
Clock
Setting the Time and Date with
Faceplate Controls
To set the time or date:
1. Select SETTINGS from the Home Page, then select Time
and Date.
2. Select the desired function.
3. Turn the MENU knob to increase or decrease the value.
4. Press the MENU knob to go to the next value. After the last
value is selected, the system
will update and return to the
Settings menu. Press
oBACK
to go to the last menu and
save the changes. Auto Set requires an active
connection to OnStar.
If auto timing is set, the time
displayed on the clock may not
update immediately when driving
into a new time zone.
To set the clock display:
1. Select SETTINGS from the Home Page, then select Time
and Date.
2. Select Clock Display.
3. Turn the MENU knob to Off or On.
4. Press the MENU knob to select.
Press
oBACK to go to the last
menu and save the changes.
Setting the Time and Date with
Touchscreen Controls
To set the time:
1. Touch SETTINGS on the Home Page, then touch Time
and Date.
Page 134 of 453
Chevrolet Tahoe/Suburban Owner Manual (GMNA-Localizing-U.S./Canada/
Mexico-9159366) - 2016 - crc - 5/20/15
Instruments and Controls 133
2. Touch Set Time, then touch«
orªto increase or decrease
hours, minutes, and AM or PM.
Touch 12–24 Hr for 12 or
24 hour clock.
3. Touch
}to go back to the
previous menu.
Auto Set requires an active
connection to OnStar.
If auto timing is set, the time
displayed on the clock may not
update immediately when driving
into a new time zone.
To set the date: 1. Touch SETTINGS on the Home Page, then touch Time
and Date.
2. Touch Set Date, then touch
«
orªto increase or decrease
month, day, or year.
3. Touch
}to go back to the
previous menu.
To set the clock display: 1. Touch SETTINGS on the Home
Page, then touch Time
and Date.
2. Touch Clock Display, then touch OFF or ON to turn the
clock display off or on.
3. Touch
}to go back to the
previous menu.
Power Outlets
Power Outlets 12 Volt Direct
Current
Accessory power outlets can be
used to plug in electrical equipment,
such as a cell phone, MP3
player, etc.
The vehicle may have up to five
accessory power outlets:
Vehicles with a Center Console
. One in front of the cupholders on
the center console.
. One inside the center storage
console.
. One on the rear of the center
storage console. .
One in the third row seat on the
driver side.
. One in the rear cargo area on
the passenger side.
Vehicles with Bench Seats
. One on the center stack below
the climate control system.
. One in the storage area on the
bench seat.
. One on the rear of the center
armrest storage.
. One in the third row seat area on
the driver side.
. One in the rear cargo area on
the passenger side.
Lift the cover to access and replace
when not in use.
The accessory power outlets are
powered as follows:
. The power outlet near the
cupholders for vehicles with a
center console or on the center
stack for vehicles with bench
seats, can be configured to
operate using Retained
Accessory Power (RAP) or
Page 174 of 453
Chevrolet Tahoe/Suburban Owner Manual (GMNA-Localizing-U.S./Canada/
Mexico-9159366) - 2016 - crc - 5/20/15
Instruments and Controls 173
Vehicle
Personalization
Use the audio system controls to
access the personalization menus
for customizing vehicle features.
The following are all possible
personalization features. Depending
on the vehicle, some may not be
available.
Base Radio Audio System
Controls
MENU :Press the center of the
knob to enter menus and select
menu items. Turn the knob to scroll
through the menus.
oBACK : Press to return to the
previous menu or exit.
Uplevel Radio Audio System
Controls
1. Press the desired feature to display a list of available
options.
2. Press to select the desired feature setting. 3. Press
oBACK on the
faceplate or the
0screen
button to return to the previous
menu or exit.
Turn the vehicle to ON/RUN to
access the Settings menu, then
select SETTINGS from the Home
Page on the infotainment system
display.
Personalization Menus
The following list of menu items may
be available:
. Time and Date
. Language (Language)
. Valet Mode
. Radio
. Vehicle
. Bluetooth
. Voice
. Display
. Rear Camera
. Return to Factory Settings
. Software Information Detailed information for each menu
follows.
Time and Date
Manually set the time and date. See
Clock
0132.
Language (Language)
Select Language, then select from
the available language(s).
The selected language will display
on the system, and voice
recognition will reflect the selected
language.
Valet Mode (If Equipped)
This will lock the infotainment
system and steering wheel controls.
It may also limit access to vehicle
storage locations (if equipped).
To enable valet mode:
1. Enter a four-digit code on the keypad.
2. Select Enter to go to the confirmation screen.
3. Re-enter the four-digit code.
Page 197 of 453
Chevrolet Tahoe/Suburban Owner Manual (GMNA-Localizing-U.S./Canada/
Mexico-9159366) - 2016 - crc - 5/19/15
196 Infotainment System
current track will start from
the beginning. Press
lto
seek the next track.
. AM, FM, or SiriusXM (If
Equipped): Press
gorl
to seek to the previous or
next strong station.
. CD (If Equipped): Press
and hold
gto quickly
reverse through a track.
Release the button to return
to playing speed. Press and
hold
lto fast forward
through a track. Release
the button to return to
playing speed.
10. RADIO .Press to change the audio
source between AM, FM,
or SiriusXM, if equipped.
11. MEDIA .Press to change the audio
source between CD, USB,
and AUX.
12.
O(Power/Volume)
. Press to turn the audio on. .
Press and hold to turn it off.
. When on, press to mute the
system. Press again to
unmute.
. Turn to increase or
decrease the volume.
Home Page
Home Page Features
The infotainment system displays a
Home Page that makes it easy to
access all of the applications. Turn
the MENU knob to highlight feature
icons. Press the MENU knob to
access the feature’s options.
Various functions are disabled when
the vehicle is moving.
AUDIO : Select the AUDIO screen
icon to display the active source
page. The sources available are
AM, FM, SiriusXM
®(if equipped),
CD, USB/iPod, and AUX. See
AM-FM Radio 0198, Satellite Radio
0 200, CD Player 0202, and
Auxiliary Jack 0207. PHONE :
Select the PHONE screen
icon to display the Phone main
page. See “Bluetooth Overview” in
Bluetooth (Overview) 0208 or
Bluetooth (Infotainment Controls -
Base Radio) 0209 orBluetooth
(Voice Recognition - Base Radio)
0 213.
NAV (Navigation, If Equipped) :
Select the NAV screen icon to
display the OnStar Turn-by-Turn
Navigation. See “OnStar Overview”
in OnStar, if equipped.
SETTINGS : Select the SETTINGS
screen icon to display the Settings
main page. See “Setting Radio
Preferences” following.
Setting Radio Preferences
Select the SETTINGS screen icon
to display the Settings menu and
the following may display:
Time :SeeClock 0132.
Language (Current Language) :
This will set the display language in
the radio and instrument cluster.
Select to display a list of languages.
Select BACK to go back to the
previous menu.
Page 222 of 453
Chevrolet Tahoe/Suburban Owner Manual (GMNA-Localizing-U.S./Canada/
Mexico-9159366) - 2016 - crc - 5/19/15
Climate Controls 221
Front Climate Controls
Automatic Operation
The system automatically controls
the fan speed, air delivery, air
conditioning, and recirculation in
order to heat or cool the vehicle to
the desired temperature.
When the indicator light is on, the
system is in full automatic operation.
If the air delivery mode or fan
setting is manually adjusted, the
auto indicator turns off and the
selected settings are displayed.
To place the system in
automatic mode:1. Press AUTO.
2. Set the driver and passenger temperature.
To find your comfort setting,
start with 22 °C (72 °F) and
allow the system time to
stabilize. Then adjust the
temperature as needed for best
comfort. To improve fuel efficiency and to
cool the vehicle faster, recirculation
may be automatically selected in
warm weather.
The recirculation light will not come
on when automatically controlled.
Press
@to manually select
recirculation; press it again to select
outside air.
Do not cover the solar sensor on the
top of the instrument panel near the
windshield. This sensor regulates
air temperature based on sun load.
See “Sensors” later in this section.
Manual Operation
O(On/Off) : Press to turn the
climate control system on or off.
Outside air still enters the vehicle,
and is directed to the floor. This
direction can be changed by
pressing the air delivery mode.
9(Fan Control) : Turn clockwise
or counterclockwise to increase or
decrease the fan speed.
Press AUTO to return to automatic
operation. Driver and Passenger
Temperature Control :
The
temperature can be adjusted
separately for the driver and
passenger.
Turn the knob clockwise or
counterclockwise to increase or
decrease the driver or passenger
temperature setting.
SYNC (Synchronized
Temperature) : Press to link the
passenger and rear climate
temperature settings to the driver
setting. The SYNC indicator light will
turn on. When the passenger or rear
climate settings are adjusted, the
SYNC indicator light turns off.
Air Delivery Mode Control : Press
Y,\,[, or-to change the
direction of the airflow. An indicator
light comes on in the selected mode
button.
Changing the mode cancels the
automatic operation and the system
goes into manual mode. Press
AUTO to return to automatic
operation.
Page 225 of 453
Chevrolet Tahoe/Suburban Owner Manual (GMNA-Localizing-U.S./Canada/
Mexico-9159366) - 2016 - crc - 5/19/15
224 Climate Controls
the side of the vehicle facing the
sun. The recirculation mode will also
be used as needed to maintain cool
outlet temperatures.
Rear Climate Control
System
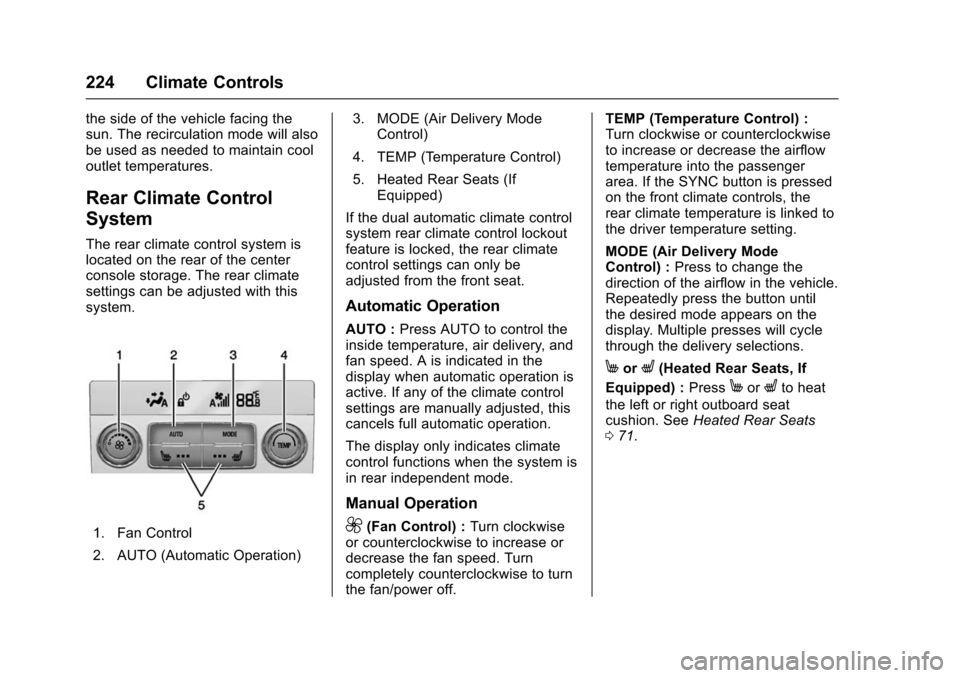
The rear climate control system is
located on the rear of the center
console storage. The rear climate
settings can be adjusted with this
system.
1. Fan Control
2. AUTO (Automatic Operation)3. MODE (Air Delivery Mode
Control)
4. TEMP (Temperature Control)
5. Heated Rear Seats (If Equipped)
If the dual automatic climate control
system rear climate control lockout
feature is locked, the rear climate
control settings can only be
adjusted from the front seat.
Automatic Operation
AUTO : Press AUTO to control the
inside temperature, air delivery, and
fan speed. A is indicated in the
display when automatic operation is
active. If any of the climate control
settings are manually adjusted, this
cancels full automatic operation.
The display only indicates climate
control functions when the system is
in rear independent mode.
Manual Operation
9(Fan Control) : Turn clockwise
or counterclockwise to increase or
decrease the fan speed. Turn
completely counterclockwise to turn
the fan/power off. TEMP (Temperature Control) :
Turn clockwise or counterclockwise
to increase or decrease the airflow
temperature into the passenger
area. If the SYNC button is pressed
on the front climate controls, the
rear climate temperature is linked to
the driver temperature setting.
MODE (Air Delivery Mode
Control) :
Press to change the
direction of the airflow in the vehicle.
Repeatedly press the button until
the desired mode appears on the
display. Multiple presses will cycle
through the delivery selections.
MorL(Heated Rear Seats, If
Equipped) : Press
MorLto heat
the left or right outboard seat
cushion. See Heated Rear Seats
0 71.