Driving CHEVROLET TAHOE 2023 User Guide
[x] Cancel search | Manufacturer: CHEVROLET, Model Year: 2023, Model line: TAHOE, Model: CHEVROLET TAHOE 2023Pages: 443, PDF Size: 18.73 MB
Page 54 of 443
Chevrolet Tahoe/Suburban Owner Manual (GMNA-Localizing-U.S./Canada/
Mexico-16416971) - 2023 - CRC - 4/25/22
Seats and Restraints 53
Also, in nearly all states and in all
Canadian provinces, the law requires
wearing seat belts.
Buckle To Drive
If equipped, this feature delays the vehicle
from shifting out of P (Park) when the driver
seat belt is not buckled. The Buckle to Drive
feature must be turned ON in the
infotainment system to work. To turn the
Buckle to Drive feature on or off, select
Settings > Vehicle > Buckle to Drive. See
Teen Driver0180, if equipped.
If the vehicle is on and the brake pedal is
pressed with the vehicle in P (Park) but the
driver seat belt is not buckled, a message
displays in the Driver Information
Center (DIC) and the vehicle will be delayed
from shifting out of P (Park). Buckle the
driver seat belt to clear the message and
shift out of P (Park). Shifting from P (Park)
will be delayed once for each time the
vehicle is started.
For some fleet vehicles, the feature is
always ON and cannot be turned OFF in the
infotainment system. The vehicle will be
delayed from shifting from P (Park) each
time the driver attempts to do so while the driver seat belt is not buckled. Turning the
vehicle off then on will not change this
condition.
On some models, Buckle to Drive may also
delay shifting out of P (Park) if a front
passenger seat belt is unbuckled. A message
displays in the DIC. Buckle the front
passenger seat belt to shift out of P (Park).
This feature may delay the vehicle from
shifting out of P (Park) if an object, such as
a briefcase, handbag, grocery bag, laptop,
or other electronic device, is on the front
passenger seat. If this happens, remove the
object from the seat or buckle the seat belt
to shift out of P (Park).
If the driver, or on some vehicles, the
present front passenger remains unbuckled,
the DIC message will turn off after several
seconds and the vehicle can be shifted out
of P (Park). See
“Seat Belts”and“Child
Restraints” in the Index for information
about the importance of proper
restraint use.
If the driver seat belt or the front passenger
seat belt is unbuckled when driving, the seat
belt reminder chime and light(s) will come
on. See Seat Belt Reminders 0111. This feature may not function properly if the
airbag readiness light is on. See
Airbag
Readiness Light 0112.
How to Wear Seat Belts Properly
Follow these rules for everyone's protection.
There are additional things to know about
seat belts and children, including smaller
children and infants. If a child will be riding
in the vehicle, see Older Children070 or
Infants and Young Children 071. Review and
follow the rules for children in addition to
the following rules.
It is very important for all occupants to
buckle up. Statistics show that unbelted
people are hurt more often in crashes than
those who are wearing seat belts.
There are important things to know about
wearing a seat belt properly.
Page 60 of 443
Chevrolet Tahoe/Suburban Owner Manual (GMNA-Localizing-U.S./Canada/
Mexico-16416971) - 2023 - CRC - 4/25/22
Seats and Restraints 59
reversing the latch plate on the webbing.
If the twist cannot be corrected, ask your
dealer to fix it.
Make sure the seat belt reminder light is
working. SeeSeat Belt Reminders 0111.
Keep seat belts clean and dry. See Seat Belt
Care 059.
Seat Belt Care
Keep belts clean and dry.
Seat belts should be properly cared for and
maintained.
Seat belt hardware should be kept dry and
free of dust or debris. As necessary, exterior
hard surfaces and seat belt webbing may be
lightly cleaned with mild soap and water.
Ensure there is not excessive dust or debris
in the mechanism. If dust or debris exists in
the system please see the dealer. Parts may
need to be replaced to ensure proper
functionality of the system.
{Warning
Do not bleach or dye seat belt webbing.
It may severely weaken the webbing. In
a crash, they might not be able to
(Continued)
Warning (Continued)
provide adequate protection. Clean and
rinse seat belt webbing only with mild
soap and lukewarm water. Allow the
webbing to dry.
Replacing Seat Belt System Parts
after a Crash
{Warning
A crash can damage the seat belt system
in the vehicle. A damaged seat belt
system may not properly protect the
person using it, resulting in serious injury
or even death in a crash. To help make
sure the seat belt systems are working
properly after a crash, have them
inspected and any necessary
replacements made as soon as possible.
After a minor crash, replacement of seat
belts may not be necessary. But the seat
belt assemblies that were used during any
crash may have been stressed or damaged.
See your dealer to have the seat belt
assemblies inspected or replaced. New parts and repairs may be necessary
even if the seat belt system was not being
used at the time of the crash.
Have the seat belt pretensioners checked if
the vehicle has been in a crash, or if the
airbag readiness light stays on after you
start the vehicle or while you are driving.
See
Airbag Readiness Light 0112.
Airbag System
The vehicle has the following airbags:
.A frontal airbag for the driver
.A frontal airbag for the front outboard
passenger
.A seat-mounted side impact airbag for the
driver
.A seat-mounted side impact airbag for the
front outboard passenger
.A roof-rail airbag for the driver and for
the second and third row passengers
seated directly behind the driver
.A roof-rail airbag for the front outboard
passenger and the second and third row
passengers seated directly behind the
front outboard passenger
Page 71 of 443
Chevrolet Tahoe/Suburban Owner Manual (GMNA-Localizing-U.S./Canada/
Mexico-16416971) - 2023 - CRC - 4/25/22
70 Seats and Restraints
If the airbag readiness light stays on after
the vehicle is started or comes on when you
are driving, the airbag system may not work
properly. Have the vehicle serviced right
away. SeeAirbag Readiness Light 0112.
Child Restraints
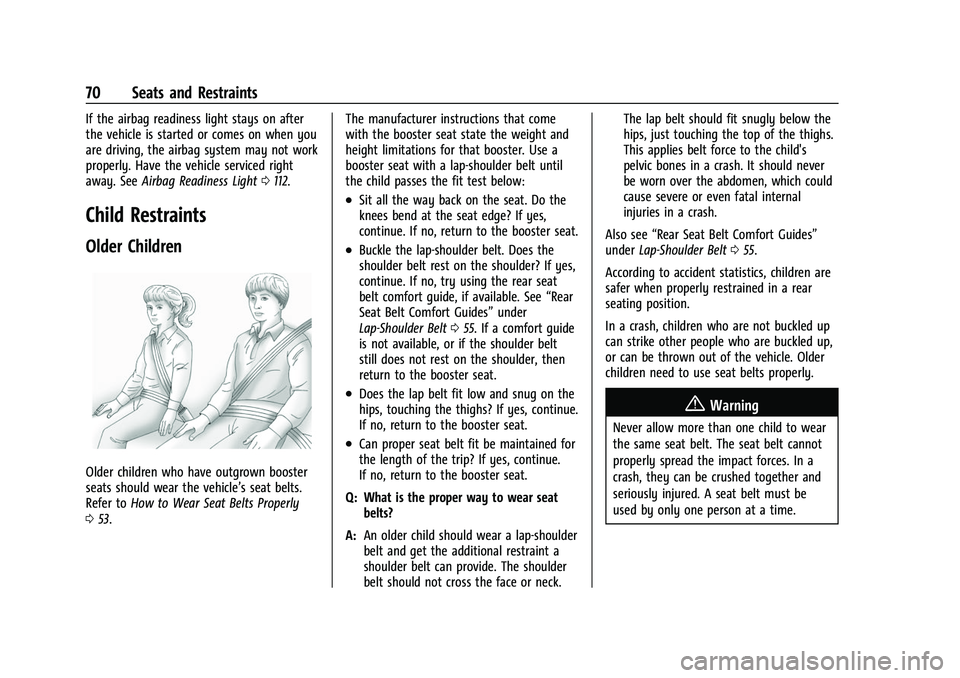
Older Children
Older children who have outgrown booster
seats should wear the vehicle’s seat belts.
Refer to How to Wear Seat Belts Properly
0 53. The manufacturer instructions that come
with the booster seat state the weight and
height limitations for that booster. Use a
booster seat with a lap-shoulder belt until
the child passes the fit test below:
.Sit all the way back on the seat. Do the
knees bend at the seat edge? If yes,
continue. If no, return to the booster seat.
.Buckle the lap-shoulder belt. Does the
shoulder belt rest on the shoulder? If yes,
continue. If no, try using the rear seat
belt comfort guide, if available. See
“Rear
Seat Belt Comfort Guides” under
Lap-Shoulder Belt 055. If a comfort guide
is not available, or if the shoulder belt
still does not rest on the shoulder, then
return to the booster seat.
.Does the lap belt fit low and snug on the
hips, touching the thighs? If yes, continue.
If no, return to the booster seat.
.Can proper seat belt fit be maintained for
the length of the trip? If yes, continue.
If no, return to the booster seat.
Q: What is the proper way to wear seat belts?
A: An older child should wear a lap-shoulder
belt and get the additional restraint a
shoulder belt can provide. The shoulder
belt should not cross the face or neck. The lap belt should fit snugly below the
hips, just touching the top of the thighs.
This applies belt force to the child's
pelvic bones in a crash. It should never
be worn over the abdomen, which could
cause severe or even fatal internal
injuries in a crash.
Also see “Rear Seat Belt Comfort Guides”
under Lap-Shoulder Belt 055.
According to accident statistics, children are
safer when properly restrained in a rear
seating position.
In a crash, children who are not buckled up
can strike other people who are buckled up,
or can be thrown out of the vehicle. Older
children need to use seat belts properly.
{Warning
Never allow more than one child to wear
the same seat belt. The seat belt cannot
properly spread the impact forces. In a
crash, they can be crushed together and
seriously injured. A seat belt must be
used by only one person at a time.
Page 77 of 443
Chevrolet Tahoe/Suburban Owner Manual (GMNA-Localizing-U.S./Canada/
Mexico-16416971) - 2023 - CRC - 4/25/22
76 Seats and Restraints
Child restraints and booster seats vary
considerably in size, and some may fit in
certain seating positions better than others.
Do not install a child restraint in any rear
seating position where it cannot be installed
securely.
Depending on where you place the child
restraint and the size of the child restraint,
you may not be able to access adjacent seat
belts or LATCH anchors for additional
passengers or child restraints. Adjacent
seating positions should not be used if the
child restraint prevents access to or
interferes with the routing of the seat belt.
The seat in front of an installed child
restraint should be adjusted to ensure
proper installation according to the child
restraint manual.
When installing a child restraint in an
adjustable second row seating position, the
seat should be adjusted fore or aft to ensure
proper installation according to the child
restraint manual. If the seat is able to
recline, the seat back should be positioned
to its full upright position before installing a
child restraint.Wherever a child restraint is installed, be
sure to follow the instructions that came
with the child restraint and secure the child
restraint properly.
Keep in mind that an unsecured child
restraint can move around in a collision or
sudden stop and injure people in the vehicle.
Be sure to properly secure any child
restraint in the vehicle
—even when no
child is in it.
Lower Anchors and Tethers for
Children (LATCH System)
The LATCH system secures a child restraint
during driving or in a crash. LATCH
attachments on the child restraint are used
to attach the child restraint to the anchors
in the vehicle. This system is designed to
make installation of a child restraint easier.
In order to use the LATCH system in your
vehicle, you need a child restraint that has
LATCH attachments. LATCH-compatible
rear-facing and forward-facing child seats can
be properly installed using either the LATCH
anchors or the vehicle’s seat belts. Do not
use both the seat belts and the LATCH
anchorage system to secure a rear-facing or
forward-facing child restraint. Booster seats use the vehicle’s seat belts to
secure the child and the booster seat. If the
manufacturer recommends that the booster
seat be secured with the LATCH system, this
can be done as long as the booster seat can
be positioned properly and there is no
interference with the proper positioning of
the lap-shoulder belt on the child.
Make sure to follow the instructions that
came with the child restraint, and also the
instructions in this manual.
When installing a child restraint with a top
tether, you must also use either the lower
anchors or the seat belts to properly secure
the child restraint. A child restraint must
never be attached using only the top tether.
For a forward-facing 5-pt harness child
restraint where the combined weight of the
child and restraint are up to 29.5 kg (65 lb),
use either the lower LATCH anchorages with
the top tether anchorage, or the seat belt
with the top tether anchorage. Where the
combined weight of the child and restraint
are greater than 29.5 kg (65 lb), use the seat
belt with the top tether anchorage only.
Page 79 of 443
Chevrolet Tahoe/Suburban Owner Manual (GMNA-Localizing-U.S./Canada/
Mexico-16416971) - 2023 - CRC - 4/25/22
78 Seats and Restraints
Lower Anchors
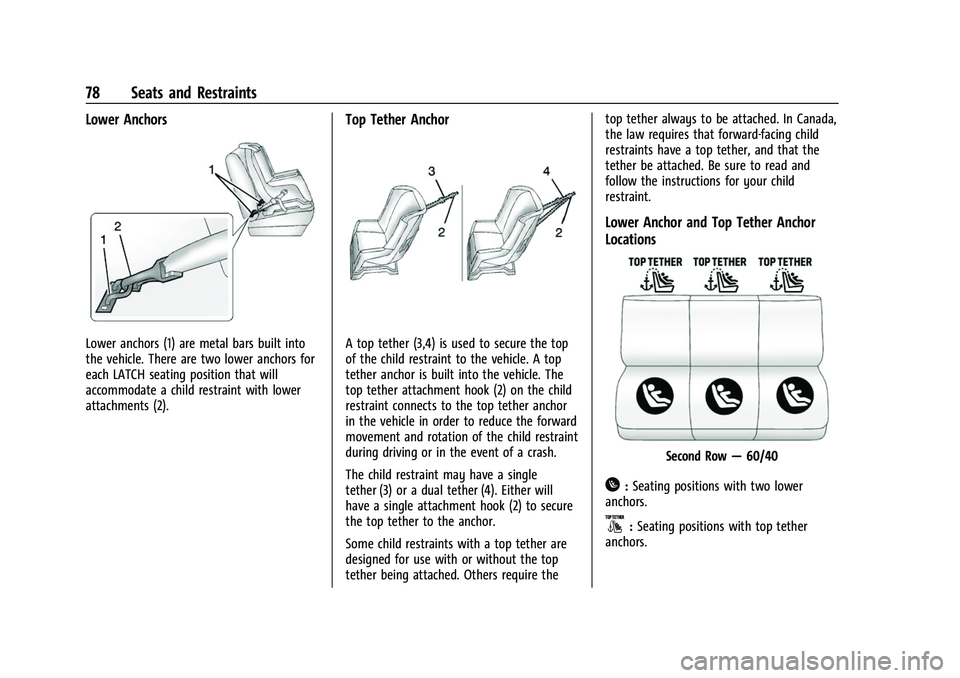
Lower anchors (1) are metal bars built into
the vehicle. There are two lower anchors for
each LATCH seating position that will
accommodate a child restraint with lower
attachments (2).
Top Tether Anchor
A top tether (3,4) is used to secure the top
of the child restraint to the vehicle. A top
tether anchor is built into the vehicle. The
top tether attachment hook (2) on the child
restraint connects to the top tether anchor
in the vehicle in order to reduce the forward
movement and rotation of the child restraint
during driving or in the event of a crash.
The child restraint may have a single
tether (3) or a dual tether (4). Either will
have a single attachment hook (2) to secure
the top tether to the anchor.
Some child restraints with a top tether are
designed for use with or without the top
tether being attached. Others require thetop tether always to be attached. In Canada,
the law requires that forward-facing child
restraints have a top tether, and that the
tether be attached. Be sure to read and
follow the instructions for your child
restraint.
Lower Anchor and Top Tether Anchor
Locations
Second Row
—60/40
H:Seating positions with two lower
anchors.
}: Seating positions with top tether
anchors.
Page 93 of 443

Chevrolet Tahoe/Suburban Owner Manual (GMNA-Localizing-U.S./Canada/
Mexico-16416971) - 2023 - CRC - 4/25/22
92 Storage
Convenience Net
This vehicle may have a convenience net in
the rear of the vehicle. Attach it to the
cargo tie-downs for storing small loads.
Do not use the net to store heavy loads.
Roof Rack System
The vehicle may be equipped with side-rails
for a roof rack system. Cargo must be
secured with properly installed cross rails
and other accessories designed to carry
cargo. These can be purchased from your
dealer.
{Warning
Before driving and occasionally during a
trip, check that cargo is securely fastened,
rests evenly between the cross rails and
does not block the vehicle's lamps or
windows. Never load cargo directly on
the roof of the vehicle or allow cargo to
hang over the rear or sides of the vehicle.
Never load cargo without first properly
installing cross rails and other accessories
designed to carry cargo. Personal injury,
death or damage to the vehicle or other
property may occur.
If driving for a long distance, on rough
roads, or at high speeds, occasionally stop
the vehicle to make sure the cargo remains
in its place.
Cargo Weight Limits
Do not exceed the maximum cargo weight
for the roof rack system, including the
weight of the cross rails and any other
accessories used to carry the cargo such as
bike racks or roof boxes. The maximum
cargo weight that can be loaded onto the
roof rack system is 100 kg (220 lb) or the weight designated in the instructions that
came with the cross rails or other roof rack
accessories, whichever is less.
{Warning
Never load the roof rack with more
weight than specified in this section.
Loading cargo on the roof rack will make
the vehicle's center of gravity higher. To
avoid losing control of the vehicle, avoid
overloading, high speeds, sudden starts,
sharp turns, sudden braking, or abrupt
maneuvers when carrying cargo on the
roof rack.
The weight of any cargo carried on the roof
rack system must be included in calculating
the loaded weight of the vehicle. Do not
exceed the maximum vehicle capacity when
loading the vehicle, including cargo carried
on the roof rack system and passengers and
cargo carried in the vehicle. For more
information on vehicle capacity and loading,
see Vehicle Load Limits 0205.
A Center High-Mounted Stoplamp (CHMSL) is
located above the rear window glass. Make
sure items loaded on the roof of the vehicle
do not block or damage the CHMSL.
Page 95 of 443
Chevrolet Tahoe/Suburban Owner Manual (GMNA-Localizing-U.S./Canada/
Mexico-16416971) - 2023 - CRC - 4/25/22
94 Instruments and Controls
Controls
Steering Wheel Adjustment
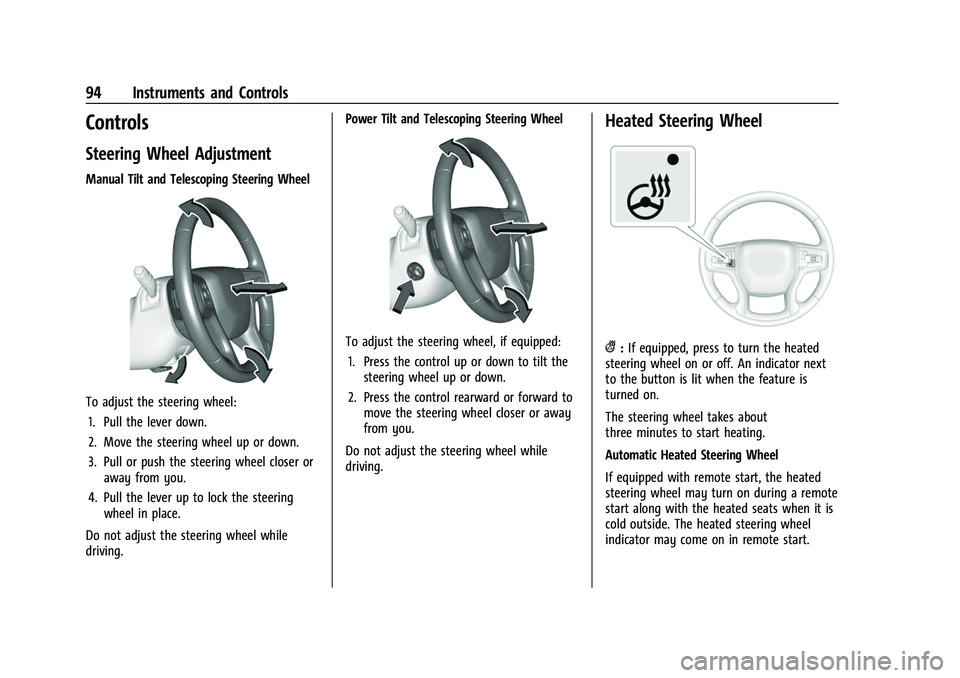
Manual Tilt and Telescoping Steering Wheel
To adjust the steering wheel:1. Pull the lever down.
2. Move the steering wheel up or down.
3. Pull or push the steering wheel closer or away from you.
4. Pull the lever up to lock the steering wheel in place.
Do not adjust the steering wheel while
driving. Power Tilt and Telescoping Steering Wheel
To adjust the steering wheel, if equipped:
1. Press the control up or down to tilt the steering wheel up or down.
2. Press the control rearward or forward to move the steering wheel closer or away
from you.
Do not adjust the steering wheel while
driving.
Heated Steering Wheel
(: If equipped, press to turn the heated
steering wheel on or off. An indicator next
to the button is lit when the feature is
turned on.
The steering wheel takes about
three minutes to start heating.
Automatic Heated Steering Wheel
If equipped with remote start, the heated
steering wheel may turn on during a remote
start along with the heated seats when it is
cold outside. The heated steering wheel
indicator may come on in remote start.
Page 96 of 443

Chevrolet Tahoe/Suburban Owner Manual (GMNA-Localizing-U.S./Canada/
Mexico-16416971) - 2023 - CRC - 4/25/22
Instruments and Controls 95
If equipped with auto heated seats, the
heated steering wheel will turn on when the
auto heated seat is activated. The heated
steering wheel indicator will display the
state of the steering wheel heat.
SeeHeated and Ventilated Front Seats 042.
Horn
To sound the horn, pressaon the
steering wheel.
Windshield Wiper/Washer
With the ignition on or in accessory mode,
move the windshield wiper band to select
the wiper speed.
1X : For a single wipe, turn the
Nband
downwards. For several wipes, hold the
band lever down. OFF :
Use to turn the wipers off.
c:If equipped with Rainsense, use this
setting for intermittent wipes when
Rainsense is disabled, or Rainsense wipes
when Rainsense is enabled. For intermittent
wipes, move the windshield wiper lever to
AUTO, then turn the band up for more
frequent wipes or down for less frequent
wipes. If Rainsense is turned on, see
“Rainsense” later in this section.
LO : Use for slow wipes.
HI : Use for fast wipes.
Clear snow and ice from the wiper blades
and windshield before using them. If frozen
to the windshield, carefully loosen or thaw
them. Damaged blades should be replaced.
See Wiper Blade Replacement 0339.
{Warning
In freezing weather, do not use the
washer until the windshield is warmed.
Otherwise the washer fluid can form ice
on the windshield, blocking your vision.
{Warning
Before driving the vehicle, always clear
snow and ice from the hood, windshield,
washer nozzles, roof, and rear of the
vehicle, including all lamps and windows.
Reduced visibility from snow and ice
buildup could lead to a crash.
Wiper Parking
If the ignition is turned off while the wipers
are on LO, HI, or AUTO with Rainsense
turned off, they will immediately stop.
If the windshield wiper lever is then moved
to OFF before the driver door is opened or
within 10 minutes, the wipers will restart
and move to the base of the windshield.
If the ignition is turned off while the wipers
are performing wipes due to windshield
washing or Rainsense, the wipers continue
to run until they reach the base of the
windshield.
Rainsense
If equipped with Rainsense and the feature
is turned on, a sensor near the top center of
the windshield detects the amount of water
Page 100 of 443
Chevrolet Tahoe/Suburban Owner Manual (GMNA-Localizing-U.S./Canada/
Mexico-16416971) - 2023 - CRC - 4/25/22
Instruments and Controls 99
When the ignition is on, power to the 110
Volt outlet is enabled. 110 Volt power is
supplied to the outlet when it is enabled
and electrical equipment is plugged into that
outlet. One power outlet can be used with
electrical equipment that uses a maximum
of 400 watts. Ensure that all connected
devices do not exceed 400 watts.
An indicator light on the outlet illuminates
when the system is enabled and no system
fault is detected. The outlet will not provide
power when the ignition is off or the plug is
not fully seated into the outlet. The outlet
does not operate while the engine is
starting. If a USB powered streaming device
is being used, it is suggested to use a USB
Port for power, seeUSB Port0153.
If uninterrupted power supply is required
while driving, disable the auto-stop feature,
see Stop/Start System 0211.
If equipment is connected using more than
400 watts or a system fault is detected, a
protection circuit shuts off the power supply
and the indicator light will flash.
Do not use a power outlet with a missing or
damaged cover.
The power outlet is not designed for the
following, and may not work properly if
they are plugged in:.Equipment with high initial peak wattage,
such as compressor-driven refrigerators
and electric power tools
.Other equipment requiring an extremely
stable power supply, such as
microcomputer-controlled electric blankets
and touch sensor lamps
.Medical equipment
Wireless Charging
If equipped and enabled, the vehicle has
wireless charging in the bin below the
climate control system. The system operates
at 145 kHz and wirelessly charges one Qi
compatible smartphone. The power output
of the system is capable of charging at a
rate up to 3 amp (15 W), as requested by
the compatible smartphone. See Radio
Frequency Statement 0419.
{Warning
Wireless charging may affect the
operation of an implanted pacemaker or
other medical devices. If you have one, it
is recommended to consult with your
doctor before using the wireless charging
system. The vehicle must be on, in accessory mode,
or Retained Accessory Power (RAP) must be
active. The wireless charging feature may
not correctly indicate charging when the
vehicle is in RAP, during a Bluetooth phone
call, or when phone projection (e.g. Apple
CarPlay / Android Auto) is active. See
Retained Accessory Power (RAP)
0212.
The operating temperature is −40 °C (−40 °F)
to 85 °C (185 °F) for the charging system and
0 °C (32 °F) to 35 °C (95 °F) for the phone.
A charging stopped alert may be displayed
on the infotainment screen, if the wireless
charger or smartphone are outside of
normal operating temperature. Charging will
automatically resume when a normal
operating temperature is reached.
{Warning
Remove all objects from the charger
before charging your compatible
smartphone. Objects, such as coins, keys,
rings, paper clips, or cards, between the
smartphone and charger may become
very hot.
(Continued)
Page 102 of 443

Chevrolet Tahoe/Suburban Owner Manual (GMNA-Localizing-U.S./Canada/
Mexico-16416971) - 2023 - CRC - 4/25/22
Instruments and Controls 101
OSS Notice Information
To obtain the source code that is
contained in this product, please visit
https://opensource.lge.com. In addition to
the source code, all referred license terms,
warranty disclaimers and copyright notices
are available for download. LG Electronics
will also provide open source code to you
on CD-ROM for a charge covering the cost of
performing such distribution (such as the
cost of media, shipping, and handling) upon
email request to [email protected]. This
offer is valid for three (3) years from the
date on which you purchased the product.
Freescale-WCT library
Copyright (c) 2012-2014 Freescale
Semiconductor, Inc.. All rights reserved.
Redistribution and use in source and binary
forms, with or without modification, are
permitted provided that the following
conditions are met:1. Redistributions of source code must retain the above copyright notice, this
list of conditions and the following
disclaimer.
2. Redistributions in binary form must reproduce the above copyright notice,
this list of conditions and the following disclaimer in the documentation and/or
other materials provided with the
distribution.
3. Neither the name of the copyright holder nor the names of its contributors may be
used to endorse or promote products
derived from this software without
specific prior written permission.
THIS SOFTWARE IS PROVIDED BY THE
COPYRIGHT HOLDERS AND CONTRIBUTORS
"AS IS" AND ANY EXPRESS OR IMPLIED
WARRANTIES, INCLUDING, BUT NOT LIMITED
TO, THE IMPLIED WARRANTIES OF
MERCHANTABILITY AND FITNESS FOR A
PARTICULAR PURPOSE ARE DISCLAIMED. IN
NO EVENT SHALL THE COPYRIGHT HOLDER
OR CONTRIBUTORS BE LIABLE FOR ANY
DIRECT, INDIRECT, INCIDENTAL, SPECIAL,
EXEMPLARY, OR CONSEQUENTIAL DAMAGES
(INCLUDING, BUT NOT LIMITED TO,
PROCUREMENT OF SUBSTITUTE GOODS OR
SERVICES; LOSS OF USE, DATA, OR PROFITS;
OR BUSINESS INTERRUPTION) HOWEVER
CAUSED AND ON ANY THEORY OF LIABILITY,
WHETHER IN CONTRACT, STRICT LIABILITY, OR
TORT (INCLUDING NEGLIGENCE OR
OTHERWISE) ARISING IN ANY WAY OUT OF
THE USE OF THIS SOFTWARE, EVEN IF
ADVISED OF THE POSSIBILITY OF SUCH
DAMAGE.Warning Lights, Gauges, and
Indicators
Warning lights and gauges can signal that
something is wrong before it becomes
serious enough to cause an expensive repair
or replacement. Paying attention to the
warning lights and gauges could prevent
injury.
Some warning lights come on briefly when
the engine is started to indicate they are
working. When one of the warning lights
comes on and stays on while driving,
or when one of the gauges shows there
may be a problem, check the section that
explains what to do. Waiting to do repairs
can be costly and even dangerous.