seats CHEVROLET TAHOE 2023 Repair Manual
[x] Cancel search | Manufacturer: CHEVROLET, Model Year: 2023, Model line: TAHOE, Model: CHEVROLET TAHOE 2023Pages: 443, PDF Size: 18.73 MB
Page 95 of 443
Chevrolet Tahoe/Suburban Owner Manual (GMNA-Localizing-U.S./Canada/
Mexico-16416971) - 2023 - CRC - 4/25/22
94 Instruments and Controls
Controls
Steering Wheel Adjustment
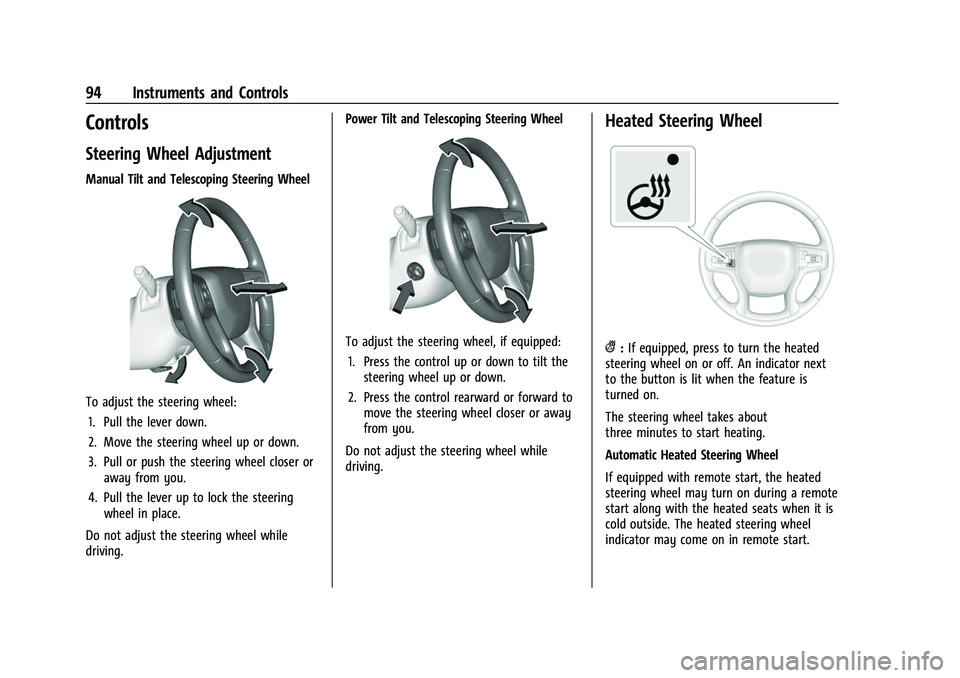
Manual Tilt and Telescoping Steering Wheel
To adjust the steering wheel:1. Pull the lever down.
2. Move the steering wheel up or down.
3. Pull or push the steering wheel closer or away from you.
4. Pull the lever up to lock the steering wheel in place.
Do not adjust the steering wheel while
driving. Power Tilt and Telescoping Steering Wheel
To adjust the steering wheel, if equipped:
1. Press the control up or down to tilt the steering wheel up or down.
2. Press the control rearward or forward to move the steering wheel closer or away
from you.
Do not adjust the steering wheel while
driving.
Heated Steering Wheel
(: If equipped, press to turn the heated
steering wheel on or off. An indicator next
to the button is lit when the feature is
turned on.
The steering wheel takes about
three minutes to start heating.
Automatic Heated Steering Wheel
If equipped with remote start, the heated
steering wheel may turn on during a remote
start along with the heated seats when it is
cold outside. The heated steering wheel
indicator may come on in remote start.
Page 96 of 443
Chevrolet Tahoe/Suburban Owner Manual (GMNA-Localizing-U.S./Canada/
Mexico-16416971) - 2023 - CRC - 4/25/22
Instruments and Controls 95
If equipped with auto heated seats, the
heated steering wheel will turn on when the
auto heated seat is activated. The heated
steering wheel indicator will display the
state of the steering wheel heat.
SeeHeated and Ventilated Front Seats 042.
Horn
To sound the horn, pressaon the
steering wheel.
Windshield Wiper/Washer
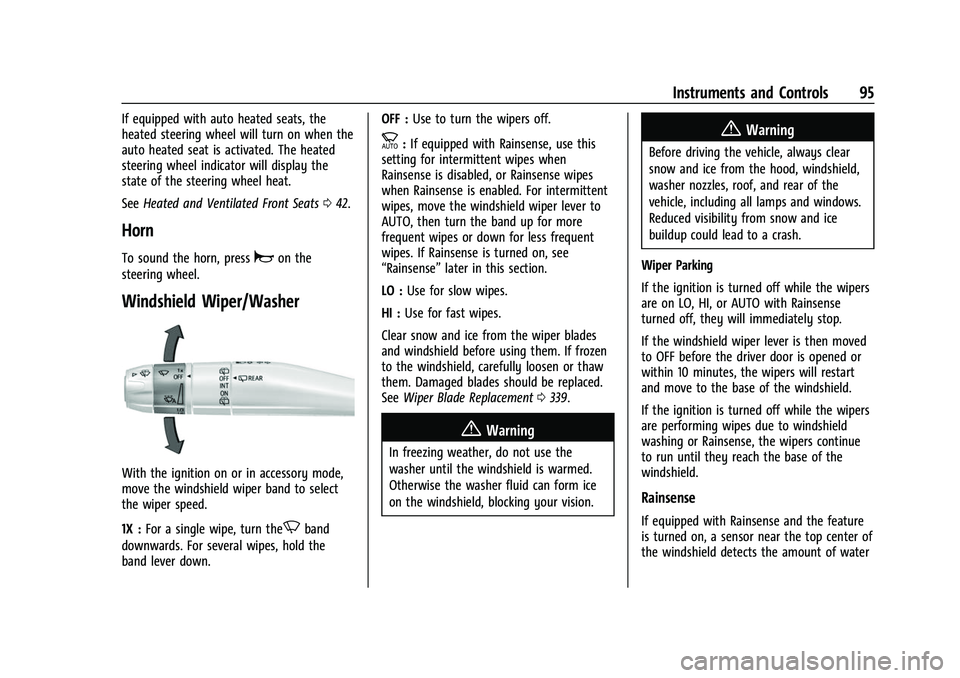
With the ignition on or in accessory mode,
move the windshield wiper band to select
the wiper speed.
1X : For a single wipe, turn the
Nband
downwards. For several wipes, hold the
band lever down. OFF :
Use to turn the wipers off.
c:If equipped with Rainsense, use this
setting for intermittent wipes when
Rainsense is disabled, or Rainsense wipes
when Rainsense is enabled. For intermittent
wipes, move the windshield wiper lever to
AUTO, then turn the band up for more
frequent wipes or down for less frequent
wipes. If Rainsense is turned on, see
“Rainsense” later in this section.
LO : Use for slow wipes.
HI : Use for fast wipes.
Clear snow and ice from the wiper blades
and windshield before using them. If frozen
to the windshield, carefully loosen or thaw
them. Damaged blades should be replaced.
See Wiper Blade Replacement 0339.
{Warning
In freezing weather, do not use the
washer until the windshield is warmed.
Otherwise the washer fluid can form ice
on the windshield, blocking your vision.
{Warning
Before driving the vehicle, always clear
snow and ice from the hood, windshield,
washer nozzles, roof, and rear of the
vehicle, including all lamps and windows.
Reduced visibility from snow and ice
buildup could lead to a crash.
Wiper Parking
If the ignition is turned off while the wipers
are on LO, HI, or AUTO with Rainsense
turned off, they will immediately stop.
If the windshield wiper lever is then moved
to OFF before the driver door is opened or
within 10 minutes, the wipers will restart
and move to the base of the windshield.
If the ignition is turned off while the wipers
are performing wipes due to windshield
washing or Rainsense, the wipers continue
to run until they reach the base of the
windshield.
Rainsense
If equipped with Rainsense and the feature
is turned on, a sensor near the top center of
the windshield detects the amount of water
Page 142 of 443
Chevrolet Tahoe/Suburban Owner Manual (GMNA-Localizing-U.S./Canada/
Mexico-16416971) - 2023 - CRC - 4/25/22
Lighting 141
Press and hold any of the overhead console
lenses to turn all dome lamps on or off
manually.
Reading Lamps
There are reading lamps on the overhead
console and over the rear seats. These lamps
come on when any door is opened.
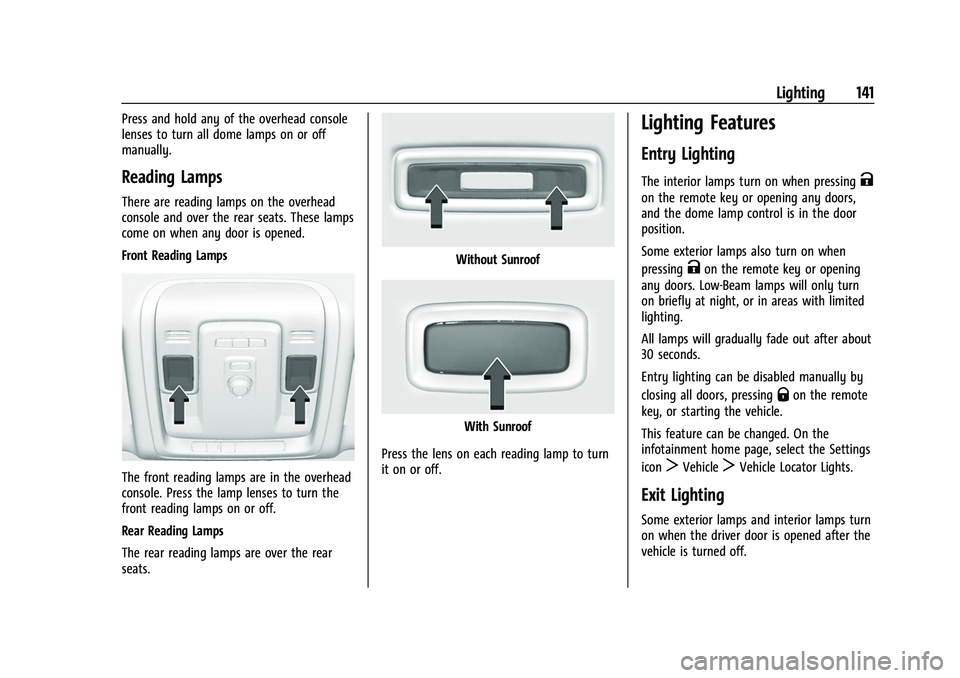
Front Reading Lamps
The front reading lamps are in the overhead
console. Press the lamp lenses to turn the
front reading lamps on or off.
Rear Reading Lamps
The rear reading lamps are over the rear
seats.
Without Sunroof
With Sunroof
Press the lens on each reading lamp to turn
it on or off.
Lighting Features
Entry Lighting
The interior lamps turn on when pressingK
on the remote key or opening any doors,
and the dome lamp control is in the door
position.
Some exterior lamps also turn on when
pressing
Kon the remote key or opening
any doors. Low-Beam lamps will only turn
on briefly at night, or in areas with limited
lighting.
All lamps will gradually fade out after about
30 seconds.
Entry lighting can be disabled manually by
closing all doors, pressing
Qon the remote
key, or starting the vehicle.
This feature can be changed. On the
infotainment home page, select the Settings
icon
TVehicleTVehicle Locator Lights.
Exit Lighting
Some exterior lamps and interior lamps turn
on when the driver door is opened after the
vehicle is turned off.
Page 143 of 443
Chevrolet Tahoe/Suburban Owner Manual (GMNA-Localizing-U.S./Canada/
Mexico-16416971) - 2023 - CRC - 4/25/22
142 Lighting
The exterior and interior lamps remain on
for a set amount of time, then automatically
turn off.
The interior lights turn on when the vehicle
is turned off.
The exterior lamps turn off immediately by
turning the exterior lamp control off.
This feature can be changed. On the
infotainment home screen, select the
Settings icon
TVehicleTExit Lighting.
Battery Load Management
The vehicle has Electric Power Management
(EPM), which estimates the battery's
temperature and state of charge. It then
adjusts the voltage for best performance
and extended life of the battery.
When the battery's state of charge is low,
the voltage is raised slightly to quickly bring
the charge back up. When the state of
charge is high, the voltage is lowered
slightly to prevent overcharging. The
voltmeter gauge or the voltage display on
the Driver Information Center (DIC),
if equipped, may show the voltage moving
up or down. This is normal. If there is a
problem, an alert will be displayed.The battery can be discharged at idle if the
electrical loads are very high. This is true for
all vehicles. This is because the generator
(alternator) may not be spinning fast
enough at idle to produce all the power that
is needed for very high electrical loads.
A high electrical load occurs when several of
the following are on, such as: headlamps,
high beams, rear window defogger, climate
control fan at high speed, heated seats,
engine cooling fans, trailer loads, and loads
plugged into accessory power outlets.
EPM works to prevent excessive discharge of
the battery. It does this by balancing the
generator's output and the vehicle's
electrical needs. It can increase engine idle
speed to generate more power, whenever
needed. It can temporarily reduce the power
demands of some accessories.
Normally, these actions occur in steps or
levels, without being noticeable. In rare
cases at the highest levels of corrective
action, this action may be noticeable to the
driver. If so, a DIC message might be
displayed and it is recommended that the
driver reduce the electrical loads as much as
possible.
Battery Power Protection
This feature helps prevent the battery from
being drained, if the interior courtesy lamps
or reading lamps are accidentally left on.
If any of these lamps are left on, they
automatically turn off after 10 minutes,
if the ignition is off. The lamps will not
come back on again until one of the
following occurs:
.The ignition is turned on.
.The doors are closed and then re-opened.
Exterior Lighting Battery Saver
The exterior lamps turn off about 10 minutes
after the vehicle is turned off, if the parking
lamps or headlamps have been manually
left on. This protects against draining the
battery. To restart the 10-minute timer, turn
the exterior lamp control to the
Oposition
and then back to the
;or2position.
To keep the lamps on for more than
10 minutes, the vehicle must be on or in
accessory mode.
Page 155 of 443
Chevrolet Tahoe/Suburban Owner Manual (GMNA-Localizing-U.S./Canada/
Mexico-16416971) - 2023 - CRC - 4/26/22
154 Infotainment System
2. Once paired, touch Audio from the HomePage, then touch Bluetooth from the
recent sources list on the left of the
display.
Bluetooth Sound Menu
See “Infotainment System Sound Menu”
under AM-FM Radio (Base Radio) 0149 or
AM-FM Radio (Uplevel Radio) 0150.
Manage Bluetooth Devices
From the Home Page: 1. Touch Audio.
2. Touch Devices to add or delete devices.
When touching Bluetooth, the radio may
not be able to launch the audio player on
the connected device to start playing. When
the vehicle is not moving, use the mobile
device to begin playback.
All devices launch audio differently. When
selecting Bluetooth as a source, the radio
may show as paused on the display. Press
play on the device or touch
pon the
vehicle display to begin playback.
Browse functionality will be provided where
supported by the Bluetooth device. This
media content will not be part of the
MyMedia source mode. Some smartphones support sending
Bluetooth music information to display on
the radio. When the radio receives this
information, it will check to see if any is
available and display it. For more
information about supported Bluetooth
features, visit your brand website. See
Online Account
0413 for details.
See Radio Frequency Statement 0419.
Bluetooth Audio (Uplevel Radio)
Music may be played from a connected
Bluetooth device.
Volume and song selection may be
controlled by using the infotainment
controls. If Bluetooth is selected and no
volume is present, check the volume setting
on the infotainment system.
To play music via Bluetooth:
1. On the audio now playing page, touch source and select the desired Bluetooth
device.
2. If there is no device connected, follow the screen prompts to pair the device.
Supported media content will appear on
the display. Manage Bluetooth Devices
Managing Bluetooth devices allows you to
add, delete, or select another paired device.
Only one Bluetooth device can be active at
a time.
Some smartphones support sending
Bluetooth music information to display on
the radio. When the radio receives this
information, it will check to see if any is
available and display it. For more
information about supported Bluetooth
features, visit your brand website. See
Online Account
0413 for details.
See Radio Frequency Statement 0419.
Rear Seat Infotainment
Rear Seat Infotainment (RSI)
System
If equipped, the system includes two HDMI
ports, two Bluetooth headphones, and video
touchscreen displays in back of the driver
and passenger seats.
The RSI system may not operate properly
until the temperature is above −20 °C (−4 °F)
and below 55 °C (131 °F).
Page 190 of 443
Chevrolet Tahoe/Suburban Owner Manual (GMNA-Localizing-U.S./Canada/
Mexico-16416971) - 2023 - CRC - 4/25/22
Climate Controls 189
If equipped with heated outside mirrors,
press
fto turn them on or off. SeeHeated
Mirrors 028.
Caution
Using a razor blade or sharp object to
clear the inside rear window can damage
the rear window defogger. Repairs would
not be covered by the vehicle warranty.
Do not clear the inside rear window with
sharp objects.
Remote Start Climate Control Operation : If
Equipped: When the vehicle is started
remotely, the climate control system, rear
window defog— and if equipped, heated or
ventilated seats or a heated steering wheel
— may run based on climate conditions.
When this occurs, the window defog
indicator will not light up as it does
normally. See Remote Vehicle Start 014,
Heated and Ventilated Front Seats 042, and
Heated Steering Wheel 094.
Sensors
The solar sensor, on top of the instrument
panel near the windshield, monitors the
solar heat.
The climate control system uses the sensor
information to adjust the temperature, fan
speed, recirculation, and air delivery mode
for best comfort.
Do not cover the sensor; otherwise the
automatic climate control system may not
work properly. Afterblow Feature
If equipped, under certain conditions, the
fan may stay on or may turn on and off
several times after you turn off and lock the
vehicle. This is normal.
Rear Climate Control System
The rear climate control system is located
on the rear of the center console storage.
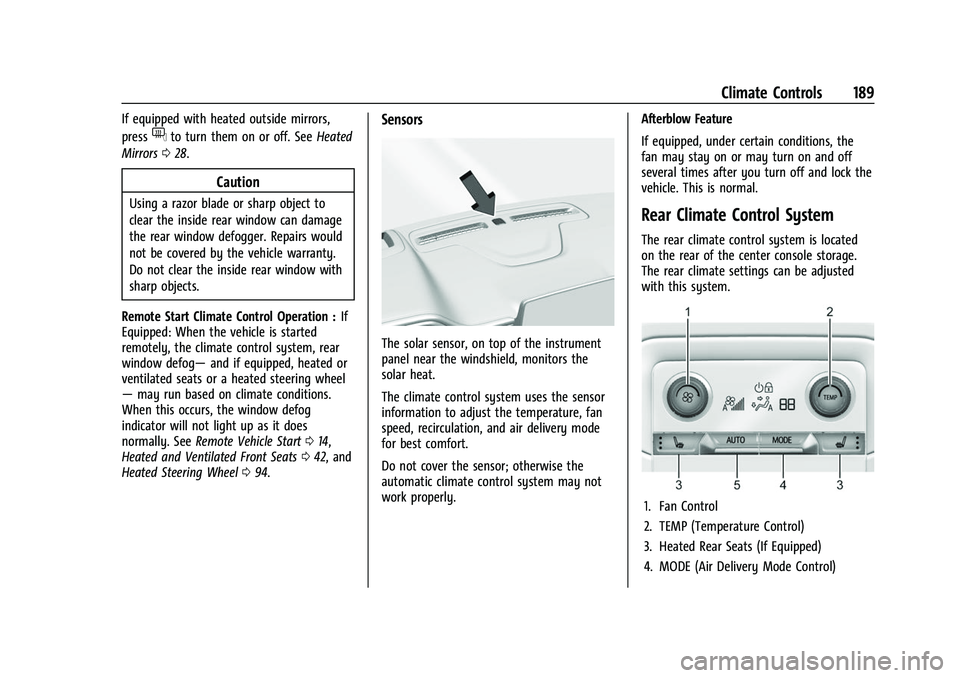
The rear climate settings can be adjusted
with this system.
1. Fan Control
2. TEMP (Temperature Control)
3. Heated Rear Seats (If Equipped)
4. MODE (Air Delivery Mode Control)
Page 191 of 443

Chevrolet Tahoe/Suburban Owner Manual (GMNA-Localizing-U.S./Canada/
Mexico-16416971) - 2023 - CRC - 4/25/22
190 Climate Controls
5. AUTO (Automatic Operation)
If the dual automatic climate control system
rear climate control lockout feature is
locked, the rear climate control settings can
only be adjusted from the front seat.
Rear Climate Display, Uplevel Shown
1. Rear Climate Temperature Setting
2. Fan Control
3. Sync (Synchronized Temperatures)
4. Rear Control Lockout
5. Auto (Automatic Operation)
6. Air Delivery Mode Control
7. On/Off (Power)
8. Rear Climate Selection 9. Rear Climate Temperature Control
Automatic Operation
AUTO :
Press AUTO to automatically control
the temperature, air delivery, and fan speed
for rear seat passengers. AUTO is indicated
in the display when automatic operation is
active.
If any of the rear climate control settings
are manually adjusted, full automatic
operation is canceled. Press AUTO to return
to full automatic operation.
The display only indicates climate control
functions when the system is in rear
independent mode.
Manual Operation
9: Turn clockwise or counterclockwise to
increase or decrease the fan speed. Turn
completely counterclockwise to turn the
fan/power off.
TEMP : Turn clockwise or counterclockwise
to increase or decrease the airflow
temperature into the passenger area. If the
SYNC button is pressed on the front climate
controls, the rear climate temperature is
linked to the driver temperature setting. MODE :
Press to change the direction of the
airflow in the vehicle. Repeatedly press the
button until the desired mode appears on
the display. Multiple presses will cycle
through the delivery selections.
MorL: If equipped, pressMorLto
heat the left or right outboard seat cushion.
See Heated Rear Seats 048.
Air Vents
Adjustable air vents are in the center and on
the side of the instrument panel.
Move the slider knobs to change the
direction of the airflow. To close the vent,
adjust slider knob away from you.
Page 192 of 443
Chevrolet Tahoe/Suburban Owner Manual (GMNA-Localizing-U.S./Canada/
Mexico-16416971) - 2023 - CRC - 4/25/22
Climate Controls 191
Rear System Air Vents
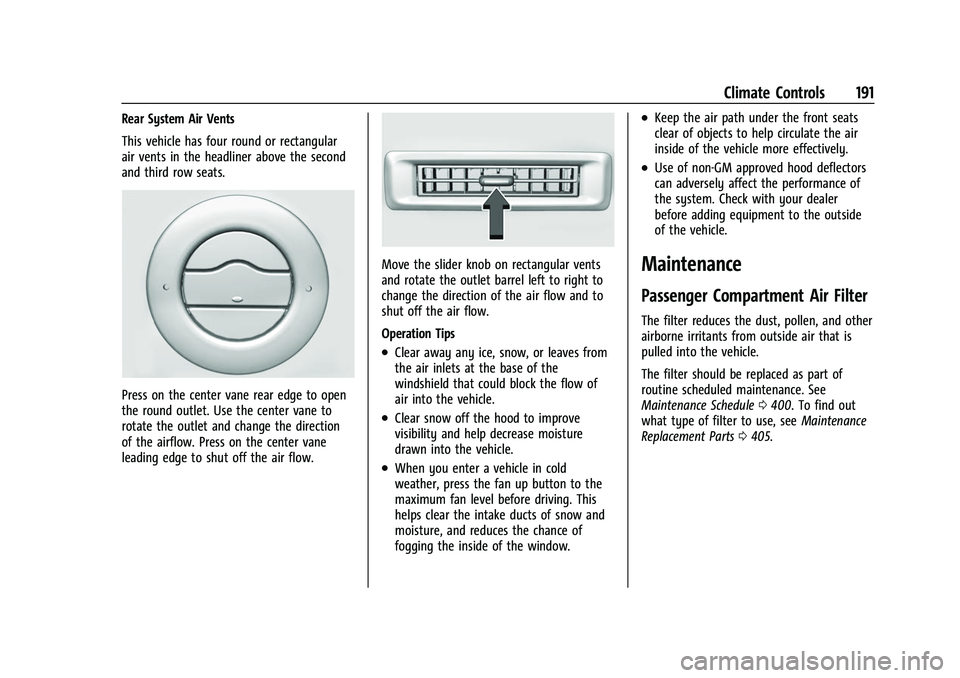
This vehicle has four round or rectangular
air vents in the headliner above the second
and third row seats.
Press on the center vane rear edge to open
the round outlet. Use the center vane to
rotate the outlet and change the direction
of the airflow. Press on the center vane
leading edge to shut off the air flow.
Move the slider knob on rectangular vents
and rotate the outlet barrel left to right to
change the direction of the air flow and to
shut off the air flow.
Operation Tips
.Clear away any ice, snow, or leaves from
the air inlets at the base of the
windshield that could block the flow of
air into the vehicle.
.Clear snow off the hood to improve
visibility and help decrease moisture
drawn into the vehicle.
.When you enter a vehicle in cold
weather, press the fan up button to the
maximum fan level before driving. This
helps clear the intake ducts of snow and
moisture, and reduces the chance of
fogging the inside of the window.
.Keep the air path under the front seats
clear of objects to help circulate the air
inside of the vehicle more effectively.
.Use of non-GM approved hood deflectors
can adversely affect the performance of
the system. Check with your dealer
before adding equipment to the outside
of the vehicle.
Maintenance
Passenger Compartment Air Filter
The filter reduces the dust, pollen, and other
airborne irritants from outside air that is
pulled into the vehicle.
The filter should be replaced as part of
routine scheduled maintenance. See
Maintenance Schedule0400. To find out
what type of filter to use, see Maintenance
Replacement Parts 0405.
Page 209 of 443
Chevrolet Tahoe/Suburban Owner Manual (GMNA-Localizing-U.S./Canada/
Mexico-16416971) - 2023 - CRC - 5/16/22
208 Driving and Operating
Caution
Overloading the vehicle may cause
damage. Repairs would not be covered by
the vehicle warranty. Do not overload the
vehicle.
The label will help decide how much
cargo and installed equipment the truck
can carry.
Using heavier suspension components
to get added durability might not
change the weight ratings. Ask your
dealer to help load the vehicle the
right way.
{Warning
Things you put inside the vehicle can
strike and injure people in a sudden
stop or turn, or in a crash.
.Put things in the cargo area of the
vehicle. Try to spread the weight
evenly.
(Continued)
Warning (Continued)
.Never stack heavier things, like
suitcases, inside the vehicle so
that some of them are above the
tops of the seats.
.Do not leave an unsecured child
restraint in the vehicle.
.When you carry something inside
the vehicle, secure it whenever
you can.
.Do not leave a seat folded down
unless you need to.
There is also important loading
information for off-road driving in this
manual. See “Loading Your Vehicle for
Off-Road Driving” underOff-Road
Driving 0198.
Starting and Operating
New Vehicle Break-In
Caution
The vehicle does not need an elaborate
break-in. But it will perform better in the
long run if you follow these guidelines:
.Do not drive at any one constant
speed, fast or slow, for the first
800 km (500 mi). Do not make
full-throttle starts. Avoid downshifting
to brake or slow the vehicle.
.Avoid making hard stops for the first
300 km (200 mi) or so. During this
time the new brake linings are not yet
broken in. Hard stops with new linings
can mean premature wear and earlier
replacement. Follow this breaking-in
guideline every time you get new
brake linings.
.Do not tow a trailer during break-in.
See Trailer Towing 0292 for the
trailer towing capabilities of the
vehicle and more information.
Following break-in, engine speed and load
can be gradually increased.
Page 367 of 443
Chevrolet Tahoe/Suburban Owner Manual (GMNA-Localizing-U.S./Canada/
Mexico-16416971) - 2023 - CRC - 4/26/22
366 Vehicle Care
Reset the Tire Pressure Monitor System.
SeeTire Pressure Monitor Operation
0 361.
Check that all wheel nuts are properly
tightened. See “Wheel Nut Torque”
under Capacities and Specifications
0 408 and“Removing the Flat Tire and
Installing the Spare Tire” underTire
Changing 0372.
{Warning
Rust or dirt on a wheel, or on the
parts to which it is fastened, can
cause wheel nuts to become loose
over time. The wheel could come off
and cause a crash. When changing a
wheel, remove any rust or dirt from
places where the wheel attaches to
the vehicle. In an emergency, a cloth
or paper towel can be used; however,
use a scraper or wire brush later to
remove all rust or dirt. Lightly coat the inner diameter of the
wheel hub opening with wheel bearing
grease after a wheel change or tire
rotation to prevent corrosion or rust
build-up.
{Warning
Do not apply grease to the wheel
mounting surface, wheel conical
seats, or the wheel nuts or bolts.
Grease applied to these areas could
cause a wheel to become loose or
come off, resulting in a crash.
When It Is Time for New Tires
Factors, such as maintenance, temperatures,
driving speeds, vehicle loading, and road
conditions affect the wear rate of the tires.
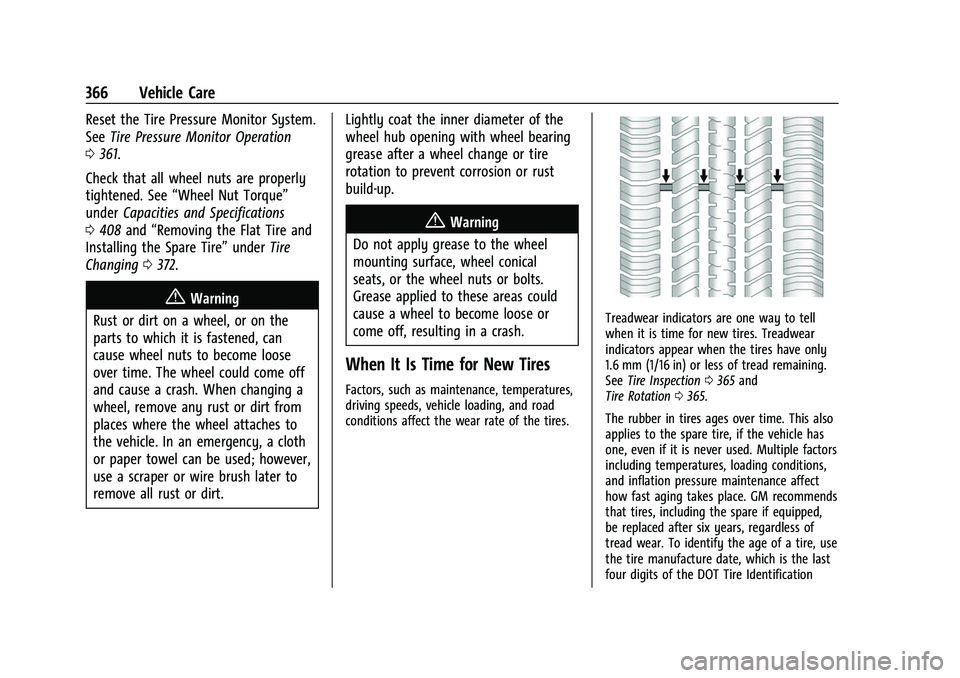
Treadwear indicators are one way to tell
when it is time for new tires. Treadwear
indicators appear when the tires have only
1.6 mm (1/16 in) or less of tread remaining.
See Tire Inspection 0365 and
Tire Rotation 0365.
The rubber in tires ages over time. This also
applies to the spare tire, if the vehicle has
one, even if it is never used. Multiple factors
including temperatures, loading conditions,
and inflation pressure maintenance affect
how fast aging takes place. GM recommends
that tires, including the spare if equipped,
be replaced after six years, regardless of
tread wear. To identify the age of a tire, use
the tire manufacture date, which is the last
four digits of the DOT Tire Identification