Side mirrors CHEVROLET TAHOE 2023 Owners Manual
[x] Cancel search | Manufacturer: CHEVROLET, Model Year: 2023, Model line: TAHOE, Model: CHEVROLET TAHOE 2023Pages: 443, PDF Size: 18.73 MB
Page 10 of 443
Chevrolet Tahoe/Suburban Owner Manual (GMNA-Localizing-U.S./Canada/
Mexico-16416971) - 2023 - CRC - 4/25/22
Keys, Doors, and Windows 9
touch the Settings icon on the infotainment
home page. Select“Vehicle”to display the
list of available options and select “Remote
Lock, Unlock, Start”.
Pressing
Qarms the alarm system. See
Vehicle Alarm System 024.
If equipped with auto mirror folding, double
pressing and holding
Qfor one second will
fold the mirrors, if enabled. To view
available settings for this feature, touch the
Settings icon on the infotainment home
page. Select “Vehicle”to display the list of
available options and select “Comfort and
Convenience”.
K: Press once to unlock only the driver
door. If
Kis pressed again within
three seconds, all remaining doors unlock.
The interior lamps may come on and stay
on for 20 seconds or until the ignition is
turned on.
If enabled, the turn signal lamps flash twice
to indicate unlocking has occurred.
If enabled, the exterior lamps may turn on.
To view available settings for this feature,
touch the Settings icon on the infotainment
home page. Select “Vehicle”to display the
list of available options and select “Remote
Lock, Unlock, Start”. Pressing
Kon the remote key disarms the
alarm system. See Vehicle Alarm System
0 24.
If equipped with auto mirror folding, double
pressing and holding
Kfor one second will
unfold the mirrors, if enabled. To view
available settings for this feature, touch the
Settings icon on the infotainment home
page. Select “Vehicle”to display the list of
available options and select “Comfort and
Convenience”.
Double press and hold
Kuntil the windows
fully open, if remote window operation is
enabled. To view available settings for this
feature, touch the Settings icon on the
infotainment home page. Select “Vehicle”to
display the list of available options and
select “Remote Lock, Unlock, Start”.
b:Press twice to open or close the
liftgate. Press once to stop the liftgate from
moving.
c: Press twice to open the liftglass.
7:Press and release to initiate vehicle
locate. The turn signal lamps flash and the
horn sounds three times. Press and hold
7for more than
three seconds to activate the panic alarm.
The turn signal lamps flash and the horn
sounds repeatedly for 30 seconds. The alarm
turns off when the ignition is turned on or
7is pressed again. The ignition must be off
for the panic alarm to work.
/: To remote start the vehicle, double
press
/from outside the vehicle using the
remote key. The vehicle cannot be started if
a remote key is left inside the vehicle. See
Remote Vehicle Start 014.
Keyless Access Operation
The Keyless Access system allows for doors
and the liftgate to be accessed without
removing the remote key from your pocket,
purse, briefcase, etc. The remote key must
be within 1 m (3 ft) of the liftgate or door
being opened. If the vehicle has this feature,
there will be a button on the outside door
handles.
Keyless Access can be programmed to
unlock all doors on the first lock/unlock
press from the driver door. To view available
settings for this feature, touch the Settings
icon on the infotainment home page. Select
Page 27 of 443

Chevrolet Tahoe/Suburban Owner Manual (GMNA-Localizing-U.S./Canada/
Mexico-16416971) - 2023 - CRC - 4/25/22
26 Keys, Doors, and Windows
To keep the steering column from binding,
straighten the front wheels before turning
off the vehicle.
Immobilizer
SeeRadio Frequency Statement 0419.
Immobilizer Operation
This vehicle has a passive theft-deterrent
system.
The system does not have to be manually
armed or disarmed.
The vehicle is automatically immobilized
when the vehicle is turned off.
The immobilization system is disarmed
when the ignition is turned on or to
accessory mode and a valid remote key is
present in the vehicle.
The security light, in the instrument cluster,
comes on if there is a problem with arming
or disarming the theft-deterrent system. The system has one or more remote keys
matched to an immobilizer control unit in
the vehicle. Only a correctly matched
remote key will start the vehicle. If the
remote key is ever damaged, you may not
be able to start your vehicle.
When trying to start the vehicle, the
security light may come on briefly.
If the engine does not start and the security
light stays on, there is a problem with the
system. Turn the ignition off and try again.
If the vehicle will not change ignition modes
(accessory mode, on, off), and the remote
key appears to be undamaged, try another
remote key. Or, you may try placing the
remote key in the backup location. See
Remote Key Operation
08.
If the ignition modes will not change with
the other remote key or in the backup
location, the vehicle needs service. If the
ignition does change modes, the first
remote key may be faulty. See your dealer.
It is possible for the immobilizer system to
learn new or replacement remote keys. Up
to eight remote keys can be programmed
for the vehicle. To program additional remote keys, see
“Programming Remote
Keys to the Vehicle” underRemote Key
Operation 08.
Do not leave the remote key or device that
disarms or deactivates the theft-deterrent
system in the vehicle.
Exterior Mirrors
Convex Mirrors
{Warning
A convex mirror can make things, like
other vehicles, look farther away than
they really are. If you cut too sharply
into the right lane, you could hit a
vehicle on the right. Check the inside
mirror or glance over your shoulder
before changing lanes.
The passenger side mirror is convex shaped.
A convex mirror surface is curved so more
can be seen from the driver seat.
Page 28 of 443
Chevrolet Tahoe/Suburban Owner Manual (GMNA-Localizing-U.S./Canada/
Mexico-16416971) - 2023 - CRC - 4/25/22
Keys, Doors, and Windows 27
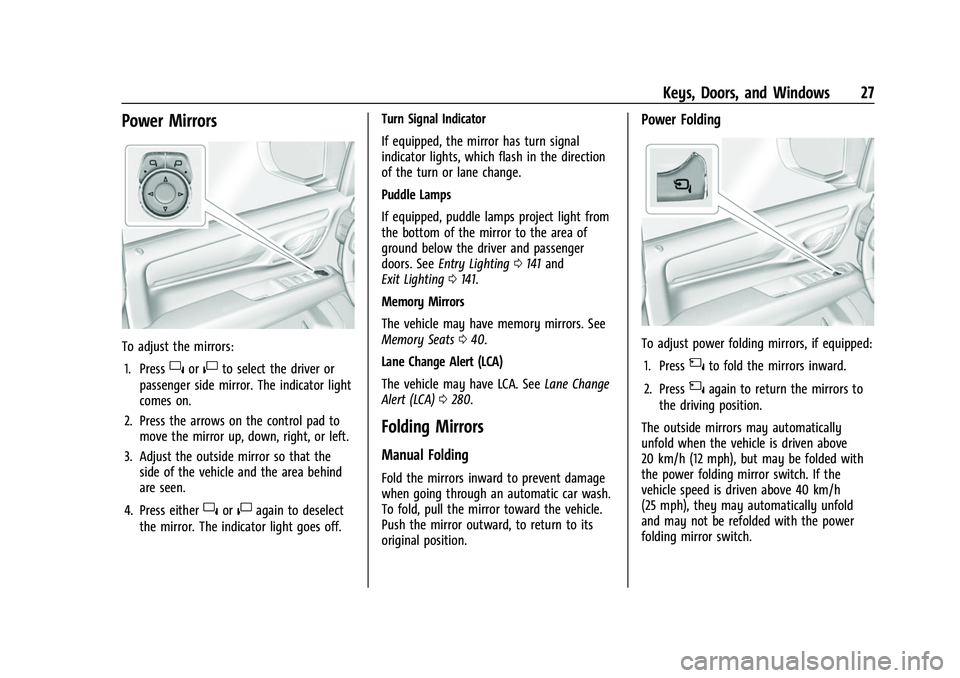
Power Mirrors
To adjust the mirrors:1. Press
}or|to select the driver or
passenger side mirror. The indicator light
comes on.
2. Press the arrows on the control pad to move the mirror up, down, right, or left.
3. Adjust the outside mirror so that the side of the vehicle and the area behind
are seen.
4. Press either
}or|again to deselect
the mirror. The indicator light goes off. Turn Signal Indicator
If equipped, the mirror has turn signal
indicator lights, which flash in the direction
of the turn or lane change.
Puddle Lamps
If equipped, puddle lamps project light from
the bottom of the mirror to the area of
ground below the driver and passenger
doors. See
Entry Lighting 0141 and
Exit Lighting 0141.
Memory Mirrors
The vehicle may have memory mirrors. See
Memory Seats 040.
Lane Change Alert (LCA)
The vehicle may have LCA. See Lane Change
Alert (LCA) 0280.
Folding Mirrors
Manual Folding
Fold the mirrors inward to prevent damage
when going through an automatic car wash.
To fold, pull the mirror toward the vehicle.
Push the mirror outward, to return to its
original position.
Power Folding
To adjust power folding mirrors, if equipped:
1. Press
{to fold the mirrors inward.
2. Press
{again to return the mirrors to
the driving position.
The outside mirrors may automatically
unfold when the vehicle is driven above
20 km/h (12 mph), but may be folded with
the power folding mirror switch. If the
vehicle speed is driven above 40 km/h
(25 mph), they may automatically unfold
and may not be refolded with the power
folding mirror switch.
Page 29 of 443
Chevrolet Tahoe/Suburban Owner Manual (GMNA-Localizing-U.S./Canada/
Mexico-16416971) - 2023 - CRC - 4/25/22
28 Keys, Doors, and Windows
Resetting the Power Folding Mirrors
Reset the power folding mirrors if:
.The mirrors are accidentally obstructed
while folding.
.They are accidentally manually folded/
unfolded.
.The mirrors do not stay in the unfolded
position.
.The mirrors vibrate at normal driving
speeds.
Fold and unfold the mirrors one time using
the mirror controls to reset them to their
normal position. A noise may be heard
during the resetting of the power folding
mirrors. This sound is normal after a manual
folding operation.
Remote Mirror Folding
If equipped with power folding mirrors and
the mirrors have been folded with the
power folding mirror switch, they may not
be unfolded by use of remote key.
If equipped with power folding mirrors and
the mirrors have not been folded with the
power folding mirror switch and the vehicle
is in P (Park), they may be automatically
folded/unfolded as follows: 1. If doors are locked by double pressing
Q
on the remote key for one second, the
mirrors will fold. If doors are unlocked by
double pressing
Kon the remote key
for one second, the mirrors will unfold.
See Remote Key Operation 08.
2. If doors are locked by pressing the door handle button, the mirrors will fold.
If doors are unlocked by pressing the
door handle button, the mirrors will
unfold. See “Keyless Unlocking/Locking
from the Driver Door” inRemote Key
Operation 08.
3. If passive locking is enabled and doors are locked by that feature, the mirrors
will fold. See “Passive Locking” inRemote
Key Operation 08.
Heated Mirrors
K:Press to heat the mirrors.
See “Rear Window Defogger” underDual
Automatic Climate Control System 0186.
Automatic Dimming Mirror
If equipped, the driver outside mirror
automatically adjusts for the glare of the
headlamps from behind. This feature comes
on when the vehicle is started.
Reverse Tilt Mirrors
If equipped with reverse tilt mirrors and
memory seats, the passenger and/or driver
mirror tilts to a preselected position when
the vehicle is in R (Reverse). This allows the
curb to be seen when parallel parking.
The mirror(s) may move from their tilted
position when:
.The vehicle is shifted out of R (Reverse),
or remains in R (Reverse) for about
30 seconds.
.The vehicle is turned off.
.The vehicle is driven in R (Reverse) above
a set speed.
To view available settings from the
infotainment screen, touch Settings >
Vehicle > Comfort and Convenience.
Interior Mirrors
Interior Rearview Mirrors
Adjust the rearview mirror for a clear view
of the area behind the vehicle.
Do not spray glass cleaner directly on the
mirror. Use a soft towel dampened with
water.
Page 31 of 443
Chevrolet Tahoe/Suburban Owner Manual (GMNA-Localizing-U.S./Canada/
Mexico-16416971) - 2023 - CRC - 4/25/22
30 Keys, Doors, and Windows
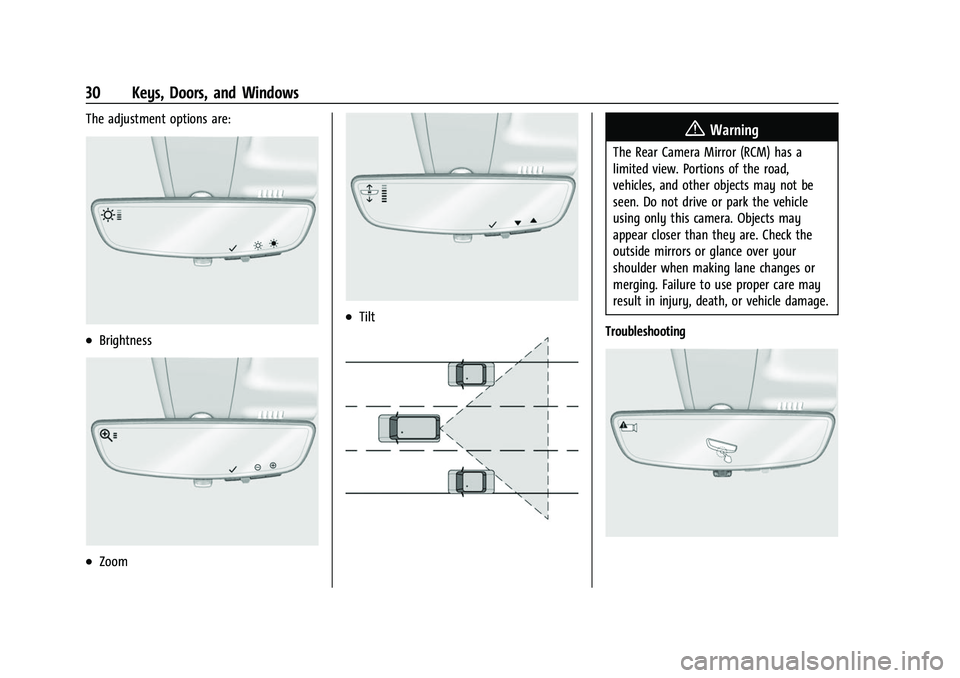
The adjustment options are:
.Brightness
.Zoom
.Tilt
{Warning
The Rear Camera Mirror (RCM) has a
limited view. Portions of the road,
vehicles, and other objects may not be
seen. Do not drive or park the vehicle
using only this camera. Objects may
appear closer than they are. Check the
outside mirrors or glance over your
shoulder when making lane changes or
merging. Failure to use proper care may
result in injury, death, or vehicle damage.
Troubleshooting
Page 190 of 443
Chevrolet Tahoe/Suburban Owner Manual (GMNA-Localizing-U.S./Canada/
Mexico-16416971) - 2023 - CRC - 4/25/22
Climate Controls 189
If equipped with heated outside mirrors,
press
fto turn them on or off. SeeHeated
Mirrors 028.
Caution
Using a razor blade or sharp object to
clear the inside rear window can damage
the rear window defogger. Repairs would
not be covered by the vehicle warranty.
Do not clear the inside rear window with
sharp objects.
Remote Start Climate Control Operation : If
Equipped: When the vehicle is started
remotely, the climate control system, rear
window defog— and if equipped, heated or
ventilated seats or a heated steering wheel
— may run based on climate conditions.
When this occurs, the window defog
indicator will not light up as it does
normally. See Remote Vehicle Start 014,
Heated and Ventilated Front Seats 042, and
Heated Steering Wheel 094.
Sensors
The solar sensor, on top of the instrument
panel near the windshield, monitors the
solar heat.
The climate control system uses the sensor
information to adjust the temperature, fan
speed, recirculation, and air delivery mode
for best comfort.
Do not cover the sensor; otherwise the
automatic climate control system may not
work properly. Afterblow Feature
If equipped, under certain conditions, the
fan may stay on or may turn on and off
several times after you turn off and lock the
vehicle. This is normal.
Rear Climate Control System
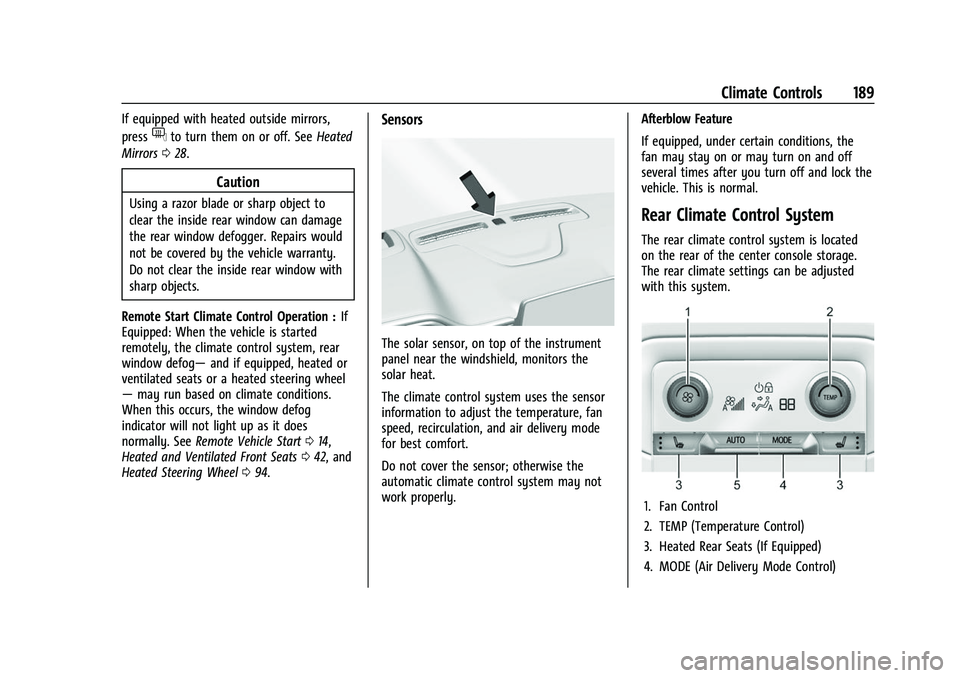
The rear climate control system is located
on the rear of the center console storage.
The rear climate settings can be adjusted
with this system.
1. Fan Control
2. TEMP (Temperature Control)
3. Heated Rear Seats (If Equipped)
4. MODE (Air Delivery Mode Control)
Page 263 of 443
Chevrolet Tahoe/Suburban Owner Manual (GMNA-Localizing-U.S./Canada/
Mexico-16416971) - 2023 - CRC - 5/16/22
262 Driving and Operating
.Front side and rear side panels
.Outside of the windshield in front of the
rearview mirror
.Side camera lens on the bottom of the
outside mirrors
.Rear side corner bumpers
.Rear Vision Camera above the license
plate
Radio Frequency
This vehicle may be equipped with driver
assistance systems that operate using radio
frequency. See Radio Frequency Statement
0 419.
Assistance Systems for Parking or
Backing
If equipped, the Rear Vision Camera (RVC),
Rear Park Assist (RPA), Front Park Assist
(FPA), Surround Vision, and Rear Cross Traffic
Alert (RCTA) may help the driver park or
avoid objects. Always check around the
vehicle when parking or backing.
Rear Vision Camera (RVC)
When the vehicle is shifted into R (Reverse),
the RVC displays an image of the area
behind the vehicle in the infotainment
display. The previous screen displays when the vehicle is shifted out of R (Reverse) after
a short delay. To return to the previous
screen sooner, press Home or Back on the
infotainment system, shift into P (Park),
or reach a vehicle speed of approximately
12 km/h (8 mph) while in D (Drive). The rear
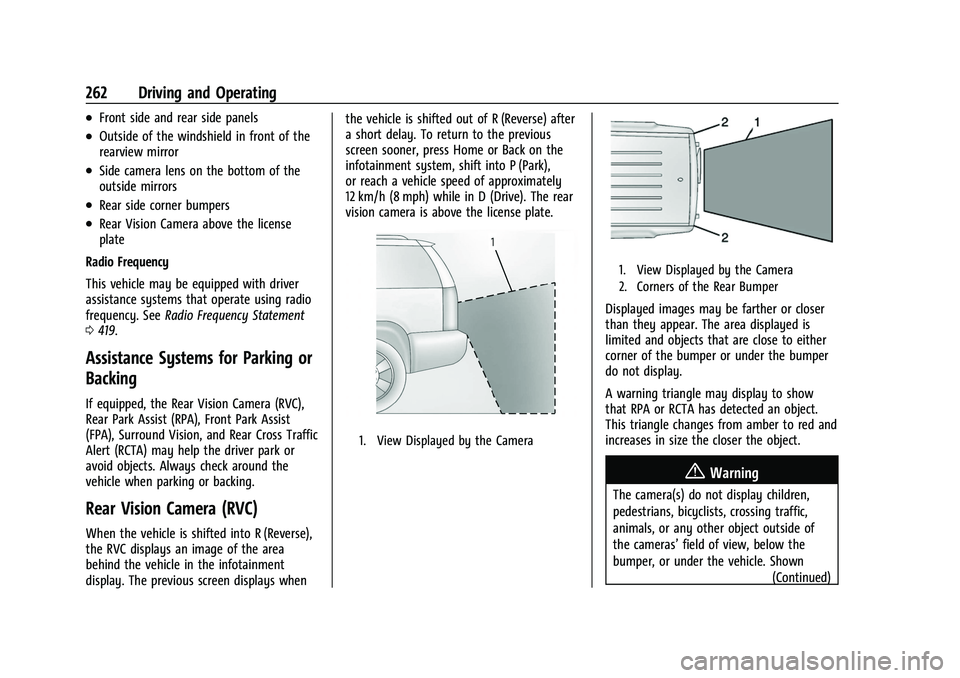
vision camera is above the license plate.
1. View Displayed by the Camera
1. View Displayed by the Camera
2. Corners of the Rear Bumper
Displayed images may be farther or closer
than they appear. The area displayed is
limited and objects that are close to either
corner of the bumper or under the bumper
do not display.
A warning triangle may display to show
that RPA or RCTA has detected an object.
This triangle changes from amber to red and
increases in size the closer the object.
{Warning
The camera(s) do not display children,
pedestrians, bicyclists, crossing traffic,
animals, or any other object outside of
the cameras’
field of view, below the
bumper, or under the vehicle. Shown (Continued)
Page 264 of 443
Chevrolet Tahoe/Suburban Owner Manual (GMNA-Localizing-U.S./Canada/
Mexico-16416971) - 2023 - CRC - 5/16/22
Driving and Operating 263
Warning (Continued)
distances may be different from actual
distances. Do not drive or park the
vehicle using only these camera(s).
Always check behind and around the
vehicle before driving. Failure to use
proper care may result in injury, death,
or vehicle damage.
Surround Vision System
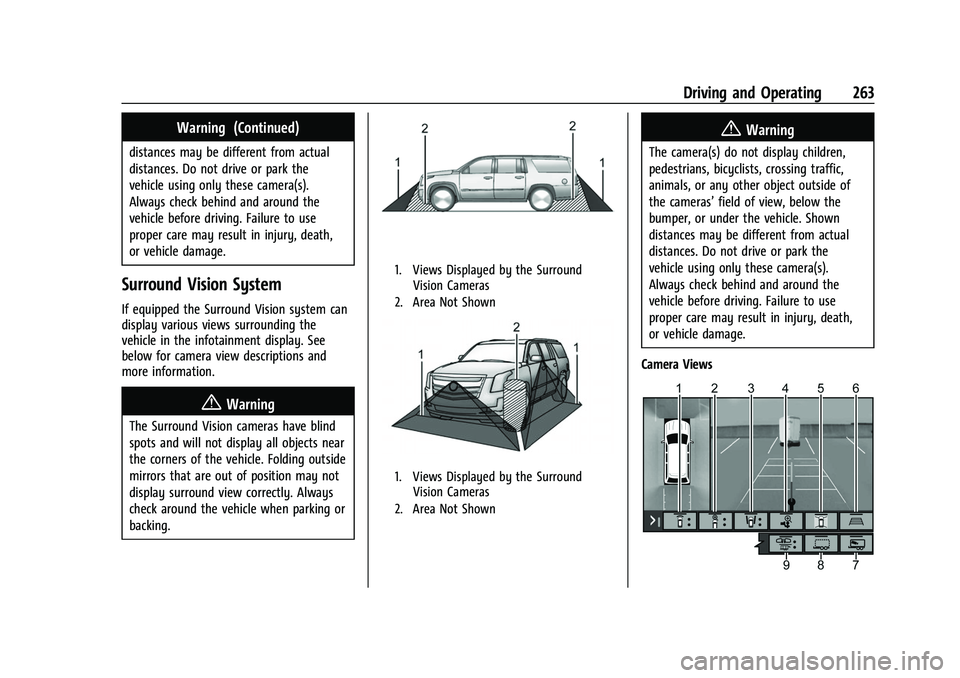
If equipped the Surround Vision system can
display various views surrounding the
vehicle in the infotainment display. See
below for camera view descriptions and
more information.
{Warning
The Surround Vision cameras have blind
spots and will not display all objects near
the corners of the vehicle. Folding outside
mirrors that are out of position may not
display surround view correctly. Always
check around the vehicle when parking or
backing.
1. Views Displayed by the SurroundVision Cameras
2. Area Not Shown
1. Views Displayed by the Surround Vision Cameras
2. Area Not Shown
{Warning
The camera(s) do not display children,
pedestrians, bicyclists, crossing traffic,
animals, or any other object outside of
the cameras’ field of view, below the
bumper, or under the vehicle. Shown
distances may be different from actual
distances. Do not drive or park the
vehicle using only these camera(s).
Always check behind and around the
vehicle before driving. Failure to use
proper care may result in injury, death,
or vehicle damage.
Camera Views
Page 268 of 443
Chevrolet Tahoe/Suburban Owner Manual (GMNA-Localizing-U.S./Canada/
Mexico-16416971) - 2023 - CRC - 5/16/22
Driving and Operating 267
position of the trailer is too far to the left
or right. The overlay can be enabled or
disabled. To view available settings from
the infotainment screen, touch Settings >
Vehicle > Collision/Detection Systems.
.Jack-Knife Detection and Alert
The vehicle may be equipped with
Jack-Knife Detection. The system will track
the position of the trailer relative to the
vehicle. As the front of the trailer
approaches the rear of the vehicle, a
warning or an alert will be displayed.
A warning indicates to the driver to
proceed with caution, an alert indicates
that a collision is imminent. Based on
vehicle equipment and user settings, the
visual warning or alert may be
accompanied by audible or safety alert
seat notifications. To view available
settings from the infotainment screen,
touch Settings > Vehicle > Collision/
Detection Systems.
.Trailer Angle Indicator
The vehicle may be equipped with a
Trailer Angle Indicator. The Trailer Angle
Indicator gives the driver a visual
representation of the trailer’s positionrelative to the vehicle. (Available only in
Reverse, Guidelines On, Rear Trailering
Views).
{Warning
Use Hitch Guidance only to help back the
vehicle to a trailer hitch or, when
traveling above 12 km/h (8 mph), to
briefly check the status of your trailer. Do
not use for any other purpose, such as
making lane change decisions. Before
making a lane change, always check the
mirrors and glance over your shoulder.
Improper use could result in serious
injury to you or others.
HD Surround Vision with Trailer Camera
Provisions
If equipped, this feature provides additional
views to aid in trailering/towing. The
system shows multiple views in the
infotainment display using five cameras
mounted around the vehicle and up to two
additional accessory cameras that can be
mounted on or in a trailer. The front camera
is in the grille under the front emblem, the
side cameras are on the bottom of the
outside mirrors, the rear camera is in the
tailgate handle and the bed camera is mounted on the rear of the cab.
Additionally, up to two accessory cameras
can be mounted to the rear and/or interior
of the trailer. See your dealer for accessory
trailer cameras. To access, touch CAMERA on
the infotainment display or shift to
R (Reverse). To return to the previous screen
when not in reverse, touch the Home or
Back buttons on the infotainment display.
Certain trailer views require a compatible
trailer profile be configured and selected.
A compatible trailer is a box type trailer
(cargo, camper, etc.) with a conventional
hitch.
Available camera views:
.Front/Rear Standard View
.Front/Rear Top-Down View
.Front/Rear Side View
.Hitch View
.Rear trailer View
.Rear Side view with a available
articulation functionality
.Picture-in-Picture Side View
.Interior Trailer View
.Transparent trailer View
.Surround View
.Guidance Lines
Page 269 of 443
Chevrolet Tahoe/Suburban Owner Manual (GMNA-Localizing-U.S./Canada/
Mexico-16416971) - 2023 - CRC - 5/16/22
268 Driving and Operating
.Hitch Guidance
Surround Vision (360 Degrees)
If equipped, the Surround Vision system can
display various views surrounding the
vehicle in the infotainment display using
four cameras mounted around the vehicle.
The front camera is in the grille under the
front emblem, the side cameras are on the
bottom of the outside mirrors, and the rear
camera is in the tailgate handle.
The Surround Vision system can be accessed
by selecting CAMERA in the infotainment
display or when the vehicle is shifted into
R (Reverse). To return to the previous screen
sooner, when not in R (Reverse), press the
Home or Back button on the infotainment
system, shift into P (Park), or, while in D
(Drive), reach a vehicle speed of
approximately 12 km/h (8 mph).
Available camera views:
.Front/Rear Standard View
.Front/Rear Top-Down View
.Front/Rear Side View
.Hitch View
.Surround View
.Guidance Lines
.Hitch Guidance Troubleshooting
The Transparent Trailer calibration may take
longer than expected or not calibrate if:
.The vehicle is driven too fast during
calibration. Speed should be maintained
below 50 km/h (31 mph).
.The vehicle is not driven straight during
calibration. Steering should be maintained
as straight as possible, excessive steering
during calibration may extend
calibration time.
.The calibration is attempted in low light.
Calibration should be attempted when
there is enough light.
.The calibration is attempted during
adverse weather conditions. Calibration
during conditions such as snow or heavy
rain should be avoided.
.The road surface is not ideal for
calibration. Calibration should be
attempted on an alternate road surface.
.The accessory trailer cameras are
swapped at the hitch connector. Ensure
that the camera mounted to the rear of
the trailer is connected to the rear trailer
camera input.
.The accessory trailer camera is mounted,
angled or rotated outside of the defined
mounting location (see camera
installation instructions).
Distortion may be observed in the calibrated
Transparent Trailer View if:
.The accessory trailer camera is mounted,
angled or rotated outside of the defined
mounting location (see camera
installation instructions).
The Transparent Trailer icon may appear
grayed out if:
.A compatible trailer profile is not
configured or a non-compatible trailer
profile is selected.
.The vehicle is in R (Reverse).
.The trailer is not connected.
.The accessory rear trailer camera is not
connected or connected to the incorrect
input.
The preview may not be provided or the
wrong preview may be provided if:
.The accessory cameras are not recognized.
Ensure that the accessory camera(s) are
connected and power cycle the vehicle.