stop start CHEVROLET TRACKER 1997 Owners Manual
[x] Cancel search | Manufacturer: CHEVROLET, Model Year: 1997, Model line: TRACKER, Model: CHEVROLET TRACKER 1997Pages: 388, PDF Size: 20.12 MB
Page 13 of 388
I
If any easy entry seat isn’t locked, it can move. In
a sudden stop or crash, the person sitting there
could be injured. And, even if there is no crash or
sudden stop, a driver sitting in an unlocked easy
entry seat could be startled by the sudden
movement and hit the wrong control or pedal,
causing an accident. After you’ve used it, be sure
to push rearward
on any easy entry seat to be
sure
it is locked.
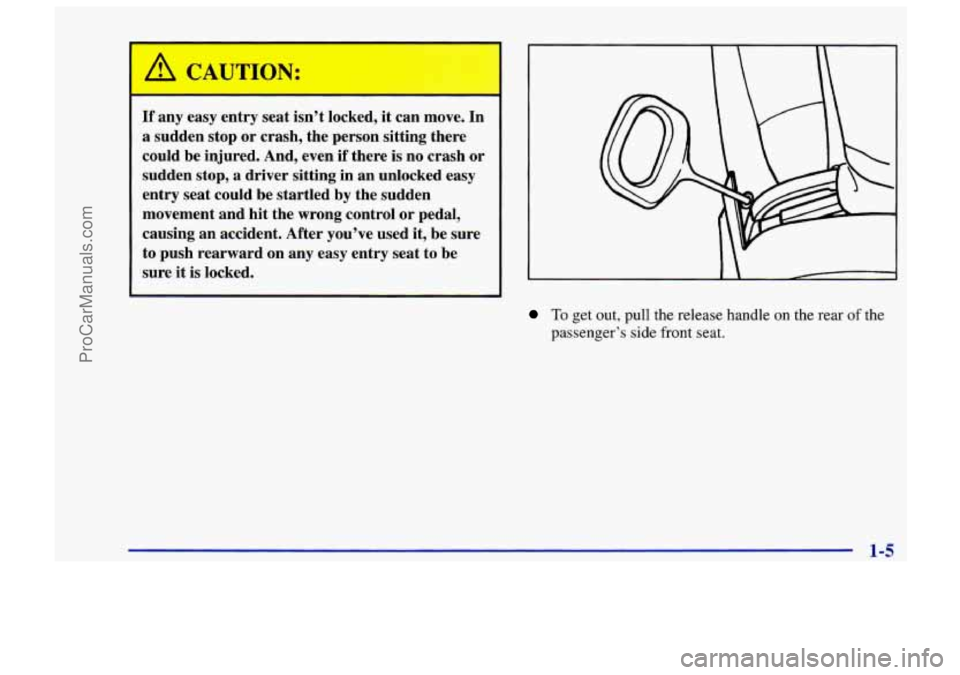
To get out, pull the release handle on the rear of the
passenger’s side front seat.
1-5
ProCarManuals.com
Page 61 of 388
New Vehicle “Break-In” 1
NOTICE:
Your modern Geo doesn’t need an elaborate
“break-in.” But it will perform better in the long
run if you follow these guidelines:
0
0
0
0
Keep your speed at 55 mph (88 km/h) or
less for the first
500 miles (805 km).
Don’t drive at any one speed
-- fast or
slow
-- for the first 500 miles (805 km).
Don’t make full-throttle starts.
Avoid making hard stops for the first
200 miles (322 km) or so. During this time
your new brake linings aren’t yet broken
in. Hard stops
with new linings can mean
premature wear and earlier replacement.
Follow this breaking-in guideline every
time you get new brake linings.
Don’t tow
a trailer during break-in.
See “Towing
a Trailer” in the Index for
more information.
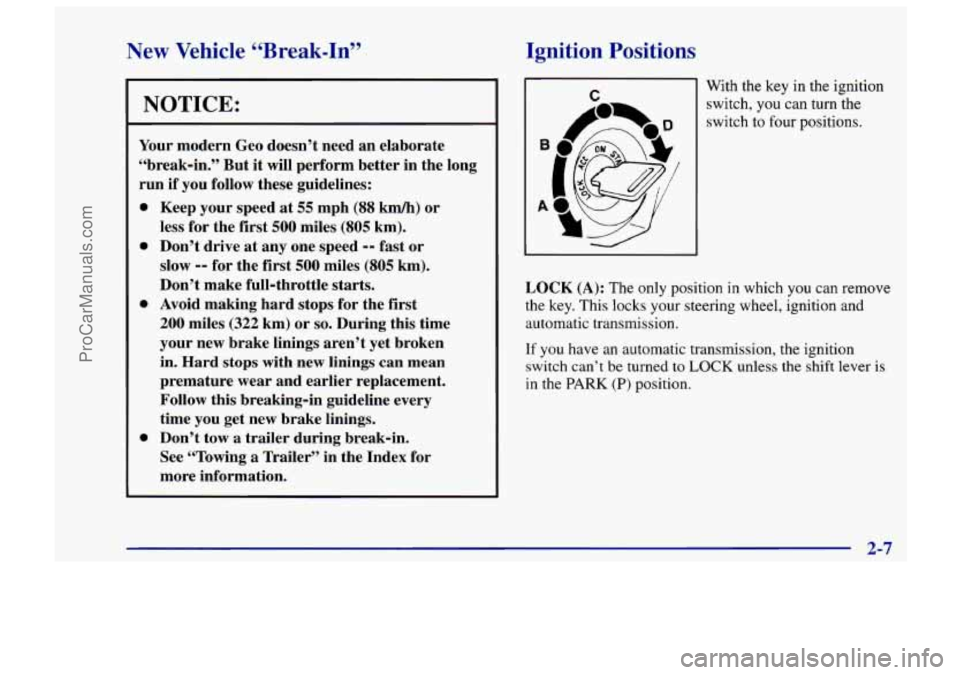
[gnition Positions
With the key in the ignition
switch, you can turn the
switch
to four positions.
LOCK (A): The only position in which you can remove
the key. This locks your steering wheel, ignition and
automatic transmission.
If you have an automatic transmission, the ignition
switch can’t be turned to
LOCK unless the shift lever is
in the PARK (P) position.
2-7
I
ProCarManuals.com
Page 63 of 388
Starting Your Engine
Automatic Transmission
Move your shift lever to PARK (P) or NEUTRAL (N).
Your engine won’t start in any other position -- that’s a
safety feature.
To restart when you’re already moving,
use
NEUTRAL (N) only.
I NOTICE:
Don’t try to shift to PARK (P) if‘ your Geo is
moving.
If you do, you could damage the
transmission. Shift to PARK
(P) only when your
vehicle
is stopped.
Manual Transmission
The gear selector should be in NEUTRAL (N). Hold the
clutch pedal to the floor and start the engine. Your
vehicle won’t start if the clutch pedal
is not all the way
down
-- that’s a safety feature.
Starting Your 1.6 Liter Engine
1. Without pushing the accelerator pedal, turn your
ignition key to START. When the engine starts, let
go of the key.
I I
NOTICE:
Holding your key in START for longer than
15 seconds at a time will cause your battery to be
drained much sooner. And the excessive heat can
damage your starter motor.
2. If it doesn’t start right away, hold your key in
START for about three seconds at a time until your
engine starts. Wait about
15 seconds between each
try to help avoid draining your battery.
If your engine still won’t start. call vour dealer for help.
2-9
ProCarManuals.com
Page 65 of 388
1 A CAUJON:
It is dangerous to get out of your vehicle if the
shift lever is not fully in PARK
(P) with the
parking brake firmly set. Your vehicle can roll.
Don’t leave your vehicle when the engine is
running unless you have to.
If you have left the
engine running, the vehicle can move suddenly.
You or others could be injured.
To be sure your
vehicle won’t move, even when you’re on fairly
level ground, always set your parking brake and
move the shift lever to PARK
(P).
If you have four-wheel drive, your vehicle will
be free to roll
-- even if your shift lever is in
PARK
(P) -- if your transfer case is in
NEUTRAL
(N). So, be sure the transfer case is in
a drive gear, two-wheel high (2H) or four-wheel
high
(4H) or four-wheel low (4L) -- not in
NEUTRAL
(N). See “Shifting Into PARK (P)” in
the Index. If you’re pulling
a trailer, see “Towing
a Trailer” in the Index.
Ensure the shift lever is fully in PARK (P) range before
starting the engine. Your Geo has a brake-transmission
shift interlock.
You have to fully apply your regular
brakes before you can shift from PARK
(P) when the
ignition key
is in the ON position. If you cannot shift
out of PARK
(P), ease pressure on the shift lever -- push
the shift lever all the way into PARK
(P) and release the
shift lever button as you maintain brake application.
Then press the shift lever button and move the shift
lever into the gear you wish. See “Shifting Out of
PARK
(P)” in the Index.
REVERSE (R): Use this gear to back up.
NOTICE:
Shifting to REVERSE (R) while your vehicle is
moving forward could damage your
transmission. Shift to REVERSE (R) only after
your vehicle is stopped.
To rock your vehicle back and forth to get out of snow,
ice or sand without damaging your transmission, see
“Stuck:
In Sand, Mud, Ice or Snow” in the Index.
2-11
,
ProCarManuals.com
Page 69 of 388
You can shift into FIRST (1) when you’re going less
than
20 mph (32 kdh). If you’ve come to a complete
stop and
it’s hard to shift into FIRST (l), put the shift
lever in NEUTRAL (N) and let up on the clutch. Press
the clutch pedal back down. Then shift into FIRST
(1).
SECOND (2): Press the clutch pedal as you let up on
the accelerator pedal and shift into SECOND (2). Then,
slowly let up on the clutch pedal as you press the
accelerator pedal.
THIRD (3), FOURTH (4), FIFTH (5): Shift into
THIRD
(3), FOURTH (4) and FIFTH (5) the same way
you do for SECOND
(2). Slowly let up on the clutch
pedal as
you press the accelerator pedal.
To stop let up on the accelerator pedal and press the
brake pedal. Just before the vehicle stops, press the
clutch pedal
and the brake pedal, and shift to
NEUTRAL (N).
NEUTRAL (N): Use this position when you start or
idle your engine.
REVERSE (R): To back up, press down the clutch
pedal and shift into REVERSE (R). Let up on the clutch
pedal slowly while pressing the accelerator pedal.
You cannot go from FIFTH
(5) into REVERSE (R). If
you try, you will be locked out. You must first shift into
NEUTRAL (N), move
the lever to the left, back to the
right, and then shift into REVERSE (R). This is a
safety feature.
I NOTICE: 1
Shift to REVERSE (R) only after your vehicle is
stopped. Shifting to REVERSE (R) while your
vehicle is moving could
damage your
transmission.
~~
Also, use REVERSE (R) along with the parking brake
for parking your vehicle.
2-15
ProCarManuals.com
Page 86 of 388
Flash-to-Pass
With the lever in the low-beam position, pull the lever
toward you to momenrarily switch to high beam (to
signal that
you are going to pass). When you release the
lever, the headlamps will return to low-beam operation.
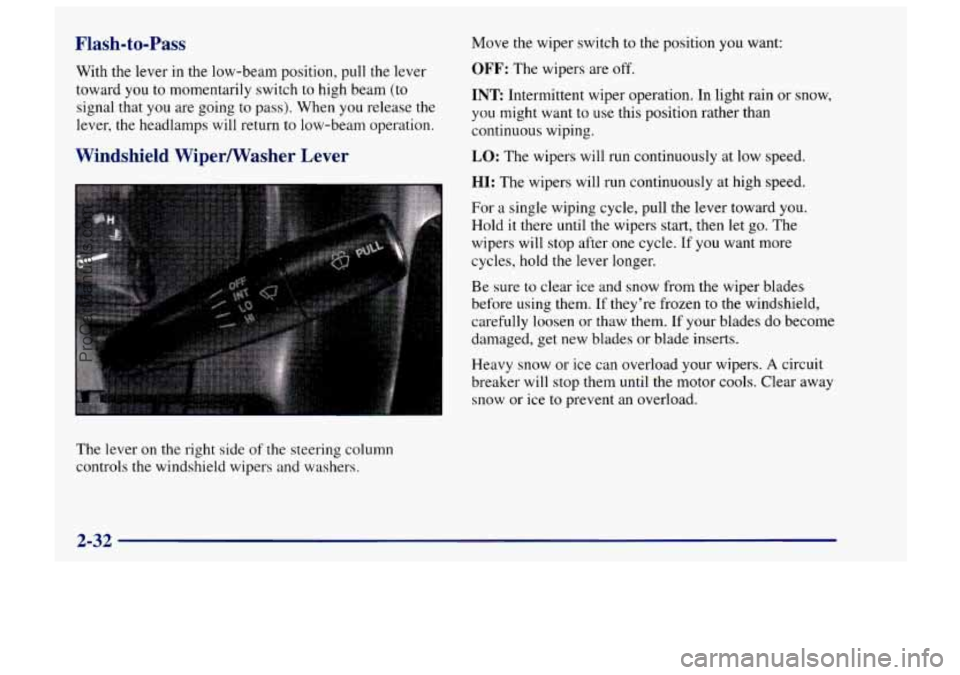
Windshield Wipermasher Lever
The lever on the right side of the steering column
controls the windshield wipers and washers. Move
the wiper switch to the position you want:
OFF: The wipers are off.
INT Intermittent wiper operation. In light rain or snow,
you might want to use this position rather than
continuous wiping.
LO: The wipers will run continuously at low speed.
HI: The wipers will run continuously at high speed.
For
a single wiping cycle, pull the lever toward you.
Hold it there until the wipers start, then let go. The
wipers will stop after one cycle. If you want more
cycles, hold the lever longer.
Be sure to clear ice and snow from the wiper blades
before using them. If they’re frozen to the windshield,
carefully loosen
or thaw them. If your blades do become
damaged, get new blades or blade inserts.
Heavy snow
or ice can overload your wipers. A circuit
breaker will stop them
until the motor cools. Clear away
snow or ice to prevent an overload.
2-32
ProCarManuals.com
Page 119 of 388
Anti-Lock Brake System Warning Light
(If Equipped)
ABS
With the anti-lock brake
system, this light will come
on when you start your
engine and it will stay
on for three seconds.
That’s normal.
If the light flashes when you’re driving, you don’t have
anti-lock brakes and there could be a problem with your
regular brakes. Pull
off the road and stop carefully. You
may notice that the pedal
is harder to push. Or, the pedal
may go closer to the floor.
It may take longer to stop.
Have the vehicle towed for service. (See “Towing Your
Vehicle” in the Index.)
A CAUTION:
Your regular brake system may not be working
properly if the anti-lock brake system warning
light is flashing. Driving with the anti-lock
brake system warning light flashing can lead to an accident. After you’ve pulled off the road
and stopped carefully, have the vehicle towed
for service.
If the anti-lock brake system warning light stays on
longer than normal after you’ve started your engine, turn
the ignition off. Or, if the light comes on and stays on
when you’re driving, stop as
soon as possible and turn
the ignition off. Then
start the engine again to reset the
system.
If the light still stays on, or comes on again
while you’re driving, your Geo needs service. If the
light is on but not flashing and the regular brake system
warning light isn’t on,
you still have brakes, but you
don’t have anti-lock brakes.
The anti-lock brake system warning light should come
on briefly when you turn the ignition key to
ON. If the
light doesn’t come
on then, have it fixed so it will be
ready to warn
you if there is a problem.
2-65
!
ProCarManuals.com
Page 122 of 388
If the Light Is Flashing If the Light Is On Steady
The following may prevent more serious damage to
your vehicle:
Reducing vehicle speed.
Avoiding hard accelerations.
Avoiding steep uphill grades.
If you are towing a trailer, reduce the amount of
cargo being hauled as soon as it is possible.
If the light stops flashing and remains on steady, see
“If
the Light Is On Steady” following.
If the light continues to flash, when it
is safe to do so,
stop
the vehicle. Find a safe place to park your vehicle.
Turn the key off, wait at least
10 seconds and restart the
engine. If the light remains on steady, see “If the Light
Is On Steady” following.
If the light is still flashing,
follow the previous steps, and drive the vehicle to your
dealer
or qualified service center for service. You
may be able to correct the emission system
malfunction by considering the following:
Did you recently put fuel into your vehicle?
If so, reinstall the fL1el cap, making sure to fully install
the cap. The diagnostic system can determine
if the fuel
cap has been left off or improperly installed.
A loose or
missing fuel cap
will allow fuel to evaporate into the
atmosphere. A few driving trips with the cap properly
installed should
turn the light off.
Did you just drive through a deep puddle of water?
If so, your electrical system may be wet. The condition
will usually be corrected when the electrical system
dries out. A few driving trips should
turn the light off.
Are you low on fuel?
As your engine starts to run out of fuel, your engine may
not run
as efficiently as designed since small amounts of
air are sucked into the fuel
line causing a misfire. The
system can detect this. Adding fuel should correct this
condition. Make sure to install the fuel cap properly. It
will take a few driving trips to turn the light off.
ProCarManuals.com
Page 139 of 388
Adjusting the Speakers
BAL: Turn ths control behind the FADE knob to move
the sound between the right and
left speakers. The middle
position balances the sound between the speakers.
FADE: Turn this knob to move the sound between the
front and rear speakers. The middle position balances
the sound between the speakers.
Playing a Cassette Tape
Your tape player is built to work best with tapes that are
30 to 45 minutes long on each side. Tapes longer than
that are
so thin they may not work well in this player.
The longer side with the tape visible should face
to the
right. If you hear nothing or hear just a garbled sound, it
may not be in squarely. Press STOP or EJECT to
remove the tape and start over.
Once the tape is playing, use the knobs for VOL, FADE,
TREB, BASS and BAL just as you do for the radio. The
lighted arrows show which side
of the tape is playing.
REW (1): Press this button to reverse the tape rapidly.
Press REW, RCL or STOP to return to playing speed.
RPT (2): Press this button to go to the beginning of the
selection and play it again. Press RPT again
to cancel
this function.
FF (3): Press this button to advance quickly to another
part
of the tape. Press FF, RCL or STOP to return to
playing speed.
PRV (4): Press this button to search for the previous
selection on the tape. Your tape must have at least three
or four seconds of silence between each selection for
PREV to work. Press NXT again
or press RCL, or
STOP to cancel this function.
RDM (5): When playing a tape, press this button during
FF or REW to hear the radio. Press it again to turn the
radio
off. During this operation, only TUNE, SEEK and
PSCAN will work.
NXT (6): Press this button to search for the next
selection
on the tape. Your tape must have at least three
or four seconds of silence between each selection for
NXT to work. Press NXT again or press RCL, or STOP
to cancel this function.
00: Press this button to reduce background noise from
tapes encoded with Dolby NR.
Dolby@ Noise Reduction is manufactured under a
license from Dolby Laboratories Licensing Corporation.
Dolby and the double-D symbol are trademarks of
Dolby Laboratories Licensing Corporation.
3-13
I
ProCarManuals.com
Page 140 of 388
MTL: Your bias is set automatically. MTL will appear
on the display when a metal or chrome tape
is inserted.
RCL: Press this button to switch from one side of the
tape to the other.
CD-TP: Press this button to switch between playing a
tape and a CD when both are inserted.
STOP: Press this button to stop the tape and switch to
the radio.
EJECT: Press this button to remove the tape and switch
to the radio.
If you leave a cassette tape in the player
while listening to the radio, it may become warm.
CLN: If this message appears on the display, the
cassette tape player needs
to be cleaned. It will still play
tapes, but you should clean it
as soon as possible to
prevent damage to the tapes and player. See “Care of
Your Cassette Tape Player”
in the Index. After you clean
the player, press and hold EJECT for five seconds to
reset the
CLN indicator. The radio will display --- to
show the indicator was reset.
Playing a Compact Disc
Don’t use the mini-discs (three-inch singles). They
won’t eject. Use full-size compact discs. With the
radio on, insert
a disc into the CD slot, label
side up. The player
will pull it in. The disc should
begin playing.
If you’re driving on a very rough road or if it’s very hot,
the disc may
not play and ERR (error) may appear on
the display. Press RCL to take ERR off the display.
When things get back to normal, the disc should play.
If
the disc comes out, it could be that:
The disc is upside down.
It is dirty, scratched or wet.
It is very humid. (If so, wait about an hour and
try again.
j
REW (1): Press and hold this button to quickly reverse
within a track. Release
it to play the passage.
RPT (2): Press this button once to hear a selection
over again.
FF (3): Press and hold this button to quickly advance
within a track. Release
it to resume playing.
PRV (4): Press this button to go to the start of a current
track.
If you hold the button, or press it more than once,
the player will continue moving back through the disc.
3-14
ProCarManuals.com