assembly CHEVROLET TRAILBLAZER 2021 Owner's Manual
[x] Cancel search | Manufacturer: CHEVROLET, Model Year: 2021, Model line: TRAILBLAZER, Model: CHEVROLET TRAILBLAZER 2021Pages: 363, PDF Size: 6.75 MB
Page 50 of 363
Chevrolet Trailblazer Owner Manual (GMNA-Localizing-U.S./Canada-
14400528) - 2021 - CRC - 11/7/19
Seats and Restraints 49
position. You can move the height adjuster
up by pushing up on the shoulder belt
guide.
After the adjuster is set to the desired
position, try to move it down without
pushing the release button to make sure it
has locked into position.
Seat Belt Pretensioners
This vehicle has seat belt pretensioners for
front outboard occupants. Although the seat
belt pretensioners cannot be seen, they are
part of the seat belt assembly. They can
help tighten the seat belts during the early
stages of a moderate to severe frontal, near
frontal, or rear crash if the threshold
conditions for pretensioner activation are
met. Seat belt pretensioners can also help
tighten the seat belts in a side crash or a
rollover event.
Pretensioners work only once. If the
pretensioners activate in a crash, the
pretensioners and probably other parts of
the vehicle’s seat belt system will need to
be replaced. SeeReplacing Seat Belt System
Parts after a Crash 050. Do not sit on the outboard seat belt while
entering or exiting the vehicle or at any
time while sitting in the seat. Sitting on the
seat belt can damage the webbing and
hardware.
Rear Seat Belt Comfort Guides
Rear seat belt comfort guides may provide
added seat belt comfort for older children
who have outgrown booster seats and for
some adults. When installed on a shoulder
belt, the comfort guide positions the
shoulder belt away from the neck and head.
Comfort guides are available through your
dealer for the rear outboard seating
positions. Instructions are included with the
guide.
Seat Belt Use During Pregnancy
Seat belts work for everyone, including
pregnant women. Like all occupants, they
are more likely to be seriously injured if
they do not wear seat belts.
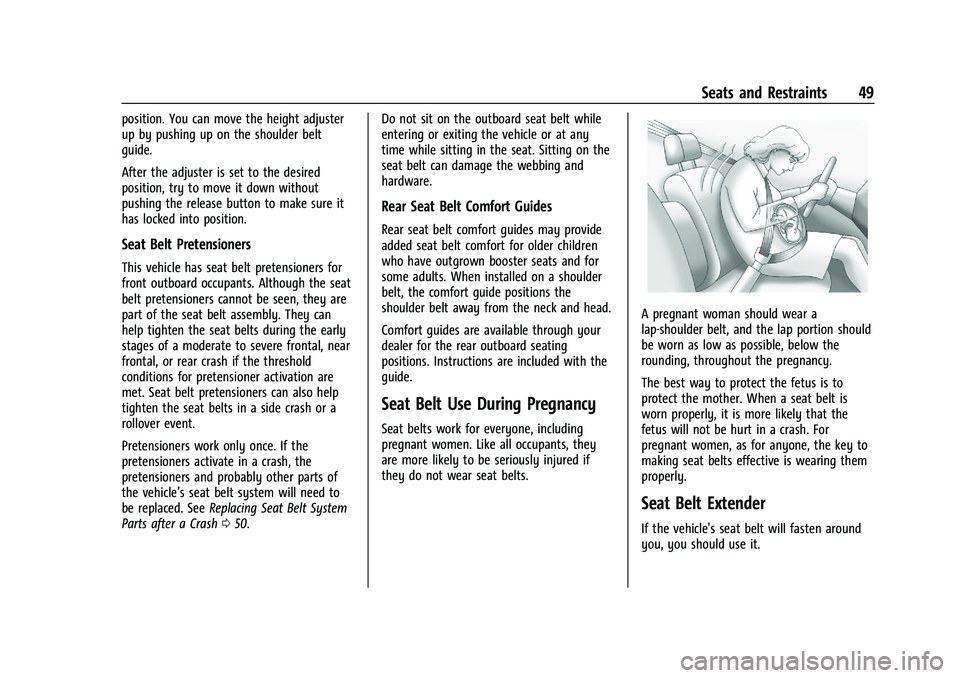
A pregnant woman should wear a
lap-shoulder belt, and the lap portion should
be worn as low as possible, below the
rounding, throughout the pregnancy.
The best way to protect the fetus is to
protect the mother. When a seat belt is
worn properly, it is more likely that the
fetus will not be hurt in a crash. For
pregnant women, as for anyone, the key to
making seat belts effective is wearing them
properly.
Seat Belt Extender
If the vehicle's seat belt will fasten around
you, you should use it.
Page 85 of 363
Chevrolet Trailblazer Owner Manual (GMNA-Localizing-U.S./Canada-
14400528) - 2021 - CRC - 11/7/19
84 Instruments and Controls
{Warning
In freezing weather, do not use the
washer until the windshield is warmed.
Otherwise the washer fluid can form ice
on the windshield, blocking your vision.
{Warning
Before driving the vehicle, always clear
snow and ice from the hood, windshield,
roof, and rear of the vehicle, including all
lamps and windows. Reduced visibility
from snow and ice buildup could lead to
a crash.
Wiper Parking
If the ignition is turned off while the wipers
are on LO, HI, or INT, they will
immediately stop.
If the windshield wiper lever is then moved
to OFF before the driver door is opened or
within 10 minutes, the wipers will restart
and move to the base of the windshield.
If the ignition is turned off while the wipers
are performing wipes due to windshield
washing, the wipers continue to run until
they reach the base of the windshield. Wiper Arm Assembly Protection
When using an automatic car wash, move
the windshield wiper lever to OFF.
The wiper operations return to normal when
the transmission is no longer in N (Neutral)
or the vehicle speed has increased.
Windshield Washere:
Pull the windshield wiper lever
toward you to spray windshield washer fluid
and activate the windshield wipers. The
wipers will continue until the lever is
released or the maximum wash time is
reached. When the windshield wiper lever is
released, additional wipes may occur
depending on how long the windshield
washer had been activated. See Washer
Fluid 0259 for information on filling the
windshield washer fluid reservoir.
Rear Window Wiper/Washer
The ignition must be on or in ACC/
ACCESSORY to operate the rear window
wiper/washer.
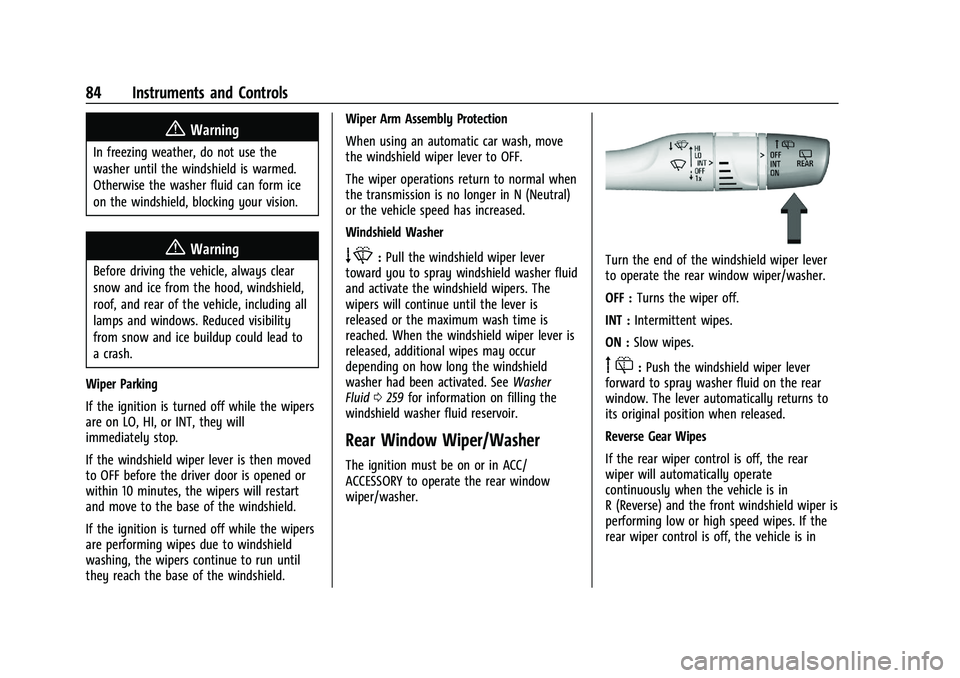
Turn the end of the windshield wiper lever
to operate the rear window wiper/washer.
OFF : Turns the wiper off.
INT : Intermittent wipes.
ON : Slow wipes.
f:Push the windshield wiper lever
forward to spray washer fluid on the rear
window. The lever automatically returns to
its original position when released.
Reverse Gear Wipes
If the rear wiper control is off, the rear
wiper will automatically operate
continuously when the vehicle is in
R (Reverse) and the front windshield wiper is
performing low or high speed wipes. If the
rear wiper control is off, the vehicle is in
Page 255 of 363
Chevrolet Trailblazer Owner Manual (GMNA-Localizing-U.S./Canada-
14400528) - 2021 - CRC - 11/7/19
254 Vehicle Care
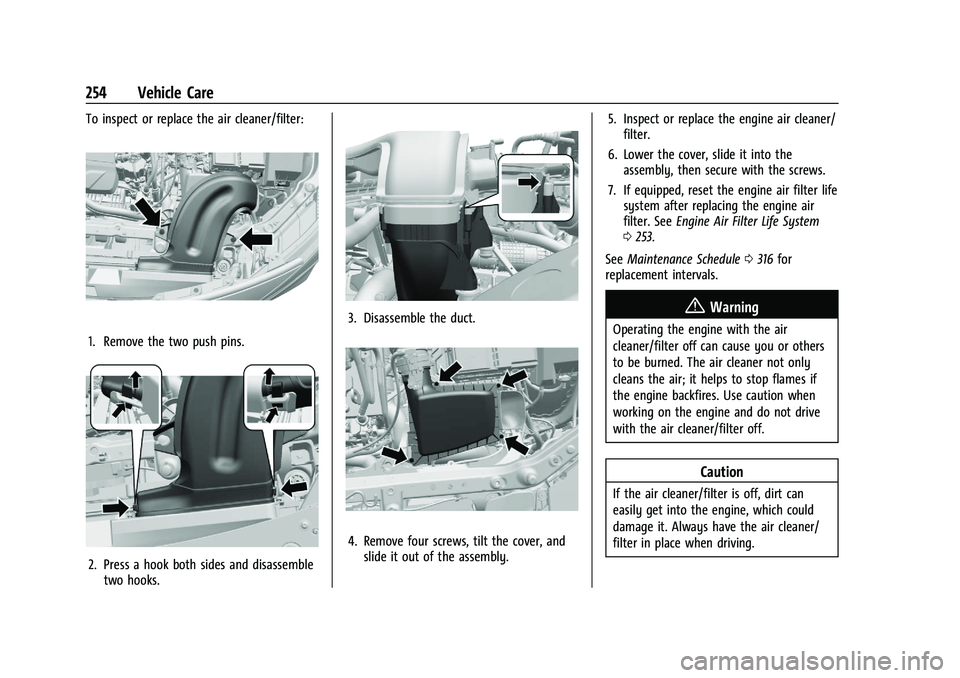
To inspect or replace the air cleaner/filter:
1. Remove the two push pins.
2. Press a hook both sides and disassembletwo hooks.
3. Disassemble the duct.
4. Remove four screws, tilt the cover, andslide it out of the assembly. 5. Inspect or replace the engine air cleaner/
filter.
6. Lower the cover, slide it into the assembly, then secure with the screws.
7. If equipped, reset the engine air filter life system after replacing the engine air
filter. See Engine Air Filter Life System
0 253.
See Maintenance Schedule 0316 for
replacement intervals.
{Warning
Operating the engine with the air
cleaner/filter off can cause you or others
to be burned. The air cleaner not only
cleans the air; it helps to stop flames if
the engine backfires. Use caution when
working on the engine and do not drive
with the air cleaner/filter off.
Caution
If the air cleaner/filter is off, dirt can
easily get into the engine, which could
damage it. Always have the air cleaner/
filter in place when driving.
Page 266 of 363
Chevrolet Trailblazer Owner Manual (GMNA-Localizing-U.S./Canada-
14400528) - 2021 - CRC - 11/7/19
Vehicle Care 265
Rear Wiper Blade Replacement
The rear wiper blade and wiper arm have a
cover for protection. The cover must be
removed before the wiper blade can be
replaced.
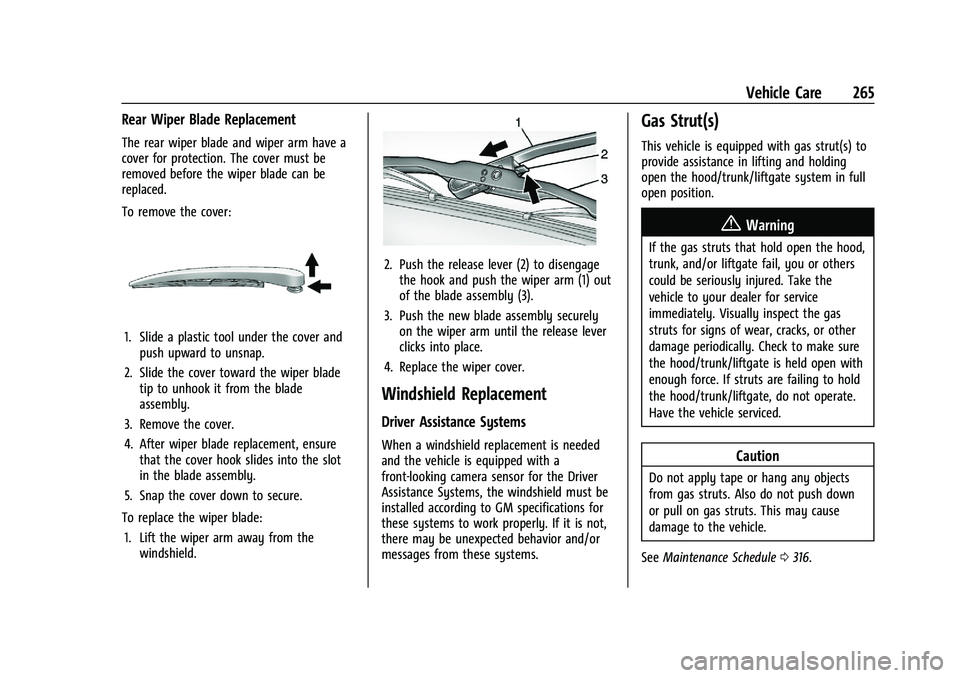
To remove the cover:
1. Slide a plastic tool under the cover andpush upward to unsnap.
2. Slide the cover toward the wiper blade tip to unhook it from the blade
assembly.
3. Remove the cover.
4. After wiper blade replacement, ensure that the cover hook slides into the slot
in the blade assembly.
5. Snap the cover down to secure.
To replace the wiper blade: 1. Lift the wiper arm away from the windshield.
2. Push the release lever (2) to disengagethe hook and push the wiper arm (1) out
of the blade assembly (3).
3. Push the new blade assembly securely on the wiper arm until the release lever
clicks into place.
4. Replace the wiper cover.
Windshield Replacement
Driver Assistance Systems
When a windshield replacement is needed
and the vehicle is equipped with a
front-looking camera sensor for the Driver
Assistance Systems, the windshield must be
installed according to GM specifications for
these systems to work properly. If it is not,
there may be unexpected behavior and/or
messages from these systems.
Gas Strut(s)
This vehicle is equipped with gas strut(s) to
provide assistance in lifting and holding
open the hood/trunk/liftgate system in full
open position.
{Warning
If the gas struts that hold open the hood,
trunk, and/or liftgate fail, you or others
could be seriously injured. Take the
vehicle to your dealer for service
immediately. Visually inspect the gas
struts for signs of wear, cracks, or other
damage periodically. Check to make sure
the hood/trunk/liftgate is held open with
enough force. If struts are failing to hold
the hood/trunk/liftgate, do not operate.
Have the vehicle serviced.
Caution
Do not apply tape or hang any objects
from gas struts. Also do not push down
or pull on gas struts. This may cause
damage to the vehicle.
See Maintenance Schedule 0316.
Page 268 of 363
Chevrolet Trailblazer Owner Manual (GMNA-Localizing-U.S./Canada-
14400528) - 2021 - CRC - 11/7/19
Vehicle Care 267
Desiccant (If equipped)
This vehicle as equipped with desiccant to
reduce fogging inside the headlamp due to
moisture.
The desiccant is consumable and its
performance may change based on the used
period and environment.
If fogging inside the headlamp due to
moisture continues for a long time, see your
dealer for service.
Halogen Bulbs
{Warning
Halogen bulbs have pressurized gas inside
and can burst if you drop or scratch the
bulb. You or others could be injured. Be
sure to read and follow the instructions
on the bulb package.
LED Lighting
This vehicle has several LED lamps. For
replacement of any LED lighting assembly,
contact your dealer.
Headlamps, Front Turn Signal,
Sidemarker, and Parking Lamps
(Base Level)
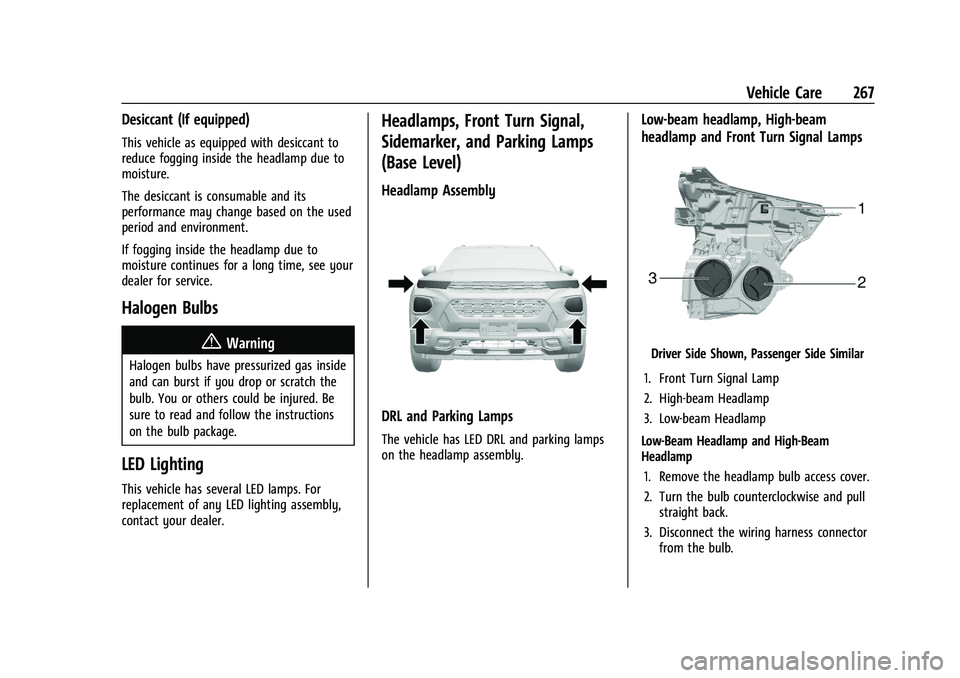
Headlamp Assembly
DRL and Parking Lamps
The vehicle has LED DRL and parking lamps
on the headlamp assembly.
Low-beam headlamp, High-beam
headlamp and Front Turn Signal Lamps
Driver Side Shown, Passenger Side Similar
1. Front Turn Signal Lamp
2. High-beam Headlamp
3. Low-beam Headlamp
Low-Beam Headlamp and High-Beam
Headlamp 1. Remove the headlamp bulb access cover.
2. Turn the bulb counterclockwise and pull straight back.
3. Disconnect the wiring harness connector from the bulb.
Page 269 of 363
Chevrolet Trailblazer Owner Manual (GMNA-Localizing-U.S./Canada-
14400528) - 2021 - CRC - 11/7/19
268 Vehicle Care
4. Install the new bulb in the headlampassembly by turning clockwise.
5. Reconnect the wiring harness connector.
6. Install the headlamp bulb access cover.
Front Turn Signal Lamp 1. Remove the bulb socket from the headlamp assembly.
2. Remove the old bulb from the bulb socket by pulling it straight out.
3. Insert a new bulb into the bulb socket.
4. Install the bulb socket into the taillamp assembly.Headlamps, Front Turn Signal,
Sidemarker, and Parking Lamps
(Uplevel)
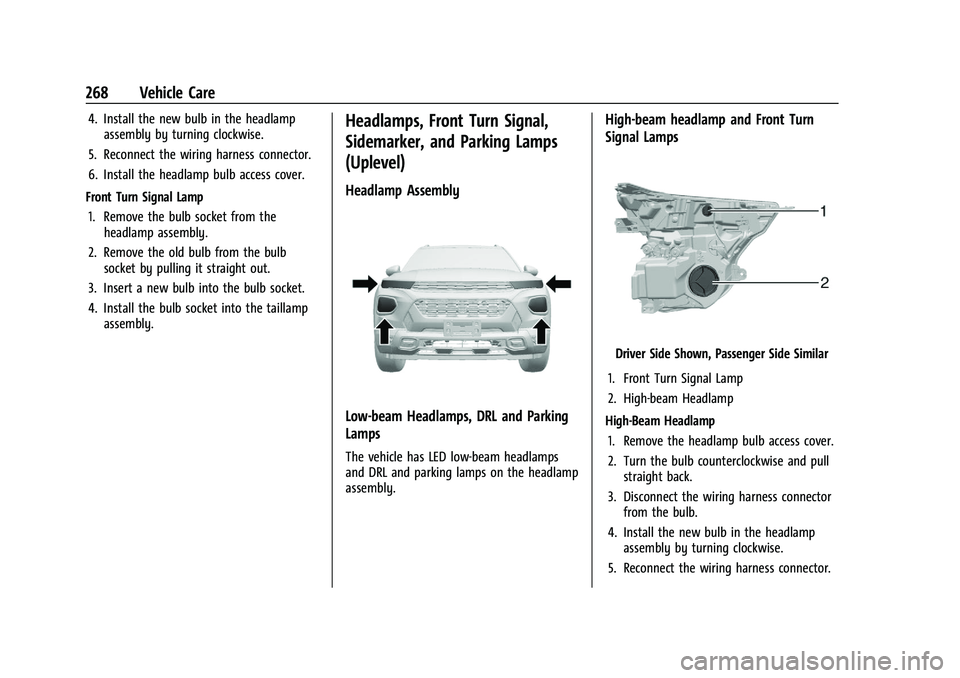
Headlamp Assembly
Low-beam Headlamps, DRL and Parking
Lamps
The vehicle has LED low-beam headlamps
and DRL and parking lamps on the headlamp
assembly.
High-beam headlamp and Front Turn
Signal Lamps
Driver Side Shown, Passenger Side Similar
1. Front Turn Signal Lamp
2. High-beam Headlamp
High-Beam Headlamp 1. Remove the headlamp bulb access cover.
2. Turn the bulb counterclockwise and pull straight back.
3. Disconnect the wiring harness connector from the bulb.
4. Install the new bulb in the headlamp assembly by turning clockwise.
5. Reconnect the wiring harness connector.
Page 270 of 363
Chevrolet Trailblazer Owner Manual (GMNA-Localizing-U.S./Canada-
14400528) - 2021 - CRC - 11/7/19
Vehicle Care 269
6. Install the headlamp bulb access cover.
Front Turn Signal Lamp 1. Remove the bulb socket from the headlamp assembly.
2. Remove the old bulb from the bulb socket by pulling it straight out.
3. Insert a new bulb into the bulb socket.
4. Install the bulb socket into the taillamp assembly.
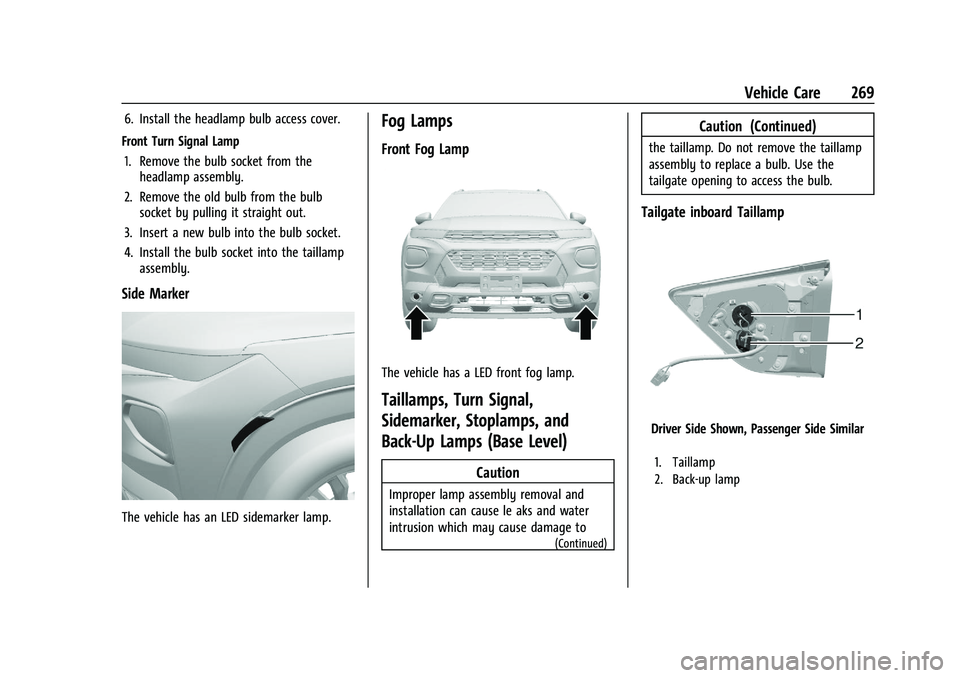
Side Marker
The vehicle has an LED sidemarker lamp.
Fog Lamps
Front Fog Lamp
The vehicle has a LED front fog lamp.
Taillamps, Turn Signal,
Sidemarker, Stoplamps, and
Back-Up Lamps (Base Level)
Caution
Improper lamp assembly removal and
installation can cause le aks and water
intrusion which may cause damage to
(Continued)
Caution (Continued)
the taillamp. Do not remove the taillamp
assembly to replace a bulb. Use the
tailgate opening to access the bulb.
Tailgate inboard Taillamp
Driver Side Shown, Passenger Side Similar
1. Taillamp
2. Back-up lamp
Page 271 of 363
Chevrolet Trailblazer Owner Manual (GMNA-Localizing-U.S./Canada-
14400528) - 2021 - CRC - 11/7/19
270 Vehicle Care
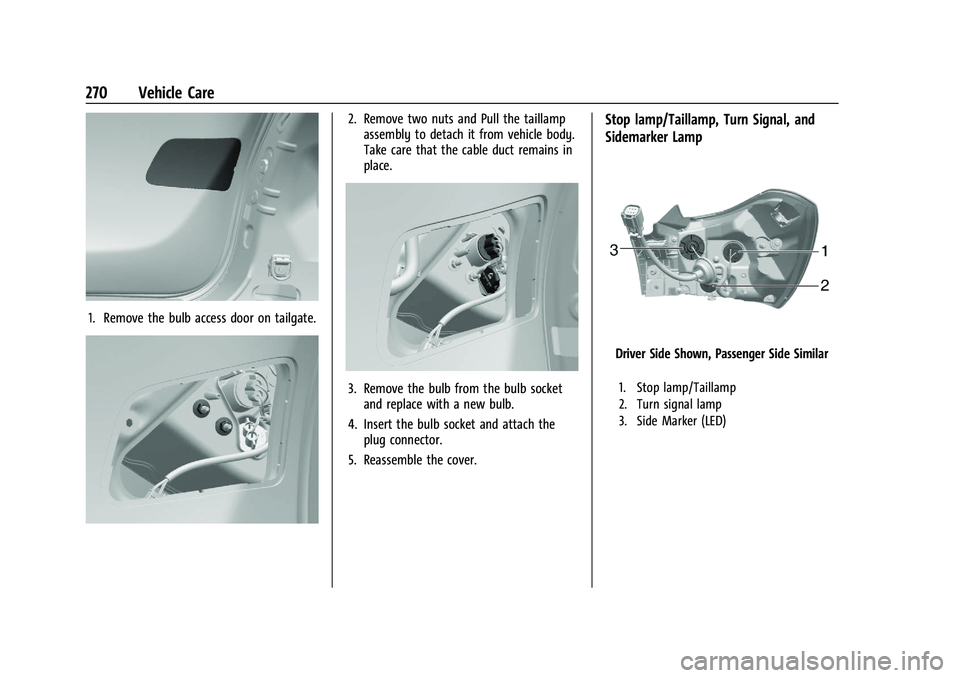
1. Remove the bulb access door on tailgate.
2. Remove two nuts and Pull the taillampassembly to detach it from vehicle body.
Take care that the cable duct remains in
place.
3. Remove the bulb from the bulb socketand replace with a new bulb.
4. Insert the bulb socket and attach the plug connector.
5. Reassemble the cover.
Stop lamp/Taillamp, Turn Signal, and
Sidemarker Lamp
Driver Side Shown, Passenger Side Similar
1. Stop lamp/Taillamp
2. Turn signal lamp
3. Side Marker (LED)
Page 272 of 363
Chevrolet Trailblazer Owner Manual (GMNA-Localizing-U.S./Canada-
14400528) - 2021 - CRC - 11/7/19
Vehicle Care 271
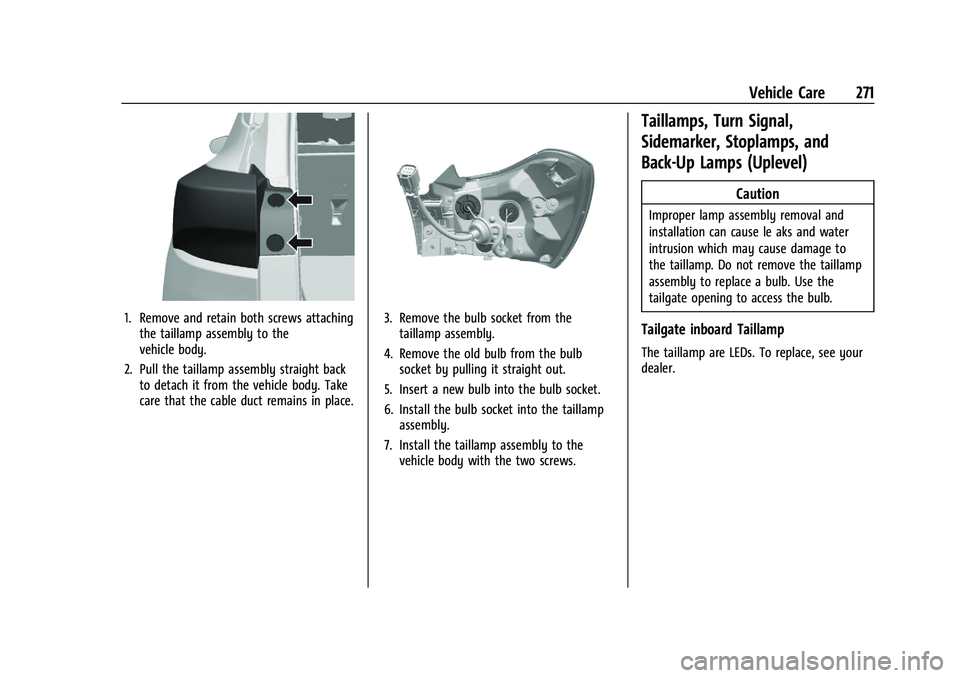
1. Remove and retain both screws attachingthe taillamp assembly to the
vehicle body.
2. Pull the taillamp assembly straight back to detach it from the vehicle body. Take
care that the cable duct remains in place.3. Remove the bulb socket from thetaillamp assembly.
4. Remove the old bulb from the bulb socket by pulling it straight out.
5. Insert a new bulb into the bulb socket.
6. Install the bulb socket into the taillamp assembly.
7. Install the taillamp assembly to the vehicle body with the two screws.
Taillamps, Turn Signal,
Sidemarker, Stoplamps, and
Back-Up Lamps (Uplevel)
Caution
Improper lamp assembly removal and
installation can cause le aks and water
intrusion which may cause damage to
the taillamp. Do not remove the taillamp
assembly to replace a bulb. Use the
tailgate opening to access the bulb.
Tailgate inboard Taillamp
The taillamp are LEDs. To replace, see your
dealer.
Page 273 of 363
Chevrolet Trailblazer Owner Manual (GMNA-Localizing-U.S./Canada-
14400528) - 2021 - CRC - 11/7/19
272 Vehicle Care
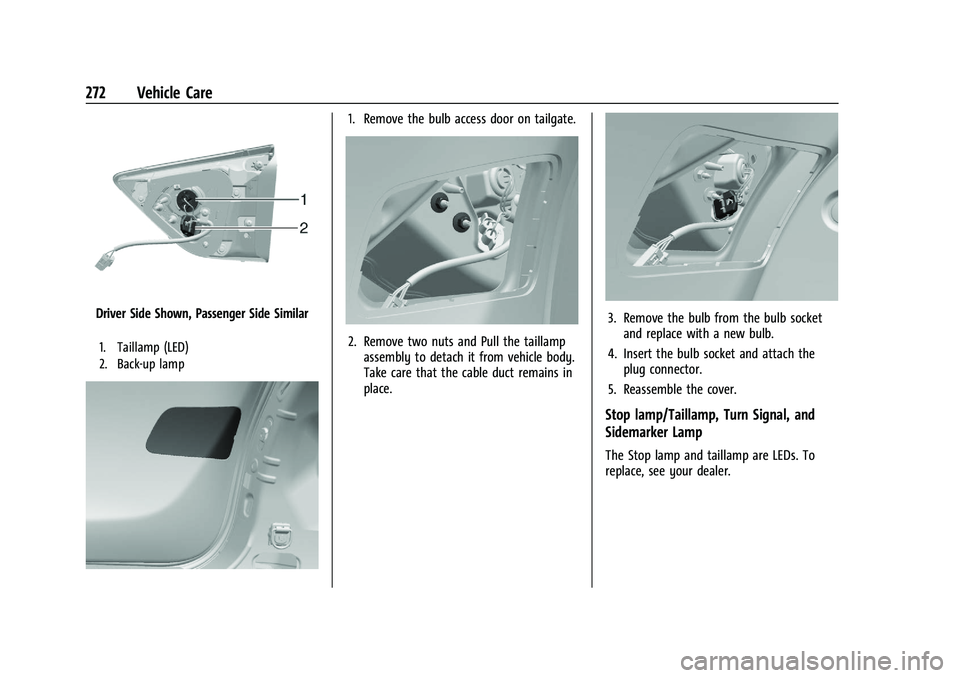
Driver Side Shown, Passenger Side Similar
1. Taillamp (LED)
2. Back-up lamp
1. Remove the bulb access door on tailgate.
2. Remove two nuts and Pull the taillampassembly to detach it from vehicle body.
Take care that the cable duct remains in
place.
3. Remove the bulb from the bulb socketand replace with a new bulb.
4. Insert the bulb socket and attach the plug connector.
5. Reassemble the cover.
Stop lamp/Taillamp, Turn Signal, and
Sidemarker Lamp
The Stop lamp and taillamp are LEDs. To
replace, see your dealer.