door lock CHEVROLET TRAILBLAZER 2022 Owner's Manual
[x] Cancel search | Manufacturer: CHEVROLET, Model Year: 2022, Model line: TRAILBLAZER, Model: CHEVROLET TRAILBLAZER 2022Pages: 363, PDF Size: 6.76 MB
Page 43 of 363
Chevrolet Trailblazer Owner Manual (GMNA-Localizing-U.S./Canada-
14400528) - 2021 - CRC - 11/7/19
42 Seats and Restraints
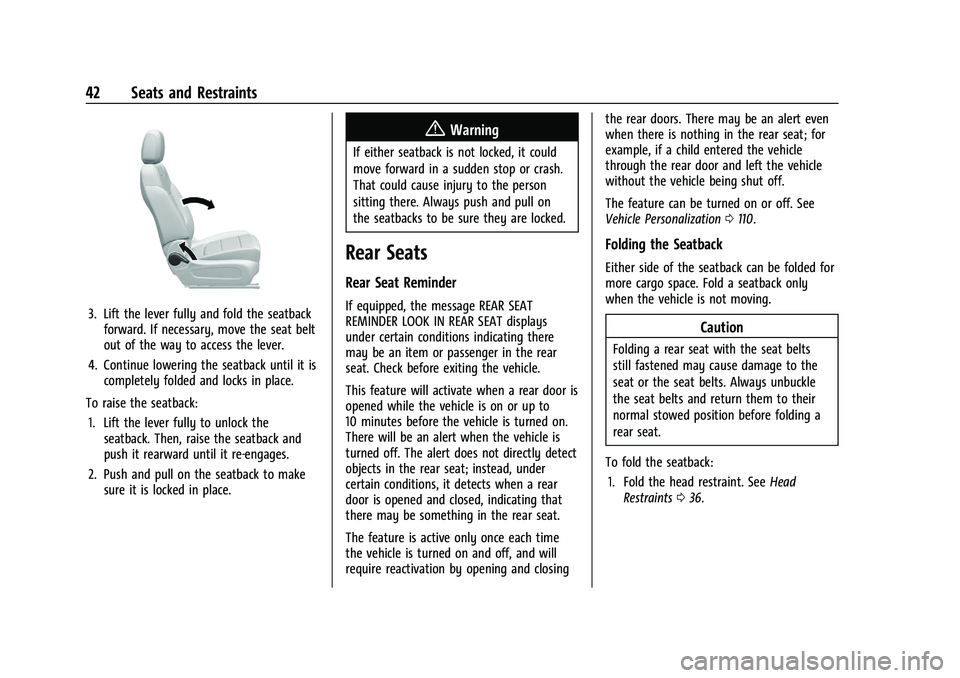
3. Lift the lever fully and fold the seatbackforward. If necessary, move the seat belt
out of the way to access the lever.
4. Continue lowering the seatback until it is completely folded and locks in place.
To raise the seatback: 1. Lift the lever fully to unlock the seatback. Then, raise the seatback and
push it rearward until it re-engages.
2. Push and pull on the seatback to make sure it is locked in place.
{Warning
If either seatback is not locked, it could
move forward in a sudden stop or crash.
That could cause injury to the person
sitting there. Always push and pull on
the seatbacks to be sure they are locked.
Rear Seats
Rear Seat Reminder
If equipped, the message REAR SEAT
REMINDER LOOK IN REAR SEAT displays
under certain conditions indicating there
may be an item or passenger in the rear
seat. Check before exiting the vehicle.
This feature will activate when a rear door is
opened while the vehicle is on or up to
10 minutes before the vehicle is turned on.
There will be an alert when the vehicle is
turned off. The alert does not directly detect
objects in the rear seat; instead, under
certain conditions, it detects when a rear
door is opened and closed, indicating that
there may be something in the rear seat.
The feature is active only once each time
the vehicle is turned on and off, and will
require reactivation by opening and closing the rear doors. There may be an alert even
when there is nothing in the rear seat; for
example, if a child entered the vehicle
through the rear door and left the vehicle
without the vehicle being shut off.
The feature can be turned on or off. See
Vehicle Personalization
0110.
Folding the Seatback
Either side of the seatback can be folded for
more cargo space. Fold a seatback only
when the vehicle is not moving.
Caution
Folding a rear seat with the seat belts
still fastened may cause damage to the
seat or the seat belts. Always unbuckle
the seat belts and return them to their
normal stowed position before folding a
rear seat.
To fold the seatback: 1. Fold the head restraint. See Head
Restraints 036.
Page 49 of 363
Chevrolet Trailblazer Owner Manual (GMNA-Localizing-U.S./Canada-
14400528) - 2021 - CRC - 11/7/19
48 Seats and Restraints
4. If equipped with a shoulder belt heightadjuster, move it to the height that is
right for you. See “Shoulder Belt Height
Adjuster” later in this section for
instructions on use and important safety
information.
5. To make the lap part tight, pull up on the shoulder belt.
It may be necessary to pull stitching on the
seat belt through the latch plate to fully
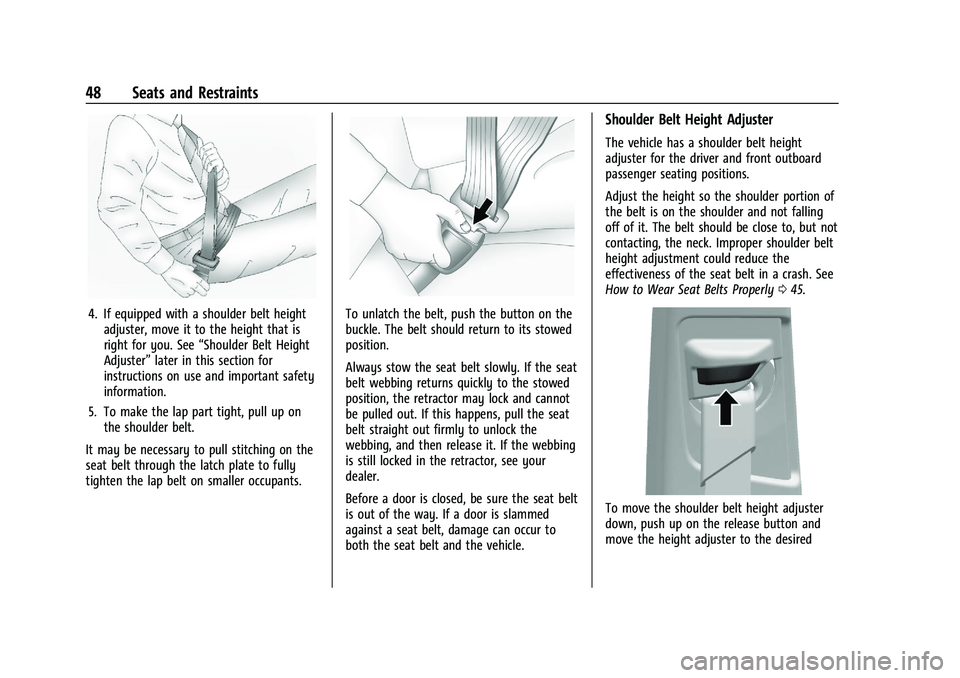
tighten the lap belt on smaller occupants.To unlatch the belt, push the button on the
buckle. The belt should return to its stowed
position.
Always stow the seat belt slowly. If the seat
belt webbing returns quickly to the stowed
position, the retractor may lock and cannot
be pulled out. If this happens, pull the seat
belt straight out firmly to unlock the
webbing, and then release it. If the webbing
is still locked in the retractor, see your
dealer.
Before a door is closed, be sure the seat belt
is out of the way. If a door is slammed
against a seat belt, damage can occur to
both the seat belt and the vehicle.
Shoulder Belt Height Adjuster
The vehicle has a shoulder belt height
adjuster for the driver and front outboard
passenger seating positions.
Adjust the height so the shoulder portion of
the belt is on the shoulder and not falling
off of it. The belt should be close to, but not
contacting, the neck. Improper shoulder belt
height adjustment could reduce the
effectiveness of the seat belt in a crash. See
How to Wear Seat Belts Properly 045.
To move the shoulder belt height adjuster
down, push up on the release button and
move the height adjuster to the desired
Page 54 of 363
Chevrolet Trailblazer Owner Manual (GMNA-Localizing-U.S./Canada-
14400528) - 2021 - CRC - 11/7/19
Seats and Restraints 53
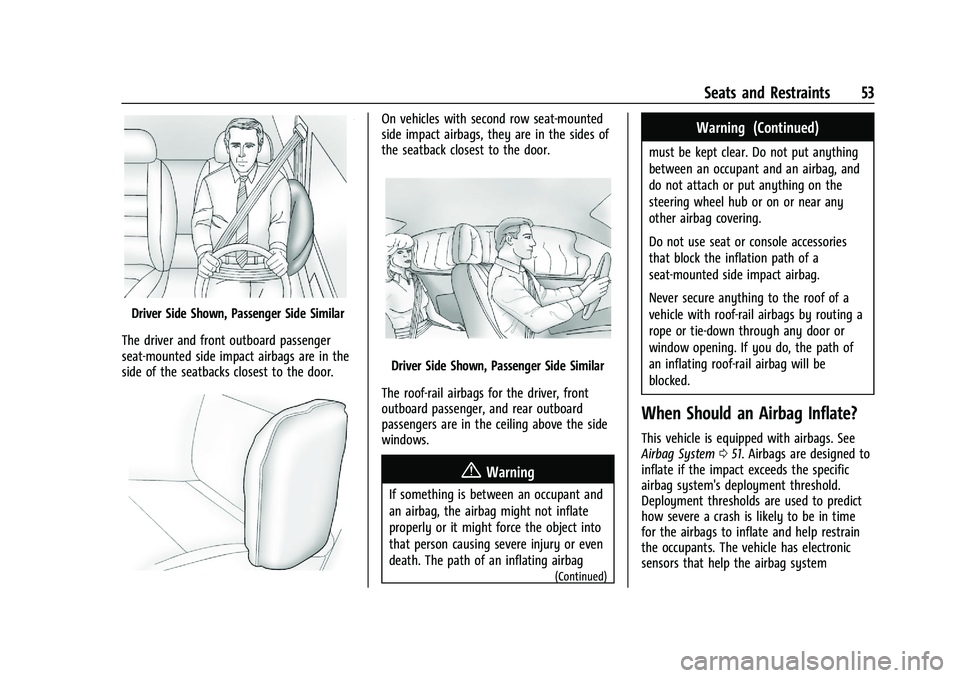
Driver Side Shown, Passenger Side Similar
The driver and front outboard passenger
seat-mounted side impact airbags are in the
side of the seatbacks closest to the door.
On vehicles with second row seat-mounted
side impact airbags, they are in the sides of
the seatback closest to the door.
Driver Side Shown, Passenger Side Similar
The roof-rail airbags for the driver, front
outboard passenger, and rear outboard
passengers are in the ceiling above the side
windows.
{Warning
If something is between an occupant and
an airbag, the airbag might not inflate
properly or it might force the object into
that person causing severe injury or even
death. The path of an inflating airbag
(Continued)
Warning (Continued)
must be kept clear. Do not put anything
between an occupant and an airbag, and
do not attach or put anything on the
steering wheel hub or on or near any
other airbag covering.
Do not use seat or console accessories
that block the inflation path of a
seat-mounted side impact airbag.
Never secure anything to the roof of a
vehicle with roof-rail airbags by routing a
rope or tie-down through any door or
window opening. If you do, the path of
an inflating roof-rail airbag will be
blocked.
When Should an Airbag Inflate?
This vehicle is equipped with airbags. See
Airbag System 051. Airbags are designed to
inflate if the impact exceeds the specific
airbag system's deployment threshold.
Deployment thresholds are used to predict
how severe a crash is likely to be in time
for the airbags to inflate and help restrain
the occupants. The vehicle has electronic
sensors that help the airbag system
Page 56 of 363
Chevrolet Trailblazer Owner Manual (GMNA-Localizing-U.S./Canada-
14400528) - 2021 - CRC - 11/7/19
Seats and Restraints 55
Rollover capable roof-rail airbags are
designed to help contain the head and chest
of occupants in the outboard seating
positions in the first and second rows. The
rollover capable roof-rail airbags are
designed to help reduce the risk of full or
partial ejection in rollover events, although
no system can prevent all such ejections.
But airbags would not help in many types
of collisions, primarily because the
occupant's motion is not toward those
airbags. SeeWhen Should an Airbag Inflate?
0 53.
Airbags should never be regarded as
anything more than a supplement to seat
belts.
What Will You See after an
Airbag Inflates?
After frontal, knee, and seat-mounted side
impact airbags inflate, they quickly deflate,
so quickly that some people may not even
realize the airbags inflated.
Roof-rail airbags may still be at least
partially inflated for some time after they
inflate. Some components of the airbag module
may be hot for several minutes. For location
of the airbags, see
Where Are the Airbags?
0 52.
The parts of the airbag that come into
contact with you may be warm, but not too
hot to touch. There may be some smoke
and dust coming from the vents in the
deflated airbags. Airbag inflation does not
prevent the driver from seeing out of the
windshield or being able to steer the
vehicle, nor does it prevent people from
leaving the vehicle.
{Warning
When an airbag inflates, there may be
dust in the air. This dust could cause
breathing problems for people with a
history of asthma or other breathing
trouble. To avoid this, everyone in the
vehicle should get out as soon as it is
safe to do so. If you have breathing
problems but cannot get out of the
vehicle after an airbag inflates, then get
fresh air by opening a window or a door.
If you experience breathing problems
following an airbag deployment, you
should seek medical attention. The vehicle has a feature that may
automatically unlock the doors, turn on the
interior lamps and hazard warning flashers,
and shut off the fuel system after the
airbags inflate. The feature may also
activate, without airbag inflation, after an
event that exceeds a predetermined
threshold. After turning the ignition off and
then on again, the fuel system will return to
normal operation; the doors can be locked,
the interior lamps can be turned off, and
the hazard warning flashers can be turned
off using the controls for those features.
If any of these systems are damaged in the
crash they may not operate as normal.{Warning
A crash severe enough to inflate the
airbags may have also damaged
important functions in the vehicle, such
as the fuel system, brake and steering
systems, etc. Even if the vehicle appears
to be drivable after a moderate crash,
there may be concealed damage that
could make it difficult to safely operate
the vehicle.
(Continued)
Page 83 of 363
Chevrolet Trailblazer Owner Manual (GMNA-Localizing-U.S./Canada-
14400528) - 2021 - CRC - 11/7/19
82 Instruments and Controls
Instruments and Controls
Controls
Steering Wheel Adjustment . . . . . . . . . . . . 83
Steering Wheel Controls . . . . . . . . . . . . . . . . 83
Horn . . . . . . . . . . . . . . . . . . . . . . . . . . . . . . . . . . . 83
Windshield Wiper/Washer . . . . . . . . . . . . . . 83
Rear Window Wiper/Washer . . . . . . . . . . . 84
Compass . . . . . . . . . . . . . . . . . . . . . . . . . . . . . . . . 85
Clock . . . . . . . . . . . . . . . . . . . . . . . . . . . . . . . . . . . 85
Power Outlets . . . . . . . . . . . . . . . . . . . . . . . . . . 85
Wireless Charging . . . . . . . . . . . . . . . . . . . . . . 86
Warning Lights, Gauges, and Indicators
Warning Lights, Gauges, andIndicators . . . . . . . . . . . . . . . . . . . . . . . . . . . . . 88
Instrument Cluster . . . . . . . . . . . . . . . . . . . . . 89
Speedometer . . . . . . . . . . . . . . . . . . . . . . . . . . . 92
Odometer . . . . . . . . . . . . . . . . . . . . . . . . . . . . . . 93
Trip Odometer . . . . . . . . . . . . . . . . . . . . . . . . . 93
Tachometer . . . . . . . . . . . . . . . . . . . . . . . . . . . . 93
Fuel Gauge . . . . . . . . . . . . . . . . . . . . . . . . . . . . . 93
Engine Coolant Temperature Gauge . . . . 94
Seat Belt Reminders . . . . . . . . . . . . . . . . . . . . 94
Airbag Readiness Light . . . . . . . . . . . . . . . . . 95
Passenger Airbag Status Indicator . . . . . . 95
Charging System Light . . . . . . . . . . . . . . . . . 96
Malfunction Indicator Lamp (Check Engine Light) . . . . . . . . . . . . . . . . . . . . . . . . . 96 Brake System Warning Light . . . . . . . . . . . 98
Electric Parking Brake Light . . . . . . . . . . . . . 98
Service Electric Parking Brake Light . . . . . 99
Antilock Brake System (ABS) Warning
Light . . . . . . . . . . . . . . . . . . . . . . . . . . . . . . . . . 99
All-Wheel-Drive Light . . . . . . . . . . . . . . . . . . . 99
Sport Mode Light . . . . . . . . . . . . . . . . . . . . . 100
Lane Keep Assist (LKA) Light . . . . . . . . . . 100
Vehicle Ahead Indicator . . . . . . . . . . . . . . . 100
Pedestrian Ahead Indicator . . . . . . . . . . . . 100
Traction Off Light . . . . . . . . . . . . . . . . . . . . . 100
StabiliTrak OFF Light . . . . . . . . . . . . . . . . . . . 101
Traction Control System (TCS)/ StabiliTrak Light . . . . . . . . . . . . . . . . . . . . . . 101
Tire Pressure Light . . . . . . . . . . . . . . . . . . . . . 101
Engine Oil Pressure Light . . . . . . . . . . . . . . 102
Low Fuel Warning Light . . . . . . . . . . . . . . . 102
Security Light . . . . . . . . . . . . . . . . . . . . . . . . . . 102
High-Beam On Light . . . . . . . . . . . . . . . . . . . 103
Front Fog Lamp Light . . . . . . . . . . . . . . . . . . 103
Lamps On Reminder . . . . . . . . . . . . . . . . . . . 103
Cruise Control Light . . . . . . . . . . . . . . . . . . . 103
Door Ajar Light . . . . . . . . . . . . . . . . . . . . . . . . 104
Information Displays
Driver Information Center (DIC) (Base Level) . . . . . . . . . . . . . . . . . . . . . . . . . . . . . . . . 104
Driver Information Center (DIC) (Uplevel) . . . . . . . . . . . . . . . . . . . . . . . . . . . . . 107
Vehicle Messages
Vehicle Messages . . . . . . . . . . . . . . . . . . . . . 109
Engine Power Messages . . . . . . . . . . . . . . . 110
Vehicle Speed Messages . . . . . . . . . . . . . . . 110
Vehicle Personalization
Vehicle Personalization . . . . . . . . . . . . . . . . . 110
Page 85 of 363
Chevrolet Trailblazer Owner Manual (GMNA-Localizing-U.S./Canada-
14400528) - 2021 - CRC - 11/7/19
84 Instruments and Controls
{Warning
In freezing weather, do not use the
washer until the windshield is warmed.
Otherwise the washer fluid can form ice
on the windshield, blocking your vision.
{Warning
Before driving the vehicle, always clear
snow and ice from the hood, windshield,
roof, and rear of the vehicle, including all
lamps and windows. Reduced visibility
from snow and ice buildup could lead to
a crash.
Wiper Parking
If the ignition is turned off while the wipers
are on LO, HI, or INT, they will
immediately stop.
If the windshield wiper lever is then moved
to OFF before the driver door is opened or
within 10 minutes, the wipers will restart
and move to the base of the windshield.
If the ignition is turned off while the wipers
are performing wipes due to windshield
washing, the wipers continue to run until
they reach the base of the windshield. Wiper Arm Assembly Protection
When using an automatic car wash, move
the windshield wiper lever to OFF.
The wiper operations return to normal when
the transmission is no longer in N (Neutral)
or the vehicle speed has increased.
Windshield Washere:
Pull the windshield wiper lever
toward you to spray windshield washer fluid
and activate the windshield wipers. The
wipers will continue until the lever is
released or the maximum wash time is
reached. When the windshield wiper lever is
released, additional wipes may occur
depending on how long the windshield
washer had been activated. See Washer
Fluid 0259 for information on filling the
windshield washer fluid reservoir.
Rear Window Wiper/Washer
The ignition must be on or in ACC/
ACCESSORY to operate the rear window
wiper/washer.
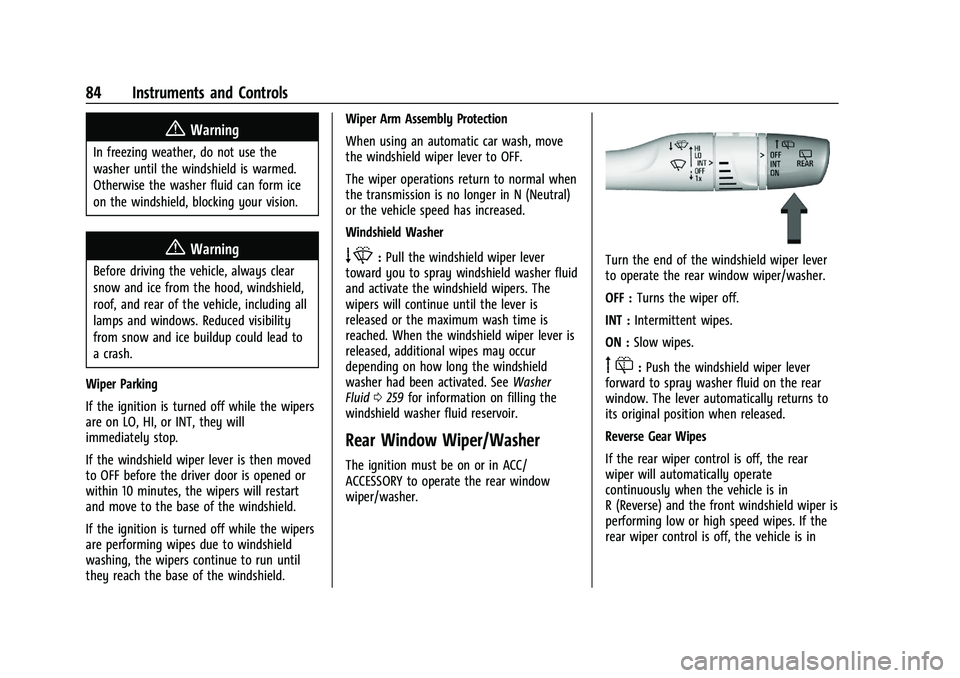
Turn the end of the windshield wiper lever
to operate the rear window wiper/washer.
OFF : Turns the wiper off.
INT : Intermittent wipes.
ON : Slow wipes.
f:Push the windshield wiper lever
forward to spray washer fluid on the rear
window. The lever automatically returns to
its original position when released.
Reverse Gear Wipes
If the rear wiper control is off, the rear
wiper will automatically operate
continuously when the vehicle is in
R (Reverse) and the front windshield wiper is
performing low or high speed wipes. If the
rear wiper control is off, the vehicle is in
Page 113 of 363
Chevrolet Trailblazer Owner Manual (GMNA-Localizing-U.S./Canada-
14400528) - 2021 - CRC - 11/7/19
112 Instruments and Controls
Hands Free Liftgate Control
The liftgate may be operated with a kicking
motion under the left side of the rear
bumper. SeeLiftgate022
Touch Off, On-Open and Close,
or On-Open Only.
Auto Wipe in Reverse Gear
This setting automatically turns on the rear
window wiper when the vehicle is in
R (Reverse) and the front wipers are on.
Touch Off or On.
Extended Hill Start Assist
This allows the duration of the Hill Start
Assist to be changed.
Touch Extended Hold or Standard Hold.
Lighting
Touch and the following may display:
.Vehicle Locator Lights
.Exit Lighting
Vehicle Locator Lights
This feature will flash the exterior lamps
when
Kon the Remote Keyless Entry (RKE)
transmitter is pressed to locate the vehicle.
Touch Off or On. Exit Lighting
This allows the selection of how long the
exterior lamps stay on when leaving the
vehicle when it is dark outside.
Touch Off, 30 Seconds, 60 Seconds, or 120
Seconds.
Power Door Locks
Touch and the following may display:
.Open Door Anti Lock Out
.Auto Door Unlock
.Delayed Door Lock
Open Door Anti Lock Out
This setting prevents the driver door from
locking when the door is open. If this
setting is on, the Delayed Door Lock menu
will not be available.
Touch Off or On.
Auto Door Unlock
This setting allows you to select which
doors will automatically unlock when the
vehicle is shifted into P (Park).
Touch Off, All Doors, or Driver Door. Delayed Door Lock
This setting delays the locking of the doors.
To override the delay, press the power door
lock switch on the door.
Touch Off or On.
Remote Lock, Unlock, Start
Touch and the following may display:
.Remote Unlock Light Feedback
.Remote Lock Feedback
.Remote Door Unlock
.Remote Start Auto Heat Seats
.Passive Door Unlock
.Passive Door Lock
.Remote Left in Vehicle Alert
Remote Unlock Light Feedback
This setting flashes the exterior lamps when
you remotely unlock the vehicle.
Touch Off or Flash Lights.
Remote Lock Feedback
This setting specifies how the vehicle
responds when you remotely lock the
vehicle.
Touch Off, Lights and Horn, Lights Only,
or Horn Only.
Page 114 of 363
Chevrolet Trailblazer Owner Manual (GMNA-Localizing-U.S./Canada-
14400528) - 2021 - CRC - 11/7/19
Instruments and Controls 113
Remote Door Unlock
This setting specifies whether all doors,
or just the driver door, unlock when pressing
Kon the RKE transmitter.
Touch All Doors or Driver Door.
Remote Start Auto Heat Seats
This setting automatically turns on the
heated seats when using the remote start
function on cold days.
Touch Off or On.
Passive Door Unlock
This setting specifies which doors unlock
when using the button on the driver door
handle to unlock the vehicle.
Touch All Doors or Driver Door Only.
Passive Door Lock
This setting specifies whether the vehicle
will automatically lock, or lock and alert you
after all the doors are closed, and you walk
away from the vehicle with the RKE
transmitter. See Remote Keyless Entry (RKE)
System Operation (Key Access) 09or
Remote Keyless Entry (RKE) System
Operation (Keyless Access) 011.
Touch Off, On with Horn Chirp, or On. Remote Left in Vehicle Alert
This feature sounds an alert when the RKE
transmitter is left in the vehicle. This menu
also enables Remote No Longer in Vehicle
Alert.
Touch Off or On.
Teen Driver
See
Teen Driver 0162.
Valet Mode
This will lock the infotainment system and
steering wheel controls. It may also limit
access to vehicle storage locations,
if equipped.
To enable valet mode:
1. Enter a four-digit code on the keypad.
2. Touch Enter to go to the confirmation screen.
3. Re-enter the four-digit code.
Touch Lock or Unlock to lock or unlock the
system. Touch Back to go back to the
previous menu.
Page 119 of 363

Chevrolet Trailblazer Owner Manual (GMNA-Localizing-U.S./Canada-
14400528) - 2021 - CRC - 11/7/19
118 Lighting
Interior Lighting
Instrument Panel Illumination
Control
The brightness of the instrument cluster
display, infotainment display and controls,
steering wheel controls, and all other
illuminated controls, as well as feature
status indicators can be adjusted.
The knob for this feature is on the
instrument panel beside the steering
column.
Push the knob in all the way until it extends
out and then turn the knob clockwise or
counterclockwise to brighten or dim the
lights.
Courtesy Lamps
Courtesy lamps come on when any door is
opened, the
Kon the remote key is
pressed, or when the ignition is
switched off.
Dome Lamps
The front dome lamp controls are in the
overhead console.
(: Press to turn the lamps off, even when
a door is open.
H: When the button is returned to the
middle position, the lamps turn on
automatically when a door is opened.
': Press to turn on the dome lamps.
If equipped, the rear dome lamp controls are
in the headliner above the rear seats.
Reading Lamps
There are reading lamps on the overhead
console and over the rear seats. These lamps
come on when any door is opened.
Page 192 of 363
Chevrolet Trailblazer Owner Manual (GMNA-Localizing-U.S./Canada-
14400528) - 2021 - CRC - 11/7/19
Driving and Operating 191
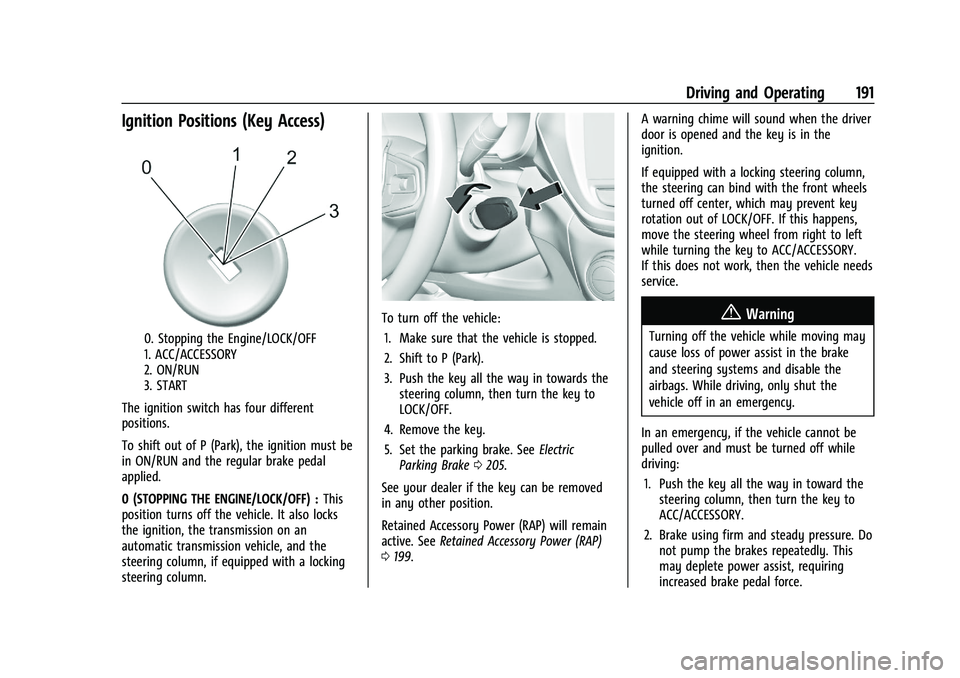
Ignition Positions (Key Access)
0. Stopping the Engine/LOCK/OFF
1. ACC/ACCESSORY
2. ON/RUN
3. START
The ignition switch has four different
positions.
To shift out of P (Park), the ignition must be
in ON/RUN and the regular brake pedal
applied.
0 (STOPPING THE ENGINE/LOCK/OFF) : This
position turns off the vehicle. It also locks
the ignition, the transmission on an
automatic transmission vehicle, and the
steering column, if equipped with a locking
steering column.
To turn off the vehicle:
1. Make sure that the vehicle is stopped.
2. Shift to P (Park).
3. Push the key all the way in towards the steering column, then turn the key to
LOCK/OFF.
4. Remove the key.
5. Set the parking brake. See Electric
Parking Brake 0205.
See your dealer if the key can be removed
in any other position.
Retained Accessory Power (RAP) will remain
active. See Retained Accessory Power (RAP)
0 199. A warning chime will sound when the driver
door is opened and the key is in the
ignition.
If equipped with a locking steering column,
the steering can bind with the front wheels
turned off center, which may prevent key
rotation out of LOCK/OFF. If this happens,
move the steering wheel from right to left
while turning the key to ACC/ACCESSORY.
If this does not work, then the vehicle needs
service.{Warning
Turning off the vehicle while moving may
cause loss of power assist in the brake
and steering systems and disable the
airbags. While driving, only shut the
vehicle off in an emergency.
In an emergency, if the vehicle cannot be
pulled over and must be turned off while
driving: 1. Push the key all the way in toward the steering column, then turn the key to
ACC/ACCESSORY.
2. Brake using firm and steady pressure. Do not pump the brakes repeatedly. This
may deplete power assist, requiring
increased brake pedal force.