CHEVROLET TRAILBLAZER 2023 Owners Manual
Manufacturer: CHEVROLET, Model Year: 2023, Model line: TRAILBLAZER, Model: CHEVROLET TRAILBLAZER 2023Pages: 360, PDF Size: 6.48 MB
Page 261 of 360
Chevrolet Trailblazer Owner Manual (GMNA-Localizing-U.S./Canada-
16263960) - 2023 - CRC - 2/23/22
260 Vehicle Care
Wiper Blade Replacement
Windshield wiper blades should be replaced
periodically. SeeMaintenance Schedule
0 315.
Replacement blades come in different types
and are removed in different ways. For
proper type and length, see Maintenance
Replacement Parts 0320.
Caution
Allowing the wiper arm to touch the
windshield when no wiper blade is
installed could damage the windshield.
Any damage that occurs would not be
covered by the vehicle warranty. Do not
allow the wiper arm to touch the
windshield.
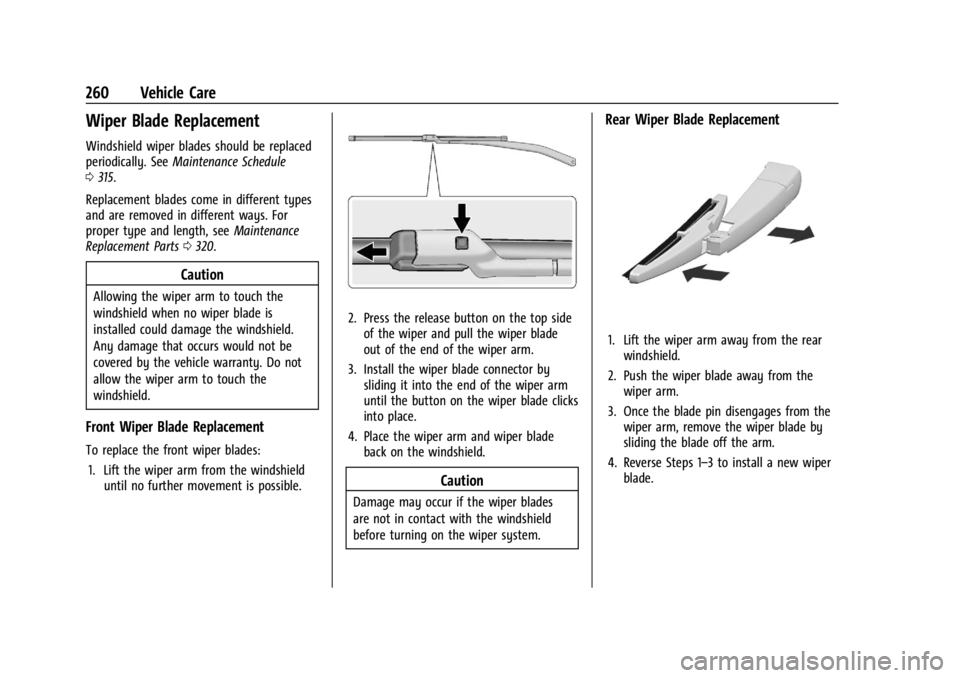
Front Wiper Blade Replacement
To replace the front wiper blades:
1. Lift the wiper arm from the windshield until no further movement is possible.
2. Press the release button on the top side
of the wiper and pull the wiper blade
out of the end of the wiper arm.
3. Install the wiper blade connector by sliding it into the end of the wiper arm
until the button on the wiper blade clicks
into place.
4. Place the wiper arm and wiper blade back on the windshield.
Caution
Damage may occur if the wiper blades
are not in contact with the windshield
before turning on the wiper system.
Rear Wiper Blade Replacement
1. Lift the wiper arm away from the rearwindshield.
2. Push the wiper blade away from the wiper arm.
3. Once the blade pin disengages from the wiper arm, remove the wiper blade by
sliding the blade off the arm.
4. Reverse Steps 1–3 to install a new wiper blade.
Page 262 of 360
Chevrolet Trailblazer Owner Manual (GMNA-Localizing-U.S./Canada-
16263960) - 2023 - CRC - 2/23/22
Vehicle Care 261
Windshield Replacement
Driver Assistance Systems
When a windshield replacement is needed
and the vehicle is equipped with a
front-looking camera sensor for the Driver
Assistance Systems, the windshield must be
installed according to GM specifications for
these systems to work properly. If it is not,
there may be unexpected behavior and/or
messages from these systems.
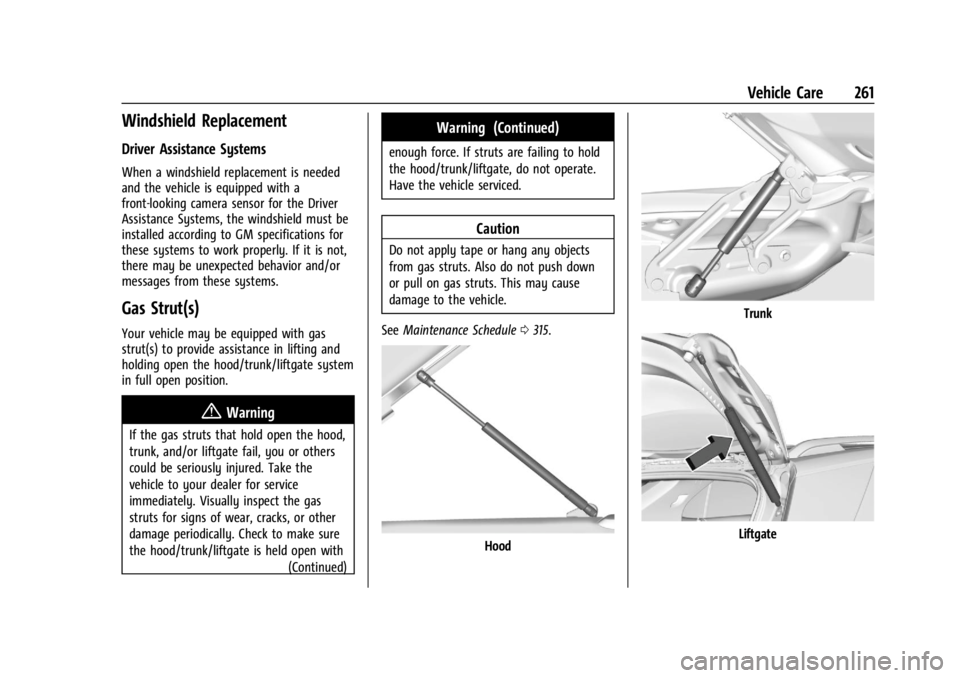
Gas Strut(s)
Your vehicle may be equipped with gas
strut(s) to provide assistance in lifting and
holding open the hood/trunk/liftgate system
in full open position.
{Warning
If the gas struts that hold open the hood,
trunk, and/or liftgate fail, you or others
could be seriously injured. Take the
vehicle to your dealer for service
immediately. Visually inspect the gas
struts for signs of wear, cracks, or other
damage periodically. Check to make sure
the hood/trunk/liftgate is held open with(Continued)
Warning (Continued)
enough force. If struts are failing to hold
the hood/trunk/liftgate, do not operate.
Have the vehicle serviced.
Caution
Do not apply tape or hang any objects
from gas struts. Also do not push down
or pull on gas struts. This may cause
damage to the vehicle.
See Maintenance Schedule 0315.
Hood
Trunk
Liftgate
Page 263 of 360
Chevrolet Trailblazer Owner Manual (GMNA-Localizing-U.S./Canada-
16263960) - 2023 - CRC - 2/23/22
262 Vehicle Care
Headlamp Aiming
Front Headlamp Aiming
Headlamp aim has been preset and should
need no further adjustment.
If the vehicle is damaged in a crash, the
headlamp aim may be affected.
If adjustment to the headlamps is necessary,
see your dealer.
Bulb Replacement
For the proper type of replacement bulbs,
or any bulb changing procedure not listed in
this section, contact your dealer.
Caution
Do not replace incandescent bulbs with
aftermarket LED replacement bulbs. This
can cause damage to the vehicle electrical
system.
This vehicle may be equipped with desiccant
to reduce fogging inside the headlamp due
to moisture. If fogging continues for a long
time, see your dealer for service.
Halogen Bulbs
{Warning
Halogen bulbs have pressurized gas inside
and can burst if you drop or scratch the
bulb. You or others could be injured. Be
sure to read and follow the instructions
on the bulb package.
LED Lighting
This vehicle has several LED lamps. For
replacement of any LED lighting assembly,
contact your dealer.
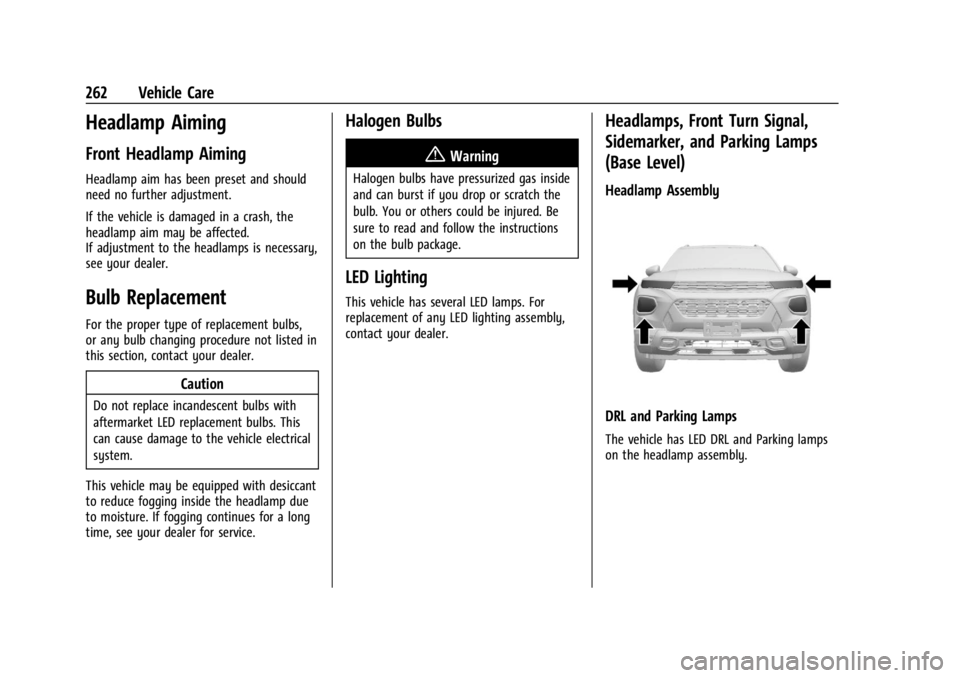
Headlamps, Front Turn Signal,
Sidemarker, and Parking Lamps
(Base Level)
Headlamp Assembly
DRL and Parking Lamps
The vehicle has LED DRL and Parking lamps
on the headlamp assembly.
Page 264 of 360
Chevrolet Trailblazer Owner Manual (GMNA-Localizing-U.S./Canada-
16263960) - 2023 - CRC - 2/23/22
Vehicle Care 263
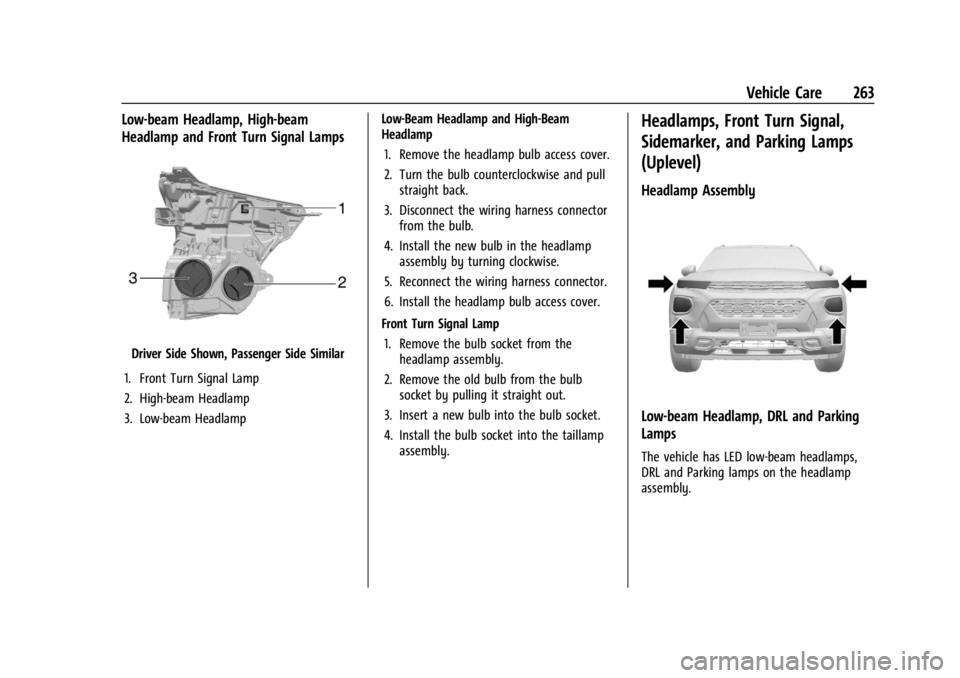
Low-beam Headlamp, High-beam
Headlamp and Front Turn Signal Lamps
Driver Side Shown, Passenger Side Similar
1. Front Turn Signal Lamp
2. High-beam Headlamp
3. Low-beam Headlamp Low-Beam Headlamp and High-Beam
Headlamp
1. Remove the headlamp bulb access cover.
2. Turn the bulb counterclockwise and pull straight back.
3. Disconnect the wiring harness connector from the bulb.
4. Install the new bulb in the headlamp assembly by turning clockwise.
5. Reconnect the wiring harness connector.
6. Install the headlamp bulb access cover.
Front Turn Signal Lamp 1. Remove the bulb socket from the headlamp assembly.
2. Remove the old bulb from the bulb socket by pulling it straight out.
3. Insert a new bulb into the bulb socket.
4. Install the bulb socket into the taillamp assembly.
Headlamps, Front Turn Signal,
Sidemarker, and Parking Lamps
(Uplevel)
Headlamp Assembly
Low-beam Headlamp, DRL and Parking
Lamps
The vehicle has LED low-beam headlamps,
DRL and Parking lamps on the headlamp
assembly.
Page 265 of 360
Chevrolet Trailblazer Owner Manual (GMNA-Localizing-U.S./Canada-
16263960) - 2023 - CRC - 2/23/22
264 Vehicle Care
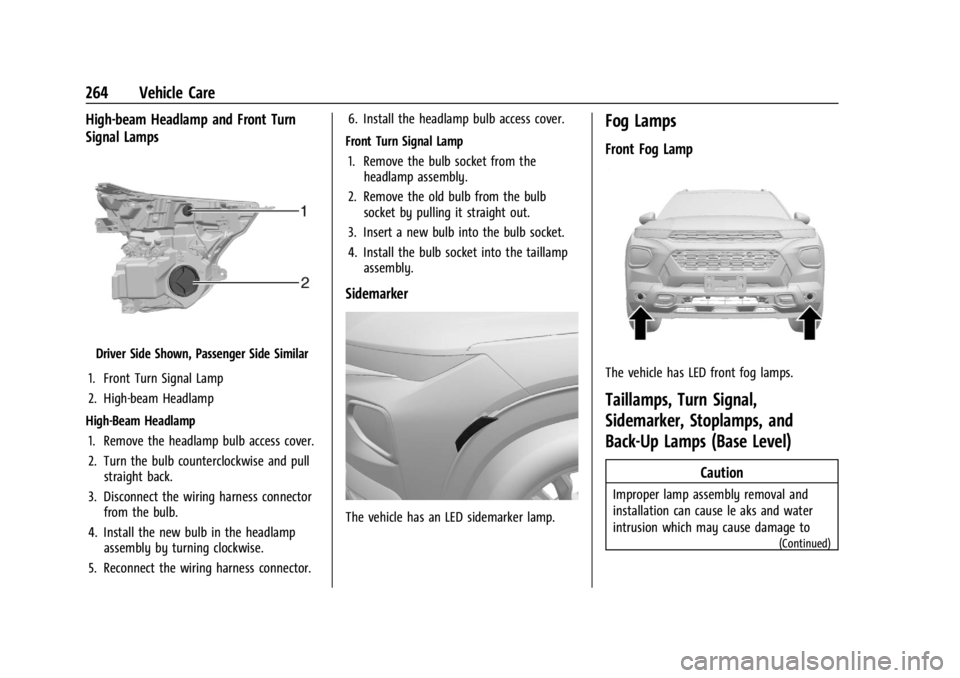
High-beam Headlamp and Front Turn
Signal Lamps
Driver Side Shown, Passenger Side Similar
1. Front Turn Signal Lamp
2. High-beam Headlamp
High-Beam Headlamp 1. Remove the headlamp bulb access cover.
2. Turn the bulb counterclockwise and pull straight back.
3. Disconnect the wiring harness connector from the bulb.
4. Install the new bulb in the headlamp assembly by turning clockwise.
5. Reconnect the wiring harness connector. 6. Install the headlamp bulb access cover.
Front Turn Signal Lamp 1. Remove the bulb socket from the headlamp assembly.
2. Remove the old bulb from the bulb socket by pulling it straight out.
3. Insert a new bulb into the bulb socket.
4. Install the bulb socket into the taillamp assembly.
Sidemarker
The vehicle has an LED sidemarker lamp.
Fog Lamps
Front Fog Lamp
The vehicle has LED front fog lamps.
Taillamps, Turn Signal,
Sidemarker, Stoplamps, and
Back-Up Lamps (Base Level)
Caution
Improper lamp assembly removal and
installation can cause le aks and water
intrusion which may cause damage to
(Continued)
Page 266 of 360
Chevrolet Trailblazer Owner Manual (GMNA-Localizing-U.S./Canada-
16263960) - 2023 - CRC - 2/23/22
Vehicle Care 265
Caution (Continued)
the taillamp. Do not remove the taillamp
assembly to replace a bulb. Use the
tailgate opening to access the bulb.
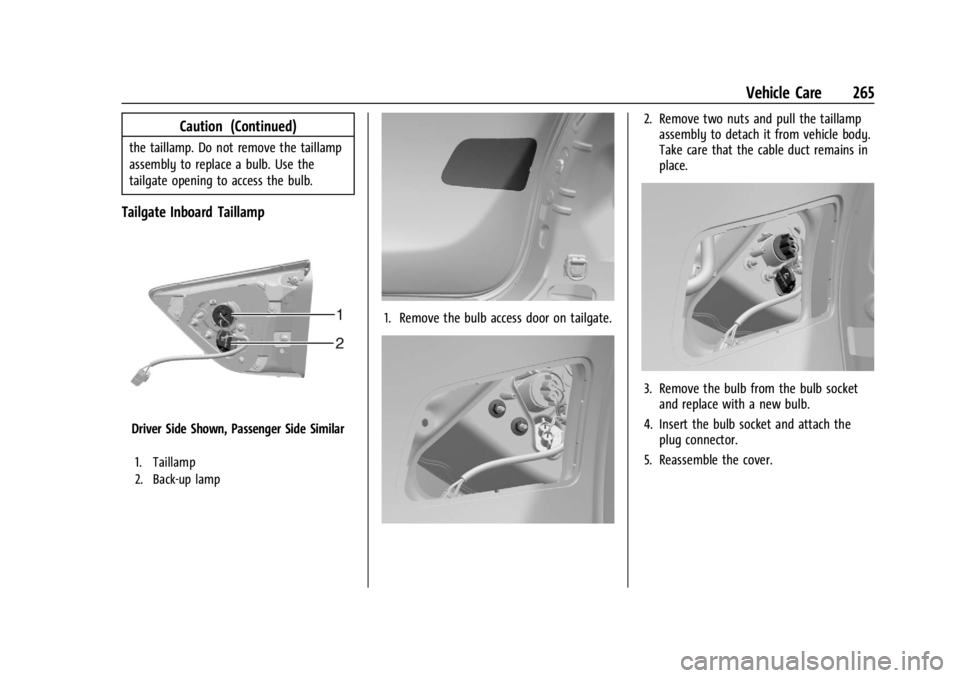
Tailgate Inboard Taillamp
Driver Side Shown, Passenger Side Similar
1. Taillamp
2. Back-up lamp
1. Remove the bulb access door on tailgate.
2. Remove two nuts and pull the taillampassembly to detach it from vehicle body.
Take care that the cable duct remains in
place.
3. Remove the bulb from the bulb socketand replace with a new bulb.
4. Insert the bulb socket and attach the plug connector.
5. Reassemble the cover.
Page 267 of 360
Chevrolet Trailblazer Owner Manual (GMNA-Localizing-U.S./Canada-
16263960) - 2023 - CRC - 2/23/22
266 Vehicle Care
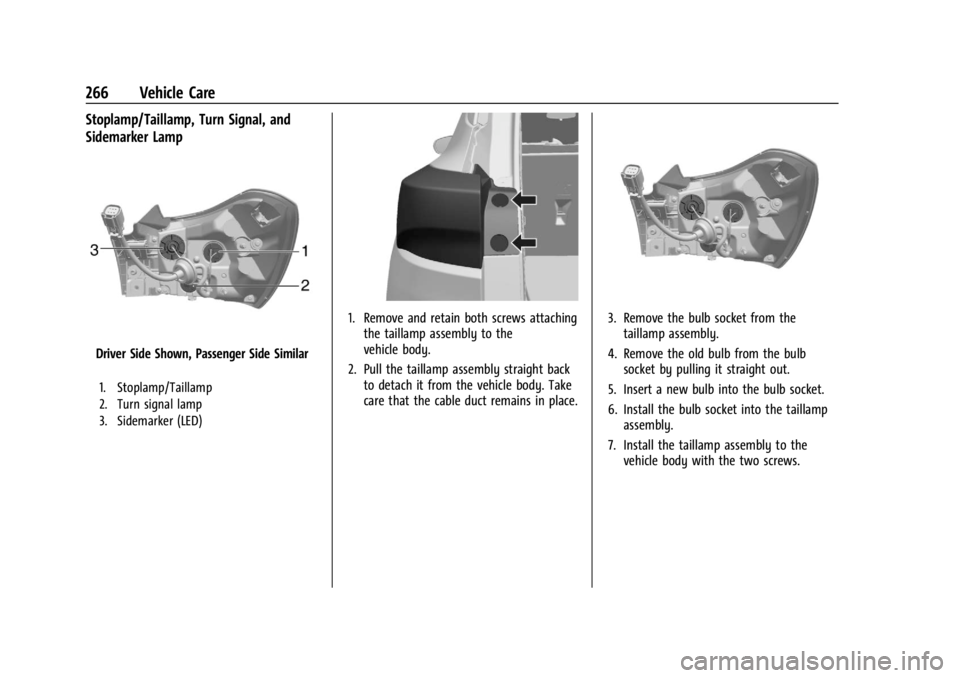
Stoplamp/Taillamp, Turn Signal, and
Sidemarker Lamp
Driver Side Shown, Passenger Side Similar
1. Stoplamp/Taillamp
2. Turn signal lamp
3. Sidemarker (LED)
1. Remove and retain both screws attachingthe taillamp assembly to the
vehicle body.
2. Pull the taillamp assembly straight back to detach it from the vehicle body. Take
care that the cable duct remains in place.3. Remove the bulb socket from thetaillamp assembly.
4. Remove the old bulb from the bulb socket by pulling it straight out.
5. Insert a new bulb into the bulb socket.
6. Install the bulb socket into the taillamp assembly.
7. Install the taillamp assembly to the vehicle body with the two screws.
Page 268 of 360
Chevrolet Trailblazer Owner Manual (GMNA-Localizing-U.S./Canada-
16263960) - 2023 - CRC - 2/23/22
Vehicle Care 267
Taillamps, Turn Signal,
Sidemarker, Stoplamps, and
Back-Up Lamps (Uplevel)
Caution
Improper lamp assembly removal and
installation can cause le aks and water
intrusion which may cause damage to
the taillamp. Do not remove the taillamp
assembly to replace a bulb. Use the
tailgate opening to access the bulb.
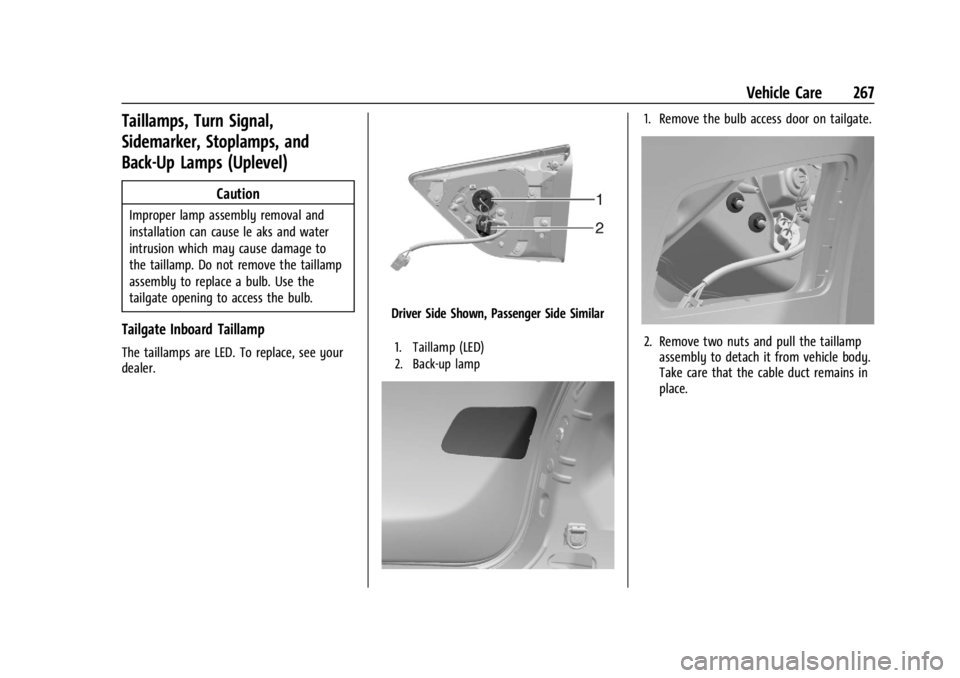
Tailgate Inboard Taillamp
The taillamps are LED. To replace, see your
dealer.
Driver Side Shown, Passenger Side Similar
1. Taillamp (LED)
2. Back-up lamp
1. Remove the bulb access door on tailgate.
2. Remove two nuts and pull the taillampassembly to detach it from vehicle body.
Take care that the cable duct remains in
place.
Page 269 of 360
Chevrolet Trailblazer Owner Manual (GMNA-Localizing-U.S./Canada-
16263960) - 2023 - CRC - 2/23/22
268 Vehicle Care
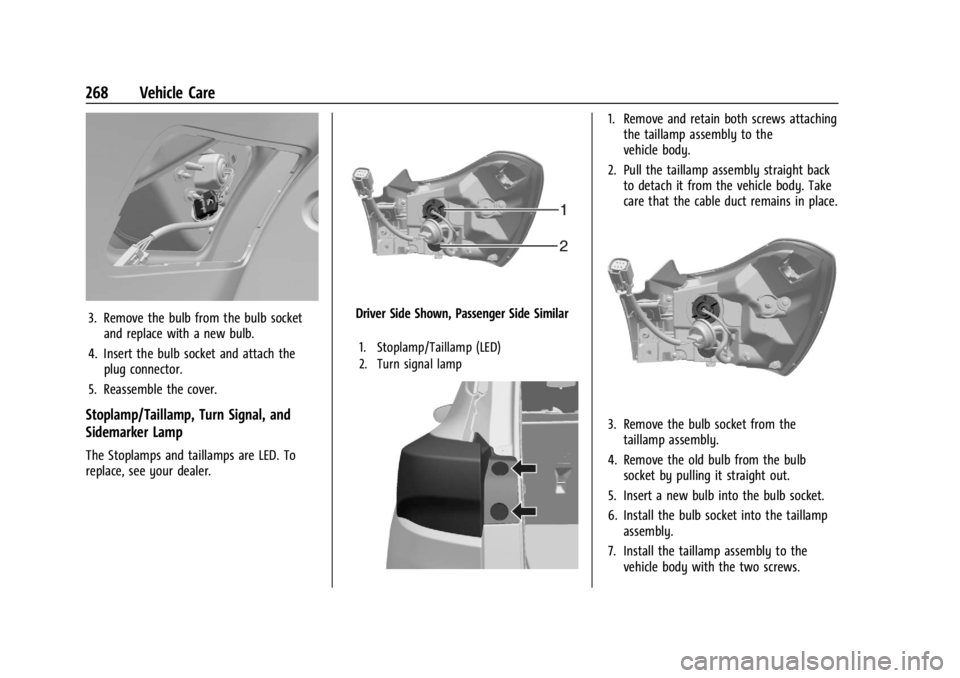
3. Remove the bulb from the bulb socketand replace with a new bulb.
4. Insert the bulb socket and attach the plug connector.
5. Reassemble the cover.
Stoplamp/Taillamp, Turn Signal, and
Sidemarker Lamp
The Stoplamps and taillamps are LED. To
replace, see your dealer.
Driver Side Shown, Passenger Side Similar
1. Stoplamp/Taillamp (LED)
2. Turn signal lamp
1. Remove and retain both screws attaching the taillamp assembly to the
vehicle body.
2. Pull the taillamp assembly straight back to detach it from the vehicle body. Take
care that the cable duct remains in place.
3. Remove the bulb socket from the
taillamp assembly.
4. Remove the old bulb from the bulb socket by pulling it straight out.
5. Insert a new bulb into the bulb socket.
6. Install the bulb socket into the taillamp assembly.
7. Install the taillamp assembly to the vehicle body with the two screws.
Page 270 of 360
Chevrolet Trailblazer Owner Manual (GMNA-Localizing-U.S./Canada-
16263960) - 2023 - CRC - 2/23/22
Vehicle Care 269
Electrical System
Electrical System Overload
The vehicle has fuses and circuit breakers to
protect against an electrical system
overload.
When the current electrical load is too
heavy, the circuit breaker opens and closes,
protecting the circuit until the current load
returns to normal or the problem is fixed.
This greatly reduces the chance of circuit
overload and fire caused by electrical
problems.
Fuses and circuit breakers protect power
devices in the vehicle.
If there is a problem on the road and a fuse
needs to be replaced, the same amperage
fuse can be borrowed. Choose some feature
of the vehicle that is not needed to use and
replace it as soon as possible.
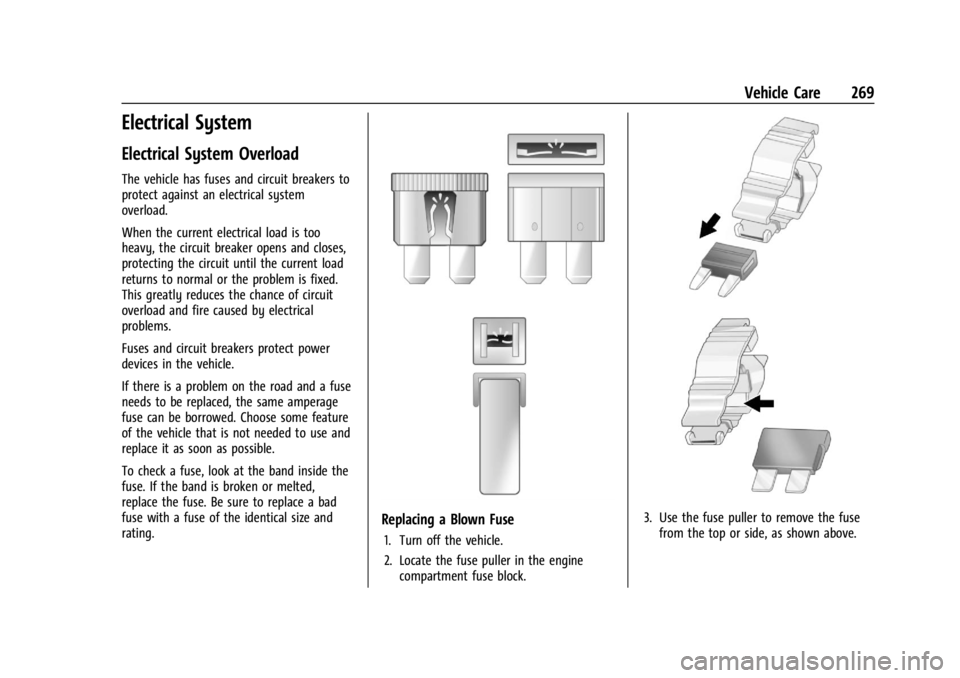
To check a fuse, look at the band inside the
fuse. If the band is broken or melted,
replace the fuse. Be sure to replace a bad
fuse with a fuse of the identical size and
rating.
Replacing a Blown Fuse
1. Turn off the vehicle.
2. Locate the fuse puller in the enginecompartment fuse block.
3. Use the fuse puller to remove the fusefrom the top or side, as shown above.