hood release CHEVROLET TRAILBLAZER 2023 Owners Manual
[x] Cancel search | Manufacturer: CHEVROLET, Model Year: 2023, Model line: TRAILBLAZER, Model: CHEVROLET TRAILBLAZER 2023Pages: 360, PDF Size: 6.48 MB
Page 7 of 360

Chevrolet Trailblazer Owner Manual (GMNA-Localizing-U.S./Canada-
16263960) - 2023 - CRC - 2/23/22
6 Introduction
1.Air Vents 0172.
2. Turn Signal Lever. See Turn and
Lane-Change Signals 0115.
IntelliBeam System Button (If Equipped).
See Exterior Lamp Controls 0112.
3. Instrument Cluster 092.
Driver Information Center (DIC) Display.
See Driver Information Center (DIC) (Base
Level) 0106 or
Driver Information Center (DIC) (Uplevel)
0 108.
4. Windshield Wiper/Washer 086.
Rear Window Wiper/Washer 087.
5. Light Sensor. See Automatic Headlamp
System 0114.
Vehicle Alarm System 030.
6. Hazard Warning Flashers 0115.
7. Infotainment Controls. See Overview
0 120.
8. Climate Control Systems 0167.
Automatic Climate Control System 0169.
Heated Front Seats 041. (If Equipped).
9. USB Port 0127.
Auxiliary Jack 0130.
10. Wireless Charging 089 (If Equipped). 11. Stop/Start Disable Button. See
Stop/Start
System 0189 (If Equipped).
Lane Keep Assist (LKA) 0224 (If
Equipped).
Traction Control/Electronic Stability
Control 0200.
Sport Mode (If Equipped). See Driver
Mode Control 0202
All-Wheel Drive 0197 (If Equipped).
12. Electric Parking Brake 0198.
13. Shift Lever. See Automatic Transmission
0 195.
14. Power Outlets 088.
15. Ignition Positions (Key Access) 0184 or
Ignition Positions (Keyless Access) 0186
(If Equipped).
16. Steering Wheel Controls 0121.
17. Horn 086.
18. Steering Wheel Adjustment 086 (Out
of View).
19. Cruise Control 0203.
Adaptive Cruise Control (Camera) 0205
(If Equipped).
Forward Collision Alert (FCA) System
0 217 (If Equipped).
20. Hood Release. See Hood0240. 21. Data Link Connector (DLC) (Out of View).
SeeMalfunction Indicator Lamp (Check
Engine Light) 099.
22. Instrument Panel Storage 080.
Instrument Panel Fuse Block 0273.
23. Exterior Lamp Controls 0112.
Page 190 of 360
Chevrolet Trailblazer Owner Manual (GMNA-Localizing-U.S./Canada-
16263960) - 2023 - CRC - 2/23/22
Driving and Operating 189
Stop/Start System
If equipped and enabled, the Stop/Start
system will shut off the engine to help
conserve fuel. It has components designed
for the increased number of starts.
{Warning
The automatic engine Stop/Start feature
causes the engine to shut off while the
vehicle is still on. Do not exit the vehicle
before shifting to P (Park). The vehicle
may restart and move unexpectedly.
Always shift to P (Park), and then turn
the ignition off before exiting the vehicle.
Auto Engine Stop/Start
When the brakes are applied and the vehicle
is at a complete stop, the engine may turn
off. When stopped, the tachometer displays
AUTO STOP. SeeTachometer095. When the
brake pedal is released or the accelerator
pedal is pressed, the engine will restart.
To maintain vehicle performance, other
conditions may cause the engine to
automatically restart before the brake pedal
is released. Auto Stops may not occur and/or auto
restarts may occur because:
.The climate control settings require the
engine to be running to cool or heat the
vehicle interior.
.The vehicle battery needs to charge.
.The vehicle battery has recently been
disconnected.
.Minimum vehicle speed has not been
reached since the last Auto Stop.
.The accelerator pedal is pressed.
.The engine or transmission is not at the
required operating temperature.
.The outside temperature is not in the
required operating range.
.The vehicle transmission is shifted out of
D (Drive) to any gear other than P (Park).
.Certain driver modes have been selected.
See
Driver Mode Control 0202.
.The vehicle is on a steep hill or grade.
.The driver door has been opened or driver
seat belt has been unbuckled.
.The hood has been opened.
.The Auto Stop has reached the maximum
allowed time.
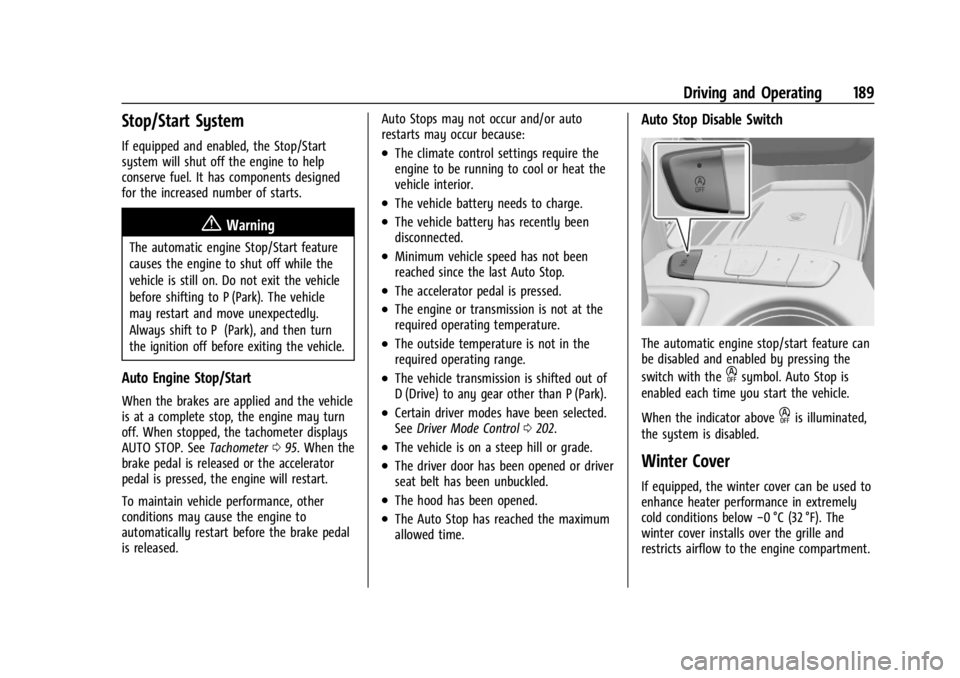
Auto Stop Disable Switch
The automatic engine stop/start feature can
be disabled and enabled by pressing the
switch with the
hsymbol. Auto Stop is
enabled each time you start the vehicle.
When the indicator above
his illuminated,
the system is disabled.
Winter Cover
If equipped, the winter cover can be used to
enhance heater performance in extremely
cold conditions below −0 °C (32 °F). The
winter cover installs over the grille and
restricts airflow to the engine compartment.
Page 242 of 360
Chevrolet Trailblazer Owner Manual (GMNA-Localizing-U.S./Canada-
16263960) - 2023 - CRC - 2/23/22
Vehicle Care 241
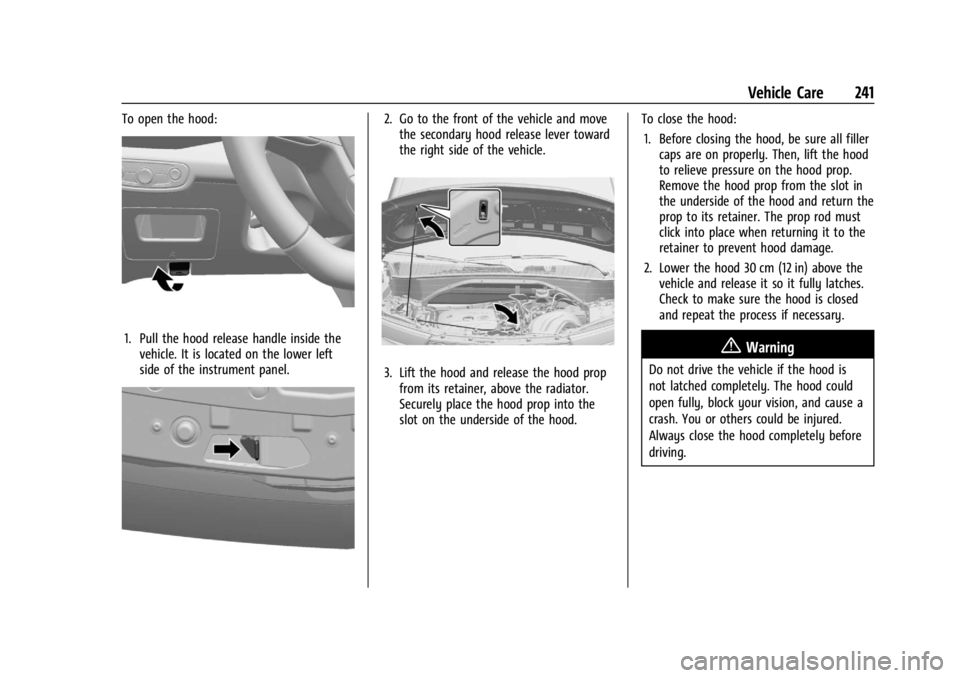
To open the hood:
1. Pull the hood release handle inside thevehicle. It is located on the lower left
side of the instrument panel.
2. Go to the front of the vehicle and movethe secondary hood release lever toward
the right side of the vehicle.
3. Lift the hood and release the hood propfrom its retainer, above the radiator.
Securely place the hood prop into the
slot on the underside of the hood. To close the hood:
1. Before closing the hood, be sure all filler caps are on properly. Then, lift the hood
to relieve pressure on the hood prop.
Remove the hood prop from the slot in
the underside of the hood and return the
prop to its retainer. The prop rod must
click into place when returning it to the
retainer to prevent hood damage.
2. Lower the hood 30 cm (12 in) above the vehicle and release it so it fully latches.
Check to make sure the hood is closed
and repeat the process if necessary.
{Warning
Do not drive the vehicle if the hood is
not latched completely. The hood could
open fully, block your vision, and cause a
crash. You or others could be injured.
Always close the hood completely before
driving.
Page 255 of 360
Chevrolet Trailblazer Owner Manual (GMNA-Localizing-U.S./Canada-
16263960) - 2023 - CRC - 2/23/22
254 Vehicle Care
5. Set the parking brake.
6. At the same time, press the acceleratorand the brake for two seconds, then
release.
At the end of the cycle, check the coolant
level in the surge tank and add coolant if it
is low. Turn off the vehicle, allow the Engine
Control Module (ECM) to go to sleep, about
two minutes, and repeat Steps 3-7.
Listen for pump activation and movement of
the control valves while watching the level
of the coolant in the surge tank. If the tank
empties, turn the ignition off, carefully
remove the surge tank cap, refill to the
indicated mark, and repeat Steps 4-7. The fill
and air removal process will run for
approximately 10 minutes.
Engine Overheating
The vehicle has an engine coolant
temperature gauge to warn of the engine
overheating. See Engine Coolant
Temperature Gauge 096.
If the decision is made not to lift the hood
when this warning appears, get service help
right away. See Roadside Assistance Program
0 330. If the decision is made to lift the hood,
make sure the vehicle is parked on a level
surface.
Then check to see if the engine cooling fan
is running. If the engine is overheating, the
fan should be running. If it is not, do not
continue to run the engine. Have the vehicle
serviced.
Caution
Do not run the engine if there is a leak
in the engine cooling system. This can
cause a loss of all coolant and can
damage the system and vehicle. Have
any leaks fixed right away.
If Steam Is Coming from the Engine
Compartment
{Warning
Steam and scalding liquids from a hot
cooling system are under pressure.
Turning the pressure cap, even a little,
can cause them to come out at high
speed and you could be burned. Never
turn the cap when the cooling system,
(Continued)
Warning (Continued)
including the pressure cap, is hot. Wait
for the cooling system and pressure cap
to cool.
If No Steam Is Coming from the Engine
Compartment
If an engine overheat warning is displayed
but no steam can be seen or heard, the
problem may not be too serious. Sometimes
the engine can get a little too hot when the
vehicle:
.Climbs a long hill on a hot day
.Stops after high-speed driving
If the overheat warning is displayed with no
sign of steam: 1. Turn the air conditioning off.
2. Turn the heater on to the highest temperature and to the highest fan
speed. Open the windows as necessary.
3. When it is safe to do so, pull off the road, shift to P (Park) or N (Neutral), and
let the engine idle.
Page 305 of 360
Chevrolet Trailblazer Owner Manual (GMNA-Localizing-U.S./Canada-
16263960) - 2023 - CRC - 2/23/22
304 Vehicle Care
6. Leave the transmission in N (Neutral) andturn the vehicle off. You may hear a
continuous chime, which is normal.
7. Open the hood and disconnect the negative battery terminal. See Battery -
North America 0257.
8. Cover the negative battery post with a non-conductive material to prevent any
contact with the negative battery
terminal.
Caution
If 113 km/h (70 mph) is exceeded while
towing the vehicle, it could be damaged.
Never exceed 113 km/h (70 mph) while
towing the vehicle.
To disconnect the towed vehicle: 1. Park on a level surface.
2. Make sure that the ignition is off.
3. Remove any tape, glue, or excess material from the negative battery post.
4. Connect the battery. See “Negative
Battery Cable Reconnection” under
Battery - North America 0257. 5. Apply the parking brake.
6. Disconnect the vehicle from the tow
vehicle.
7. Release the parking brake.
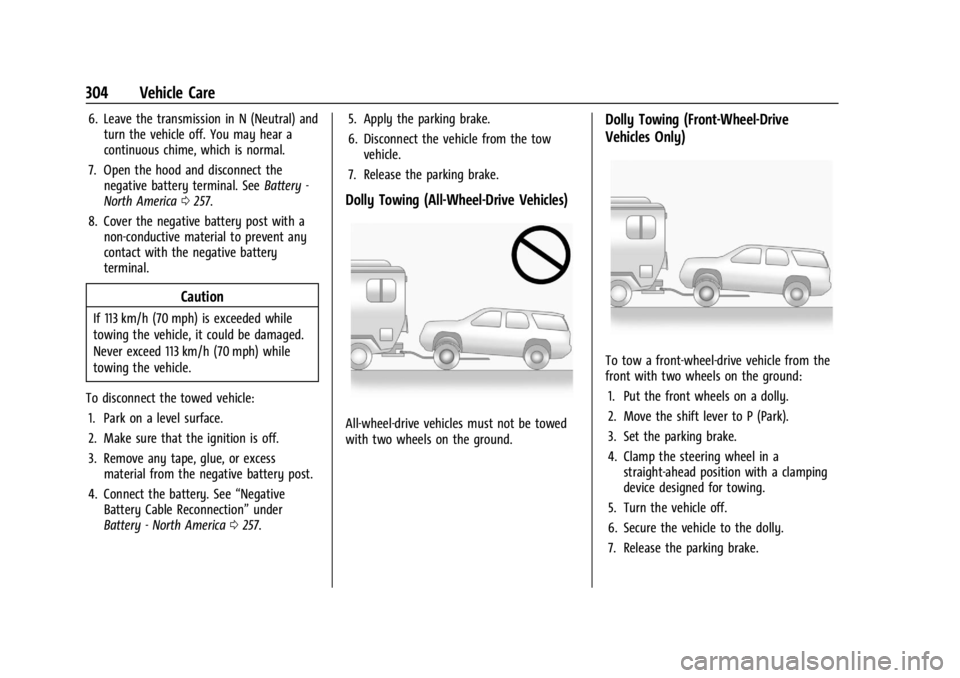
Dolly Towing (All-Wheel-Drive Vehicles)
All-wheel-drive vehicles must not be towed
with two wheels on the ground.
Dolly Towing (Front-Wheel-Drive
Vehicles Only)
To tow a front-wheel-drive vehicle from the
front with two wheels on the ground: 1. Put the front wheels on a dolly.
2. Move the shift lever to P (Park).
3. Set the parking brake.
4. Clamp the steering wheel in a straight-ahead position with a clamping
device designed for towing.
5. Turn the vehicle off.
6. Secure the vehicle to the dolly.
7. Release the parking brake.
Page 320 of 360
Chevrolet Trailblazer Owner Manual (GMNA-Localizing-U.S./Canada-
16263960) - 2023 - CRC - 2/23/22
Service and Maintenance 319
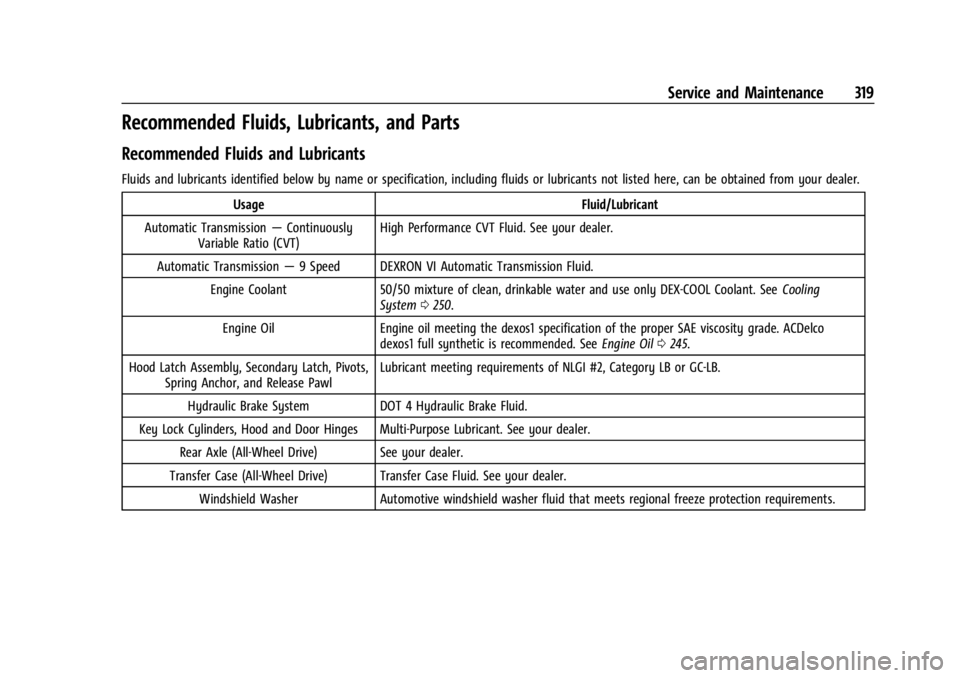
Recommended Fluids, Lubricants, and Parts
Recommended Fluids and Lubricants
Fluids and lubricants identified below by name or specification, including fluids or lubricants not listed here, can be obtained from your dealer.Usage Fluid/Lubricant
Automatic Transmission —Continuously
Variable Ratio (CVT) High Performance CVT Fluid. See your dealer.
Automatic Transmission —9 Speed DEXRON VI Automatic Transmission Fluid.
Engine Coolant 50/50 mixture of clean, drinkable water and use only DEX-COOL Coolant. See Cooling
System 0250.
Engine Oil Engine oil meeting the dexos1 specification of the proper SAE viscosity grade. ACDelco dexos1 full synthetic is recommended. See Engine Oil0245.
Hood Latch Assembly, Secondary Latch, Pivots, Spring Anchor, and Release Pawl Lubricant meeting requirements of NLGI #2, Category LB or GC-LB.
Hydraulic Brake System DOT 4 Hydraulic Brake Fluid.
Key Lock Cylinders, Hood and Door Hinges Multi-Purpose Lubricant. See your dealer. Rear Axle (All-Wheel Drive) See your dealer.
Transfer Case (All-Wheel Drive) Transfer Case Fluid. See your dealer. Windshield Washer Automotive windshield washer fluid that meets regional freeze protection requirements.