radio CHEVROLET TRAVERSE 2009 1.G Owners Manual
[x] Cancel search | Manufacturer: CHEVROLET, Model Year: 2009, Model line: TRAVERSE, Model: CHEVROLET TRAVERSE 2009 1.GPages: 422, PDF Size: 2.06 MB
Page 67 of 422
If you are locked out of the vehicle,
call the Roadside Assistance
Center. SeeRoadside Assistance
Program on page 7-6.
Remote Keyless Entry
(RKE) System
The Remote Keyless Entry (RKE)
system operates on a radio
frequency subject to Federal
Communications Commission (FCC)
Rules and with Industry Canada.
This device complies with Part 15 of
the FCC Rules. Operation is subject
to the following two conditions:
1. This device may not cause
interference.
2. This device must accept any
interference received, including
interference that may cause
undesired operation of the
device.This device complies with RSS-210
of Industry Canada. Operation is
subject to the following two
conditions:
1. This device may not cause
interference.
2. This device must accept any
interference received, including
interference that may cause
undesired operation of the
device.
Changes or modi�cations to
this system by other than an
authorized service facility could void
authorization to use this equipment.
If there is a decrease in the RKE
operating range, try this:
Check the distance. The
transmitter may be too far from
the vehicle. Stand closer
during rainy or snowy weather.
Check the location. Other
vehicles or objects may be
blocking the signal. Take a few
steps to the left or right, hold
the transmitter higher, and
try again.
Check the transmitter’s battery.
See “Battery Replacement”
later in this section.
If the transmitter is still not
working correctly, see your
dealer/retailer or a quali�ed
technician for service.
Features and Controls 2-3
Page 82 of 422

PASS-Key®III+ Electronic
Immobilizer
The PASS-Key III+ system
operates on a radio frequency
subject to Federal Communications
Commission (FCC) Rules and
with Industry Canada.
This device complies with Part 15 of
the FCC Rules. Operation is subject
to the following two conditions:
1. This device may not cause
harmful interference.
2. This device must accept any
interference received, including
interference that may cause
undesired operation.This device complies with RSS-210
of Industry Canada. Operation is
subject to the following two
conditions:
1. This device may not cause
interference.
2. This device must accept any
interference received, including
interference that may cause
undesired operation of the
device.
Changes or modi�cations to this
system by other than an authorized
service facility could void
authorization to use this equipment.
PASS-Key III+ uses a radio
frequency transponder in the key
that matches a decoder in the
vehicle.
PASS-Key®III+ Electronic
Immobilizer Operation
This vehicle has PASS-Key®III+
(Personalized Automotive Security
System) theft-deterrent system.
PASS-Key
®III+ is a passive
theft-deterrent system.
The system is automatically armed
when the key is removed from
the ignition.
The system is automatically
disarmed when the key is turned to
ON/RUN, ACC/ACCESSORY or
START from the LOCK/OFF position.
You do not have to manually arm or
disarm the system.
The security light comes on if there is
a problem with arming or disarming
the theft-deterrent system.
2-18 Features and Controls
Page 86 of 422
Retained Accessory
Power (RAP)
These vehicle accessories can be
used for up to 10 minutes after
the ignition key is turned off:
Audio System
Power Windows
Sunroof (if equipped)
Power to the windows and sunroof
will work up to 10 minutes or
until a door is opened.
The radio continues to work for
10 minutes or until the driver’s door
is opened.
For an additional 10 minutes of
operation, close all the doors and
turn the key to ON/RUN and
then back to LOCK/OFF.
All these features will work when
the key is in the ON/RUN or
ACC/ACCESSORY positions.
Starting the Engine
Move the shift lever to P (Park) or
N (Neutral). The engine will not start
in any other position. To restart the
engine when the vehicle is already
moving, use N (Neutral) only.
Notice:Do not try to shift to
P (Park) if the vehicle is moving.
If you do, you could damage
the transmission. Shift to P (Park)
only when the vehicle is stopped.
Starting Procedure
1. With your foot off the accelerator
pedal, turn the ignition to START.
When the engine starts, let go of
the key. The idle speed will slow
down as the engine warms. Do
not race the engine immediately
after starting it. Operate the
engine and transmission gently to
allow the oil to warm up and
lubricate all moving parts.The vehicle has a
Computer-Controlled Cranking
System. This feature assists
in starting the engine and
protects components. If the
ignition key is turned to the
START position, and then
released when the engine
begins cranking, the engine
will continue cranking for a
few seconds or until the vehicle
starts. If the engine does not
start and the key is held in
START, cranking will be stopped
after 15 seconds to prevent
cranking motor damage.
To prevent gear damage, this
system also prevents cranking if
the engine is already running.
Engine cranking can be stopped
by turning the ignition switch
to the ACC/ACCESSORY
or LOCK/OFF position.
2-22 Features and Controls
Page 110 of 422
How OnStar Service Works
The OnStar system can record and
transmit vehicle information. This
information is automatically sent to
an OnStar Call Center when the
OnStar button is pressed, the
emergency button is pressed, or if
the airbags or AACN system deploy.
This information usually includes
the vehicle’s GPS location and, in
the event of a crash, additional
information regarding the crash that
the vehicle was involved in (e.g.
the direction from which the vehicle
was hit). When the Virtual Advisor
feature of OnStar Hands-Free
Calling is used, the vehicle also
sends OnStar the vehicle’s
GPS location so they can provide
services where it is located.
OnStar service cannot work unless
the vehicle is in a place where
OnStar has an agreement with a
wireless service provider for service
in that area. OnStar service also
cannot work unless the vehicle is in a
place where the wireless serviceprovider OnStar has hired for that
area has coverage, network capacity
and reception when the service is
needed, and technology that is
compatible with the OnStar service.
Not all services are available
everywhere, particularly in remote or
enclosed areas, or at all times.
Location information about the
vehicle is only available if the GPS
satellite signals are unobstructed
and available.
The vehicle must have a working
electrical system, including adequate
battery power, for the OnStar
equipment to operate. There are
other problems OnStar cannot
control that may prevent OnStar
from providing OnStar service at
any particular time or place.
Some examples are damage to
important parts of the vehicle in a
crash, hills, tall buildings, tunnels,
weather or wireless phone network
congestion.Your Responsibility
Increase the volume of the radio if
the OnStar advisor cannot be heard.
If the light next to the OnStar
buttons is red, the system may not
be functioning properly. Press
the OnStar button and request a
vehicle diagnostic. If the light
appears clear (no light is appearing),
your OnStar subscription has
expired and all services have been
deactivated. Press the OnStar
button to con�rm that the OnStar
equipment is active.
2-46 Features and Controls
Page 111 of 422
Universal Home
Remote System
The Universal Home Remote
System provides a way to
replace up to three hand-held
Radio-Frequency (RF) transmitters
used to activate devices such
as garage door openers, security
systems, and home lighting.
This device complies with Part 15 of
the FCC Rules. Operation is subject
to the following two conditions:
1. This device may not cause
harmful interference.
2. This device must accept any
interference received, including
interference that may cause
undesired operation.This device complies with RSS-210
of Industry Canada. Operation is
subject to the following two
conditions:
1. This device may not cause
interference.
2. This device must accept any
interference received, including
interference that may cause
undesired operation of the
device.
Changes or modi�cations to this
system by other than an authorized
service facility could void
authorization to use this equipment.
Universal Home Remote
System Operation
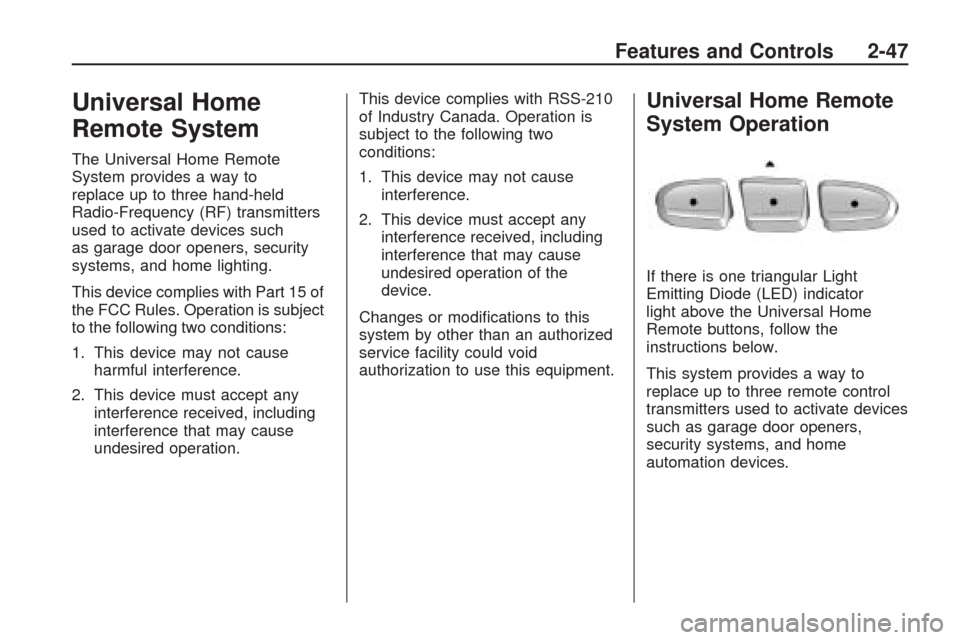
If there is one triangular Light
Emitting Diode (LED) indicator
light above the Universal Home
Remote buttons, follow the
instructions below.
This system provides a way to
replace up to three remote control
transmitters used to activate devices
such as garage door openers,
security systems, and home
automation devices.
Features and Controls 2-47
Page 112 of 422
Do not use the Universal Home
Remote with any garage door
opener that does not have the stop
and reverse feature. This includes
any garage door opener model
manufactured before April 1, 1982.
Read the instructions completely
before attempting to program
the Universal Home Remote.
Because of the steps involved, it
may be helpful to have another
person available to assist you in the
programming the Universal Home
Remote.
Keep the original hand-held
transmitter for use in other vehicles
as well as for future Universal
Home Remote programming. It is
also recommended that upon
the sale of the vehicle, the
programmed Universal Home
Remote buttons should be erased
for security purposes. See “Erasing
Universal Home Remote Buttons”
later in this section.When programming a garage door,
park outside of the garage. Park
directly in line with and facing
the garage door opener motor-head
or gate motor-head. Be sure that
people and objects are clear of the
garage door or gate that is being
programmed.
It is recommended that a new
battery be installed in your
hand-held transmitter for quicker
and more accurate transmission of
the radio-frequency signal.
Programming the Universal
Home Remote System
For questions or help programming
the Universal Home Remote
System, call 1-800-355-3515 or
go to www.homelink.com.
Programming a garage door opener
involves time-sensitive actions,
so read the entire procedure before
starting. Otherwise, the device
will time out and the procedure will
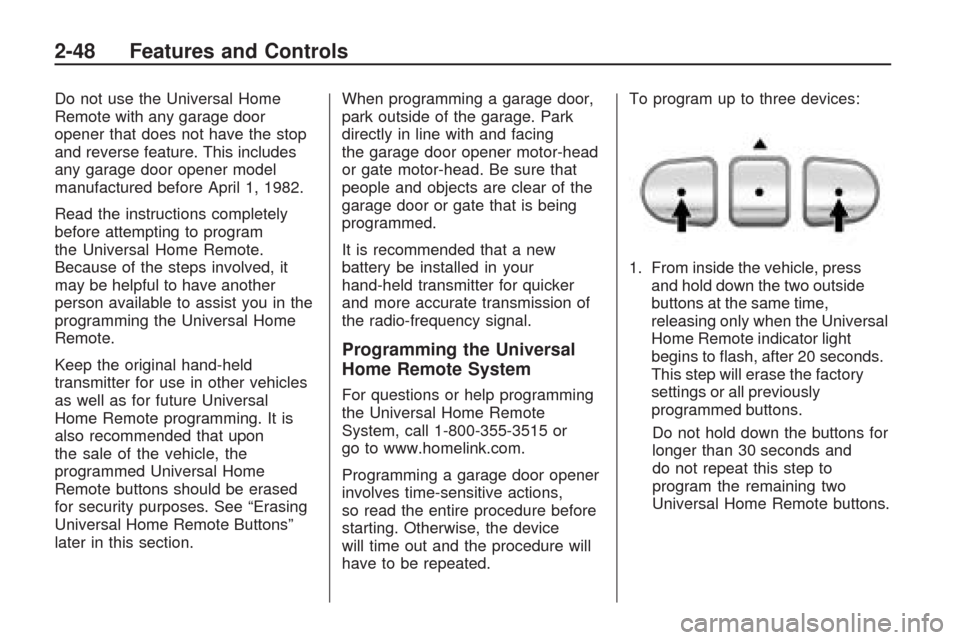
have to be repeated.To program up to three devices:
1. From inside the vehicle, press
and hold down the two outside
buttons at the same time,
releasing only when the Universal
Home Remote indicator light
begins to �ash, after 20 seconds.
This step will erase the factory
settings or all previously
programmed buttons.
Do not hold down the buttons for
longer than 30 seconds and
do not repeat this step to
program the remaining two
Universal Home Remote buttons.
2-48 Features and Controls
Page 114 of 422
7. Firmly press and release the
“Learn” or “Smart” button.
After you press this button,
you will have 30 seconds to
complete Step 8.
8. Immediately return to the vehicle.
Firmly press and hold the
Universal Home Remote button,
chosen in Step 3 to control
the garage door, for two seconds,
and then release it. If the
garage door does not move,
press and hold the same button
a second time for two seconds,
and then release it. Again, if
the door does not move, press
and hold the same button a
third time for two seconds, and
then release.
The Universal Home Remote
should now activate the
garage door.To program the remaining two
Universal Home Remote buttons,
begin with Step 2 of “Programming
the Universal Home Remote
System.” Do not repeat Step 1,
as this will erase all previous
programming from the Universal
Home Remote buttons.
Gate Operator and Canadian
Programming
If you have questions or need help
programming the Universal
Home Remote System, call
1-800-355-3515 or go to
www.homelink.com.
Canadian radio-frequency laws
require transmitter signals to time
out or quit after several seconds of
transmission. This may not be
long enough for Universal HomeRemote to pick up the signal during
programming. Similarly, some
U.S. gate operators are
manufactured to time out in the
same manner.
If you live in Canada, or you are
having difficulty programming a gate
operator or garage door opener
by using the “Programming
Universal Home Remote”
procedures, regardless of where
you live, replace Step 3 under
“Programming Universal Home
Remote” with the following:
Continue to press and hold the
Universal Home Remote button
while you press and release every
two seconds (cycle) the hand-held
transmitter button until the frequency
signal has been successfully
2-50 Features and Controls
Page 116 of 422
Storage Areas
Glove Box
Lift the glove box handle up to open
it. Use the key to lock and unlock
the glove box.
Cupholders
There are two cupholders, with
removable liners, located in front of
the center console. There may
be cupholders located in the
second row seat armrest.
To access, pull the armrest down.There are additional cupholders
located on each side of the third row
seat and in each door. There may
be cupholders located at the rear
of the center console. To access,
pull the handle down.
Instrument Panel Storage
This vehicle has an instrument panel
storage area located above the
radio. To open the cover, press the
button.
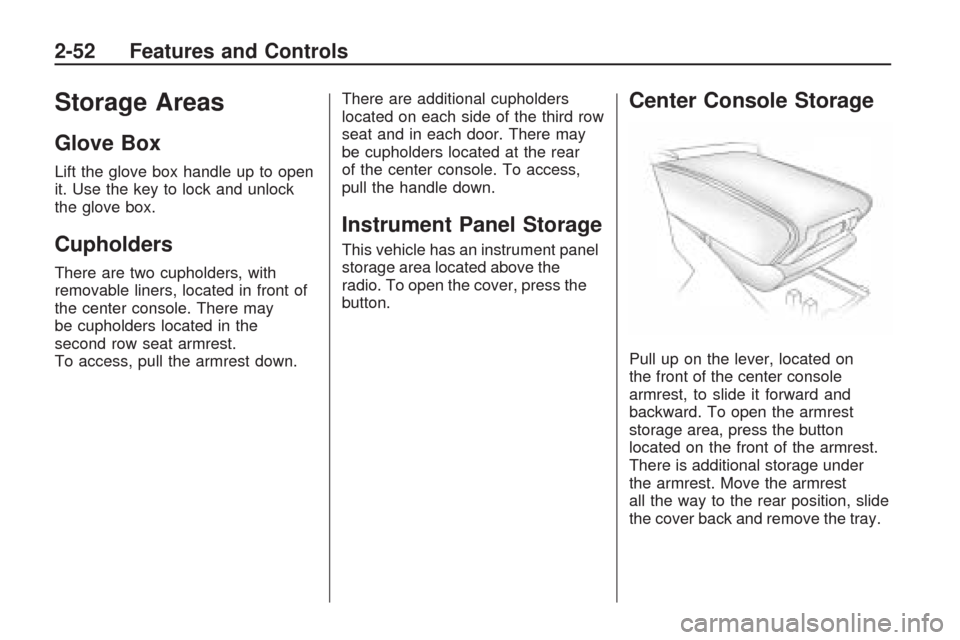
Center Console Storage
Pull up on the lever, located on
the front of the center console
armrest, to slide it forward and
backward. To open the armrest
storage area, press the button
located on the front of the armrest.
There is additional storage under
the armrest. Move the armrest
all the way to the rear position, slide
the cover back and remove the tray.
2-52 Features and Controls
Page 122 of 422
Cruise Control Light.............3-43
Highbeam On Light..............3-43
Tow/Haul Mode Light...........3-43
Fuel Gage..........................3-43
Driver Information
Center (DIC)
Driver Information
Center (DIC).....................3-44
DIC Operation and Displays
(With DIC Buttons).............3-45
DIC Operation and Displays
(Without DIC Buttons).........3-51
DIC Compass.....................3-54
DIC Warnings and
Messages.........................3-56
DIC Vehicle Customization
(With DIC Buttons).............3-65
Audio System(s)Audio System(s)..................3-73
Setting the Clock.................3-74
Radio(s).............................3-75
Using an MP3
(Radio with CD).................3-92
Using an MP3 (Radio with
CD and DVD Player)..........3-96
XM Radio Messages..........3-102Navigation/Radio System.....3-103
Bluetooth
®........................3-103
Rear Seat Entertainment
(RSE) System..................3-114
Rear Seat Audio (RSA)......3-123
Theft-Deterrent Feature.......3-125
Audio Steering Wheel
Controls..........................3-125
Radio Reception................3-126
Multi-Band Antenna............3-127
3-2 Instrument Panel
Page 125 of 422
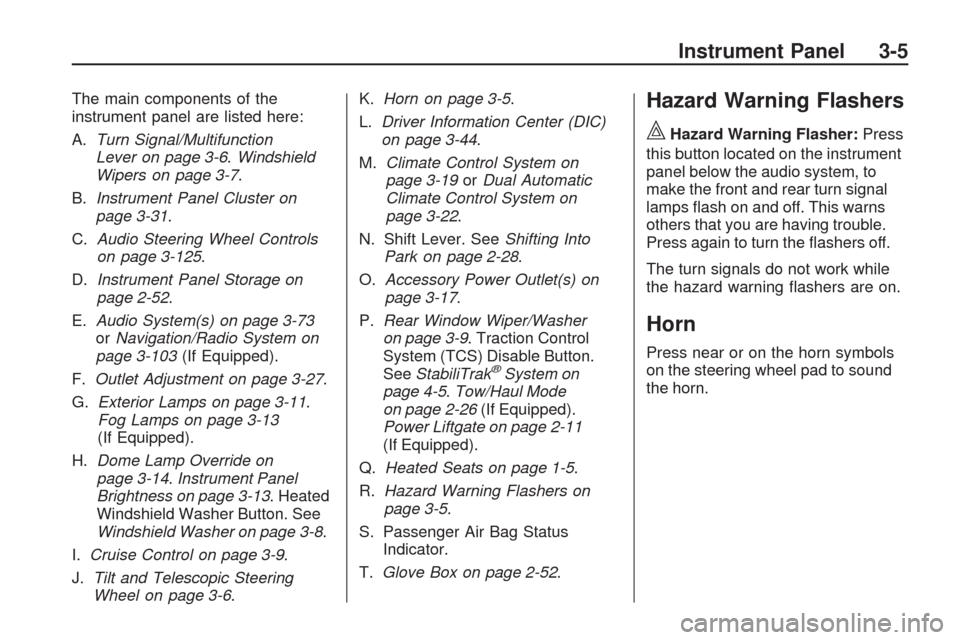
The main components of the
instrument panel are listed here:
A.Turn Signal/Multifunction
Lever on page 3-6.Windshield
Wipers on page 3-7.
B.Instrument Panel Cluster on
page 3-31.
C.Audio Steering Wheel Controls
on page 3-125.
D.Instrument Panel Storage on
page 2-52.
E.Audio System(s) on page 3-73
orNavigation/Radio System on
page 3-103(If Equipped).
F.Outlet Adjustment on page 3-27.
G.Exterior Lamps on page 3-11.
Fog Lamps on page 3-13
(If Equipped).
H.Dome Lamp Override on
page 3-14.Instrument Panel
Brightness on page 3-13. Heated
Windshield Washer Button. See
Windshield Washer on page 3-8.
I.Cruise Control on page 3-9.
J.Tilt and Telescopic Steering
Wheel on page 3-6.K.Horn on page 3-5.
L.Driver Information Center (DIC)
on page 3-44.
M.Climate Control System on
page 3-19orDual Automatic
Climate Control System on
page 3-22.
N. Shift Lever. SeeShifting Into
Park on page 2-28.
O.Accessory Power Outlet(s) on
page 3-17.
P.Rear Window Wiper/Washer
on page 3-9. Traction Control
System (TCS) Disable Button.
SeeStabiliTrak
®System on
page 4-5.Tow/Haul Mode
on page 2-26(If Equipped).
Power Liftgate on page 2-11
(If Equipped).
Q.Heated Seats on page 1-5.
R.Hazard Warning Flashers on
page 3-5.
S. Passenger Air Bag Status
Indicator.
T.Glove Box on page 2-52.
Hazard Warning Flashers
|
Hazard Warning Flasher:Press
this button located on the instrument
panel below the audio system, to
make the front and rear turn signal
lamps �ash on and off. This warns
others that you are having trouble.
Press again to turn the �ashers off.
The turn signals do not work while
the hazard warning �ashers are on.
Horn
Press near or on the horn symbols
on the steering wheel pad to sound
the horn.
Instrument Panel 3-5