steering wheel CHEVROLET TRAVERSE 2010 1.G Owner's Guide
[x] Cancel search | Manufacturer: CHEVROLET, Model Year: 2010, Model line: TRAVERSE, Model: CHEVROLET TRAVERSE 2010 1.GPages: 448, PDF Size: 6.96 MB
Page 283 of 448
Driving and Operating 9-31
If cruise control is being used when
the system activates, the StabiliTrak
light will flash and cruise control will
automatically disengage. Cruise
control may be reengaged when
road conditions allow. SeeCruise
Control on page 9‑31.
StabiliTrak may also turn off
automatically if it determines that a
problem exists with the system.
If the problem does not clear itself
after restarting the vehicle, see your
dealer for service.Cruise Control
With cruise control, a speed of
about 40 km/h (25 mph) or more can
be maintained without keeping your
foot on the accelerator. Cruise
control does not work at speeds
below about 40 km/h (25 mph).
When the brakes are applied, the
cruise control is disengaged.
{WARNING
Cruise control can be dangerous
where you cannot drive safely at
a steady speed. So, do not use
the cruise control on winding
roads or in heavy traffic.
Cruise control can be dangerous
on slippery roads. On such roads,
fast changes in tire traction can
cause excessive wheel slip, and
you could lose control. Do not use
cruise control on slippery roads.
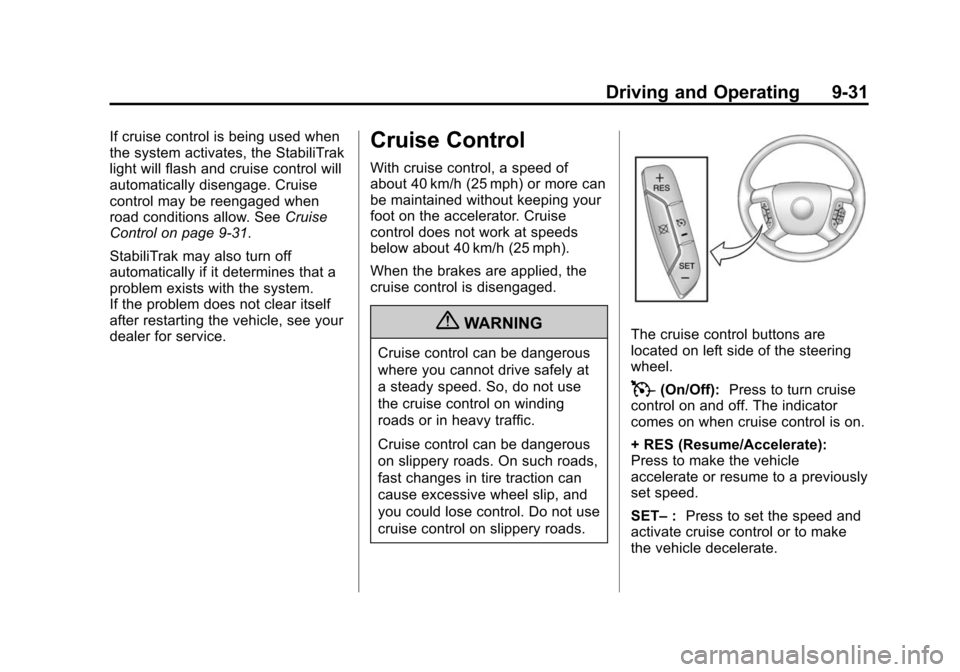
The cruise control buttons are
located on left side of the steering
wheel.
T(On/Off): Press to turn cruise
control on and off. The indicator
comes on when cruise control is on.
+ RES (Resume/Accelerate):
Press to make the vehicle
accelerate or resume to a previously
set speed.
SET– :Press to set the speed and
activate cruise control or to make
the vehicle decelerate.
Page 284 of 448
9-32 Driving and Operating
[(Cancel):Press to cancel cruise
control without erasing the set
speed from memory.
Setting Cruise Control
Cruise control will not work if the
parking brake is set, or if the master
cylinder brake fluid level is low.
The cruise control light on the
instrument panel cluster comes on
after the cruise control has been set
to the desired speed.
{WARNING
If you leave your cruise control on
when you are not using cruise,
you might hit a button and go into
cruise when you do not want to.
You could be startled and even
lose control. Keep the cruise
control switch off until you want to
use cruise control.
1. Press the
Ibutton to turn the
cruise control system on.
2. Get up to the speed desired. 3. Press and release the
SET– button located on the
steering wheel.
4. Take your foot off the accelerator.
Resuming a Set Speed
If the cruise control is set at a
desired speed and then the brakes
are applied, the cruise control is
disengaged without erasing the set
speed from memory.
Once the vehicle speed is 40 km/h
(25 mph) or greater, press the +RES
button on the steering wheel. The
vehicle returns to the previously set
speed and stays there.
Increasing Speed While Using
Cruise Control
If the cruise control is already
engaged,
.Press and hold the +RES button
on the steering wheel until the
desired speed is reached, then
release it.
.To increase vehicle speed in
small increments, press the
+RES button briefly. Each time
this is done, the vehicle goes
about 1.6 km/h (1 mph) faster.
Reducing Speed While Using
Cruise Control
If the cruise control system is
already engaged,
.Press and hold the SET– button
on the steering wheel until the
lower speed desired is reached,
then release it.
.To slow down in very small
amounts, press the SET– button
briefly. Each time this is done,
the vehicle goes about 1.6 km/h
(1 mph) slower.
Passing Another Vehicle While
Using Cruise Control
Use the accelerator pedal to
increase vehicle speed. When you
take your foot off the pedal, the
vehicle will slow down to the
previously set cruise speed.
Page 300 of 448
9-48 Driving and Operating
Following Distance
Stay at least twice as far behind the
vehicle ahead as you would when
driving the vehicle without a trailer.
This can help to avoid situations
that require heavy braking and
sudden turns.
Passing
More passing distance is needed
when towing a trailer. Because the
rig is longer, it is necessary to go
farther beyond the passed vehicle
before returning to the lane.
Backing Up
Hold the bottom of the steering
wheel with one hand. To move the
trailer to the left, move that hand to
the left. To move the trailer to the
right, move your hand to the right.
Always back up slowly and,
if possible, have someone
guide you.
Making Turns
Notice:Making very sharp turns
while trailering could cause the
trailer to come in contact with the
vehicle. The vehicle could be
damaged. Avoid making very
sharp turns while trailering.
When turning with a trailer, make
wider turns than normal so the
trailer will not strike soft shoulders,
curbs, road signs, trees or other
objects. Use the turn signal well in
advance and avoid jerky or sudden
maneuvers.
Turn Signals When Towing a
Trailer
The turn signal indicators on the
instrument panel flash whenever
signaling a turn or lane change.
Properly hooked up, the trailer
lamps also flash, telling other
drivers the vehicle is turning,
changing lanes or stopping. When towing a trailer, the arrows on
the instrument panel flash for turns
even if the bulbs on the trailer are
burned out. Check occasionally to
be sure the trailer bulbs are still
working.
Driving On Grades
Reduce speed and shift to a lower
gear before starting down a long or
steep downgrade. If the
transmission is not shifted down, the
brakes might have to be used so
much that they would get hot and no
longer work well. See
“Automatic
Engine Grade Braking” withinTow/
Haul Mode on page 9‑26.
The vehicle can tow in D (Drive).
Use a lower gear if the transmission
shifts too often.
Page 309 of 448
Vehicle Care 10-1
Vehicle Care
General Information
General Information . . . . . . . . . . 10-2
California Proposition65 Warning . . . . . . . . . . . . . . . . . 10-3
California Perchlorate Materials Requirements . . . . 10-3
Accessories and Modifications . . . . . . . . . . . . . . . 10-3
Vehicle Checks
Doing Your OwnService Work . . . . . . . . . . . . . . . 10-4
Hood . . . . . . . . . . . . . . . . . . . . . . . . 10-5
Engine Compartment Overview . . . . . . . . . . . . . . . . . . . 10-6
Engine Cover . . . . . . . . . . . . . . . . 10-7
Engine Oil . . . . . . . . . . . . . . . . . . . 10-8
Engine Oil Life System . . . . . 10-10
Automatic Transmission Fluid . . . . . . . . . . . . . . . . . . . . . . 10-11
Engine Air Cleaner/Filter . . . . 10-12
Cooling System . . . . . . . . . . . . 10-14
Engine Coolant . . . . . . . . . . . . . 10-14
Engine Overheating . . . . . . . . 10-18 Overheated Engine
Protection
Operating Mode . . . . . . . . . . . 10-20
Power Steering Fluid . . . . . . . 10-20
Washer Fluid . . . . . . . . . . . . . . . 10-21
Brakes . . . . . . . . . . . . . . . . . . . . . 10-22
Brake Fluid . . . . . . . . . . . . . . . . . 10-23
Battery . . . . . . . . . . . . . . . . . . . . . 10-24
Starter Switch Check . . . . . . . 10-25
Automatic Transmission Shift Lock Control System
Check . . . . . . . . . . . . . . . . . . . . . 10-25
Ignition Transmission Lock Check . . . . . . . . . . . . . . . . . . . . . 10-25
Park Brake and P (Park) Mechanism Check . . . . . . . . 10-26
Wiper Blade Replacement . . . . . . . . . . . . . . 10-26
Headlamp Aiming
Headlamp Aiming . . . . . . . . . . 10-27
Bulb Replacement
Bulb Replacement . . . . . . . . . . 10-27
Halogen Bulbs . . . . . . . . . . . . . . 10-27
Taillamps, Turn Signal,Sidemarker, and
Stoplamps . . . . . . . . . . . . . . . . 10-28
Replacement Bulbs . . . . . . . . . 10-29
Electrical System
High Voltage Devices and
Wiring . . . . . . . . . . . . . . . . . . . . . 10-29
Electrical System Overload . . . . . . . . . . . . . . . . . . 10-29
Fuses and Circuit
Breakers . . . . . . . . . . . . . . . . . . 10-30
Engine Compartment Fuse Block . . . . . . . . . . . . . . . . . . . . . 10-30
Instrument Panel Fuse Block . . . . . . . . . . . . . . . . . . . . . 10-33
Wheels and Tires
Tires . . . . . . . . . . . . . . . . . . . . . . . . 10-36
Tire Sidewall Labeling . . . . . . 10-36
Tire Designations . . . . . . . . . . . 10-38
Tire Terminology andDefinitions . . . . . . . . . . . . . . . . 10-39
Tire Pressure . . . . . . . . . . . . . . . 10-42
Tire Pressure Monitor System . . . . . . . . . . . . . . . . . . . 10-43
Tire Pressure Monitor Operation . . . . . . . . . . . . . . . . . 10-44
Tire Inspection . . . . . . . . . . . . . . 10-48
Tire Rotation . . . . . . . . . . . . . . . 10-48
When It Is Time for New Tires . . . . . . . . . . . . . . . . . . . . . . 10-49
Buying New Tires . . . . . . . . . . . 10-50
Page 342 of 448
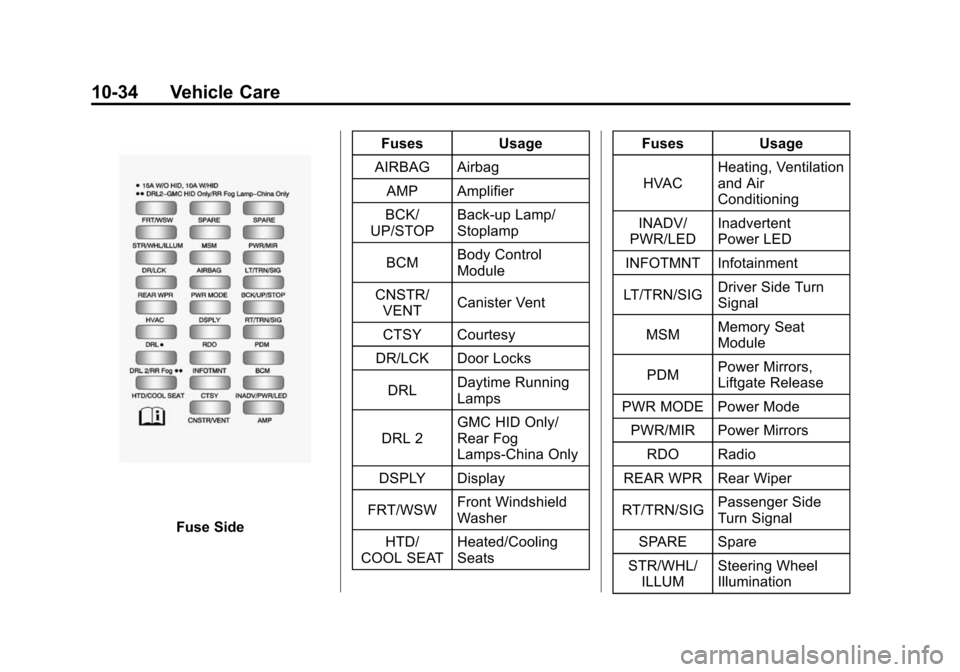
10-34 Vehicle Care
Fuse SideFuses
Usage
AIRBAG Airbag AMP Amplifier
BCK/
UP/STOP Back‐up Lamp/
Stoplamp
BCM Body Control
Module
CNSTR/ VENT Canister Vent
CTSY Courtesy
DR/LCK Door Locks
DRL Daytime Running
Lamps
DRL 2 GMC HID Only/
Rear Fog
Lamps-China Only
DSPLY Display
FRT/WSW Front Windshield
Washer
HTD/
COOL SEAT Heated/Cooling
Seats Fuses
Usage
HVAC Heating, Ventilation
and Air
Conditioning
INADV/
PWR/LED Inadvertent
Power LED
INFOTMNT Infotainment
LT/TRN/SIG Driver Side Turn
Signal
MSM Memory Seat
Module
PDM Power Mirrors,
Liftgate Release
PWR MODE Power Mode
PWR/MIR Power Mirrors RDO Radio
REAR WPR Rear Wiper
RT/TRN/SIG Passenger Side
Turn Signal
SPARE Spare
STR/WHL/ ILLUM Steering Wheel
Illumination
Page 347 of 448
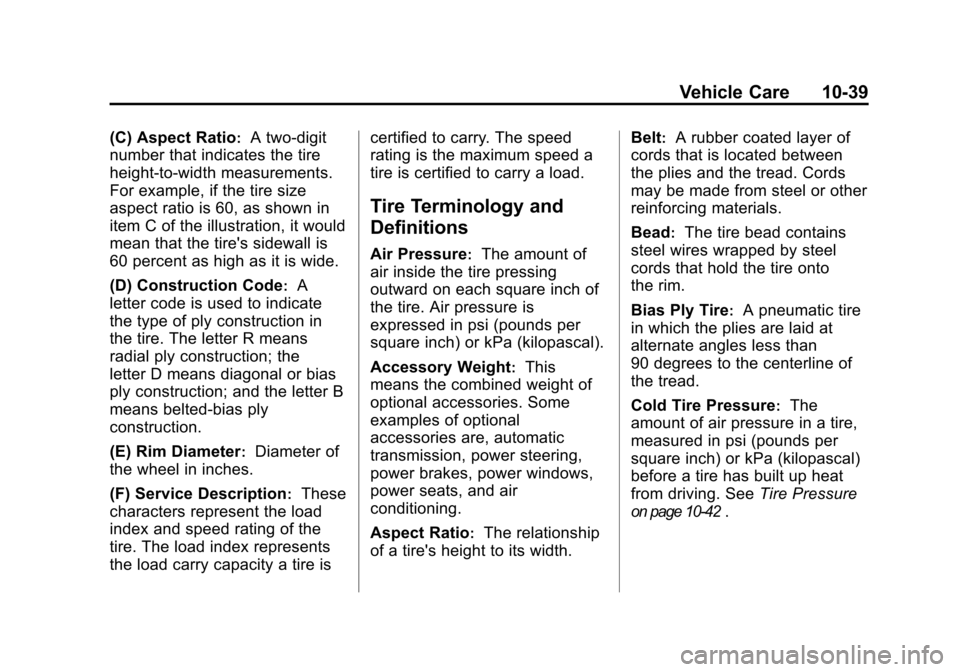
Vehicle Care 10-39
(C) Aspect Ratio:A two‐digit
number that indicates the tire
height‐to‐width measurements.
For example, if the tire size
aspect ratio is 60, as shown in
item C of the illustration, it would
mean that the tire's sidewall is
60 percent as high as it is wide.
(D) Construction Code
:A
letter code is used to indicate
the type of ply construction in
the tire. The letter R means
radial ply construction; the
letter D means diagonal or bias
ply construction; and the letter B
means belted‐bias ply
construction.
(E) Rim Diameter
:Diameter of
the wheel in inches.
(F) Service Description
:These
characters represent the load
index and speed rating of the
tire. The load index represents
the load carry capacity a tire is certified to carry. The speed
rating is the maximum speed a
tire is certified to carry a load.
Tire Terminology and
Definitions
Air Pressure:The amount of
air inside the tire pressing
outward on each square inch of
the tire. Air pressure is
expressed in psi (pounds per
square inch) or kPa (kilopascal).
Accessory Weight
:This
means the combined weight of
optional accessories. Some
examples of optional
accessories are, automatic
transmission, power steering,
power brakes, power windows,
power seats, and air
conditioning.
Aspect Ratio
:The relationship
of a tire's height to its width. Belt
:A rubber coated layer of
cords that is located between
the plies and the tread. Cords
may be made from steel or other
reinforcing materials.
Bead
:The tire bead contains
steel wires wrapped by steel
cords that hold the tire onto
the rim.
Bias Ply Tire
:A pneumatic tire
in which the plies are laid at
alternate angles less than
90 degrees to the centerline of
the tread.
Cold Tire Pressure
:The
amount of air pressure in a tire,
measured in psi (pounds per
square inch) or kPa (kilopascal)
before a tire has built up heat
from driving. See Tire Pressure
on page 10‑42.
Page 364 of 448
10-56 Vehicle Care
If a Tire Goes Flat
It is unusual for a tire to blowout
while you are driving, especially if
you maintain your vehicle's tires
properly. If air goes out of a tire, it is
much more likely to leak out slowly.
But if you should ever have a
blowout, here are a few tips about
what to expect and what to do:
If a front tire fails, the flat tire
creates a drag that pulls the vehicle
toward that side. Take your foot off
the accelerator pedal and grip the
steering wheel firmly. Steer to
maintain lane position, and then
gently brake to a stop well out of the
traffic lane.A rear blowout, particularly on a
curve, acts much like a skid and
may require the same correction
you would use in a skid. In any rear
blowout remove your foot from the
accelerator pedal. Get the vehicle
under control by steering the way
you want the vehicle to go. It may
be very bumpy and noisy, but you
can still steer. Gently brake to a
stop, well off the road if possible.
{WARNING
Lifting a vehicle and getting under
it to do maintenance or repairs is
dangerous without the
appropriate safety equipment and
training. If a jack is provided with
the vehicle, it is designed only for
(Continued)
WARNING (Continued)
changing a flat tire. If it is used for
anything else, you or others could
be badly injured or killed if the
vehicle slips off the jack. If a jack
is provided with the vehicle, only
use it for changing a flat tire.
If a tire goes flat, avoid further tire
and wheel damage by driving slowly
to a level place. Turn on the hazard
warning flashers. See Hazard
Warning Flashers on page 6‑3.
Page 393 of 448
Vehicle Care 10-85
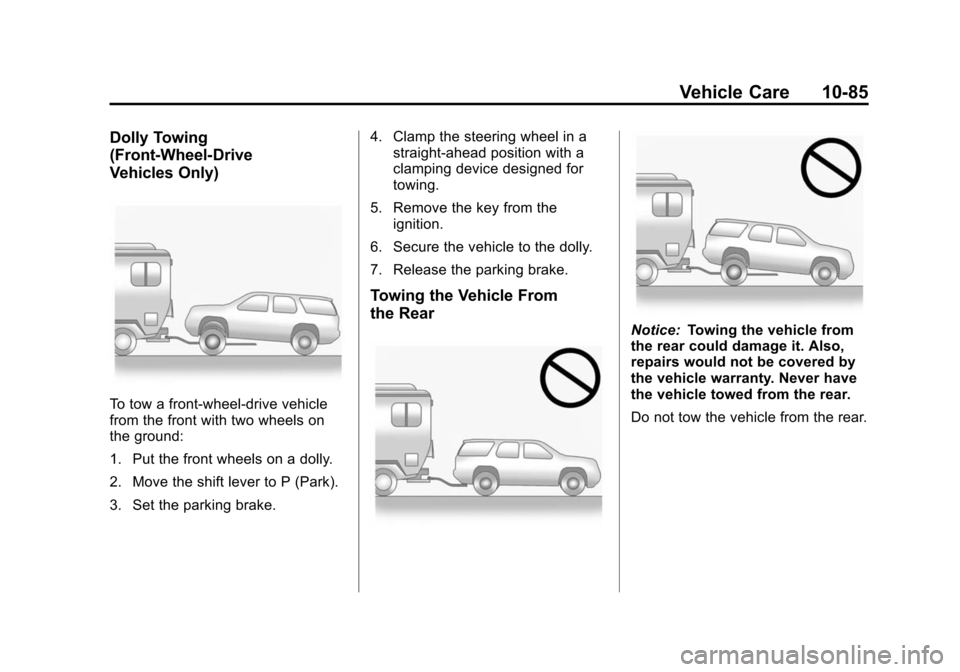
Dolly Towing
(Front-Wheel‐Drive
Vehicles Only)
To tow a front-wheel‐drive vehicle
from the front with two wheels on
the ground:
1. Put the front wheels on a dolly.
2. Move the shift lever to P (Park).
3. Set the parking brake. 4. Clamp the steering wheel in a
straight-ahead position with a
clamping device designed for
towing.
5. Remove the key from the ignition.
6. Secure the vehicle to the dolly.
7. Release the parking brake.
Towing the Vehicle From
the Rear
Notice: Towing the vehicle from
the rear could damage it. Also,
repairs would not be covered by
the vehicle warranty. Never have
the vehicle towed from the rear.
Do not tow the vehicle from the rear.
Page 444 of 448

i-10 INDEX
ShiftingInto Park . . . . . . . . . . . . . . . . . . . . . . 9-18
Out of Park . . . . . . . . . . . . . . . . . . . 9-19
Sidemarker and Stoplamps Bulb Replacement . . . . . . . . . . 10-25
Signals, Turn and Lane-Change . . . . . . . . . . . . . . . . . 6-3
Spare Tire Compact . . . . . . . . . . . . . . . . . . . . 10-72
Specifications and Capacities . . . . . . . . . . . . . . . . . . . . 12-2
Speedometer . . . . . . . . . . . . . . . . . . 5-12
StabiliTrak System . . . . . . . . . . . . . 9-27
StabiliTrak
®Indicator Light . . . . 5-19
Start Vehicle, Remote . . . . . . . . . . 2-4
Starter Switch Check . . . . . . . . . 10-22
Starting the Engine . . . . . . . . . . . . 9-16
Steering . . . . . . . . . . . . . . . . . . . . . . . . 9-4 Fluid, Power . . . . . . . . . . . . . . . . 10-18
Wheel Adjustment . . . . . . . . . . . . . 5-2
Wheel Controls . . . . . . . . . . . . . . . . 5-3 Storage Areas
Armrest . . . . . . . . . . . . . . . . . . . . . . . . 4-1
Cargo Cover . . . . . . . . . . . . . . . . . . . 4-3
Cargo Management System . . . 4-3
Center Console . . . . . . . . . . . . . . . . 4-1
Convenience Net . . . . . . . . . . . . . . 4-3
Floor Console . . . . . . . . . . . . . . . . . 4-2
Glove Box . . . . . . . . . . . . . . . . . . . . . 4-1
Instrument Panel . . . . . . . . . . . . . . 4-1
Roof Rack System . . . . . . . . . . . . . 4-4
Storing the Tire Sealant
and Compressor Kit . . . . . . . . . 10-61
Stuck Vehicle . . . . . . . . . . . . . . . . . . . 9-9
Sun Visors . . . . . . . . . . . . . . . . . . . . . 2-20
Sunroof . . . . . . . . . . . . . . . . . . . . . . . . 2-20
Symbols . . . . . . . . . . . . . . . . . . . . . . . . . . iv
System Roof Rack . . . . . . . . . . . . . . . . . . . . . 4-4
System Check Automatic TransmissionShiftlock Control . . . . . . . . . . 10-23
T
Tachometer . . . . . . . . . . . . . . . . . . . . 5-12
Taillamps
Bulb Replacement . . . . . . . . . . 10-25
Text Telephone (TTY) Users . . . 13-4
Theft-Deterrent Systems . . . . . . . 2-13 Immobilizer . . . . . . . . . . . . . . . . . . . 2-13
Third-Row Seats . . . . . . . . . . . . . . . 3-11
Time . . . . . . . . . . . . . . . . . . . . . . . . . . . . 5-8
Tires Buying New Tires . . . . . . . . . . . 10-47
Chains . . . . . . . . . . . . . . . . . . . . . . 10-51
Changing . . . . . . . . . . . . . . . . . . . 10-61
Compact Spare . . . . . . . . . . . . . 10-72
Designations . . . . . . . . . . . . . . . 10-36
Different Size . . . . . . . . . . . . . . . 10-48
If a Tire Goes Flat . . . . . . . . . . 10-52
Inflation Monitor System . . . . 10-42
Inspection . . . . . . . . . . . . . . . . . . 10-45
Messages . . . . . . . . . . . . . . . . . . . . 5-37
Pressure Light . . . . . . . . . . . . . . . . 5-20
Pressure Monitor System . . . 10-41
Rotation . . . . . . . . . . . . . . . . . . . . 10-45
Sealant andCompressor Kit . . . . . . . . . . . 10-53