seat adjustment CHEVROLET TRAVERSE 2011 1.G User Guide
[x] Cancel search | Manufacturer: CHEVROLET, Model Year: 2011, Model line: TRAVERSE, Model: CHEVROLET TRAVERSE 2011 1.GPages: 454, PDF Size: 6.56 MB
Page 58 of 454
Black plate (4,1)Chevrolet Traverse Owner Manual - 2011
3-4 Seats and Restraints
To manually raise or lower the seat,
move the lever (B) repeatedly
upward or downward.
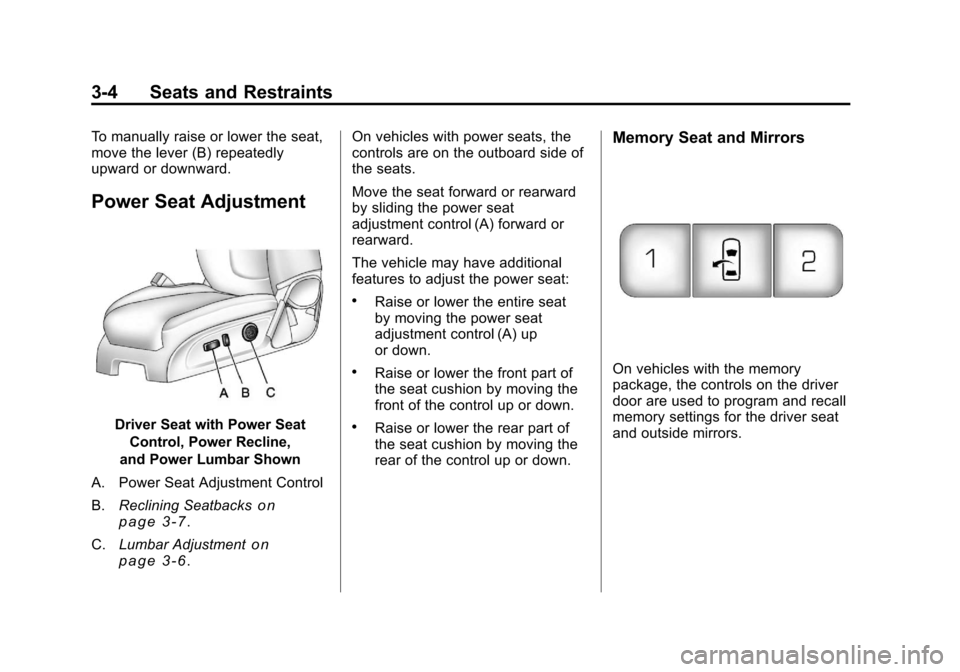
Power Seat Adjustment
Driver Seat with Power SeatControl, Power Recline,
and Power Lumbar Shown
A. Power Seat Adjustment Control
B. Reclining Seatbacks
on
page 3‑7.
C. Lumbar Adjustment
on
page 3‑6. On vehicles with power seats, the
controls are on the outboard side of
the seats.
Move the seat forward or rearward
by sliding the power seat
adjustment control (A) forward or
rearward.
The vehicle may have additional
features to adjust the power seat:
.Raise or lower the entire seat
by moving the power seat
adjustment control (A) up
or down.
.Raise or lower the front part of
the seat cushion by moving the
front of the control up or down.
.Raise or lower the rear part of
the seat cushion by moving the
rear of the control up or down.
Memory Seat and Mirrors
On vehicles with the memory
package, the controls on the driver
door are used to program and recall
memory settings for the driver seat
and outside mirrors.
Page 60 of 454
Black plate (6,1)Chevrolet Traverse Owner Manual - 2011
3-6 Seats and Restraints
A single beep sounds. The driver
seat moves back approximately
8 cm (3 in). To move the seat back
farther, press the easy exit seat
button again until the seat is all
the way back.
If something has blocked the driver
seat while recalling the exit position,
the recall may stop. Remove the
obstruction; then press and hold the
power seat control rearward for
two seconds. Try recalling the exit
position again. If the exit position is
still not recalling, see your dealer
for service.
See“Easy Exit Seat” underVehicle
Personalization (With DIC Buttons)
on page 5‑41for more information.
Lumbar Adjustment
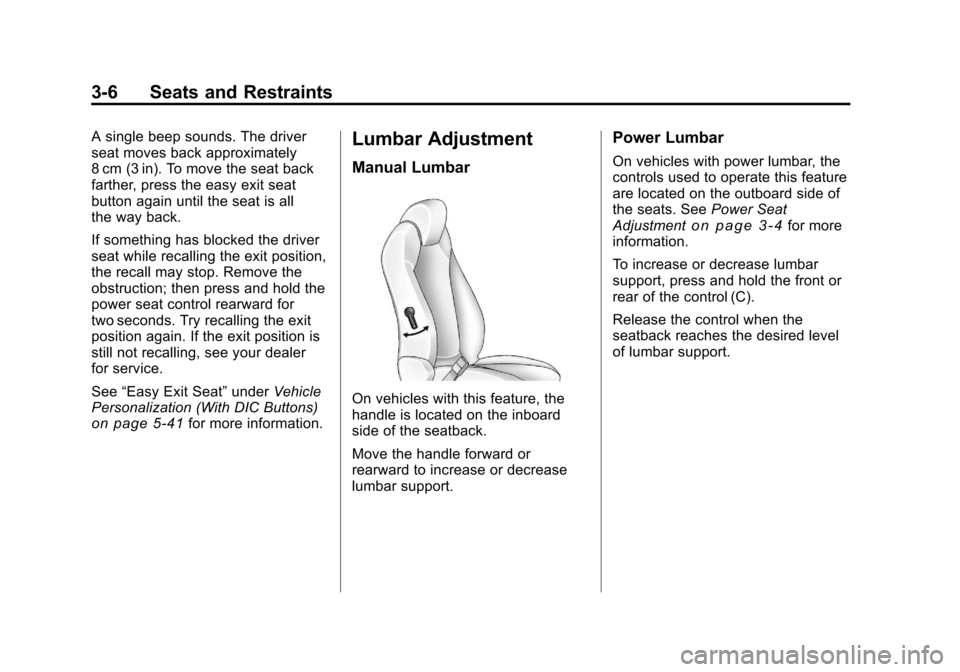
Manual Lumbar
On vehicles with this feature, the
handle is located on the inboard
side of the seatback.
Move the handle forward or
rearward to increase or decrease
lumbar support.
Power Lumbar
On vehicles with power lumbar, the
controls used to operate this feature
are located on the outboard side of
the seats. See Power Seat
Adjustment
on page 3‑4for more
information.
To increase or decrease lumbar
support, press and hold the front or
rear of the control (C).
Release the control when the
seatback reaches the desired level
of lumbar support.
Page 65 of 454
Black plate (11,1)Chevrolet Traverse Owner Manual - 2011
Seats and Restraints 3-11
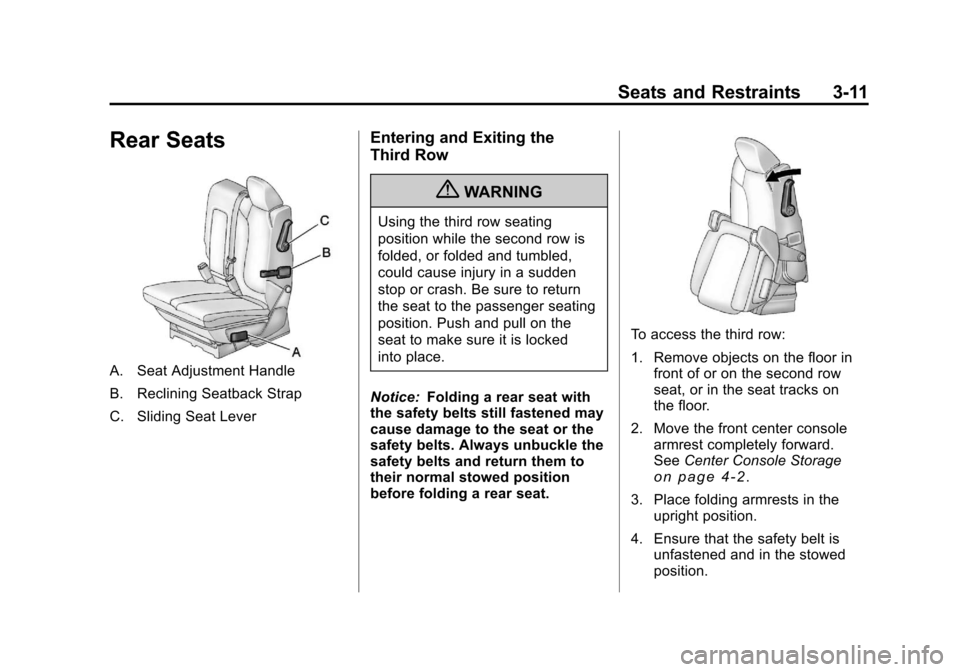
Rear Seats
A. Seat Adjustment Handle
B. Reclining Seatback Strap
C. Sliding Seat Lever
Entering and Exiting the
Third Row
{WARNING
Using the third row seating
position while the second row is
folded, or folded and tumbled,
could cause injury in a sudden
stop or crash. Be sure to return
the seat to the passenger seating
position. Push and pull on the
seat to make sure it is locked
into place.
Notice: Folding a rear seat with
the safety belts still fastened may
cause damage to the seat or the
safety belts. Always unbuckle the
safety belts and return them to
their normal stowed position
before folding a rear seat.
To access the third row:
1. Remove objects on the floor in front of or on the second row
seat, or in the seat tracks on
the floor.
2. Move the front center console armrest completely forward.
See Center Console Storage
on page 4‑2.
3. Place folding armrests in the upright position.
4. Ensure that the safety belt is unfastened and in the stowed
position.
Page 67 of 454
Black plate (13,1)Chevrolet Traverse Owner Manual - 2011
Seats and Restraints 3-13
Adjusting the Seats
To adjust the second row seats, pull
outward on the seat adjustment
handle (A). Slide the seat forward or
rearward to the desired position.
Release the handle and push and
pull on the seat to make sure it
is locked.
Third Row Seats
{WARNING
Using the third row seating
position while the second row is
folded, or pushed forward in the
entry position, could cause injury
in a sudden stop or crash. Be
sure to return the seat to the
passenger seating position. Push
and pull on the seat to make sure
it is locked into place.
The third row seats can be folded
forward or removed.
Notice: Folding a rear seat with
the safety belts still fastened may
cause damage to the seat or the
safety belts. Always unbuckle the
safety belts and return them to
their normal stowed position
before folding a rear seat. To fold the seatback:
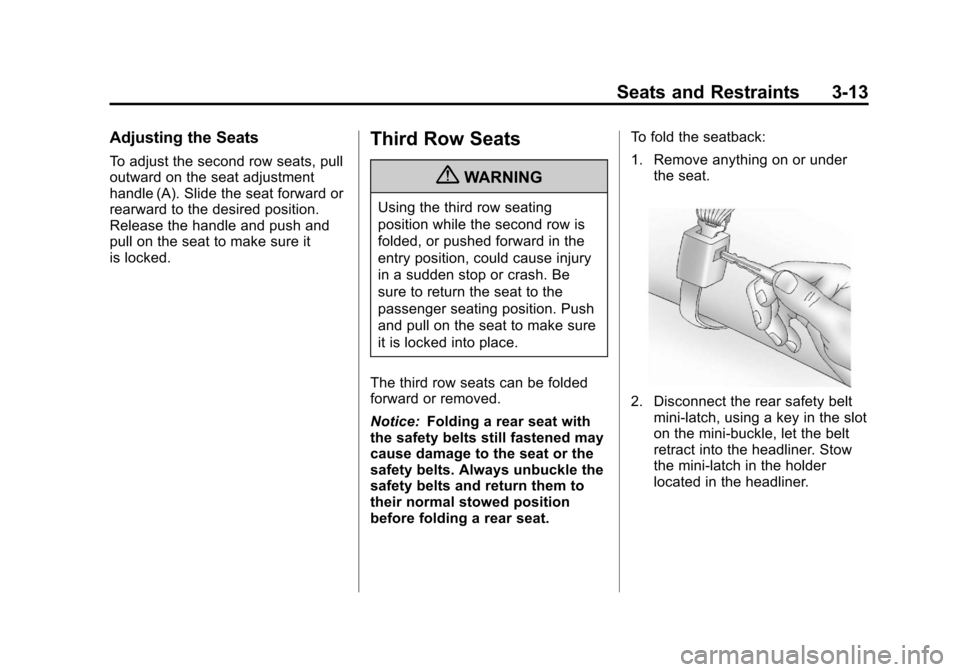
1. Remove anything on or under
the seat.
2. Disconnect the rear safety beltmini-latch, using a key in the slot
on the mini-buckle, let the belt
retract into the headliner. Stow
the mini-latch in the holder
located in the headliner.
Page 80 of 454
Black plate (26,1)Chevrolet Traverse Owner Manual - 2011
3-26 Seats and Restraints
Shoulder Belt Height Adjuster
The vehicle has a shoulder belt
height adjuster for the driver and
right front passenger seating
positions.
Adjust the height so the shoulder
portion of the belt is on the shoulder
but not falling off of it. The belt
should be close to but not
contacting the neck. Improper
shoulder belt height adjustment
could reduce the effectiveness of
the safety belt in a crash.
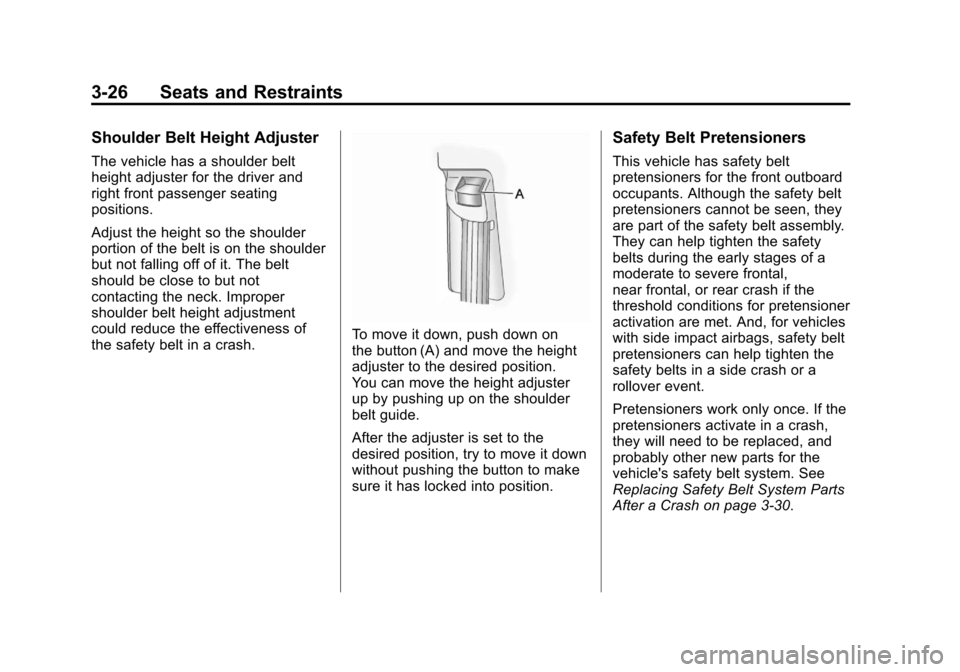
To move it down, push down on
the button (A) and move the height
adjuster to the desired position.
You can move the height adjuster
up by pushing up on the shoulder
belt guide.
After the adjuster is set to the
desired position, try to move it down
without pushing the button to make
sure it has locked into position.
Safety Belt Pretensioners
This vehicle has safety belt
pretensioners for the front outboard
occupants. Although the safety belt
pretensioners cannot be seen, they
are part of the safety belt assembly.
They can help tighten the safety
belts during the early stages of a
moderate to severe frontal,
near frontal, or rear crash if the
threshold conditions for pretensioner
activation are met. And, for vehicles
with side impact airbags, safety belt
pretensioners can help tighten the
safety belts in a side crash or a
rollover event.
Pretensioners work only once. If the
pretensioners activate in a crash,
they will need to be replaced, and
probably other new parts for the
vehicle's safety belt system. See
Replacing Safety Belt System Parts
After a Crash on page 3‑30.
Page 189 of 454
Black plate (1,1)Chevrolet Traverse Owner Manual - 2011
Infotainment System 7-1
Infotainment
System
Introduction
Introduction . . . . . . . . . . . . . . . . . . . 7-1
Theft-Deterrent Feature . . . . . . . 7-2
Operation . . . . . . . . . . . . . . . . . . . . . 7-2
Radio
AM-FM Radio . . . . . . . . . . . . . . . . . 7-6
Satellite Radio . . . . . . . . . . . . . . . . 7-8
Radio Reception . . . . . . . . . . . . . 7-11
Multi-Band Antenna . . . . . . . . . . 7-12
Audio Players
CD Player . . . . . . . . . . . . . . . . . . . 7-12
CD/DVD Player . . . . . . . . . . . . . . 7-14
MP3 (Radio with CD andRadio with CD/USB) . . . . . . . 7-21
MP3 (Radio with CD/DVD) . . . 7-27
Auxiliary Devices . . . . . . . . . . . . 7-33
Rear Seat Infotainment
Rear Seat Entertainment
(RSE) System . . . . . . . . . . . . . . 7-35
Rear Seat Audio (RSA) System . . . . . . . . . . . . . . . . . . . . . 7-44
Phone
Bluetooth . . . . . . . . . . . . . . . . . . . . 7-46
Introduction
Read the following pages to
become familiar with the audio
system's features.
{WARNING
Taking your eyes off the road for
extended periods could cause a
crash resulting in injury or death
to you or others. Do not give
extended attention to
entertainment tasks while driving.
This system provides access to
many audio and non audio listings.
To minimize taking your eyes off the
road while driving, do the following
while the vehicle is parked:
.Become familiar with the
operation and controls of the
audio system.
.Set up the tone, speaker
adjustments, and preset radio
stations.
Page 222 of 454
Black plate (34,1)Chevrolet Traverse Owner Manual - 2011
7-34 Infotainment System
To use an auxiliary input device,
connect a 3.5 mm (1/8 in) cable to
the radio's front auxiliary input jack.
O(Power/Volume):Turn
clockwise or counterclockwise to
increase or decrease the volume of
the portable player. Additional
volume adjustments might have
to be made from the portable
device if the volume is not loud or
soft enough.
BAND: Press to listen to the radio
when a portable audio device is
playing. The portable audio device
continues playing, so you might
want to stop it or turn it off.
CD/AUX (CD/Auxiliary): Press to
select between CD, or Auxiliary.
.When a CD is in the player the
CD icon and a message
showing the disc and/or track
number displays.
.If an auxiliary input device is not
connected, “No Input Device
Found” displays. DVD/CD AUX (Auxiliary):
Press to
select between DVD, CD,
or Auxiliary.
.If an auxiliary input device is not
connected, “No Aux Input
Device” displays.
.When a disc is in either slot, the
DVD/CD text tab and a message
showing the track or chapter
number displays.
.If an auxiliary input device is not
connected, and a disc is in both
the DVD slot and the CD slot the
DVD/CD AUX button only cycles
between the two sources and
does not indicate “No Aux Input
Device”.
.If a front auxiliary input device is
connected, the DVD/CD AUX
button cycles through all
available options.
If a disc is inserted into top DVD
slot, the rear seat operator can turn
on the video screen and use the remote control to only navigate the
CD tracks through the remote
control.
See
“Using the Auxiliary Input
Jack(s)” later in this section,
or “Audio/Video (A/V) Jacks” under,
Rear Seat Entertainment (RSE)
System
on page 7‑35for more
information.
Using the USB Port
For vehicles with a USB port,
the connector is located in the
center console.
Radios with a USB port can control
a USB storage device or an iPod
®
using the radio buttons and knobs.
See MP3 (Radio with CD and Radio
with CD/USB)
on page 7‑21or
MP3 (Radio with CD/DVD)on
page 7‑27for information about
how to connect and control a USB
storage device or an iPod.
Page 443 of 454

Black plate (1,1)Chevrolet Traverse Owner Manual - 2011
INDEX i-1
A
Accessories andModifications . . . . . . . . . . . . . . . . . 10-3
Accessory Power . . . . . . . . . . . . . . 9-18
Add-On Electrical Equipment . . . . . . . . . . . . . . . . . . . 9-57
Adding Equipment to the
Airbag-Equipped Vehicle . . . . . 3-45
Adjustments Lumbar, Front Seats . . . . . . . . . . . 3-6
Air Cleaner/Filter, Engine . . . . . 10-12
Air Vents . . . . . . . . . . . . . . . . . . . . . . 8-12
Airbag System
Check . . . . . . . . . . . . . . . . . . . . . . . . 3-46
How Does an AirbagRestrain? . . . . . . . . . . . . . . . . . . . 3-37
Passenger Sensing System . . . . . . . . . . . . . . . . . . . . . . 3-39
What Makes an Airbag Inflate? . . . . . . . . . . . . . . . . . . . . . . 3-36
What Will You See After an Airbag Inflates? . . . . . . . . . . 3-38 Airbag System (cont.)
When Should an Airbag
Inflate? . . . . . . . . . . . . . . . . . . . . . . 3-35
Where Are the Airbags? . . . . . . 3-33
Airbags Adding Equipment to theVehicle . . . . . . . . . . . . . . . . . . . . . . 3-45
Passenger Status Indicator . . . 5-15
Readiness Light . . . . . . . . . . . . . . 5-15
Servicing Airbag-Equipped Vehicles . . . . . . . . . . . . . . . . . . . . . 3-44
System Check . . . . . . . . . . . . . . . . 3-31
Alarm System Anti-Theft . . . . . . . . . . . . . . . . . . . . . 2-12
All-Wheel Drive . . . . . . . . . . . . . . . . 9-27
AM-FM Radio . . . . . . . . . . . . . . . . . . . 7-6
Antenna Multi-Band . . . . . . . . . . . . . . . . . . . . 7-12
Anti-Theft Alarm System . . . . . . . . . . . . . . . . 2-12
Alarm System Messages . . . . . 5-37
Antilock Brake System (ABS) . . . . . . . . . . . . . . . . 9-28
Warning Light . . . . . . . . . . . . . . . . . 5-20 Appearance Care
Exterior . . . . . . . . . . . . . . . . . . . . . 10-89
Interior . . . . . . . . . . . . . . . . . . . . . . 10-92
Armrest Storage . . . . . . . . . . . . . . . . 4-1
Assistance Program, Roadside . . . . . . . . . . . . . . 13-8, 13-10
Audio Players . . . . . . . . . . . . . . . . . 7-12
CD . . . . . . . . . . . . . . . . . . . . . . . . . . . 7-12
CD/DVD . . . . . . . . . . . . . . . . . . . . . . 7-14
MP3 . . . . . . . . . . . . . . . . . . . . 7-21, 7-27
Audio System
Radio Reception . . . . . . . . . . . . . . 7-11
Rear Seat (RSA) . . . . . . . . . . . . . 7-44
Theft-Deterrent Feature . . . . . . . . 7-2
Automatic Door Locks . . . . . . . . . . . . . . . . . . . . 2-8
Automatic Transmission . . . . . . . 9-24 Fluid . . . . . . . . . . . . . . . . . . . . . . . . 10-12
Manual Mode . . . . . . . . . . . . . . . . . 9-26
Automatic Transmission Shift Lock Control
Function Check . . . . . . . . . . . . . 10-27
Auxiliary Devices . . . . . . . . . . . . . . 7-33
Page 447 of 454

Black plate (5,1)Chevrolet Traverse Owner Manual - 2011
INDEX i-5
FluidAutomatic Transmission . . . . 10-12
Brakes . . . . . . . . . . . . . . . . . . . . . . 10-24
Power Steering . . . . . . . . . . . . . 10-21
Washer . . . . . . . . . . . . . . . . . . . . . 10-22
Folding Mirrors . . . . . . . . . . . . . . . . 2-16
Front Seats Adjustment . . . . . . . . . . . . . . . . . . . . 3-3
Heated . . . . . . . . . . . . . . . . . . . . . . . . 3-9
Heated and Ventilated . . . . . . . . 3-10
Fuel . . . . . . . . . . . . . . . . . . . . . . . . . . . 9-40
Additives . . . . . . . . . . . . . . . . . . . . . 9-42
Filling a Portable FuelContainer . . . . . . . . . . . . . . . . . . . 9-45
Filling the Tank . . . . . . . . . . . . . . . 9-44
Fuels in Foreign Countries . . . . 9-42
Gasoline Specifications . . . . . . . 9-41
Gauge . . . . . . . . . . . . . . . . . . . . . . . . 5-12
Recommended . . . . . . . . . . . . . . . 9-41
Requirements, California . . . . . 9-41
System Messages . . . . . . . . . . . . 5-35
Fuel Economy Driving for Better . . . . . . . . . . . . . 1-23 Fuses
Engine Compartment
Fuse Block . . . . . . . . . . . . . . . . 10-32
Fuses and Circuit Breakers . . . . . . . . . . . . . . . . . . 10-32
Instrument Panel Fuse Block . . . . . . . . . . . . . . . . . . . . . . 10-35
G
Garage Door Opener . . . . . . . . . . 5-48
Programming . . . . . . . . . . . . . . . . . 5-48
Gasoline Specifications . . . . . . . . . . . . . . . . . 9-41
Gauges Engine CoolantTemperature . . . . . . . . . . . . . . . . 5-13
Fuel . . . . . . . . . . . . . . . . . . . . . . . . . . 5-12
Odometer . . . . . . . . . . . . . . . . . . . . . 5-12
Speedometer . . . . . . . . . . . . . . . . . 5-12
Tachometer . . . . . . . . . . . . . . . . . . . 5-12
Voltmeter . . . . . . . . . . . . . . . . . . . . . 5-13
Warning Lights and Indicators . . . . . . . . . . . . . . . . . . . 5-10 General Information
Service and Maintenance . . . . . 11-1
Towing . . . . . . . . . . . . . . . . . . . . . . . . 9-46
Vehicle Care . . . . . . . . . . . . . . . . . . 10-2
Glove Box . . . . . . . . . . . . . . . . . . . . . . 4-1
GM Mobility Reimbursement Program . . . . . . . . . . . . . . . . . . . . . . 13-8
H
Halogen Bulbs . . . . . . . . . . . . . . . . 10-29
Hazard Warning Flashers . . . . . . . 6-3
Head Restraints . . . . . . . . . . . . . . . . 3-2
Headlamps
Aiming . . . . . . . . . . . . . . . . . . . . . . 10-29
Bulb Replacement . . . . . . . . . . 10-29
Daytime Running Lamps/Automatic Headlamp
System . . . . . . . . . . . . . . . . . . . . . . . 6-3
Delayed . . . . . . . . . . . . . . . . . . . . . . . 6-3
Flash-to-Pass . . . . . . . . . . . . . . . . . . 6-2
High-Beam On Light . . . . . . . . . . 5-23
High/Low Beam Changer . . . . . . 6-2
Page 449 of 454

Black plate (7,1)Chevrolet Traverse Owner Manual - 2011
INDEX i-7
LocksAutomatic Door . . . . . . . . . . . . . . . . 2-8
Delayed Locking . . . . . . . . . . . . . . . 2-8
Door . . . . . . . . . . . . . . . . . . . . . . . . . . . 2-7
Lockout Protection . . . . . . . . . . . . . 2-8
Power Door . . . . . . . . . . . . . . . . . . . . 2-8
Safety . . . . . . . . . . . . . . . . . . . . . . . . . 2-8
Loss of Control . . . . . . . . . . . . . . . . . 9-5
Lower Anchors and Tethers for Children (LATCH
SYSTEM) . . . . . . . . . . . . . . . . . . . . 3-56
Lumbar Adjustment . . . . . . . . . . . . . 3-6 Front Seats . . . . . . . . . . . . . . . . . . . . 3-6
M
MaintenanceRecords . . . . . . . . . . . . . . . . . . . . . . 11-9
Maintenance Schedule
Recommended Fluids andLubricants . . . . . . . . . . . . . . . . . . . 11-6
Scheduled Maintenance . . . . . . 11-2
Malfunction Indicator Lamp . . . . 5-16
Manual Mode . . . . . . . . . . . . . . . . . . 9-26
Memory Features . . . . . . . . . . . . . . . 1-7 Messages
Airbag System . . . . . . . . . . . . . . . . 5-37
Anti-Theft Alarm System . . . . . . 5-37
Battery Voltage and
Charging . . . . . . . . . . . . . . . . . . . . 5-32
Brake System . . . . . . . . . . . . . . . . 5-32
Door Ajar . . . . . . . . . . . . . . . . . . . . . 5-32
Engine Cooling System . . . . . . . 5-33
Engine Oil . . . . . . . . . . . . . . . . . . . . 5-34
Engine Power . . . . . . . . . . . . . . . . 5-35
Fuel System . . . . . . . . . . . . . . . . . . 5-35
Key and Lock . . . . . . . . . . . . . . . . . 5-36
Lamp . . . . . . . . . . . . . . . . . . . . . . . . . 5-36
Object Detection System . . . . . 5-36
Ride Control System . . . . . . . . . . 5-37
Service Vehicle . . . . . . . . . . . . . . . 5-38
Tire . . . . . . . . . . . . . . . . . . . . . . . . . . . 5-38
Transmission . . . . . . . . . . . . . . . . . 5-39
Vehicle . . . . . . . . . . . . . . . . . . . . . . . 5-31
Vehicle Reminder . . . . . . . . . . . . . 5-40
Vehicle Speed . . . . . . . . . . . . . . . . 5-40
Washer Fluid . . . . . . . . . . . . . . . . . 5-40 Mirrors
Automatic Dimming
Rearview . . . . . . . . . . . . . . . . . . . . 2-18
Blind Spot . . . . . . . . . . . . . . . . . . . . 2-16
Convex . . . . . . . . . . . . . . . . . . . . . . . 2-16
Folding . . . . . . . . . . . . . . . . . . . . . . . 2-16
Heated . . . . . . . . . . . . . . . . . . . . . . . 2-16
Manual Rearview . . . . . . . . . . . . . 2-18
Park Tilt . . . . . . . . . . . . . . . . . . . . . . 2-17
Power . . . . . . . . . . . . . . . . . . . . . . . . 2-16
Monitor System, Tire
Pressure . . . . . . . . . . . . . . . . . . . . 10-45
MP3 . . . . . . . . . . . . . . . . . . . . . 7-21, 7-27
Multi-Band Antenna . . . . . . . . . . . . 7-12N
Navigation System Vehicle Data Recording
and Privacy . . . . . . . . . . . . . . . 13-19
Net, Convenience . . . . . . . . . . . . . . 4-4
New Vehicle Break-In . . . . . . . . . . 9-16