tire pressure reset CHEVROLET TRAVERSE 2011 1.G Owners Manual
[x] Cancel search | Manufacturer: CHEVROLET, Model Year: 2011, Model line: TRAVERSE, Model: CHEVROLET TRAVERSE 2011 1.GPages: 454, PDF Size: 6.56 MB
Page 25 of 454
Black plate (19,1)Chevrolet Traverse Owner Manual - 2011
In Brief 1-19
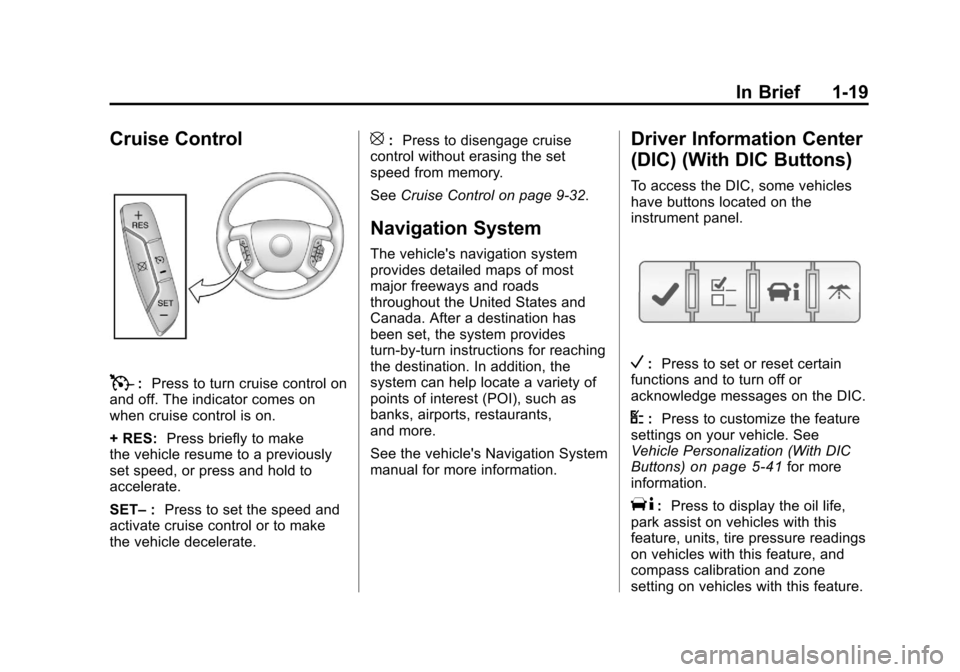
Cruise Control
T:Press to turn cruise control on
and off. The indicator comes on
when cruise control is on.
+ RES: Press briefly to make
the vehicle resume to a previously
set speed, or press and hold to
accelerate.
SET– :Press to set the speed and
activate cruise control or to make
the vehicle decelerate.
[: Press to disengage cruise
control without erasing the set
speed from memory.
See Cruise Control on page 9‑32.
Navigation System
The vehicle's navigation system
provides detailed maps of most
major freeways and roads
throughout the United States and
Canada. After a destination has
been set, the system provides
turn-by-turn instructions for reaching
the destination. In addition, the
system can help locate a variety of
points of interest (POI), such as
banks, airports, restaurants,
and more.
See the vehicle's Navigation System
manual for more information.
Driver Information Center
(DIC) (With DIC Buttons)
To access the DIC, some vehicles
have buttons located on the
instrument panel.
V:Press to set or reset certain
functions and to turn off or
acknowledge messages on the DIC.
U: Press to customize the feature
settings on your vehicle. See
Vehicle Personalization (With DIC
Buttons)
on page 5‑41for more
information.
T: Press to display the oil life,
park assist on vehicles with this
feature, units, tire pressure readings
on vehicles with this feature, and
compass calibration and zone
setting on vehicles with this feature.
Page 28 of 454
Black plate (22,1)Chevrolet Traverse Owner Manual - 2011
1-22 In Brief
During cooler conditions, the low tire
pressure warning light may appear
when the vehicle is first started and
then turn off. This may be an early
indicator that the tire pressures are
getting low and the tires need to be
inflated to the proper pressure.
The TPMS does not replace normal
monthly tire maintenance. It is the
driver’s responsibility to maintain
correct tire pressures.
See Tire Pressure Monitor System
on page 10‑45.
Tire Sealant and
Compressor Kit
This vehicle may come with a jack
and spare tire or a tire sealant and
compressor kit. The kit can be used
to seal small punctures in the tread
area of the tire.
SeeTire Sealant and Compressor
Kit
on page 10‑61for complete
operating information. If the vehicle came with a jack and
spare tire, see
If a Tire Goes Flat
on
page 10‑58.
Engine Oil Life System
The engine oil life system calculates
engine oil life based on vehicle use
and displays the CHANGE ENGINE
OIL SOON message when it is time
to change the engine oil and filter.
The oil life system should be reset
to 100% only following an oil
change.
Resetting the Oil Life System
1. Turn the ignition to ON/RUN, with the engine off.
2. If the vehicle has Driver Information Center (DIC)
buttons: Press the vehicle
information button until OIL LIFE
REMAINING displays.
If the vehicle does not have
Driver Information Center (DIC)
buttons: The vehicle must be in
P (Park) to access this display. Press the trip odometer reset
stem until OIL LIFE REMAINING
displays.
3. If the vehicle has Driver Information Center (DIC)
buttons: Press and hold the set/
reset button until “100%”is
displayed. Three chimes sound
and the CHANGE ENGINE OIL
SOON message goes off.
If the vehicle does not have
Driver Information Center (DIC)
buttons: Press and hold the trip
odometer reset stem until OIL
LIFE REMAINING shows
“100%.” Three chimes sound
and the CHANGE ENGINE OIL
SOON message goes off.
4. Turn the key to LOCK/OFF.
See Engine Oil Life System
on
page 10‑11.
Page 153 of 454
Black plate (25,1)Chevrolet Traverse Owner Manual - 2011
Instruments and Controls 5-25
T(Vehicle Information):Press
this button to display the oil life,
park assist on vehicles with this
feature, units, tire pressure readings
on vehicles with this feature, and
compass calibration and zone
setting on vehicles with this feature.
3(Trip/Fuel): Press this button
to display the odometer, trip
odometers, fuel range, average
economy, timer, fuel used, and
average speed.
Vehicle Information Menu
Items
T(Vehicle Information): Press
this button to scroll through the
following menu items:
OIL LIFE
Press the vehicle information button
until OIL LIFE REMAINING
displays. This display shows an
estimate of the oil's remaining useful
life. If you see 99% OIL LIFE
REMAINING on the display, that
means 99% of the current oil life
remains. The engine oil life system will alert you to change the oil on a
schedule consistent with your
driving conditions.
When the remaining oil life is low,
the CHANGE ENGINE OIL SOON
message will appear on the display.
See
“CHANGE ENGINE OIL SOON”
under Engine Oil Messages
on
page 5‑34. You should change the
oil as soon as you can. See Engine
Oil
on page 10‑8. In addition to the
engine oil life system monitoring the
oil life, additional maintenance is
recommended in the Maintenance
Schedule in this manual. See
Scheduled Maintenance
on
page 11‑2for more information.
Remember, you must reset the OIL
LIFE display yourself after each oil
change. It will not reset itself. Also,
be careful not to reset the OIL LIFE
display accidentally at any time
other than when the oil has just
been changed. It cannot be reset
accurately until the next oil change.
To reset the engine oil life system,
see Engine Oil Life System
on
page 10‑11. PARK ASSIST
If your vehicle has the Ultrasonic
Rear Parking Assist (URPA) system,
press the vehicle information button
until PARK ASSIST displays. This
display allows the system to be
turned on or off. Once in this
display, press the set/reset button to
select between ON or OFF. If you
choose ON, the system will be
turned on. If you choose OFF, the
system will be turned off. The URPA
system automatically turns back on
after each vehicle start. When the
URPA system is turned off and the
vehicle is shifted out of P (Park), the
DIC will display the PARK ASSIST
OFF message as a reminder that
the system has been turned off. See
Object Detection System Messages
on page 5‑36and
Ultrasonic
Parking Assiston page 9‑34for
more information.
Page 154 of 454
Black plate (26,1)Chevrolet Traverse Owner Manual - 2011
5-26 Instruments and Controls
UNITS
Press the vehicle information button
until UNITS displays. This display
allows you to select between Metric
or English units of measurement.
Once in this display, press the
set/reset button to select between
METRIC or ENGLISH units. All of
the vehicle information will then be
displayed in the unit of
measurement selected.
FRONT TIRES or REAR TIRES
On vehicles with the Tire Pressure
Monitor System (TPMS), the
pressure for each tire can be viewed
in the DIC. The tire pressure will be
shown in either kilopascals (kPa) or
pounds per square inch (psi).
Press the vehicle information button
until the DIC displays FRONT
TIRES kPa (PSI) LEFT ##
RIGHT ##. Press the vehicle
information button again until
the DIC displays REAR TIRESkPa (PSI) LEFT ## RIGHT ##. If a low tire pressure condition is
detected by the system while
driving, a message advising you
add air to a specific tire will appear
in the display. See
Tire Pressure
on
page 10‑44and Tire Messageson
page 5‑38for more information.
If the tire pressure display shows
dashes instead of a value, there
may be a problem with your vehicle.
If this consistently occurs, see your
dealer for service.
COMPASS ZONE SETTING
This display will be available if the
vehicle has a compass. See
Compass
on page 5‑6for more
information.
COMPASS RECALIBRATION
This display will be available if the
vehicle has a compass. See
Compass
on page 5‑6for more
information.
Blank Display
This display shows no information.
Trip/Fuel Menu Items
3(Trip/Fuel): Press this button
to scroll through the following menu
items:
ODOMETER
Press the trip/fuel button until
ODOMETER displays. This display
shows the distance the vehicle has
been driven in either kilometers (km)
or miles (mi). Pressing the trip
odometer reset stem will also
display the odometer.
To switch between English and
metric measurements, see “UNITS”
earlier in this section.
TRIP A and TRIP B
Press the trip/fuel button until
TRIP A or TRIP B displays. This
display shows the current distance
traveled in either kilometers (km) or
miles (mi) since the last reset for
each trip odometer. Both trip
odometers can be used at the same
time. Pressing the trip odometer
reset stem will also display the trip
odometers.
Page 166 of 454
Black plate (38,1)Chevrolet Traverse Owner Manual - 2011
5-38 Instruments and Controls
Service Vehicle Messages
SERVICE A/C
(Air Conditioning) SYSTEM
This message displays when the
electronic sensors that control the
air conditioning and heating
systems are no longer working.
Have the climate control system
serviced by your dealer if you notice
a drop in heating and air
conditioning efficiency.
SERVICE POWER STEERING
This message displays when a
problem is detected with the power
steering system. When this
message is displayed, you may
notice that the effort required to
steer the vehicle increases or feels
heavier, but you will still be able to
steer the vehicle. Have your vehicle
serviced by your dealer immediately.
SERVICE VEHICLE SOON
This message displays when a
non-emissions related malfunction
occurs. Have the vehicle serviced
by your dealer as soon as possible.
STARTING DISABLED
SERVICE THROTTLE
This message displays when your
vehicle's throttle system is not
functioning properly. Have your
vehicle serviced by your dealer.
Tire Messages
TIRE LOW ADD AIR TO TIRE
On vehicles with the Tire Pressure
Monitor System (TPMS), this
message displays when the
pressure in one or more of the
vehicle's tires is low.
This message also displays
LEFT FRT (left front), RIGHT FRT
(right front), LEFT RR (left rear),
or RIGHT RR (right rear) to indicate
the location of the low tire.The low tire pressure warning light
will also come on. See
Tire
Pressure Light on page 5‑21.
If a tire pressure message appears
on the DIC, stop as soon as you
can. Inflate the tires by adding air
until the tire pressure is equal to the
values shown on the Tire Loading
Information label. See Tires
on
page 10‑38, Vehicle Load Limitson
page 9‑12, and Tire Pressureon
page 10‑44.
You can receive more than one tire
pressure message at a time. To
read the other messages that may
have been sent at the same time,
press the set/reset button or the trip
odometer reset stem. The DIC also
shows the tire pressure values. See
Driver Information Center (DIC)
(With DIC Buttons)
on page 5‑24or
Driver Information Center (DIC)
(Without DIC Buttons)
on
page 5‑29.
Page 167 of 454
Black plate (39,1)Chevrolet Traverse Owner Manual - 2011
Instruments and Controls 5-39
SERVICE TIRE MONITOR
SYSTEM
On vehicles with the Tire Pressure
Monitor System (TPMS), this
message displays if a part on the
TPMS is not working properly. The
tire pressure light also flashes and
then remains on during the same
ignition cycle. SeeTire Pressure
Light
on page 5‑21. Several
conditions may cause this message
to appear. See Tire Pressure
Monitor Operation
on page 10‑47for
more information. If the warning
comes on and stays on, there may
be a problem with the TPMS.
See your dealer.
TIRE LEARNING ACTIVE
This message displays when
the Tire Pressure Monitor System
(TPMS) is re-learning the tire
positions on your vehicle. The tire
positions must be re-learned after
rotating the tires or after replacing a tire or sensor. See
Tire Rotation
on
page 10‑50, Tire Pressure Monitor
Systemon page 10‑45, and Tire
Pressureon page 10‑44for more
information.
Transmission Messages
ALL WHEEL DRIVE OFF
If your vehicle has the All-Wheel
Drive (AWD) system, this message
displays when there is a compact
spare tire on the vehicle, when the
Antilock Brake System (ABS)
warning light comes on, or when the
rear differential fluid is overheating.
This message turns off when the
differential fluid cools.
The AWD system is disabled until
the compact spare tire is replaced
by a full-size tire. If the warning
message is still on after putting on
the full-size tire, you need to reset
the warning message. To reset the warning message, turn the ignition
off and then back on again after
30 seconds. If the message stays
on, see your dealer right away. See
All-Wheel Drive
on page 9‑27for
more information.
SERVICE ALL WHEEL DRIVE
If your vehicle has the All-Wheel
Drive (AWD) system, this message
displays if there is a problem with
this system. If this message
appears, stop as soon as possible
and turn off the vehicle. Restart the
vehicle after 30 seconds and check
for the message on the DIC display.
If the message is still displayed or
appears again when you begin
driving, the AWD system needs
service. See your dealer.
SERVICE TRANSMISSION
This message displays when there
is a problem with the transmission.
See your dealer for service.
Page 361 of 454
Black plate (51,1)Chevrolet Traverse Owner Manual - 2011
Vehicle Care 10-51
SeeWhen It Is Time for New
Tires
on page 10‑52andWheel
Replacement
on page 10‑57.
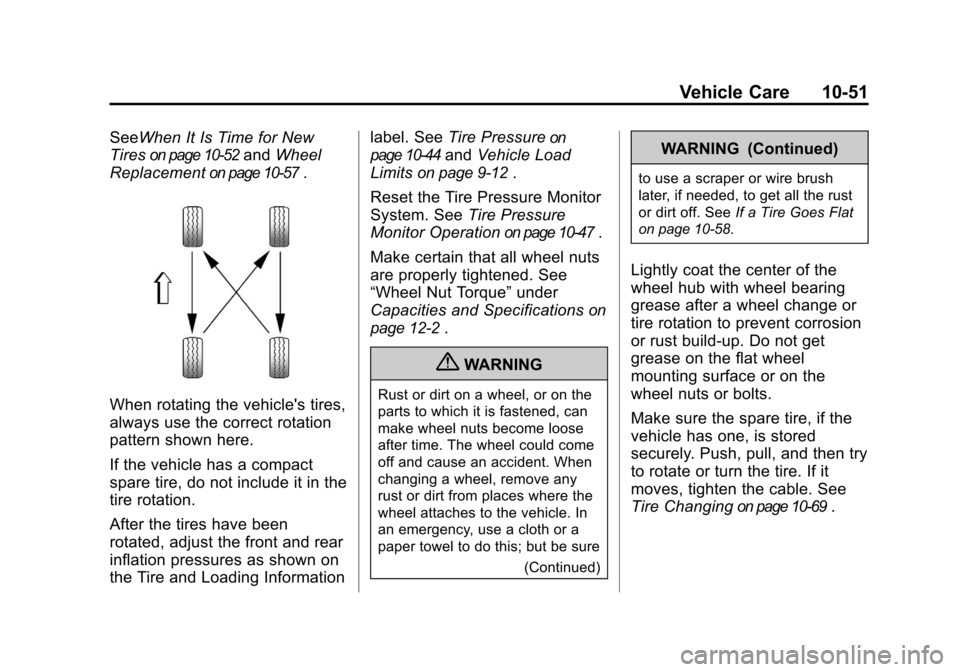
When rotating the vehicle's tires,
always use the correct rotation
pattern shown here.
If the vehicle has a compact
spare tire, do not include it in the
tire rotation.
After the tires have been
rotated, adjust the front and rear
inflation pressures as shown on
the Tire and Loading Information label. See
Tire Pressure
on
page 10‑44
and Vehicle Load
Limits
on page 9‑12.
Reset the Tire Pressure Monitor
System. See Tire Pressure
Monitor Operation
on page 10‑47.
Make certain that all wheel nuts
are properly tightened. See
“Wheel Nut Torque” under
Capacities and Specifications
on
page 12‑2
.
{WARNING
Rust or dirt on a wheel, or on the
parts to which it is fastened, can
make wheel nuts become loose
after time. The wheel could come
off and cause an accident. When
changing a wheel, remove any
rust or dirt from places where the
wheel attaches to the vehicle. In
an emergency, use a cloth or a
paper towel to do this; but be sure
(Continued)
WARNING (Continued)
to use a scraper or wire brush
later, if needed, to get all the rust
or dirt off. SeeIf a Tire Goes Flat
on page 10‑58.
Lightly coat the center of the
wheel hub with wheel bearing
grease after a wheel change or
tire rotation to prevent corrosion
or rust build-up. Do not get
grease on the flat wheel
mounting surface or on the
wheel nuts or bolts.
Make sure the spare tire, if the
vehicle has one, is stored
securely. Push, pull, and then try
to rotate or turn the tire. If it
moves, tighten the cable. See
Tire Changing
on page 10‑69.
Page 409 of 454
Black plate (3,1)Chevrolet Traverse Owner Manual - 2011
Service and Maintenance 11-3
Reset the oil life system whenever
the oil is changed. SeeEngine Oil
Life System on page 10‑11.
Every Engine Oil Change
.Change engine oil and filter.
Reset oil life system. See
Engine Oil
on page 10‑8and
Engine Oil Life Systemon
page 10‑11. An Emission Control
Service.
.Engine coolant level check. See
Engine Coolant on page 10‑14.
.Engine cooling system
inspection. Visual inspection of
hoses, pipes, fittings, and
clamps and replacement,
if needed.
.Windshield washer fluid level
check. See Washer Fluidon
page 10‑22.
.Windshield wiper blade
inspection for wear, cracking,
or contamination and windshield
and wiper blade cleaning,
if contaminated. See Exterior
Care
on page 10‑89. Worn or damaged wiper blade
replacement. See
Wiper Blade
Replacement on page 10‑28.
.Tire inflation pressures check.
See Tire Pressure on
page 10‑44.
.Tire wear inspection. See Tire
Inspection on page 10‑50.
.Rotate tires if necessary. See
Tire Rotation on page 10‑50.
.Fluids visual leak check
(or every 12 months, whichever
occurs first). A leak in any
system must be repaired and
the fluid level checked.
.Engine air cleaner filter
inspection. See Engine Air
Cleaner/Filter on page 10‑12.
.Brake system inspection
(or every 12 months, whichever
occurs first).
.Steering and suspension
inspection. Visual inspection for
damaged, loose, or missing
parts or signs of wear.
.Body hinges and latches, key
lock cylinders, hood latch
assemblies, secondary latches,
pivots, spring anchor and
release pawl, hood and door
hinges, rear folding seats, and
liftgate hinges lubrication. See
Recommended Fluids and
Lubricants
on page 11‑6. More
frequent lubrication may be
required when the vehicle is
exposed to a corrosive
environment. Applying silicone
grease on weatherstrips with a
clean cloth makes them last
longer, seal better, and not stick
or squeak.
.Restraint system component
check. See Safety System
Check on page 3‑30.
.Fuel system inspection for
damage or leaks.
.Exhaust system and nearby heat
shields inspection for loose or
damaged components.