torque CHEVROLET TRAVERSE 2011 1.G Owners Manual
[x] Cancel search | Manufacturer: CHEVROLET, Model Year: 2011, Model line: TRAVERSE, Model: CHEVROLET TRAVERSE 2011 1.GPages: 454, PDF Size: 6.56 MB
Page 69 of 454
Black plate (15,1)Chevrolet Traverse Owner Manual - 2011
Seats and Restraints 3-15
Removing the Third Row Seats
1. Remove the cargo managementsystem, if it is in the vehicle. See
Cargo Management System
on
page 4‑4.
2. Remove anything on or under the seat.
Notice: Folding a rear seat with
the safety belts still fastened may
cause damage to the seat or the
safety belts. Always unbuckle the
safety belts and return them to
their normal stowed position
before folding a rear seat.
3. Fold the seatback down. See “Folding the Seatback” earlier in
this section. 4. Remove the rear bolts located
on the floor on each side of
the seat.
5. Remove the seat by tilting it slightly upward, and then pulling
it out of the rear of the vehicle in
one motion.
6. Replace the bolts in the floor holes for storage.
Installing the Third Row Seats
1. Before installing the seat the
seatback must be folded
forward. See “Folding the
Seatback” earlier in this section.
The seats must be placed in the
proper locations to attach
correctly. The wider seat must
be installed on the driver side
and the narrower seat on the
passenger side. Remove the
bolts from the holes in the floor
before installing the seats. 2. Place the seat on the vehicle
floor so that the front seat hooks
are on the vehicle bars.
3. Reinstall the bolts, and torque to 55Y (41 lb ft). Pull up on the
seat to make sure it is locked
in place.
4. Raise the seatback to its upright position. Push and pull on the
seatback to make sure it is
locked into place.
5. Reconnect the center safety belt mini-latch to the mini-buckle.
Do not let it twist.
Page 273 of 454
Black plate (21,1)Chevrolet Traverse Owner Manual - 2011
Driving and Operating 9-21
If you can, it means that the shift
lever was not fully locked in
P (Park).
Torque Lock
Torque lock is when the weight
of the vehicle puts too much
force on the parking pawl in the
transmission. This happens when
parking on a hill and shifting the
transmission into P (Park) is not
done properly and then it is difficult
to shift out of P (Park). To prevent
torque lock, set the parking brake
and then shift into P (Park). To find
out how, see“Shifting Into Park”
listed previously.
If torque lock does occur, your
vehicle may need to be pushed
uphill by another vehicle to relieve
the parking pawl pressure, so you
can shift out of P (Park).
Shifting Out of Park
The vehicle is equipped with an
electronic shift lock release system.
The shift lock release is
designed to:
.Prevent ignition key removal
unless the shift lever is in
P (Park) with the shift lever
button fully released, and
.Prevent movement of the shift
lever out of P (Park), unless the
ignition is in ON/RUN or ACC/
ACCESSORY and the regular
brake pedal is applied.
The shift lock release is always
functional except in the case of an
uncharged or low voltage (less than
9 volt) battery.
If the vehicle has an uncharged
battery or a battery with low voltage,
try charging or jump starting the
battery. See Jump Starting
on
page 10‑81for more information. To shift out of P (Park):
1. Apply the brake pedal.
2. Press the shift lever button.
3. Move the shift lever to the
desired position.
If you still are unable to shift out of
P (Park):
1. Fully release the shift lever button.
2. While holding down the brake pedal, press the shift lever
button again.
3. Move the shift lever to the desired position.
If you still cannot move the shift
lever from P (Park), see your dealer.
Page 277 of 454
Black plate (25,1)Chevrolet Traverse Owner Manual - 2011
Driving and Operating 9-25
N (Neutral):In this position, the
engine does not connect with the
wheels. To restart the engine when
the vehicle is already moving, use
N (Neutral) only. Also, use
N (Neutral) when the vehicle is
being towed.
{WARNING
Shifting into a drive gear while the
engine is running at high speed is
dangerous. Unless your foot is
firmly on the brake pedal, the
vehicle could move very rapidly.
You could lose control and hit
people or objects. Do not shift
into a drive gear while the engine
is running at high speed.
Notice: Shifting out of P (Park) or
N (Neutral) with the engine
running at high speed may
damage the transmission. The
repairs would not be covered by
the vehicle warranty. Be sure the
engine is not running at high
speed when shifting the vehicle. D (Drive):
This position is for
normal driving. It provides the best
fuel economy. If you need more
power for passing, and you are:
.Going less than 56 km/h
(35 mph), push the accelerator
pedal about halfway down.
.Going about 56 km/h (35 mph) or
more, push the accelerator all
the way down.
Notice: If the vehicle seems to
accelerate slowly or not shift
gears when you go faster, and
you continue to drive the vehicle
that way, you could damage
the transmission. Have the
vehicle serviced right away.
You can drive in L (Low) when
you are driving less than 56 km/h
(35 mph) and D (Drive) for higher
speeds until then. If the vehicle is stopped on a hill,
with your foot off the brake pedal,
the vehicle may roll. This is normal
and is due to the torque converter
designed to improve fuel economy
and performance. Use the brake to
hold the vehicle on a hill. Do not use
the accelerator pedal.
L (Low):
This position gives you
access to gear ranges. This
provides more engine braking but
lower fuel economy than D (Drive).
You can use it on very steep hills,
or in deep snow or mud.
Page 333 of 454
Black plate (23,1)Chevrolet Traverse Owner Manual - 2011
Vehicle Care 10-23
Brakes
This vehicle has disc brakes.
Disc brake pads have built-in wear
indicators that make a high-pitched
warning sound when the brake pads
are worn and new pads are needed.
The sound can come and go or be
heard all the time the vehicle is
moving, except when applying the
brake pedal firmly.
{WARNING
The brake wear warning sound
means that soon the brakes will
not work well. That could lead to
a crash. When the brake wear
warning sound is heard, have the
vehicle serviced.
Notice: Continuing to drive with
worn-out brake pads could result
in costly brake repair. Some driving conditions or climates
can cause a brake squeal when the
brakes are first applied or lightly
applied. This does not mean
something is wrong with the brakes.
Properly torqued wheel nuts are
necessary to help prevent brake
pulsation. When tires are rotated,
inspect brake pads for wear and
evenly tighten wheel nuts in the
proper sequence to torque
specifications in
Capacities and
Specifications on page 12‑2.
Brake linings should always be
replaced as complete axle sets.
Brake Pedal Travel
See your dealer if the brake pedal
does not return to normal height,
or if there is a rapid increase in
pedal travel. This could be a sign
that brake service might be
required.
Brake Adjustment
Every time the brakes are applied,
with or without the vehicle moving,
the brakes adjust for wear.
Replacing Brake System Parts
The braking system on a vehicle is
complex. Its many parts have to be
of top quality and work well together
if the vehicle is to have really good
braking. The vehicle was designed
and tested with top-quality brake
parts. When parts of the braking
system are replaced, be sure to get
new, approved replacement parts.
If this is not done, the brakes might
not work properly. For example,
installing disc brake pads that are
wrong for the vehicle, can change
the balance between the front and
rear brakes —for the worse. The
braking performance expected can
change in many other ways if the
wrong replacement brake parts
are installed.
Page 361 of 454
Black plate (51,1)Chevrolet Traverse Owner Manual - 2011
Vehicle Care 10-51
SeeWhen It Is Time for New
Tires
on page 10‑52andWheel
Replacement
on page 10‑57.
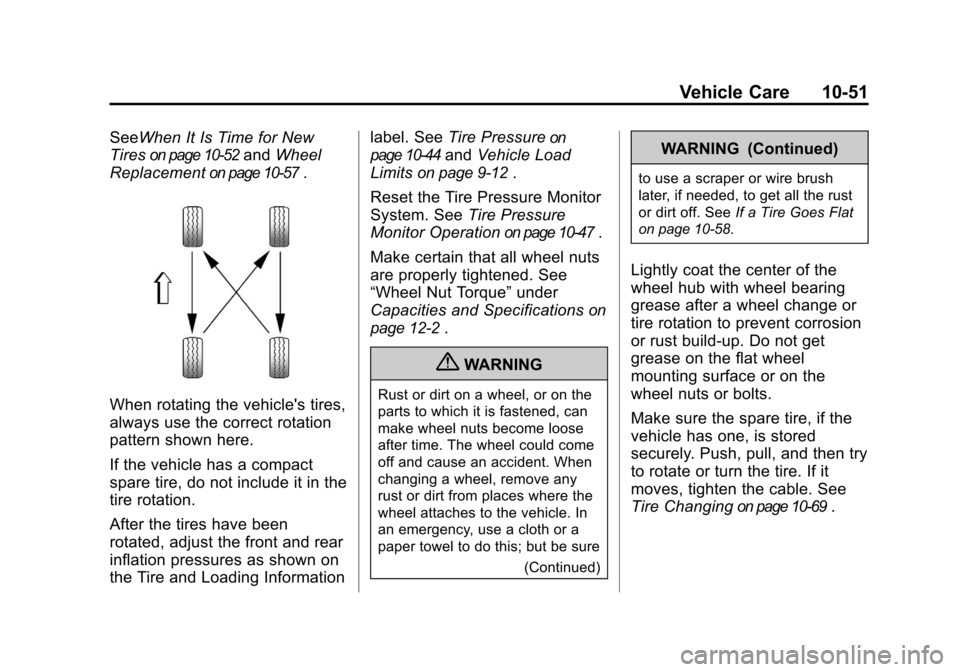
When rotating the vehicle's tires,
always use the correct rotation
pattern shown here.
If the vehicle has a compact
spare tire, do not include it in the
tire rotation.
After the tires have been
rotated, adjust the front and rear
inflation pressures as shown on
the Tire and Loading Information label. See
Tire Pressure
on
page 10‑44
and Vehicle Load
Limits
on page 9‑12.
Reset the Tire Pressure Monitor
System. See Tire Pressure
Monitor Operation
on page 10‑47.
Make certain that all wheel nuts
are properly tightened. See
“Wheel Nut Torque” under
Capacities and Specifications
on
page 12‑2
.
{WARNING
Rust or dirt on a wheel, or on the
parts to which it is fastened, can
make wheel nuts become loose
after time. The wheel could come
off and cause an accident. When
changing a wheel, remove any
rust or dirt from places where the
wheel attaches to the vehicle. In
an emergency, use a cloth or a
paper towel to do this; but be sure
(Continued)
WARNING (Continued)
to use a scraper or wire brush
later, if needed, to get all the rust
or dirt off. SeeIf a Tire Goes Flat
on page 10‑58.
Lightly coat the center of the
wheel hub with wheel bearing
grease after a wheel change or
tire rotation to prevent corrosion
or rust build-up. Do not get
grease on the flat wheel
mounting surface or on the
wheel nuts or bolts.
Make sure the spare tire, if the
vehicle has one, is stored
securely. Push, pull, and then try
to rotate or turn the tire. If it
moves, tighten the cable. See
Tire Changing
on page 10‑69.
Page 384 of 454
Black plate (74,1)Chevrolet Traverse Owner Manual - 2011
10-74 Vehicle Care
{WARNING
Rust or dirt on a wheel, or on the
parts to which it is fastened, can
make wheel nuts become loose
after time. The wheel could come
off and cause an accident. When
changing a wheel, remove any
rust or dirt from places where the
wheel attaches to the vehicle. In
an emergency, use a cloth or a
paper towel to do this; but be sure
to use a scraper or wire brush
later, if needed, to get all the rust
or dirt off. SeeIf a Tire Goes Flat
on page 10‑58.
{WARNING
Never use oil or grease on bolts
or nuts because the nuts might
come loose. The vehicle's wheel
could fall off, causing a crash.
10. Remove any rust or dirt from the wheel bolts, mounting
surfaces, and spare wheel.
11. Place the spare tire on the wheel mounting surface.
12. Put the nuts on by hand by turning them clockwise until the
wheel is held against the
mounting surface. Make sure
the rounded end is toward the
wheel.
13. Lower the vehicle by attaching the lug wrench to
the jack and turning the
wrench counterclockwise.
Lower the jack completely.
{WARNING
Wheel nuts that are improperly or
incorrectly tightened can cause
the wheels to become loose or
come off. The wheel nuts should
be tightened with a torque wrench
to the proper torque specification
after replacing. Follow the torque
specification supplied by the
aftermarket manufacturer when
using accessory locking wheel
nuts. See Capacities and
Specifications
on page 12‑2for
original equipment wheel nut
torque specifications.
Notice: Improperly tightened
wheel nuts can lead to brake
pulsation and rotor damage. To
avoid expensive brake repairs,
evenly tighten the wheel nuts in
the proper sequence and to the
proper torque specification. See
Capacities and Specifications
on
page 12‑2for the wheel nut
torque specification.
Page 420 of 454
Black plate (2,1)Chevrolet Traverse Owner Manual - 2011
12-2 Technical Data
Vehicle Data
Capacities and Specifications
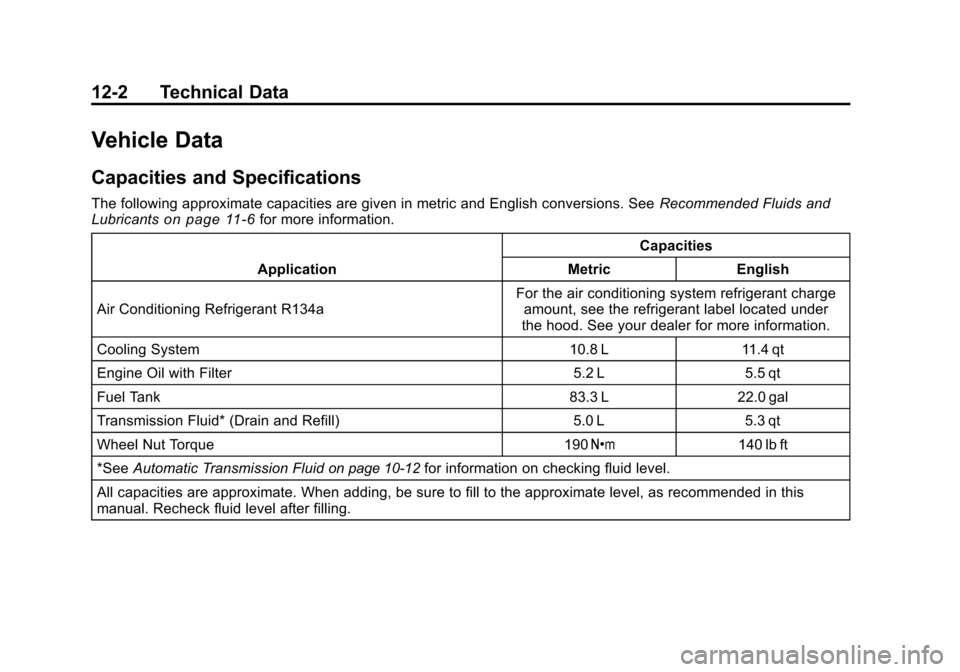
The following approximate capacities are given in metric and English conversions. SeeRecommended Fluids and
Lubricantson page 11‑6for more information.
Application Capacities
Metric English
Air Conditioning Refrigerant R134a For the air conditioning system refrigerant charge
amount, see the refrigerant label located under
the hood. See your dealer for more information.
Cooling System 10.8 L 11.4 qt
Engine Oil with Filter 5.2 L 5.5 qt
Fuel Tank 83.3 L 22.0 gal
Transmission Fluid* (Drain and Refill) 5.0 L 5.3 qt
Wheel Nut Torque 190 Y140 lb ft
*See Automatic Transmission Fluid
on page 10‑12for information on checking fluid level.
All capacities are approximate. When adding, be sure to fill to the approximate level, as recommended in this
manual. Recheck fluid level after filling.